Page 49 of 174
.
Switching automatic mode of the
360° camera on/off
This function activat")
Switching the display on automatically
XYou can automatically switch the 360° cam-
era display using reverse gear (Ypage 47).
Switching automatic mode of the
360° camera on/off
This function activates the 360° camera when
reverse gear is engaged.
XPress theØbutton.
or
XPress Vehiclein the main function bar.
The vehicle menu is displayed.
XTo switch to the menu bar: slide6the
controller.
XTo select System Settings: turn and press
the controller.
XTo select 360° Camera: turn and press the
controller.
The 360° Camera
menu appears.
XSelect Activation by R gear.
The function is switched on Oor off ª.
Opening the camera cover for clean-
ing
XTo select Open Camera Coverin the 360°
camera menu: turn the controller and press to
confirm.
The Please Wait...
message appears for
approximately three seconds.
The camera cover opens.
The camera cover closes automatically if:
Rthe ignition is switched off
Rthe vehicle exceeds a moderate speed
Rear view camera
General notes
The rear view camera covers the immediate sur-
roundings behind the vehicle and assists you
when parking.
The rear view camera is only an aid. It is not a
replacement for your attention to your immedi-
ate surroundings. You are always responsible
for safe maneuvering and parking. Make sure
that there are no persons, animals or objects in the maneuvering area while maneuvering and
parking in parking spaces.
You can find further information about the rear
view camera in the vehicle Operator's Manual.
Switching automatic mode of the rear
view camera on/off
This function activates the rear view camera
when reverse gear is engaged.
XPress the
Øbutton.
or
XPress Vehiclein the main function bar.
The vehicle menu is displayed.
XSlide 6the controller.
XTo select System Settings: turn and press
the controller.
XSelect Rear View Camera.
XSelectActivation by R gear.
The function is switched on Oor off ª,
depending on the previous status.
When you start the vehicle and engage
reverse gear, the camera cover opens auto-
matically if the function is activated. The area
behind the vehicle is shown with guide lines in
the display; see the vehicle Operator's Man-
ual.
For further information on the rear view camera;
see the vehicle Operator's Manual.
Object detection
The rear view camera can detect moving and
stationary objects. If, for example, a pedestrian
or another vehicle is detected, these objects are
marked with bars. The system is able to detect
and mark stationary objects when your vehicle
is moving. Moving objects will always be detec-
ted and marked.
Switching object detection on/off
XTo select ObjectDetectionin the rear view
camera menu: turn and press the controller.
The function is switched on Oor off ª,
depending on the previous status.
Rear view camera47
Vehicle functions
Z
Page 50 of 174

Opening the camera cover for clean-
ing
XTo selectOpen Camera Coverin the rear
view camera menu: turn and press the con-
troller.
The Please Wait...
message appears for
approximately three seconds.
The camera cover opens.
The camera cover closes automatically if:
Rthe ignition is switched off
Rthe vehicle pulls away
Climate control settings
Overview
You can adjust the climate control settings
using the climate control bar (Ypage 48) or
the climate control menu (Ypage 49).
Using the climate control bar you can set the
most important climate control functions, for
example:
RTemperature (Ypage 48)
RAirflow (Ypage 48)
RAir distribution (Ypage 48)
You can find all available climate control func-
tions in the climate control menu. You can use
the climate control bar (
Ypage 48) to switch
to the climate control menu.
Settings in the climate control bar
Overview
Example
:Adjusts temperature, air distribution on the
left and airflow and also displays the current
setting
;Calls up the climate control menu, displays
the current cooling and climate mode set-
ting
=Adjusts temperature and air distribution on
the right and displays the current setting
Calling up the climate control bar
XPress the Øbutton.
or
XPress Vehiclein the main function bar.
The vehicle menu is displayed.
XSlide 6the controller repeatedly until the
climate control bar is activated.
Setting the temperature
XCall up the climate control bar (Ypage 48).
XTo select the current temperature on the left
or right: turn and press the controller.
The temperature setting scale appears.
XTo change the setting: turn the controller.
XTo close the temperature setting scale: press the controller.
iYou can also use the climate control menu
to set the temperature (Ypage 49).
Setting the air distribution
XCall up the climate control bar (Ypage 48).
XTo select the current air distribution display
on the left or right, e.g. O: turn and press
the controller.
The air distribution setting scale appears.
XTo change the setting: turn the controller.
XTo close the temperature setting scale: press
the controller.
iYou can also use the climate control menu
(Ypage 49) to set the air distribution.
Setting the airflow
XCall up the climate control bar (Ypage 48).
XTo select J: turn and press the controller.
The airflow setting scale appears.
XTo change the setting: turn the controller.
XTo close the temperature setting scale: press the controller.
iYou can also use the climate control menu
(Ypage 49) to set the airflow.
48Climate control settings
Vehicle functions
Page 51 of 174

Calling up the climate control menu
Example
XPress theØbutton.
or
XPress Vehiclein the main function bar.
The vehicle menu is displayed.
XSlide 6the controller repeatedly until the
climate control bar is activated.
XTo select from climate control bar ;: turn
and press the controller.
The menu for selecting the climate control
function is activated.
XTo select the climate control function: turn
and press the controller.
The selected climate control function
appears.
Settings in the climate menu
Adjusting the climate mode settings
By setting the climate mode you determine the
type of airflow. The setting is active when the air
conditioning system is set to Ã, see the vehi-
cle Operator's Manual.
XCall up the climate control menu (Ypage 49).
XTo select Climate Mode: turn and press the
controller.
XTo change the setting: turn the controller.
XTo exit the menu: press the %button.
The current airflow setting is shown in the cli-
mate control bar: DIFFUSE
,MEDIUMor FOCUS(Ypage 48).
Starting/stopping the perfume atom-
izer
The perfume atomizer makes it possible to scent
the air in individual compartments in the vehicle interior. Further information (see the vehicle
Operator's Manual).
XCall up the climate control menu (Ypage 49).
XTo select
AirFreshener: turn and press the
controller.
The setting element is active.
XTo start/stop the perfume atomizer: press
the controller.
XTo set the intensity: turn the controller when
the atomizer is switched on.
XTo exit the menu: press the %button.
Switching ionization on/off
The ionization has a cleansing effect on the air in
the vehicle interior. Further information (see the
vehicle Operator's Manual).
XCall up the climate control menu (Ypage 49).
XTo select Ionization: turn and press the
controller.
The setting element is active.
XTo switch the ionization on or off: turn the
controller.
XTo exit the menu: press the %button.
Pre-entry climate control via SmartKey
This function is available for plug-in hybrid vehi-
cles.
Before getting in, the driver's seat area or the
whole interior can be briefly warmed or ventila-
ted in advance with the air from the air vents
being pre-cooled.
XCall up the climate control menu (Ypage 49).
XTo select Pre-entry Climate Controlvia Key: turn and press the controller.
XTo switch on or off: turn the controller.
XTo exit the menu: press the %button.
Further information on pre-entry climate con-
trol; see the vehicle Operator's Manual.
Pre-entry climate control at time of
departure
This function is available for plug-in hybrid vehi-
cles.
You can climatize the driver's seat and the vehi-
cle interior in time for the departure time set.
Climate control settings49
Vehicle functions
Z
Page 52 of 174
.
XTo select Pre-entry Climate Ctrl. atDepartureTime: turn and press the control-
ler.
A rotary menu appears.
XTo select the setting: turn the controller.
Th")
XCallup the climate control menu (Ypage 49).
XTo select Pre-entry Climate Ctrl. atDepartureTime: turn and press the control-
ler.
A rotary menu appears.
XTo select the setting: turn the controller.
The menu symbol, text and image show the
selected setting.
XTo exit the menu: press the %button.
Settings in the bottom bar of the cli-
mate control menu
Activating/deactivating climate con-
trol
This setting ismade inthe bottom bar of the
clim ate control menu.
XCall up the climate control menu (Ypage 49).
XSlide6 the controller repeatedly untilthe
bottom bar isactivated.
XTo select OClimate Ctrl On: turn and
press the controller.
The climate control is switched on Oor off
ª dependin g on the settings.
If the clim ate control is switched off:
Rtheclim ate control setting functions are
deactivate d.
Rtheblower is switched off.
Rthe air recirculation flaps are closed.
Switching cooling with air dehumidifi-
cation on/off
This setting ismade inthe bottom bar of the
clim ate control menu.
XCall up the climate control menu (Ypage 49).
XSlide6 the controller repeatedly untilthe
bottom bar isactivated.
XTo select OA/C: turn and press the control-
ler.
XSwit ch co olingwit h air dehumidif ication on
O or off ª.
iThe current status of the co oling function is
displ ayed inthe clim ate control bar: A/C ON
– activated, A/C OFF – deactivated
(
Ypage 48).
iDeactivating the co oling with air dehumidi-
fication function reduces fuel consumption.
Synchronizing the climate control set-
tings
Use OSync(synchronization) to select the cli-
mate control setting for all zones together Oor
separate lyª.
This setting is made in the bottom bar of the
clim ate control menu.
XCall up the climate control menu (Ypage 49).
XSlide6 the controller repeatedly until the
bottom bar isactivated.
XTo select OSync: turn and press the con-
troller.
XSwit ch the synchronization function on Oor
off ª.
For further information on synchronizing climate
control settings (see the vehicle Operator's
Manual).
DYNAMIC SELECT
General notes
You can use DYNAMIC SELECTto configure the
foll owin g settings for the Individual drive pro-
gram:
RDrive system
RSuspension
RSt eering
RClimate control
RECO start/stop function
In addition, current vehicle and engine data is
visualized via the two further Vehicle
Dataand
Engine Datamenus.
iIn a few countries, the ECO start/stop func-
tion is deactivated at the factory due to the
available fuel grade. In this case, the ECO
start/stop function isnot availab leregardless
of the display in the multimedia system dis-
play.
The ECO Assist setting is availab leon
PLUG‑ IN HYBRID vehicles.
In Mercedes-AMG vehicles, you can use
DYNAMIC
SELECTto configure the foll owing set-
tings for the Individual drive program:
RDrive system
RSuspension
50DYNAMIC SELECT
Vehicle functions
Page 53 of 174

RTransmission
RSports exhaust system
RElectronic Stability Program ESP®
There may be fewer settings or set values, or
none, depending on your vehicle's equipment.
For further information on the Individual drive
program; see the vehicle Operator's Manual.
Configuration via the DYNAMIC
SELECT switch
XUse the DYNAMIC SELECT switch to select
the Individual drive program; see the vehicle
Operator's Manual.
A window appears after a short while.
XTo confirmAdjust:press the controller.
The Individual Configuration
menu for
setting the drive program appears.
XTo select Drive,Suspension,Steering,
Climate Controlor Eco Start/StopFunction: turn and press the controller.
XSelect individual settings.
The menu symbol, text and image show the
selected setting.
In Mercedes-AMG vehicles, you can configure
the settings of the drive system, suspension,
transmission, sports exhaust system and Elec-
tronic Stability Program ESP
®.
Displaying vehicle data
XPress the Øbutton.
or
XPress Vehiclein the main function bar.
The vehicle menu is displayed.
XTo select DYNAMIC SELECT: turn and press
the controller.
The Individual
Configuration,VehicleDataand Engine Datamenus appear.
XSelect Vehicle Data.
Updates of the following data are displayed:
RRoad type analogous to the selected drive
program
RG-force display of longitudinal and lateral
acceleration
RAccelerator and brake pedal activity
RActivity of the suspension struts
RWheel angle
ROverrun mode animation The G-force display is not available in all of the
drive programs.
Daytime or night-time view is shown depending
on the automatic light sensor.
Displaying engine data
XPress Vehiclein the main function bar.
The vehicle menu is displayed.
XTo select DYNAMIC SELECT: turn and press
the controller.
The Individual
Configuration,VehicleDataand Engine Datamenus appear.
XSelect Engine Data.
The following current data is displayed:
REngine output
REngine torque
REngine oil temperature
ROn-board electrical system voltage
iThe values for engine output and engine tor-
que may deviate from the nominal values.
Items that can influence this are, for example:
REngine speed
RSea level
RFuel grade
ROutside temperature
In Mercedes-AMG vehicles you will see current
data on the transmission oil temperature
instead of the on-board electrical system volt-
age.
Setting options
You can choose from the following settings for
the drive:
CComfort
SSport
S+Sport +
MManual
EEco
DYNAMIC SELECT51
Vehicle functions
Z
Page 54 of 174

You can make the following settings for the sus-
pension:
CComfort
SSport
S+Sport +
You can make the following settings for the
steering:
CComfort
SSport
You can choose from the following settings for
climate control:
EEco
CComfort
You can choose from the following settings for
the ECO start/stop function:
OnSwitches the ECO
start/stop function
on
OffSwitches the ECO
start/stop function
off
You can make the following settings for ECO
Assist (PLUG-IN HYBRID vehicles):
OnSwitches ECO Assist
on
OffSwitches ECO Assist
off
Setting options for Mercedes-AMG
vehicles
You can choose from the following settings for
the drive:
RRace
CComfort
SSport
S+Sport +
You can make the following settings for the sus-
pension:
CComfort
SSport
S+Sport +
You can choose from the following settings for
the transmission:
DAutomatic
MManual
You can make the following settings for the
sports exhaust system:
CComfort
S+Sport +
You can choose from the following settings for
the Electronic Stability Program ESP®:
SSport
OnActivates the Electronic Sta-
bility Program ESP®
For further information on the Individual drive
program; see the vehicle Operator's Manual.
52DYNAMIC SELECT
Vehicle functions
Page 55 of 174

Your multimediasyste mequipment
These operatin ginstruction sdescribe all th e
standar dan doptional equipment of your multi-
media system, as available at th etime of going
to press. Country-specifi cdifference sare pos -
sible. Bear in min dthat your vehicle may no t
feature all function sdescribed here. Thi salso
applies to safety-relevan tsystems an dfunc-
tions.
Read th einformation on qualifie dspecialis t
workshop sin th evehicle Operator's Manual.
Introduction
Important safet ynotes
GWARNING
If you operat einformation systems an dcom-
munication equipment integrated in th evehi-
cl e when driving, you may be distracted from
th etraffic situation .You could also los econ-
trol of th evehicle. There is aris kof an acci-
dent.
Only operat ethis equipment when th etraffic
situation permits. If you are no tsur ethat this
is possible, par kth evehicle payin gattention
to traffic condition san doperat eth eequip-
men twhen th evehicle is stationary.
You mus tobserv eth elegal requirements fo rth e
country in whic hyou are currentl ydrivin gwhen
operatin gth emultimedia system.
The multimedia syste mcalculates th erout eto
th edestination without taking th efollowin ginto
account, fo rexample:
Rtraffic lights
Rstop an dyield signs
Rmergin glanes
Rparking or stoppin gin ano parking/n ostop-
pin gzone
Rother road an dtraffic rule san dregulation s
Rnarrow bridge s
The multimedia syste mmay giv eincorrec tnav-
igation commands if th eactual street/traffic
situation doe sno tcorrespon dwit hth edigita l
map's data. Fo rexample, arout emay hav ebee n
d
iverted or th edirection of aone-way stree tmay
hav echanged . Fo
rthis reason ,you mus talways observ eroad
an dtraffic rule san dregulation sdurin gyour
journey. Road an dtraffic rule san dregulation s
always hav epriorit yover th esystem' sdrivin g
recommendations.
Navigation announcement sare intended to
direc tyou whil edrivin gwithout divertin gyour
attention from th eroad an ddriving.
Please always use this feature instead of con-
sultin gth emap display fo rdirections. Lookin g
at th eicon sor map display can distract you from
traffic condition san ddriving, an dincrease th e
ris kof an accident.
General notes
Operationa lreadines sof th enavigation
syste m
The navigation syste mmus tdetermin eth eposi-
tion of th evehicle befor efirst use or wheneve r
operational status is restored .Therefore, you
may hav eto drive fo r awhil ebefor eprecise
rout eguidance is possible.
GP Sreception
Amon gother things, correc tfunctionin gof th e
navigation syste mdepends on GPS reception .In
certain situations, GPS reception may be
impaired, there may be interferenc eor there
may be no reception at all, e.g. in tunnels or
parking garages .
iUsing roof carriers may impair th ecorrec t
functionin gof aroof antenn a(phone, satellite
radio, GPS).
Entry restriction
Fo rvehicles in certain countries, there is adat a
entr yrestriction .
The restriction is active abov e avehicle speed of
about 3mph (5 km/h). The restriction is deac -
tivated as soo nas th evehicle speed drops
belo wabout 2mph (3 km/h).
Whe nth erestriction is active ,certain entries
canno tbe made. Men uitems are shown in gray
an dcanno tbe selected.
Fo rexample:
Renterin gth edestination city an dstree t
Renterin g adestination via th emap
Introduction53
Navigation
Z
Page 56 of 174

Rentering POIs in the vicinity of a city or via a
name search
Rediting entries
Other entries are possible, such as entering
points of interest in the vicinity of the destina-
tion or current position.
Switching to navigation mode
:Traffic reports can be received or traffic
reports are available
XPress the ßbutton.
If route guidance is active, the map is shown
in full-screen mode. The map shows the vehi-
cle's current position.
If no route guidance is active, the menu is also
displayed. Destination
is highlighted.
Access from one of the other main functions:
XTo activate the menu: slide5the con-
troller (e.g. in radio mode).
XTo select Navi: turn and press the controller.
The navigation menu appears.
XPress the controller.
The map shows the vehicle's current position.
Access within navigation:
XFrom any menu, press the ßbutton.
The navigation menu appears.
XPress the controller.
Showing/hiding the menu
Using the menu, you can make a destination
entry or select the navigation settings, for exam-
ple.
XTo show: slide6the controller when the
map appears.
or
XSwipe down the touchpad with one finger.
If there has been no route calculated, Des‐
tinationis marked.
If a route has been calculated, yis
marked.
XTo hide: press the %button.
or
XSlide 5the controller.
Full screen symbol :appears.
XPress the controller.
Moving the map
Requirement: the map is in full screen mode, the
menu is faded out (Ypage 54).
XPress the controller.
The crosshair is shown.
XSlide 1, 4or2 the controller.
The map moves in the corresponding direc-
tion under the crosshair.
iEnter a destination using the map
(Ypage 64).
54Introduction
Navigation
 1
1 2
2 3
3 4
4 5
5 6
6 7
7 8
8 9
9 10
10 11
11 12
12 13
13 14
14 15
15 16
16 17
17 18
18 19
19 20
20 21
21 22
22 23
23 24
24 25
25 26
26 27
27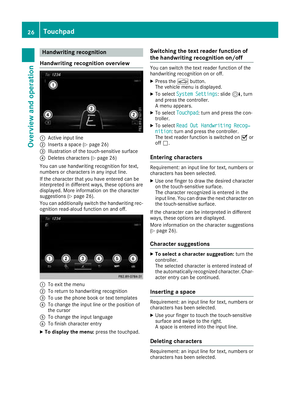 28
28 29
29 30
30 31
31 32
32 33
33 34
34 35
35 36
36 37
37 38
38 39
39 40
40 41
41 42
42 43
43 44
44 45
45 46
46 47
47 48
48 49
49 50
50 51
51 52
52 53
53 54
54 55
55 56
56 57
57 58
58 59
59 60
60 61
61 62
62 63
63 64
64 65
65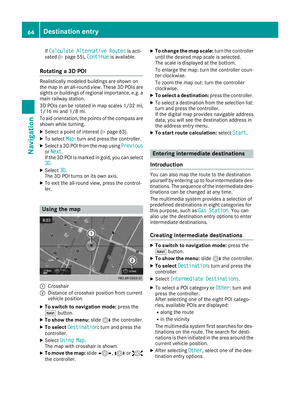 66
66 67
67 68
68 69
69 70
70 71
71 72
72 73
73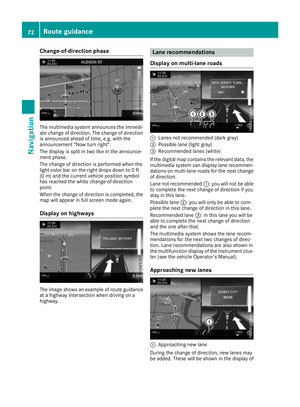 74
74 75
75 76
76 77
77 78
78 79
79 80
80 81
81 82
82 83
83 84
84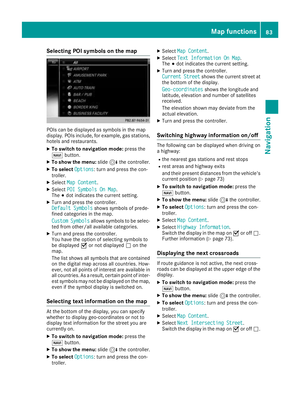 85
85 86
86 87
87 88
88 89
89 90
90 91
91 92
92 93
93 94
94 95
95 96
96 97
97 98
98 99
99 100
100 101
101 102
102 103
103 104
104 105
105 106
106 107
107 108
108 109
109 110
110 111
111 112
112 113
113 114
114 115
115 116
116 117
117 118
118 119
119 120
120 121
121 122
122 123
123 124
124 125
125 126
126 127
127 128
128 129
129 130
130 131
131 132
132 133
133 134
134 135
135 136
136 137
137 138
138 139
139 140
140 141
141 142
142 143
143 144
144 145
145 146
146 147
147 148
148 149
149 150
150 151
151 152
152 153
153 154
154 155
155 156
156 157
157 158
158 159
159 160
160 161
161 162
162 163
163 164
164 165
165 166
166 167
167 168
168 169
169 170
170 171
171 172
172 173
173