2018 MERCEDES-BENZ AMG GT ROADSTER wipers
[x] Cancel search: wipersPage 5 of 409
Symbols
........................................................ 4At
agl ance .................................................... 6
Cockpit ........................................................... 6
Wa rning and indicator lamps ........................ 10
Overhead contro l panel ................................ 12
Door control panel and seat adjustment ....... 14
Emergencies and breakdowns ...................... 16Digital Owner's Manual
.............................18
Calling up the Digital Owner's Manual ..........18 Genera
l notes............................................. 19
Pr otection of the environment ......................19
Ta ke -ba ckof end-of-life vehicles ...................19
Mercedes-Benz Genuine Parts ......................20
Owner's Manual ............................................ 21
Operating saf ety .......................................... .21
Declaration of Conformity ............................ 22
Diagno stics connection ................................ 23
Qualified specialist workshop ....................... 24
Ve hicle registration ....................................... 24
Cor rect use of theve hicle ............................25 Information on
the REA CHregulation ........... 25
Implied warranty .......................................... .25
QR code forre scue card ...............................25
Data storage .................................................26
Copyright ...................................................... 28 Occupant saf
ety......................................... 29
Re stra int sy stem ...........................................29
Seat belts ..................................................... 31
Airbags ......................................................... 35
PRE-SAFE ®
sy stem ....................................... 43
Safely transporting children in theve hi‐
cle ................................................................43
No tes on pets in theve hicle .........................55 Opening and closing
.................................. 56
Ke y .............................................................. .56
Doo rs............................................................ 60
Boot .............................................................. 64
Side windo ws............................................... 68
Soft top ........................................................ 72
Anti-theft pr otection .....................................76 Seats and
stowing ..................................... 80
No tes on the cor rect driver's seat posi‐
tion ............................................................... 80
Seats ............................................................ 81
St eering wheel ..............................................88
Easy entry and exitfeature .......................... .89
Operating the memory function .................... 90
St ow age areas .............................................. 91
Cup holders .................................................. 93
Asht ray and cigar ette lighter ........................ .94
Soc kets ......................................................... 96
Fitting/removing thefloor mats ...................97 Light and sight
........................................... 98
Ex terior lighting ............................................ 98
Interior lighting ...........................................1 02
Wi ndsc reen wipers and windscreen
wa sher sy stem ............................................ 103
Mir rors ........................................................ 104
Operating the sun visors ............................. 107 Climate control
........................................ 109
Overview of climate contro l systems ..........1 09
Operating the climate control sy stem ......... 109 2
Contents
Page 106 of 409
Setting
the interior lighting switch-off delay
time Multimedia sy
stem:
4 Vehicle 5
÷ Light settings
5 Interior light shut-off #
Set the switch-off delay time. Wi
ndscreen wipers and windscreen washer
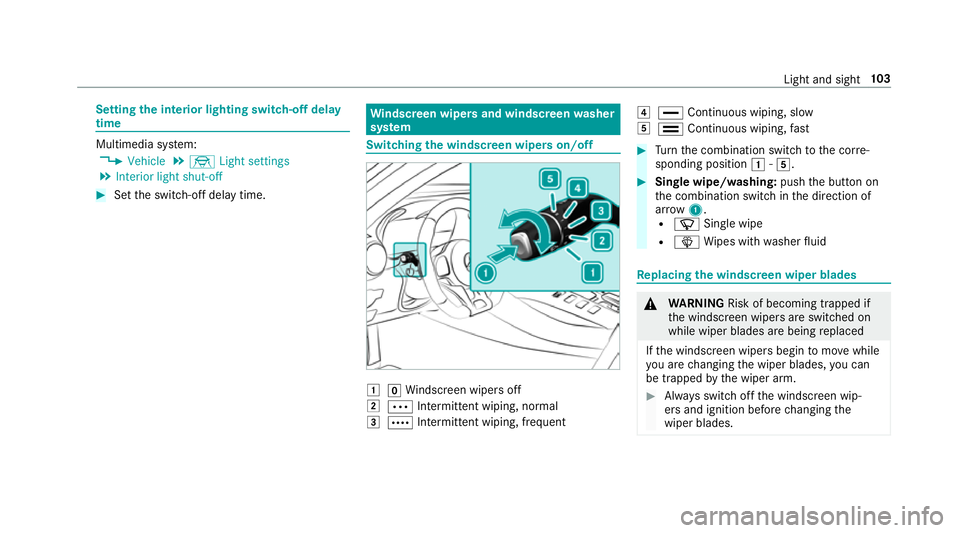
sy stem Switching
the windscreen wipers on/off 1
gWindsc reen wipers off
2 Ä Intermittent wiping, normal
3 Å Intermittent wiping, frequent 4
° Continuous wiping, slow
5 ¯ Continuous wiping, fast #
Turn the combination switch tothe cor re‐
sponding position 1-5. #
Single wipe/washing: pushthe button on
th e combination switch in the direction of
ar row 1.
R í Single wipe
R î Wipes with washer fluid Re
placing the windsc reen wiper blades &
WARNING Risk of becoming trapped if
th e windscreen wipers are switched on
while wiper blades are being replaced
If th e windscreen wipers begin tomo vewhile
yo u are changing the wiper blades, you can
be trapped bythe wiper arm. #
Alw ays switch off the windscreen wip‐
ers and ignition before changing the
wiper blades. Light and sight
103
Page 114 of 409
The synchronisation function is deactivated if
th
e settings for one of theot her climate zones
are changed. Ac
tivating or deactivating the climate con‐
trol syn chronisation function using the mul‐
timedia sy stem Multimedia sy
stem:
4 Vehicle 5
b Climate control
5 SYNC
The climate control can be controlled cent rally
using the synchronisation function. The temp era‐
ture setting is automatically adop tedfo r all cli‐
mate zones. #
Activate Oor deacti vate ª the function. Demisting
the windo ws Wi
ndo wsmis ted up on the inside #
Press button ¿. #
Press button Ã. #
Ifth e windo wscontinue tomist up: press the
¬ button.
Wi ndo wsmis ted up on the outside #
Switch on the windscreen wipers. #
Press button Ã. Switching air-recirculation mode on/off
#
Press theg button.
The interior air will be recirculated.
Air-reci rculation mode automatically swit ches to
fresh air mode af ter some time.
% If air-recirculation mode is switched on, the
windo wsmay mist up more quickl y.Switch
on ai r-re circulation mode only brie fly. Air
vents Ad
justing the air vents &
WARNING ‑ Risk of bu rns/frostbite due
to not maintaining a su fficient dis tance
to the air vents
Ve ry hot or very cold air can flow from the air
ve nts.
This could result in burns or frostbite in the
immediate vicinity of the air vents. #
Alw ays ensure that all vehicle occu‐
pants maintain a suf ficient di stance to
th e air vents. #
If necessa ry,re direct the air flow to
ano ther area of theve hicle interior. To
guarantee theflow of fresh air thro ugh the air
ve nts into theve hicle interior, comply with the
fo llowing:
R Alw ayske ep theve nts and theve ntilation
grille in theve hicle interior free.
R Keep the air inlet free of deposits
(/ page 254). Climate control
111
Page 252 of 409
Make sure of
thefo llowing before per form ing
ta sks in the engine compartmen t:#
Switch the ignition off. #
Neverto uch the danger zone sur round‐
ing moving co mponent parts, e.g. the
ro tation area of thefa n. #
Remo vejewe llery and watches. #
Keep items of clo thing and hair away
from moving parts. &
WARNING Risk of inju ryfrom touching
co mp onent parts under voltage
The ignition sy stem and the fuel injection
sy stem workunder high voltage. If youto uch
co mp onent parts which are under voltage,
yo u could recei vean electric shoc k. #
Neverto uch co mponents of the ignition
sy stem or the fuel injection sy stem
when the ignition is switched on. &
WARNING Danger of bu rns from hot
component parts in the engine compart‐
ment
Cer tain component parts in the engine com‐
partment may be very hot, e.g. the engine,
th era diator and parts of theex haust sy stem. #
Let the engine cool down and only
to uch the component parts described
below: &
WARNING Risk of inju ryfrom using the
windscreen wipers while the engine bon‐
net is open
When the engine bonn etis open, and the
windscreen wipers are set in motion, you can
be trapped bythe wiper linkage. #
Alw ays switch off the windscreen wip‐
ers and ignition before opening the
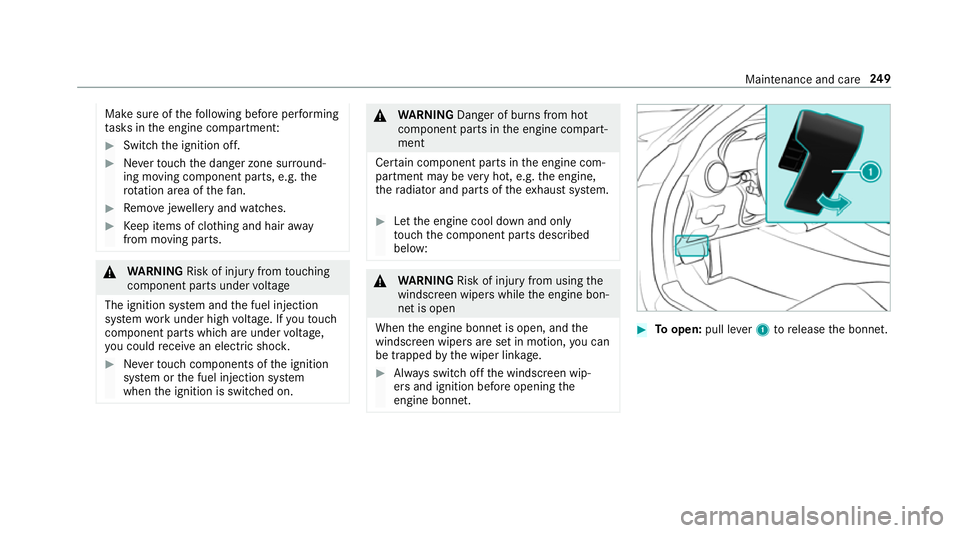
engine bonn et. #
Toopen: pull lever1 torelease the bonn et. Maintenance and care
249
Page 263 of 409
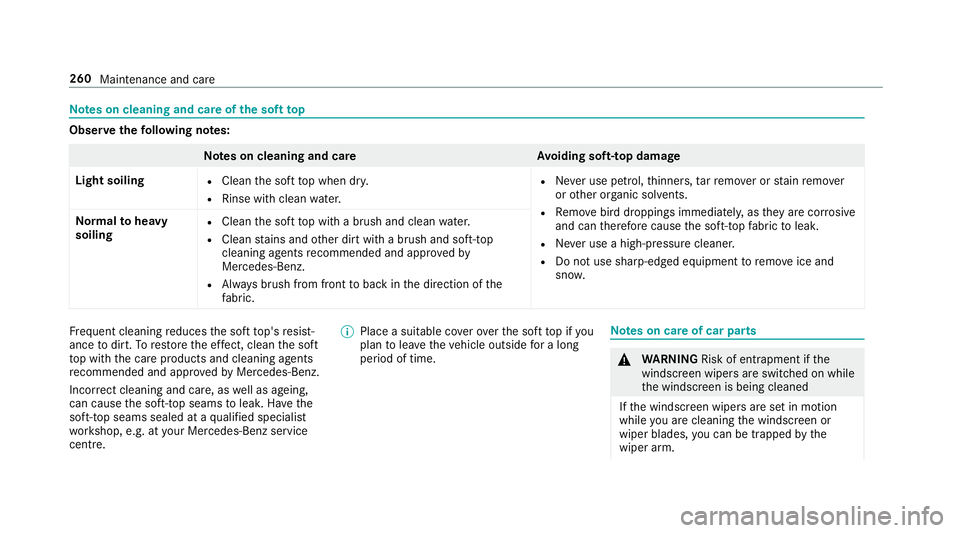
Note
s on cleaning and care of the soft top Obser
vethefo llowing no tes: Note
s on cleaning and car eA voiding soft- top damage
Light soiling R
Clean the soft top when dr y.
R Rinse with clean water. R
Never use petrol, thinners, tarre mo ver or stain remo ver
or other or ganic sol vents.
R Remo vebird droppings immediatel y,as they are cor rosive
and can therefore cause the soft-to pfabric toleak.
R Never use a high-p ressure cleaner.
R Do not use sharp-edged equipment toremo veice and
sno w.
Norm
alto heavy
soiling R
Clean the soft top with a brush and clean water.
R Clean stains and other dirt with a brush and soft-top
cleaning agents recommended and appr ovedby
Mercedes-Benz.
R Alw ays brush from front toback in the direction of the
fa bric. Fr
equent cleaning reduces the soft top's resist‐
ance todirt. Torestore the ef fect, clean the soft
to p with the care products and cleaning agents
re commended and appr ovedby Mercedes-Benz.
Incor rect cleaning and care, as well as ageing,
can cause the soft-to p seams toleak. Ha vethe
soft-top seams sealed at a qualified specialist
wo rkshop, e.g. at your Mercedes-Benz service
centre. %
Place a suitable co verove rth e soft top if you
plan tolea vetheve hicle outside for a long
period of time. Note
s on care of car parts &
WARNING Risk of entrapment if the
windscreen wipers are swit ched on while
th e windscreen is being cleaned
If th e windscreen wipers are set in motion
while you are cleaning the windscreen or
wiper blades, you can be trapped bythe
wiper arm. 260
Maintenance and care
Page 405 of 409
We
bsite
Calling up ............................................ 228
Showing/hiding thewe b br ows er
menu ................................................... 228
Wheel change
Fitting a new wheel .............................. 301
Fitting/removing pla stic hub caps ...... 298
Lo we ring theve hicle ........................... 302
Preparation .......................................... 297
Ra ising theve hicle .............................. 298
Re moving a wheel .............................. .300
Wheel rotation ........................................ .296
Wheels Care .................................................... 260
Checking ............................................. 285
Checking the tyre pressure (tyre
pressure monitoring sy stem) ............... 288
Fitting .................................................. 301
Flat tyre ............................................... 266
Inter changing ...................................... 296
MOExtended tyres .............................. .267
No ise .................................................. .285
No tes on fitting ................................... 293
Re moving ............................................ 300
Re placing .................................... 293, 297 Re
starting the tyre pressure monitor‐
ing sy stem ...........................................2 89
Selection ............................................. 293
Snow chains ........................................ 285
St oring .................................................2 97
TIREFIT kit ...........................................2 68
Ty re pressure (N otes) .......................... 286
Ty re pressure monitoring sy stem
(function) ............................................. 287
Ty re pressure table .............................. 287
Un usual handling characteristics ........ 285
Wi -Fi .......................................................... 189
Overview ............................................. 189
Setting ................................................. 189
Setting up a hotspot ............................ 19 0
Setting up an Internet connection ....... 224
Wi ndo ws
see Side windo ws
Wi ndo ws(Care) ...................................... .260
Wi ndscreen
see Windshield
Wi ndscreen washer fluid ........................ 313
No tes ................................................... 313Wi
ndscreen washer sy stem
To pping up ...........................................2 53
Wi ndscreen wipers
Changing the wiper blades .................. 103
Switching on/off ................................. 103
Wi ndshield ............................................... 103
Changing the wiper blades .................. 103
Wi nter operation
Snow chains ........................................ 285
Wi nter tyres
Setting the permanent speed limita‐
tion ...................................................... 14 6
Wi per blades
Ca re .................................................... 260
Re placing .............................................1 03
Wire lessvehicle comp onents
Declaration of con form ity ...................... 22
Wo rkshop
see Qualified specialist workshop 402
Index