2018 MERCEDES-BENZ AMG GT ROADSTER light
[x] Cancel search: lightPage 117 of 409
g
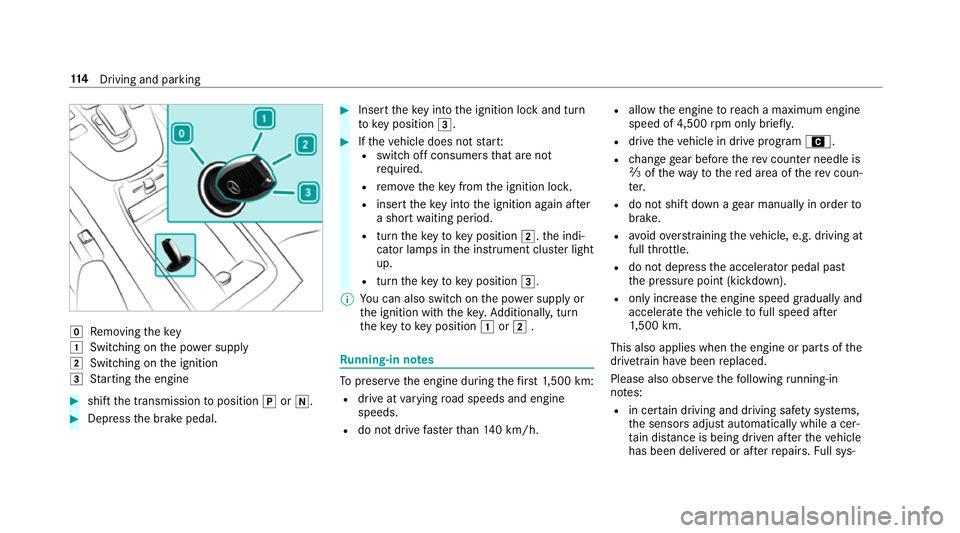
Removing thekey
1 Switching on the po wer supp ly
2 Switching on the ignition
3 Starting the engine #
shift the transmission toposition jori. #
Depress the brake pedal. #
Insert theke y in tothe ignition lock and turn
to key position 3. #
Ifth eve hicle does not star t:
R switch off consumers that are not
requ ired.
R remo vetheke y from the ignition loc k.
R inse rttheke y in tothe ignition again af ter
a short waiting period.
R turn theke yto key position 2.the indi‐
cator lamps in the instrument clus ter light
up.
R turn theke yto key position 3.
% You can also swit chon the po wer supp lyor
th e ignition with thekey. Additionall y,turn
th eke yto key position 1or2 . Ru
nning-in no tes To
preser vethe engine during thefirs t1, 500 km:
R drive at varying road speeds and engine
speeds.
R do not drive fasterthan 140 km/h. R
allow the engine toreach a maximum engine
speed of 4,500 rpm on ly brie fly.
R drive theve hicle in drive program A.
R change gear before there v counter needle is
Ô ofthewa yto there d area of there v coun‐
te r.
R do not shift down a gear manually in order to
brake.
R avoidove rstraining theve hicle, e.g. driving at
full thro ttle.
R do not depress the accelera tor pedal past
th e pressure point (kickdown).
R only increase the engine speed gradually and
accelera tetheve hicle tofull speed af ter
1, 500 km.
This also applies when the engine or parts of the
driv etra in ha vebeen replaced.
Please also obser vethefo llowing running-in
no tes:
R in cer tain driving and driving saf ety sy stems,
th e sensors adjust automatically while a cer‐
ta in dis tance is being driven af terth eve hicle
has been delivered or af terre pairs. Full sys‐ 11 4
Driving and pa rking
Page 119 of 409
#
Do not shi ftdown on slippery road sur‐
fa ces toinc rease the engine braking
ef fect. &
DANG ER Risk of fata l injuries due topoi‐
sonous exhaust gases
If th eta ilpipe is bloc ked or suf ficient ventila‐
tion is not possible, poisonous exhaust gases
such as carbon monoxide may enter theve hi‐
cle. This is the case, forex ample, if theve hi‐
cle is stuck in sn ow. #
When the engine or thest ationary
heater are running, keep theta ilpipe
and the area around theve hicle clear of
sno w. #
Open a window on the side of theve hi‐
cle facing the wind toensure an ade‐
qu ate supply of fresh air. &
WARNING Risk of accident due tothe
brake sy stem overheating
If yo u lea veyour foot on the brake pedal
when driving, the brake sy stem may over‐
heat.
This increases the braking dis tance and the
brake sy stem may evenfa il. #
Never use the brake pedal as a foot re st. #
Do not depress the brake pedal and the
accelerator pedal at the same time
while driving. *
NO
TECausing wearto the brake linings
by permanently depressing the brake
pedal #
Do not permanently depress the brake
pedal while driving. #
Touse braking ef fect of the engine,
shift toa lo werge ar in good time. *
NO
TEDama getothe driv etra in and
engine when pulling away #
Do not warm upthe engine while the
ve hicle is stationar y.Pull away immedi‐
atel y. #
Avoid high engine speeds and driving at
full thro ttle until the engine has reached
its operating temp erature. *
NO
TEDama getothe catalytic con verter
due tonon-combu sted fuel The engine is not
running smo othly and is
misfiring.
Non-combus ted fuel may get into the cata‐
lytic con verter. #
Only depress the accelera tor pedal
slightl y. #
Have the cause rectified immediately at
a qu alified specialist workshop. 11 6
Driving and pa rking
Page 121 of 409
ECO
start/s top function Ope
ration of the ECO start/s top function
Deacti vating or acti vating the ECO start/
sto p function #
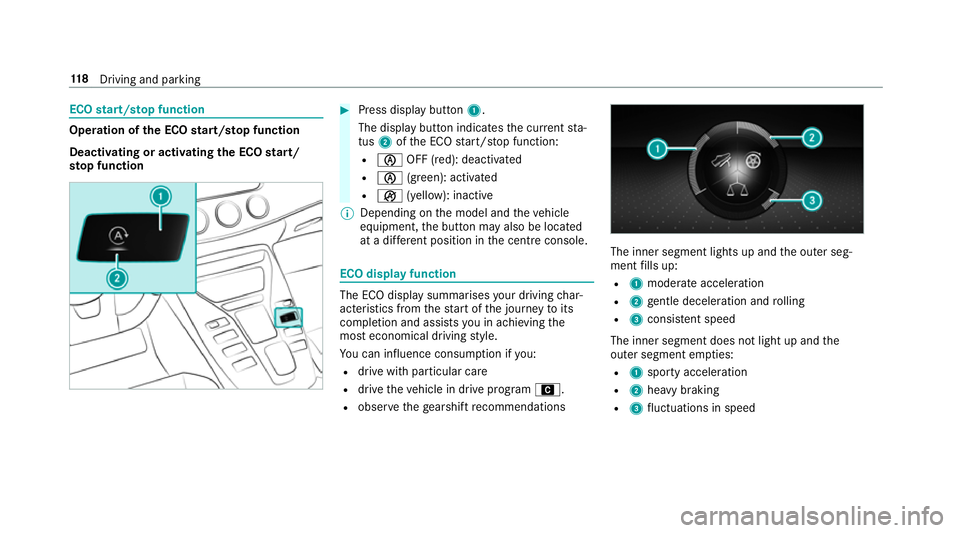
Press displ aybutton 1.
The display button indicates the cur rent sta‐
tus 2ofthe ECO start/ stop function:
R è OFF (red): deactivated
R è (green): activated
R ç (yellow): inactive
% Depending on the model and theve hicle
equipment, the button may also be located
at a dif fere nt position in the cent reconsole. ECO displ
ayfunction The ECO display summa
rises your driving char‐
acteristics from thest art of the journey toits
completion and assists you in achieving the
most economical driving style.
Yo u can influence consum ption if you:
R drive with particular care
R drive theve hicle in drive program A.
R obser vethege arshift recommendations The inner segment lights up and
the outer seg‐
ment fills up:
R 1 moderate acceleration
R 2 gentle deceleration and rolling
R 3 consis tent speed
The inner segment does not light up and the
outer segment em pties:
R 1 sporty acceleration
R 2 heavy braking
R 3 fluctuations in speed 11 8
Driving and pa rking
Page 122 of 409
Yo
u ha vedriven economically when:
R theth re e outer segments are comple tely fil‐
led simultaneously
R the ECO display lights up
The additional range achi eved as a result of your
driving style in comparison toa driver with a
ve ry sporty driving style is shown under Bonus
from start. The range displ ayed does not indicate
a fixe dre duction in consum ption. AMG
Performance exhaust sy stem Fu
nction of the AMG Performance exhaust
sy stem
Changing the position of theex haust gasflaps
allo wsyouto select the sound characteristics of
th e AMG Performance exhaust sy stem:
R closed exhaust gasflaps: com fort ch aracter‐
istic (balanced)
R open exhaust gasflaps: sporty characteristic
(po werful) Ope
rating the AMG Performance exhaust
sy stem #
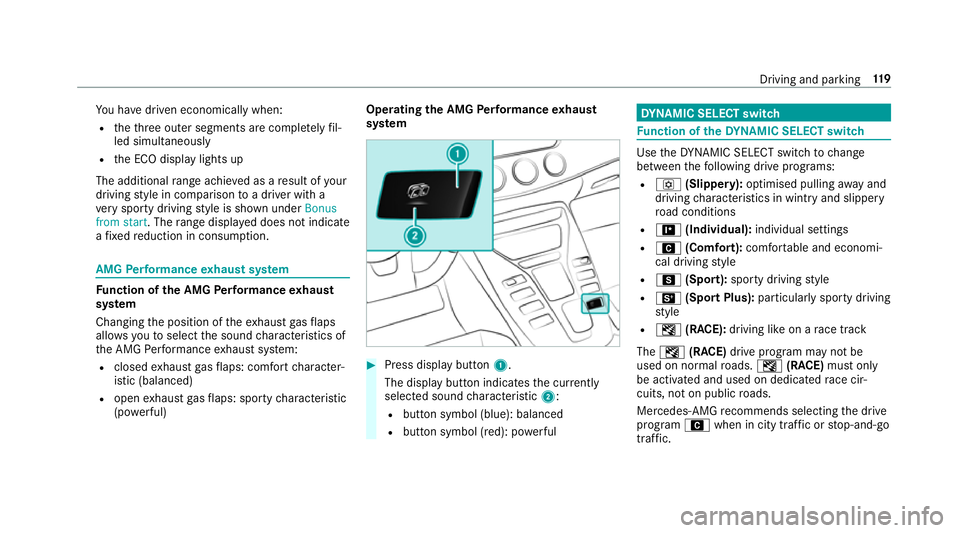
Press display button 1.
The display button indicates the cur rently
selected sound characteristic 2:
R button symbol (blue): balanced
R button symbol (red): po werful DY
NA MIC SELECT switch Fu
nction of theDY NA MIC SELECT switch Use
theDY NA MIC SELECT switch tochange
between thefo llowing drive programs:
R o (Slippery): optimised pulling away and
driving characteristics in wint ryand slippe ry
ro ad conditions
R = (Individual): individual settings
R A (Comfort): comfortable and economi‐
cal driving style
R C (Sport): sporty driving style
R B (Sport Plus): particularly sporty driving
st yle
R I (RACE): driving like on a race track
The I (RACE) drive program may not be
used on normal roads. I (RACE) must on ly
be activated and used on dedicated race cir‐
cuits, not on public roads.
Mercedes-AMG recommends selecting the drive
prog ram A when in city traf fic or stop-and-go
traf fic. Driving and pa
rking 11 9
Page 127 of 409
Manual
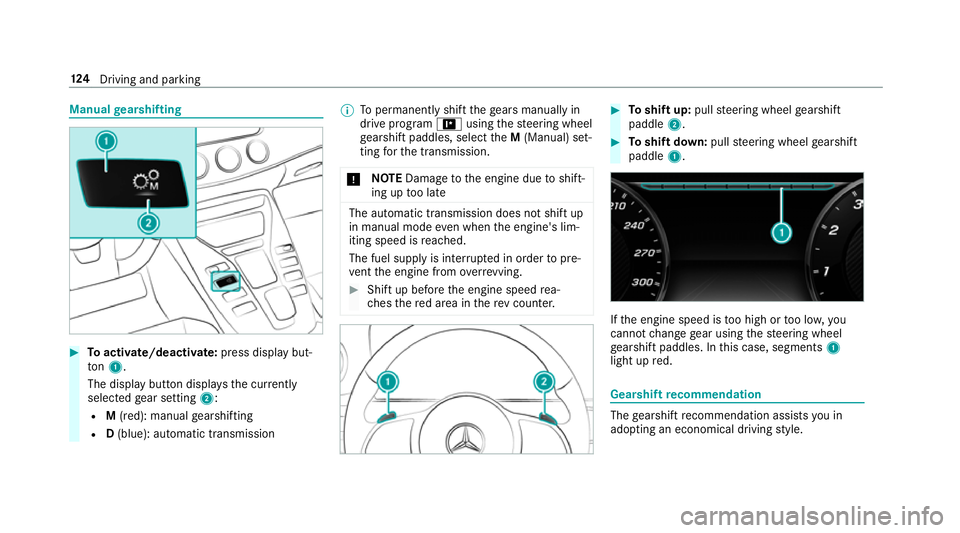
gearshifting #
Toactivate/deacti vate: press display but‐
to n1.
The displ aybutton displa ys the cur rently
selected gear setting 2:
R M(red): manual gearshifting
R D(blue): automatic transmission %
Topermanently shift thege ars manually in
drive prog ram = using thesteering wheel
ge arshift paddles, select theM (Manual) set‐
ting forth e transmission.
* NO
TEDama getothe engine due toshift‐
ing up too late The automatic transmission does not shift up
in manual mode even when the engine's lim‐
iting speed is reached.
The fuel supply is inter rupte d in order topre‐
ve nt the engine from overrev ving. #
Shift up before the engine speed rea‐
ch es there d area in there v counter. #
Toshift up: pullsteering wheel gearshift
paddle 2. #
Toshift down: pullsteering wheel gearshift
paddle 1. If
th e engine speed is too high or too lo w,you
cannot change gear using thesteering wheel
ge arshift paddles. In this case, segments 1
light up red. Gearshift
recommendation The
gearshift recommendation assists you in
adopting an economical driving style. 124
Driving and pa rking
Page 132 of 409
#
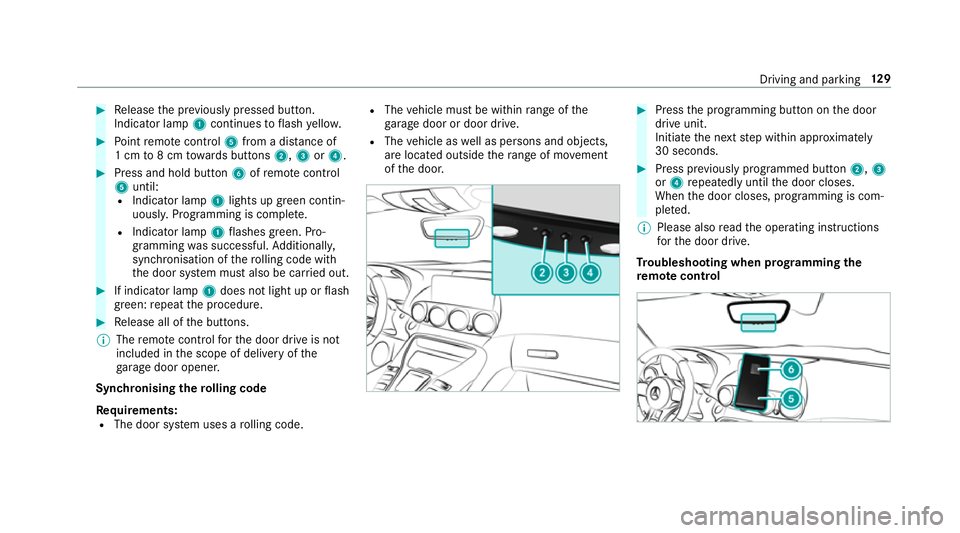
Release the pr eviously pressed button.
Indicator lamp 1continues toflash yello w. #
Point remo tecontrol 5from a di stance of
1 cm to8 cm towa rds buttons 2,3or4. #
Press and hold button 6ofremo tecontrol
5 until:
R Indicator la mp1lights up green contin‐
uousl y.Programming is comple te.
R Indicator lamp 1flashes green. Pro‐
gr amming was successful. Additionally,
synchronisation of thero lling code with
th e door sy stem must also be car ried out. #
If indicator lamp 1does not light up or flash
green: repeat the procedure. #
Release all of the buttons.
% The remo tecontrol forth e door drive is not
included in the scope of delivery of the
ga rage door opener.
Synchronising thero lling code
Re quirements:
R The door sy stem uses a rolling code. R
The vehicle must be within range of the
ga rage door or door drive.
R The vehicle as well as persons and objects,
are located outside thera nge of mo vement
of the door. #
Press the programming button on the door
drive unit.
Initiate the next step within appr oximately
30 seconds. #
Press pr eviously prog rammed button 2,3
or 4 repeatedly until the door closes.
When the door closes, programming is com‐
ple ted.
% Please also read the operating instructions
fo rth e door drive.
Tr oubleshooting when prog ramming the
re mo tecont rol Driving and pa
rking 12 9
Page 134 of 409
Clearing
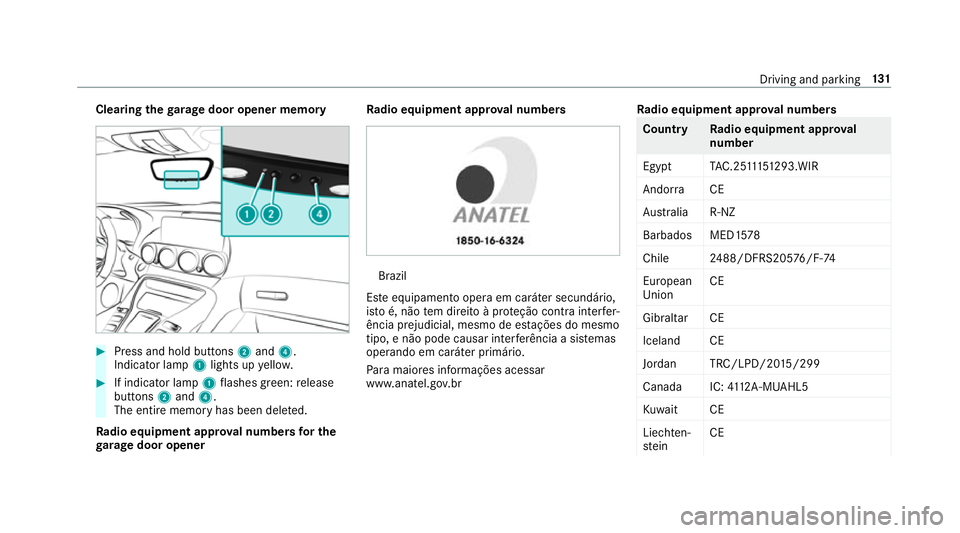
thega rage door opener memo ry#
Press and hold buttons 2and 4.
Indicator lamp 1lights up yello w. #
If indicator lamp 1flashes green: release
buttons 2and 4.
The entire memo ryhas been dele ted.
Ra dio equipment appr oval numbers for the
ga rage door opener Ra
dio equipment appr oval numbers Brazil
Es te equipamento opera em caráter secundário,
is to é, não tem direito à pr oteção contra inter fer‐
ência prejudicial, mesmo de es tações do mesmo
tipo, e não pode causar inter ferê ncia a si stemas
operando em caráter primário.
Pa ra maio res informações acessar
www.anatel.go v.br Ra
dio equipment appr oval numbers Countr
yRadio equipment appr oval
number
Egyp tT AC.25 111 51293.WIR
Andor ra CE
Au stra lia R-NZ
Barbados MED1 578
Chile 2488/DFRS205 76/F-74
European
Union CE
Gibral tarCE
Iceland CE
Jordan TRC/LPD/20 15/299
Canad aI C:4112 A-MUAHL5
Ku wa it CE
Liechten‐
st ein CE Driving and parking
131
Page 139 of 409
and do not
relie ve you of your responsibility per‐
ta ining toroad traf fic la w.Pay attention tothe
traf fic conditions at all times and inter vene
when necessa ry. Be aware of the limitations
re ga rding the safe use of these sy stems. Information about
radar senso rs Some driving and driving sa
fety sy stems use
ra dar sensors tomonitor the area in front of,
behind or next totheve hicle (depending on the
ve hicle's equipment).
Depending on theve hicle's equipment, thera dar
sensors are integrated behind the bumpers
and/or behind the Mercedes star. Keep these
parts free of dirt, ice and slush (/ page 260).
The sensors must not be co vered, forex ample
by cycle rack s, overhanging loads, sticke rs,fo il
or foils toprotect against stone chipping. In the
eve nt of dama getothe bumpers or radiator
grille, or following a collision impacting the
bumpers or radiator grille, ha vethe function of
th era dar sensors checked at a qualified special‐
ist workshop. The driver assis tance sy stem may
no longer workproperly. Overview of driving sy
stems and driving
saf ety sy stems In
this section, you will find information about
th efo llowing driving sy stems and driving saf ety
sy stems:
R ABS (A nti-lock Braking System)
(/ page 136)
R Active Dis tance Assi stDISTRONIC
(/ page 147)
R Adaptive Brake Lights (/ page142)
R AMG RIDE CONTROL (/ page156)
R Active Brake Assi st
R Lane Keeping Assist (/ page163)
R ATTENTION ASSIST (/ page161)
R BAS (Bra keAssist System) (/ page137)
R Hill Start Assist (/ page151)
R EBD ( Electronic Brakeforce Distribution)
(/ page 140)
R ESP ®
(Electronic Stability Program)
(/ page 137)
R HOLD fu nction (/ page 151) R
Limi ter (/ page144)
R Parking Assist PARKTRONIC (/ page157)
R Front and reve rsing camera (/ page159)
R RACE START (/ page 153)
R Cruise control (/ page 143)
R Blind Spot Assist (/ page162) Fu
nction of ABS (Anti-lock Braking Sy stem) ABS
regulates the brake pressure in critical driv‐
ing situations:
R During braking, e.g. at full brake application
or insuf ficient tyre traction, the wheels are
pr eve nted from lo cking.
R Vehicle steerability while braking is ensured.
If ABS inter venes when braking, you will feel a
pulsing in the brake pedal. The pulsating brake
pedal can be an indication of hazardous road
conditions and can ser veas a reminder totake
ex tra care while driving. 13 6
Driving and pa rking