2018 MERCEDES-BENZ AMG GT ROADSTER tire type
[x] Cancel search: tire typePage 15 of 294
Locking the vehicleTrunk lid separately ........................ .76
Low-beam headlamps
Display message ............................ 185
Switching on/off .............................. 97
Lubricant additives
see Additives (engine oil)
M
M button ............................................ .121
M+S tires ............................................ 263
Malfunction message
see Display messages
Manual drive program
Activating ....................................... 122
Changing gear ............................... 123
Deactivating ................................... 123
General notes ................................ 122
Manual mode
Activating ....................................... 123
Deactivating ................................... 124
General notes ................................ 123
Matte finish (cleaning instruc-
tions) ..................................................2 43
mbrace
Call priority ....................................2 25
Display message ............................ 180
Downloading destinations
(COMAND) ..................................... 225
Downloading routes ....................... 228
Emergency call .............................. 222
General notes ................................ 221
Geo fencing ................................... 228
Info call button .............................. 224
Locating a stolen vehicle ...............2 27
Remote fault diagnosis .................. 227
Remote vehicle locking .................. 226
Roadside assistance button ........... 223
Search & Send ............................... 225
Self-test ......................................... 222
Speed alert .................................... 228
System .......................................... 222
Triggering the vehicle alarm ........... 228
Vehicle remote unlocking .............. 226
Mechanical key
Function/notes ................................ 68
General notes .................................. 68 Inserting .......................................... 68
Locking vehicle ................................ 73
Removing ......................................... 68
Unlocking the driver's door .............. 73
Media Interface
see Digital Operator's Manual
Memory card (audio) ......................... 165
Memory function
Seats, steering wheel, exterior
mirrors ............................................. 94
Mercedes me connect
Change of vehicle ............................ 32
Data protection ................................ 32
Website ............................................ 31
Merce
des-Benz Intelligent Drive
Distance Pilot DISTRONIC ............. 136
Message memory (on-board com-
puter) .................................................. 174
Messages
see Display messages
see Warning and indicator lamps
Mirror turn signal
Cleaning ......................................... 244
Mirrors
see Exterior mirrors
see Rear-view mirror
see Vanity mirror
Mobile phone
Connecting (device manager) ........ 214
Frequencies ................................... 285
Installation ..................................... 285
Menu (on-board computer) ............ 166
Transmission output (maximum) .... 285
Model type
see Vehicle identification plate
Modifying the programming
(SmartKey) ........................................... 67
Mounting wheels
Lowering the vehicle ...................... 283
Mounting a new wheel ................... 282
Preparing the vehicle ..................... 280
Raising the vehicle ......................... 280
Removing a wheel .......................... 282
Securing the vehicle against roll-
ing away ........................................ 280
MP3
Operation ....................................... 165
Index13
Page 23 of 294
Two-way radioFrequencies ................................... 285
Installation ..................................... 285
Transmission output (maximum) .... 285
Type identification plate
see Vehicle identification plate
U
UnlockingEmergency unlocking ....................... 73
From inside the vehicle (central
unlocking button) ............................. 72
USB devices
Connecting to the Media Inter-
face ...............................................2 16
V
Vanity mirror (in the sun visor)........220
Vehicle
Correct use ...................................... 28
Data acquisition ............................... 29
Display message ............................ 193
Electronics ..................................... 285
Equipment ....................................... 25
Individual settings .......................... 168
Limited Warranty .............................2 9
Loading .......................................... 269
Locking (in an emergency) ............... 73
Locking (SmartKey) .......................... 66
Lowering ........................................ 283
Maintenance .................................... 26
Operating safety .............................. 27
Parking .......................................... 127
Parking for a long period ................ 130
Pulling away ................................... 112
Raising ........................................... 280
Reporting problems ......................... 28
Securing from rolling away ............ 280
Towing away .................................. 257
Transporting .................................. 259
Unlocking (in an emergency) ........... 73
Unlocking (SmartKey) ...................... 66
Vehicle data ................................... 291
Vehicle battery
see Battery (vehicle)
Vehicle data
Trunk load (maximum) ................... 291 Vehicle dimensions
........................... 291
Vehicle emergency locking ................ 73
Vehicle identification number
see VIN
Vehicle identification plate .............. 285
Vehicle maintenance
see ASSYST PLUS
Vehicle tool kit .................................. 248
Ventilation
see Climate control
Video
Operating the DVD ......................... 166
see also Digital Operator's Man-
ual .................................................. 208
VIN
Seat ............................................... 286
Type plate ...................................... 285W
Warning and indicator lampsABS ................................................ 200
Active Brake Assist ........................ 205
Brakes ........................................... 199
Check Engine ................................. 203
Coolant .......................................... 203
Distance warning ........................... 205
ESP
®.............................................. 200
ESP®OFF ....................................... 201
Fuel tank ........................................ 203
Overview .......................................... 34
Parking brake ................................ 202
PASSENGER AIR BAG ...................... 41
Reserve fuel ................................... 203
Restraint system ............................ 202
Seat belt ........................................ 198
SPORT handling mode ................... 202
Steering ......................................... 207
Tire pressure monitor .................... 206
Warranty .............................................. 25
Washer fluid
Display message ............................ 196
Weather display (COMAND)
see also Digital Operator's Man-
ual .................................................. 208
Wheel and tire combinations
Tires ............................................... 283
Wheel bolt tightening torque ........... 283
Index21
Page 32 of 294
are used to help in finding malfunctions and
improving quality and are sent to the manufac-
turer where necessary. In addition, the manu-
facturer is subject to product liability. The man-
ufacturer needs technical data from vehicles for
this purpose.
Malfunction memories in the vehicle can be
reset by a service center during repair or service
work.
You can incorporate data into the vehicle's com-
fort and infotainment functions yourself as part
of the selected equipment.
These include, for example:
Rmultimedia data such as music, films or pho-
tos for playback in an integrated multimedia
system
Raddress book data for use in conjunction with
an integrated hands-free system or an inte-
grated navigation system
Rnavigation destinations that have been
entered
Rdata about using Internet services
These data can be saved locally in the vehicle or
are located on a device that you have connected
to the vehicle. If this data is saved in the vehicle,
you can delete it at any time. These data are sent
to third parties only at your request, particularly
when you use online services in accordance with
the settings that you have selected.
You can save and change comfort settings/
customizations in the vehicle at any time.
Depending on the piece of equipment in ques-
t
ion, these can include, for example:
Rseat and steering wheel position settings
Rsuspension and climate control settings
Rcustom settings such as interior lighting
If your vehicle is equipped appropriately, you
can connect your smartphone or another mobile
end device to the vehicle. You can control this by
means of the control elements integrated in the vehicle. The smartphone's picture and sound
can be output via the multimedia system. Spe-
cific items of information are also sent to your
smartphone.
Depending on the type of integration, this can
include:
Rgeneral vehicle information
Rposition data
This allows the use of selected smartphone
Apps, such as navigation or music player Apps.
There is no additional interaction between the smartphone and the vehicle, particularly active
access to vehicle data. The type of additional
data processing is determined by the provider of
the App being used. Whether you can configure
settings for it and, if so, which ones, depends on
the App and your smartphone's operating sys-
tem.
Service provider
Wireless network connection
If your vehicle has a wireless network connec-
tion, data can be exchanged between your vehi-
cle and other systems. The wireless network
connection is enabled by either an in-vehicle
transmitter and receiver or your own mobile end
device (e.g. smartphone). Online functions can
be used via this wireless network connection.
These include online services and applications/ Apps provided by the manufacturer or other
providers.
Services provided by the manufacturer
In the case of the manufacturer's online serv-
ices, the manufacturer describes the functions
in a suitable place and the associated informa-
tion subject to data protection legislation. Per-
sonal data can be used in order to provide online
services. Data are exchanged via a secure con-
nection (e.g. using the IT system specially pro-
vided for this purpose by the manufacturer).
Collecting, processing and using personal data
beyond the provision of services is permitted
only on the basis of a statutory permit or decla-
ration of consent.
You can usually activate and deactivate the serv-
ices and functions (some of which are subject to
charge). In many cases, this also applies to the
vehicle's entire data connection. However, this
does not apply in particular to legally prescribed
functions and services such as the "eCall" emer-
gency call system.
Services from third parties
If it is possible to use online services from other
providers, these services are the responsibility
of the provider in question and subject to that
provider's data protection conditions and terms
of use. The manufacturer has no influence over
the content exchanged here.
30Data stored in the vehicle
Introduction
Page 128 of 294
!Use a filter when adding fuel from a fuel can.
The fuel lines and/or the fuel injection system
could otherwise be blocked by particles from
the fuel can.
If you overfill the fuel tank, fuel could spray out
when the fuel pump nozzle is removed.
For further information on fuel and fuel quality
(
Ypage 286).
Refueling
General information
Pay attention to the important safety notes
(Ypage 125).
If you unlock/lock the vehicle from the outside, the fuel filler flap also unlocks/locks.
The position of the fuel filler cap is displayed
8 in the instrument cluster. The arrow next
to the filling pump indicates the side of the vehi-
cle.
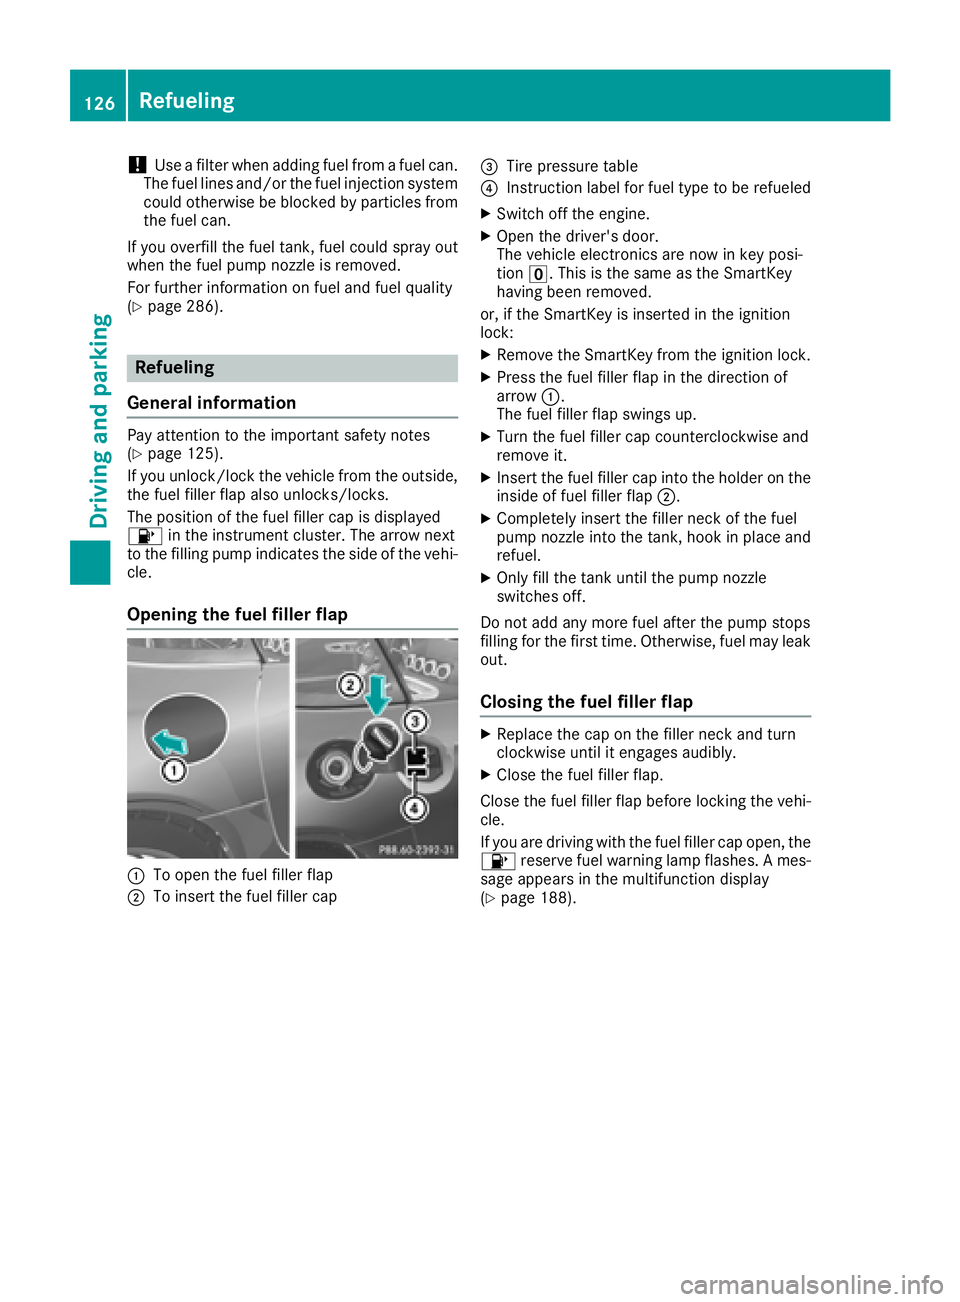
Opening the fuel filler flap
:To open the fuel filler flap
;To insert the fuel filler cap
=Tire pressure table
?Instruction label for fuel type to be refueled
XSwitch off the engine.
XOpen the driver's door.
The vehicle electronics are now in key posi-
tion u. This is the same as the SmartKey
having been removed.
or, if the SmartKey is inserted in the ignition
lock:
XRemove the SmartKey from the ignition lock.
XPress the fuel filler flap in the direction of
arrow :.
The fuel filler flap swings up.
XTurn the fuel filler cap counterclockwise and
remove it.
XInsert the fuel filler cap into the holder on the
inside of fuel filler flap ;.
XCompletely insert the filler neck of the fuel
pump nozzle into the tank, hook in place and
refuel.
XOnly fill the tank until the pump nozzle
switches off.
Do not add any more fuel after the pump stops
filling for the first time. Otherwise, fuel may leak
out.
Closing the fuel filler flap
XReplace the cap on the filler neck and turn
clockwise until it engages audibly.
XClose the fuel filler flap.
Close the fuel filler flap before locking the vehi-
cle.
If you are driving with the fuel filler cap open, the 8 reserve fuel warning lamp flashes. A mes-
sage appears in the multifunction display
(
Ypage 188).
126Refueling
Driving and parking
Page 208 of 294
Tires
Warning/
indicator
lampNSignal type
Possible causes/consequences and M
Solutions
hNThe yellow tire pressure monitor warning lamp (pressure loss/malfunction) is lit.
The tire pressure monitor has detected a loss of pressure in at least one of the tires.
GWARNING
Tire pressures that are too low pose the following hazards:
Rthey may burst, especially as the load and vehicle speed increase.
Rthey may wear excessively and/or unevenly, which may greatly impair tire trac-
tion.
Rthe driving characteristics, as well as steering and braking, may be greatly
impaired.
There is a risk of an accident.
XStop the vehicle without making any sudden steering or braking maneuvers. Pay
attention to the traffic conditions as you do so.
XSecure the vehicle against rolling away (Ypage 127).
XObserve the additional display messages in the multifunction display.
XCheck the tires and, if necessary, follow the instructions for a flat tire
(Ypage 249).
XCheck the tire pressure (Ypage 267).
XIf necessary, correct the tire pressure.
hN The yellow tire pressure monitor warning lamp (pressure loss/malfunction)
flashes for approximately one minute and then remains lit.
The tire pressure monitor is faulty.
GWARNING
The system is possibly unable to recognize or register low tire pressure.
There is a risk of an accident.
XObserve the additional display messages in the multifunction display.
XVisit a qualified specialist workshop immediately.
206Warning and indicator lamps in the instrument cluster
On-board computer and displays
Page 244 of 294

XDo not use hot water and do not wash the
vehicle in direct sunlight.
XUse a soft sponge to clean.
XUse a mild cleaning agent, such as a car
shampoo approved by Mercedes-Benz.
XThoroughly hose down the vehicle with a gen-
tle jet of water.
XDo not point the water jet directly towards the
air inlet.
XUse plenty of water and rinse out the sponge
frequently.
XRinse the vehicle with clean water and dry
thoroughly with a chamois.
XDo not let the cleaning agent dry on the paint-work.
Carefully remove all deposits of road salt as
soon as possible when driving in winter.
Power washers
GWARNING
The water jet from a circular jet nozzle (dirt
blasters) can cause invisible exterior damage
to the tires or chassis components. Compo-
nents damaged in this way may fail unexpect-
edly. There is a risk of an accident.
Do not use power washers with circular jet
nozzles to clean the vehicle. Have damaged
tires or chassis components replaced imme-
diately.
!Always maintain a distance of at least
11.8 in (30 cm) between the vehicle and the
high-pressure cleaner nozzle. Information
about the correct distance is available from
the equipment manufacturer.
Move the power washer nozzle around when
cleaning your vehicle.
Do not aim directly at any of the following:
Rtires
Rdoor gaps, joints etc.
Rsoft top
Rwind deflector net
Relectrical components
Rbattery
Rplug-type couplings
Rlights
Rseals
Rtrim
Rventilation slots
Damaged seals or electrical components can
lead to leaks or failures.
!Vehicles with decorative foil: parts of your
vehicle are covered with decorative foil. Main-
tain a distance of at least 27.5 in (70 cm)
between the foil-wrapped parts of the vehicle
and the nozzle of the high pressure cleaner.
Informatio n a
bout the correct distance is
available from the equipment manufacturer.
Move the power washer nozzle around when
cleaning your vehicle.
The water temperature of the high-pressure
cleaner must not exceed 140 °F (60 °C).
!If the SmartKey is within the rear detection
range of KEYLESS-GO, the following situa-
tions, for example, could lead to the uninten-
tional opening of the trunk lid:
Rwhen using an automatic car wash
Rwhen using a power washer
Make sure that the SmartKey is at least 10 ft
(3 m) away from the vehicle.
Cleaning the paintwork
!Do not affix:
Rstickers
Rfilms
Rmagnetic plates or similar items
to painted surfaces. You could otherwise
damage the paintwork.
Scratches, corrosive deposits, areas affected by corrosion and damage caused by inadequate
care cannot always be completely repaired. In
such cases, visit a qualified specialist workshop.
XRemove dirt immediately, where possible,
while avoiding rubbing too hard.
XSoak insect remains with insect remover and
rinse off the treated areas afterwards.
XSoak bird droppings with water and rinse off
the treated areas afterwards.
XRemove coolant, brake fluid, tree resin, oils,
fuels and greases by rubbing gently with a
cloth soaked in petroleum ether or lighter
fluid.
XUse tar remover to remove tar stains.
XUse silicone remover to remove wax.
242Care
Maintenance and care
Page 249 of 294

Seat covers of other materials
!Observe the following when cleaning:
Rclean artificial leather covers with a cloth
moistened with a solution containing 1%
detergent (e.g. dish washing liquid).
Rclean cloth covers with a microfiber cloth
moistened with a solution containing 1%
detergent (e.g. dish washing liquid). Rub
carefully and always wipe entire seat sec-
tions to avoid leaving visible lines. Leave
the seat to dry afterwards. Cleaning results
depend on the type of dirt and how long it
has been there.
Rclean DINAMICA covers with a damp cloth.
Make sure that you wipe entire seat sec-
tions to avoid leaving visible lines.
Cleaning the seat belts
GWARNING
Seat belts can become severely weakened if
bleached or dyed. This could cause the seat
belts to tear or fail, for instance, in the event of an accident. This poses an increased risk of
injury or fatal injury.
Never bleach or dye the seat belts.
!Do not clean the seat belts using chemical
cleaning agents. Do not dry the seat belts by
heating at temperatures above 176 ‡(80 †)
or in direct sunlight.
XUse clean, lukewarm water and soap solution.
Cleaning the carpets
XUse the carpet and textile cleaning agents
recommended and approved by Mercedes-
Benz.
Care247
Maintenance and care
Z
Page 259 of 294

Towing and tow-starting
Important safety notes
GWARNING
The rear axle locks when:
Rthe engine is not running
Rthe engine stalls while the vehicle is being
towed
Rthere is a malfunction in the power supply
or the vehicle's electrical system
There is a risk of an accident.
In the event of a breakdown, you should
always have the vehicle transported.
GWARNING
If the brake system or power steering is mal-
functioning and your vehicle is then towed
away, significantly more effort may be
required to steer and brake than is normally
required. There is a risk of an accident.
In such cases, use a tow bar. Before towing,
make sure that the steering moves freely.
GWARNING
When towing or tow-starting another vehicle
and its weight is greater than the permissible
gross weight of your vehicle, the:
Rthe towing eye could detach itself
Rthe vehicle/trailer combination could roll-
over.
There is a risk of an accident.
When towing or tow-starting another vehicle,
its weight should not be greater than the per- missible gross weight of your vehicle.
Details on the permissible gross vehicle weight
of your vehicle can be found on the vehicle iden-
tification plate (
Ypage 285).
!Use the SmartKey instead of the Start/Stop
button when towing the vehicle.
Start the engine and keep it running. The
SmartKey is in position 2in the ignition lock.
Set the transmission to iusing the E-
SELECT selector lever. Make sure that you
then leave the SmartKey in position 2.Check the transmission position in the instru-
ment cluster.
!Make sure that the electric parking brake is
released. If the electric parking brake is faulty,
visit a qualified specialist workshop.
!Secure the tow rope or tow bar to the towing
eye only. Otherwise, the vehicle could
become damaged.
!When Active Brake Assist, Distance Pilot
DISTR ONIC or the HOLD function is activated,
the vehicle brakes automatically in certain
situations.
To avoid damage to the vehicle, deactivate
these systems in the following or similar sit-
uations:
Rwhen towing the vehicle
Rin the car wash
!Do not use the towing eyes for recovery pur-
poses as this could damage the vehicle. If in
doubt, recover the vehicle with a crane.
!When towing, pull away slowly and
smoothly. If the tractive power is too high, the
vehicles could be damaged.
!Shift the automatic transmission to position
i and do not open the driver's or front-
passenger door when towing the vehicle
away. Otherwise, the automatic transmission
may shift to position jwhich can cause
damage to both vehicles.
!Do not tow with sling-type equipment. This
could damage the vehicle.
!The vehicle can be towed a maximum of
30 miles (50km). The towing speed of 30 mph
(50 km/h) must not be exceeded.
If the vehicle has to be towed more than
30 miles (50km), the entire vehicle must be
raised and transported.
!Observe the transmission fluid temperature
(AMG menu) in the on-board computer when
towing. The transmission fluid temperature
must not exceed 250 ‡ (
120 †). If this
occurs, you must stop towing immediately.
!Tow-starting the vehicle is not permitted.
The transmission may otherwise be damaged.
Towing and tow-starting257
Breakdown assistance
Z