2018 MERCEDES-BENZ AMG GT ROADSTER alarm
[x] Cancel search: alarmPage 68 of 294

SmartKey
Important safety notes
GWARNING
If children are left unsupervised in the vehicle,
they could:
Ropen the doors, thus endangering other
people or road users.
Rget out and disrupt traffic.
Roperate the vehicle's equipment.
Additionally, children could set the vehicle in
motion if, for example, they:
Rrelease the parking brake.
Rshifting the automatic transmission out of
park position P
RStart the engine.
There is a risk of an accident and injury.
When leaving the vehicle, always take the
SmartKey with you and lock the vehicle. Never
leave children or animals unattended in the
vehicle. Always keep the SmartKey out of
reach of children.
GWARNING
If you attach heavy or large objects to the
SmartKey, the SmartKey could be uninten-
tionally turned in the ignition lock. This could
cause the engine to be switched off. There is a risk of an accident.
Do not attach any heavy or large objects to the
SmartKey. Remove any bulky key rings before
inserting the SmartKey into the ignition lock.
!Keep the SmartKey away from strong mag-
netic fields. Otherwise, the remote control
function could be affected.
Strong magnetic fields can occur in the vicin-
ity of powerful electrical installations.
Do not keep the SmartKey:
Rwith electronic devices, e.g. a mobile phone
or another SmartKey
Rwith metallic objects, e.g. coins or metal foil
Rinside metallic objects, e.g. a metal case
This can affect the functionality of the Smart-
Key. Vehicles with KEYLESS-GO start function:
do
not keep the SmartKey in the trunk. Otherwise,
the SmartKey may not be detected, e.g. when
starting the engine using the Start/Stop button.
A brief radio connection between the vehicle
and the SmartKey determines whether a valid
SmartKey is in, or in the direct vicinity of, the
vehicle. This occurs, for example:
Rwhen starting the engine
Rwhile driving
Rwhen using the trunk unlocking sensor
Rwhen the external door handles are touched
Rduring convenience closing
SmartKey functions
:& Locks the vehicle
;FOpens the trunk lid
=%Unlocks the vehicle
XTo unlock centrally: press the%button.
If you do not open the vehicle within approx-
imately 40 seconds of unlocking:
Rthe vehicle is locked again
Rthe anti-theft alarm system is armed again.
XTo lock centrally: press the&button.
The SmartKey centrally locks and unlocks the
doors, the glove box and the fuel filler flap.
The turn signals flash once when unlocking and
three times when locking.
You can also set an audible signal to confirm
that the vehicle has been locked. The audible
signal can be activated and deactivated via the
multimedia system; see the Digital Operator's
Manual.
When the locator lighting is activated via the
multimedia system, it lights up when it is dark
after the vehicle is unlocked with the SmartKey.
66SmartKey
Opening and closing
Page 70 of 294

for about six seconds until the battery indica-
tor lamp flashes twice (Ypage 69).
If the setting of the locking system is changed
within the signal range of the vehicle, pressing
the & or% button:
Rlocks or
Runlocks the vehicle
The SmartKey now functions as follows:
XTo unlock: press the%button once.
XTo unlock centrally: press the%button
twice.
XTo lock: press the &button.
The KEYLESS-GO functions can be changed as
follows:
XTo unlock the driver's door: touch the inner
surface of the door handle on the driver's
door.
XTo unlock centrally: touch the inner surface
of the front-passenger door handle.
XTo lock centrally: touch the outer sensor
surface on one of the door handles.
Restoring factory settings:
XPress the %and& buttons simultane-
ously for approximately six seconds until the
battery check lamp flashes twice
(
Ypage 69).
Mechanical key
General notes
If the vehicle can no longer be locked or
unlocked with the SmartKey or KEYLESS-GO,
use the mechanical key.
If you use the mechanical key to unlock and
open the driver's door, the anti-theft alarm sys-
tem will be triggered. Switch off the alarm
(
Ypage 64).
If you unlock the vehicle using the mechanical
key, the fuel filler flap will not be unlocked auto-
matically.
XTo unlock the fuel filler flap: insert the
SmartKey into the ignition lock.
Removing the mechanical key
XPush release catch :in the direction of the
arrow and at the same time remove mechan- ical key ;from the SmartKey.
For further information about:
Runlocking the driver's door (Ypage 73)
Rlocking the vehicle (Ypage 73)
Inserting the mechanical key
XPush mechanical key ;completely into the
SmartKey until it engages and release
catch :is back in its basic position.
SmartKey battery
Important safety notes
GWARNING
Batteries contain toxic and corrosive substan- ces. If batteries are swallowed, it can result in
severe health problems. There is a risk of fatalinjury.
Keep batteries out of the reach of children. If
a battery is swallowed, seek medical attention immediately.
HEnvironmental note
Batteries contain dangerous
substances. It is against the
law to dispose of them with
the household rubbish. They
must be collected separately
68SmartKey
Opening and closing
Page 74 of 294

!The side windows will not open/close if the
battery is discharged or if the side windows
have iced up. It will then not be possible to
close the door. Do not attempt to force the
door closed. You could otherwise damage the
door or the side window.
Unlocking and opening doors from
the inside
You can open a door from inside the vehicle
even if it has been locked. If the vehicle has been
locked with the SmartKey or with KEYLESS-GO,
opening a door from the inside will trigger the
anti-theft alarm system. Switch off the alarm
(
Ypage 64).
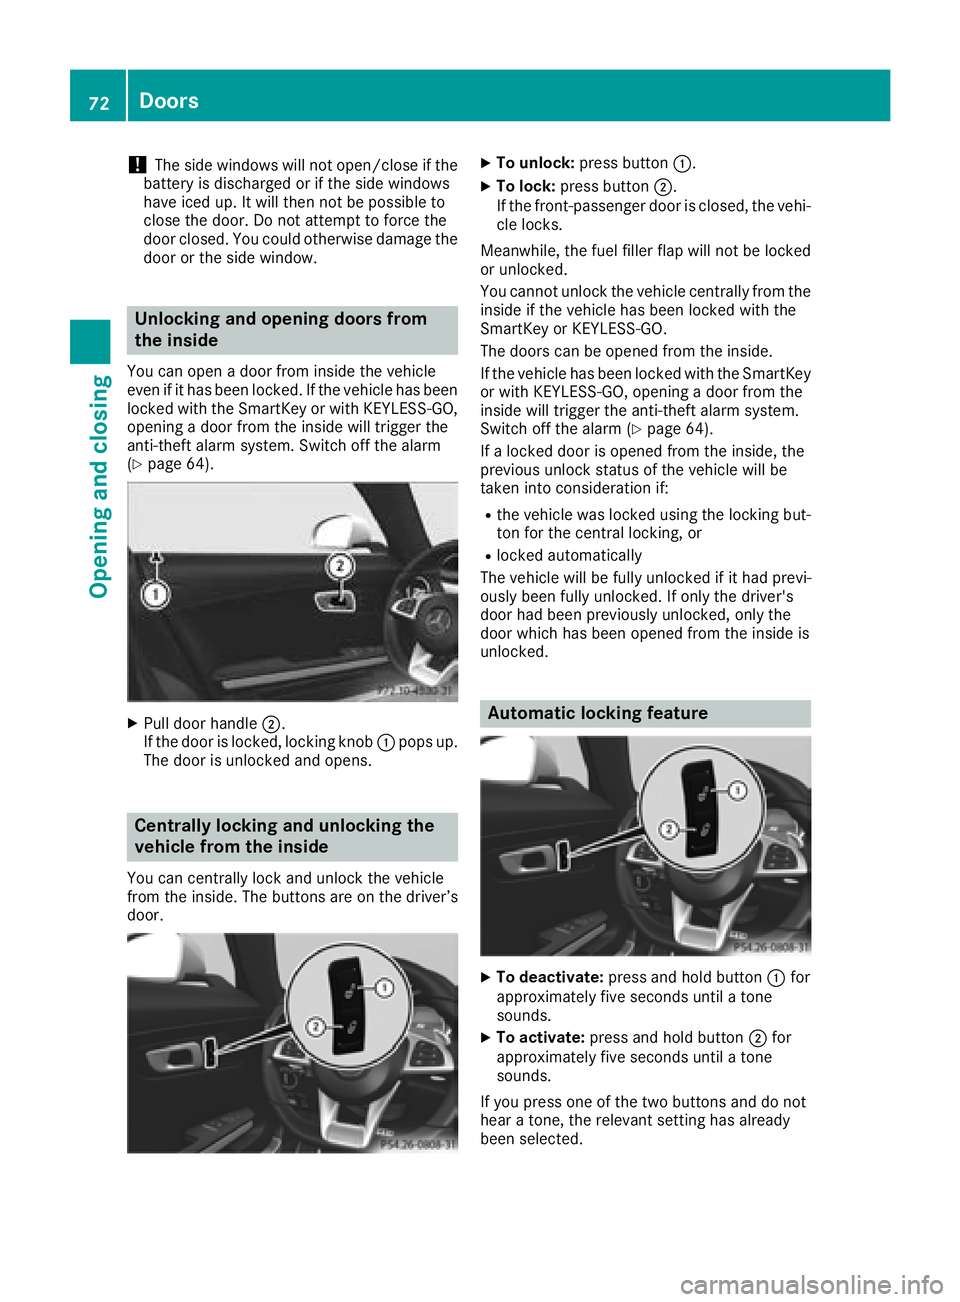
XPull door handle ;.
If the door is locked, locking knob :pops up.
The door is unlocked and opens.
Centrally locking and unlocking the
vehicle from the inside
You can centrally lock and unlock the vehicle
from the inside. The buttons are on the driver’s
door.
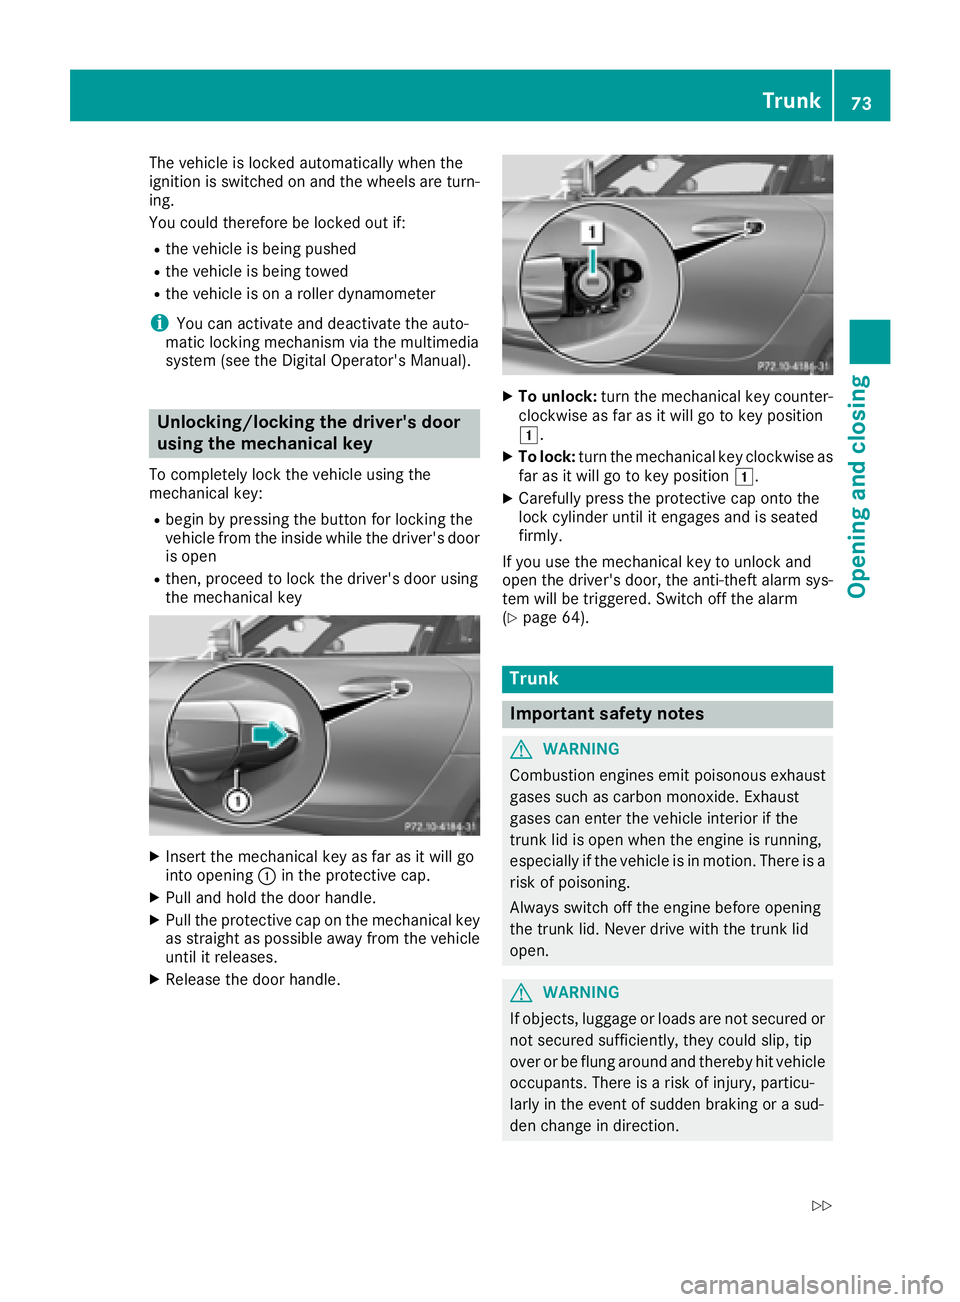
XTo unlock: press button :.
XTo lock:press button ;.
If the front-passenger door is closed, the vehi-
cle locks.
Meanwhile, the fuel filler flap will not be locked
or unlocked.
You cannot unlock the vehicle centrally from the
inside if the vehicle has been locked with the
SmartKey or KEYLESS-GO.
The doors can be opened from the inside.
If the vehicle has been locked with the SmartKey
or with KEYLESS-GO, opening a door from the
inside will trigger the anti-theft alarm system.
Switch off the alarm (
Ypage 64).
If a locked door is opened from the inside, the
previous unlock status of the vehicle will be
taken into consideration if:
Rthe vehicle was locked using the locking but-
ton for the central locking, or
Rlocked automatically
The vehicle will be fully unlocked if it had previ-
ously been fully unlocked. If only the driver's
door had been previously unlocked, only the
door which has been opened from the inside is
unlocked.
Automatic locking feature
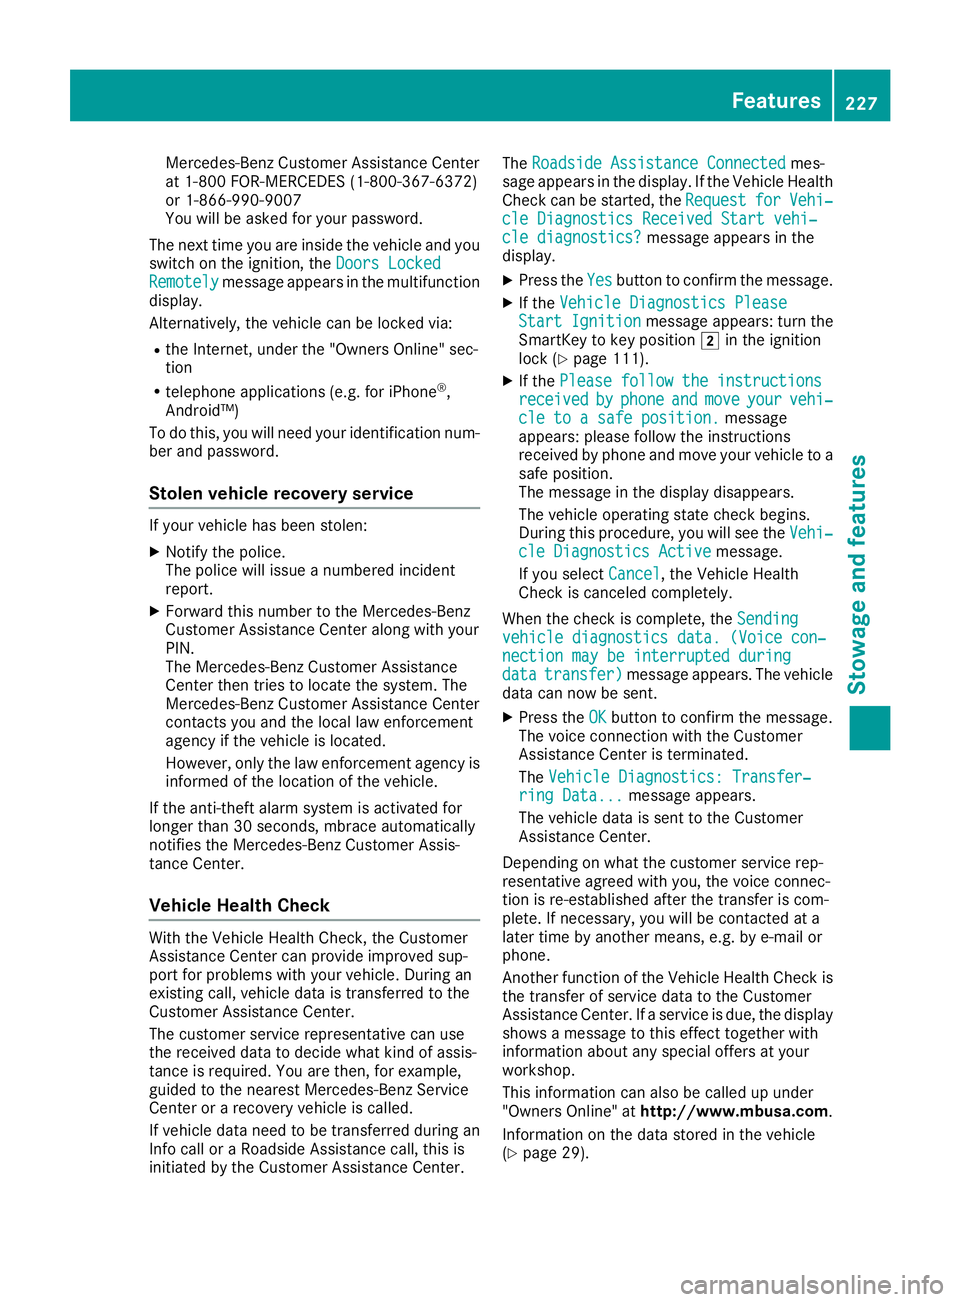
XTo deactivate: press and hold button :for
approximately five seconds until a tone
sounds.
XTo activate: press and hold button ;for
approximately five seconds until a tone
sounds.
If you press one of the two buttons and do not
hear a tone, the relevant setting has already
been selected.
72Doors
Opening and closing
Page 75 of 294

The vehicle is locked automatically when the
ignition is switched on and the wheels are turn-
ing.
You could therefore be locked out if:
Rthe vehicle is being pushed
Rthe vehicle is being towed
Rthe vehicle is on a roller dynamometer
iYou can activate and deactivate the auto-
matic locking mechanism via the multimedia
system (see the Digital Operator's Manual).
Unlocking/locking the driver's door
using the mechanical key
To completely lock the vehicle using the
mechanical key:
Rbegin by pressing the button for locking the
vehicle from the inside while the driver's door
is open
Rthen, proceed to lock the driver's door using
the mechanical key
XInsert the mechanical key as far as it will go
into opening :in the protective cap.
XPull and hold the door handle.
XPull the protective cap on the mechanical key
as straight as possible away from the vehicle
until it releases.
XRelease the door handle.
XTo unlock: turn the mechanical key counter-
clockwise as far as it will go to key position
1.
XTo lock: turn the mechanical key clockwise as
far as it will go to key position 1.
XCarefully press the protective cap onto the
lock cylinder until it engages and is seated
firmly.
If you use the mechanical key to unlock and
open the driver's door, the anti-theft alarm sys-
tem will be triggered. Switch off the alarm
(
Ypage 64).
Trunk
Important safety notes
GWARNING
Combustion engines emit poisonous exhaust
gases such as carbon monoxide. Exhaust
gases can enter the vehicle interior if the
trunk lid is open when the engine is running,
especially if the vehicle is in motion. There is a
risk of poisoning.
Always switch off the engine before opening
the trunk lid. Never drive with the trunk lid
open.
GWARNING
If objects, luggage or loads are not secured or
not secured sufficiently, they could slip, tip
over or be flung around and thereby hit vehicle
occupants. There is a risk of injury, particu-
larly in the event of sudden braking or a sud-
den change in direction.
Trunk73
Opening and closing
Z
Page 78 of 294

You can unlock the trunk lid from the driver's
seat when the vehicle is stationary and
unlocked.
XPress remote operating switch:for the
trunk lid until the trunk lid is unlocked.
The trunk lid opens slightly.
Locking the trunk lid separately
The "Locking the trunk lid separately" function is
only available in certain countries.
You can lock the trunk lid separately. If you then
unlock the vehicle centrally, the trunk lid
remains locked and cannot be opened.
XTo activate: close the trunk lid.
XOpen the glove box.
XSlide the switch to position 1.
If the vehicle is unlocked centrally, the trunk
lid remains locked.
iYou can also lock the glove box
(Ypage 218).
XTo deactivate: open the glove box.
XSlide the switch to position 2.
If the vehicle is unlocked centrally, the trunk
lid will also be unlocked.
Trunk emergency release
You can unlock the trunk lid from the inside with
emergency release button :.
XPress emergency release button :briefly.
The trunk lid unlocks and opens.
XPush the trunk lid upwards to open it com-
pletely.
The trunk lid can be unlocked with emergency
release button :when the vehicle is stationary
or in motion.
Emergency release button ::
Rflashes for 30 minutes after the trunk lid is
opened
Rflashes for 60 minutes after the trunk lid is
closed
Emergency release button :does not unlock
the trunk lid if the battery is disconnected or
discharged.
If the vehicle was locked centrally, opening the
trunk lid with emergency release button :trig-
gers the anti-theft alarm system.
Side windows
Important safety notes
GWARNING
While opening the side windows, body parts
could become trapped between the side win-
dow and the door frame as the side window
moves. There is a risk of injury.
Make sure that nobody touches the side win-
dow during the opening procedure. If some-
body becomes trapped, release the switch or
pull the switch to close the side window again.
76Side windows
Opening and closing
Page 229 of 294

Mercedes-Benz Customer Assistance Center
at 1-800 FOR-MERCEDES (1-800-367-6372)
or 1-866-990-9007
You will be asked for your password.
The next time you are inside the vehicle and you
switch on the ignition, the Doors Locked
Remotelymessage appears in the multifunction
display.
Alternatively, the vehicle can be locked via:
Rthe Internet, under the "Owners Online" sec-
tion
Rtelephone applications (e.g. for iPhone®,
Android™)
To do this, you will need your identification num-
ber and password.
Stolen vehicle recovery service
If your vehicle has been stolen:
XNotify the police.
The police will issue a numbered incident
report.
XForward this number to the Mercedes-Benz
Customer Assistance Center along with your
PIN.
The Mercedes-Benz Customer Assistance
Center then tries to locate the system. The
Mercedes-Benz Customer Assistance Center
contacts you and the local law enforcement
agency if the vehicle is located.
However, only the law enforcement agency is
informed of the location of the vehicle.
If the anti-theft alarm system is activated for
longer than 30 seconds, mbrace automatically
notifies the Mercedes-Benz Customer Assis-
tance Center.
Vehicle Health Check
With the Vehicle Health Check, the Customer
Assistance Center can provide improved sup-
port for problems with your vehicle. During an
existing call, vehicle data is transferred to the
Customer Assistance Center.
The customer service representative can use
the received data to decide what kind of assis-
tance is required. You are then, for example,
guided to the nearest Mercedes-Benz Service
Center or a recovery vehicle is called.
If vehicle data need to be transferred during an
Info call or a Roadside Assistance call, this is
initiated by the Customer Assistance Center. The
Roadside Assistance Connected
mes-
sage appears in the display. If the Vehicle Health
Check can be started, the Request
forVehi‐cle Diagnostics Received Start vehi‐cle diagnostics?message appears in the
display.
XPress the Yesbutton to confirm the message.
XIf theVehicle Diagnostics PleaseStart Ignitionmessage appears: turn the
SmartKey to key position 2in the ignition
lock (
Ypage 111).
XIf the Please follow the instructionsreceivedbyphoneandmoveyourvehi‐cle to a safe position.message
appears: please follow the instructions
received by phone and move your vehicle to a
safe position.
The message in the display disappears.
The vehicle operating state check begins.
During this procedure, you will see the Vehi‐
cle Diagnostics Activemessage.
If you select Cancel
, the Vehicle Health
Check is canceled completely.
When the check is complete, the Sending
vehicle diagnostics data. (Voice con‐nection may be interrupted duringdatatransfer)message appears. The vehicle
data can now be sent.
XPress the OKbutton to confirm the message.
The voice connection with the Customer
Assistance Center is terminated.
The Vehicle Diagnostics: Transfer‐
ring Data...message appears.
The vehicle data is sent to the Customer
Assistance Center.
Depending on what the customer service rep-
resentative agreed with you, the voice connec-
tion is re-established after the transfer is com-
plete. If necessary, you will be contacted at a
later time by another means, e.g. by e-mail or
phone.
Another function of the Vehicle Health Check is
the transfer of service data to the Customer
Assistance Center. If a service is due, the display
shows a message to this effect together with
information about any special offers at your
workshop.
This information can also be called up under
"Owners Online" at http://www.mbusa.com .
Information on the data stored in the vehicle
(
Ypage 29).
Features227
Stowage and features
Z
Page 230 of 294

Information on Roadside Assistance
(Ypage 26).
Downloading routes
Downloading routes allows you to transfer and
save predefined routes in the navigation sys-
tem.
A route can be prepared and sent either by a
customer service representative or under "Own-
ers Online" athttp://www.mbusa.com.
Each route can include up to four way points.
Once a route has been received by the naviga-
tion system, you will see the Do
youwanttostart route guidance? DestinationReceived destination has been savedin "Previous destinations".message on
the multimedia system display.
The route is saved.
XTo start route guidance: selectYes.
An overview of the route is shown in the dis-
play.
If you select No
, the saved route can be called
up later in the navigation menu.
XSelect Start.
Route guidance starts.
Downloaded and saved routes can be called up
again.
Speed alert
You can define the upper speed limit, which
must not be exceeded by the vehicle.
If the vehicle exceeds the set speed, a message
is sent to the Customer Assistance Center. The
Customer Assistance Center then forwards this
information to you.
You can select the way in which you receive this
information beforehand. Possible options
include text message, e-mail or an automated
call.
The data you receive contains the following
information:
Rthe location where the speed limit was excee-
ded
Rthe time at which the speed limit was excee-
ded
Rthe selected speed limit which was exceeded
Geo fencing
Geo fencing allows you to select areas which the
vehicle should not enter or leave. You will be
informed if the vehicle crosses the boundaries
of the selected areas. You can select the way in
which you receive this information beforehand.
Possible options include text message, e-mail or an automated call.
The area can be determined as either a circle or
a polygon with a maximum of ten corners. You
can specify up to ten areas simultaneously. Dif-
ferent settings are possible for each area.
These settings can be called up under "Owners
Online" at http://www.mbusa.com.
Alternatively, you can also trigger an Info call
and notify the customer service representative
that you wish to activate geo-fencing.
Currently inactive areas can be activated by text
message.
Triggering the vehicle alarm
With this function, you can trigger the vehicle's
panic alarm via text message. An alarm sounds
and the exterior lighting flashes. Depending on
the setting, the panic alarm lasts five or ten sec-onds. Afterwards, the alarm switches off.
Rear spoiler
Overview
The rear spoiler improves the handling of the
vehicle. It adapts the vehicle's aerodynamics to
the operating conditions, dependent on the
speed of the vehicle.
Only use button :to extend and retract the
rear spoiler manually for cleaning.
Button :is not used to operate the rear spoiler.
228Features
Stowage and features