2018 MERCEDES-BENZ AMG GT ROADSTER oil temperature
[x] Cancel search: oil temperaturePage 7 of 294

Anti-lock braking systemsee ABS (Anti-lock Braking System)
Anti-skid chains
see Snow chains
Anti-theft ala rmsystem
see ATA (Anti-Theft Alarm system)
Asht ray.............................................. .220
Assistance display (on-board com-
puter) ..................................................1 67
Assistance menu (on-board com-
puter) ..................................................1 68
Assistance system
see Driving systems
ASSYST PLUS
Displaying a service message ........2 40
Hiding a service message .............. 239
Resetting the service interval dis-
play ................................................ 240
Service message ............................ 239
Special service requirements ......... 240
ATA (Anti-Theft Alarm system)
Activating/deactivating ................... 64
Function ...........................................6 4
Switching off the alarm .................... 64
ATTENTION ASSIST
Activating/deactivating ................. 168
Display message ............................ 188
Function/notes ............................. 153
Authorized Mercedes-Benz Center
see Qualified specialist workshop
Authorized workshop
see Qualified specialist workshop
AUTO lights
Display message ............................ 185
see Lights
Automatic car wash (care) ............... 241
Automatic engine start (ECO start/
stop function) .................................... 114
Automatic engine switch-off (ECO
start/stop function) .......................... 113
Automatic headlamp mode ................ 96
Automatic transmission
Accelerator pedal position ............. 120
Automatic drive program ............... 122
Changing gear ............................... 120
Display message ............................ 193
Double-clutch function .................. 120Dri
ve program display .................... 119
Driving tips .................................... 120
Emergency running mode .............. 125
Engaging neutral ............................ 118
Engaging park position automati-
cally ............................................... 118
Engaging reverse gear ................... 118
Engaging the park position ............ 118
Gearshift recommendation ............ 123
Gliding mode ................................. 120
Important safety notes .................. 117
Kickdown ....................................... 120
Manual drive program .................... 122
Manual mode ................................. 123
Oil temperature (on-board com-
puter) ............................................. 170
Overview ........................................ 117
Problem (malfunction) ................... 125
Pulling away ................................... 112
Rocking the vehicle free ................ 120
Shift override ................................. 124
Starting the engine ........................ 112
Steering wheel paddle shifters ...... 121
Transmission position display ........ 119
Transmission positions .................. 119
Automatic transmission emer-
gency mode ....................................... 125
B
Back button ....................................... 209
BAS (Brake Assist System) ................. 59
Basic settings
see Settings
Battery (SmartKey)
Checking .......................................... 69
Important safety notes .................... 68
Replacing ......................................... 69
Battery (vehicle)
Charging ........................................ 254
Display message ............................ 187
Important safety notes .................. 253
Jump starting ................................. 254
Belt
see Seat belts
Belt warning ......................................... 44
Index5
Page 12 of 294

Emergency brakingsee BAS (Brake Assist System)
Emergency release
Driver's door .................................... 73
Trunk .............................................. .76
Vehicle .............................................7 3
Emergency Tensioning Devices
Activation ........................................ .52
Emissions control
Service and warranty information .... 25
Engine
Check Engine warning lamp .......... .203
Display message ............................ 186
ECO start/stop function ................ 113
Engine number ............................... 286
Irregular running ............................ 115
Jump-starting ................................. 254
Starting problems .......................... 115
Starting the engine with the
SmartKey ....................................... 112
Starting with the Start/Stop but-
ton ................................................. 112
Switching off .................................. 128
Tow-starting (vehicle) ..................... 259
Engine electronics
Notes ............................................. 285
Problem (malfunction) ................... 115
Engine oil
Adding ...........................................2 37
Additives ........................................ 289
Checking the oil level ..................... 235
Checking the oil level using the
dipstick .......................................... 235
Checking the oil level using the
on-board computer ........................ 236
Display message ............................ 187
Filling capacity ............................... 289
Notes about oil grades ................... 289
Notes on oil level/consumption .... 235
Temperature (on-board com-
puter) ............................................. 170
Engine oil additives
see Additives (engine oil)
Ente ring an addre
ss
see also Digital Operator's Man-
ual ..................................................2 08
ESC (Electronic Stability Control)
see ESP
®(Electronic Stability Program) ESP
®(Electronic Stability Pro-
gram)
AMG menu (on-board computer) ... 171
Characteristics ................................. 62
Deactivating/activating ................... 62
Deactivating/activating (button
in AMG vehicles) .............................. 63
Display message ............................ 175
Function/notes ................................ 62
General notes .................................. 62
Important safety information ........... 62
Warning lamp ................................. 200
ETS (Electronic Traction System) ....... 62
Exhaust check ................................... 131
Exhaust pipe (cleaning instruc-
tions) ..................................................2 45
Exterior lighting
Cleaning ......................................... 244
see Lights
Exterior mirror
Calling up a stored setting (mem-
ory function) ....................................9 5
Exterior mirrors
Adjusting ........................................ .92
Dipping (automatic) .........................9 3
Folding in/out (automatically) ......... 92
Folding in/out (electrically) ............. 92
Out of position (troubleshooting) ..... 93
Setting ............................................. 92
Storing settings (memory func-
tion) ................................................. 94
Storing the parking position ............. 93
F
Favorites
Overview ........................................ 211
Features ............................................. 219
Filler cap
see Refueling
Flat tire
Changing a wheel/mounting the
spare wheel ................................... 279
Preparing the vehicle ..................... 249
TIREFIT kit ...................................... 250
Floormats ........................................... 232
Frequencies
Mobile phone ................................. 285
10Index
Page 21 of 294

Technical dataCapacities ...................................... 286
Information .................................... 285
Tires/wheels ................................. 283
Vehicle data ................................... 291
Telephone
Accepting a call (multifunction
steering wheel) .............................. 167
Authorizing a mobile phone (con-
necting) ......................................... 215
Connecting a mobile phone
(device manager) ........................... 214
Display message ............................ 196
Introduction ................................... 166
Menu (on-board computer) ............ 166
Number from the phone book ........ 167
Redialing ........................................ 167
Rejecting/ending a call ................. 167
see also Digital Operator's Man-
ual .................................................. 208
Temperature
Coolant (display in the instrument
cluster) .......................................... 159
Engine oil (on-board computer) ...... 170
Outside temperature ...................... 159
Setting (climate control) ................ 105
Transmission oil (on-board com-
puter) ............................................. 170
Timing (RACETIMER) ......................... 172
Tire pressure
Calling up (on-board computer) ..... 267
Checking manually ........................ 266
Display message ............................ 191
Maximum ....................................... 266
Not reached (TIREFIT) .................... 251
Notes ............................................. 265
Reached (TIREFIT) .......................... 252
Recommended ............................... 264
Tire pressure monitor
Checking the tire pressure elec-
tronically ........................................ 268
Function/notes ............................. 267
General notes ................................ 267
Important safety notes .................. 267
Restarting ...................................... 269
Warning lamp ................................. 206
Warning message .......................... 268
Tire-change tool kit ........................... 249 TIREFIT kit
Important safety notes .................. 250
Storage location ............................ 249
Tire pressure not reached .............. 251
Tire pressu re re
ached .................... 252
Using ............................................. 250
Tires
Aspect ratio (definition) ................. 278
Average weight of the vehicle
occupants (definition) .................... 277
Bar (definition) ............................... 277
Changing a wheel .......................... 279
Characteristics .............................. 277
Checking ........................................ 262
Curb weight (definition) ................. 278
Definition of terms ......................... 277
Direction of rotation ...................... 279
Display message ............................ 191
Distribution of the vehicle occu-
pants (definition) ............................ 279
DOT (Department of Transporta-
tion) (definition) ............................. 277
DOT, Tire Identification Number
(TIN) ............................................... 276
GAWR (Gross Axle Weight Rating)
(definition) ..................................... 277
GVW (Gross Vehicle Weight) (def-
inition) ........................................... 278
GVWR (Gross Vehicle Weight Rat-
ing) (definition) .............................. 278
Important safety notes .................. 261
Increased vehicle weight due to
optional equipment (definition) ...... 277
Information on driving .................... 261
Kilopascal (kPa) (definition) ........... 278
Labeling (overview) ........................ 274
Load bearing index (definition) ...... 279
Load index ..................................... 276
Load index (definition) ................... 278
Maximum load on a tire (defini-
tion) ............................................... 278
Maximum loaded vehicle weight
(definition) ..................................... 278
Maximum permissible tire pres-
sure (definition) ............................. 278
Maximum tire load ......................... 276
Maximum tire load (definition) ....... 278
Notes on sport tires ....................... 261
Index19
Page 112 of 294

!Do not warm up the engine while stationary.
Pull away immediately. Avoid high engine
speeds and full throttle until the engine has
reached its operating temperature.
In vehicles with automatic transmission,
engage positions P and R only when the vehi-
cle is stationary.
Where possible, avoid spinning the drive
wheels when pulling away on slippery roads.
You could otherwise damage the drive train.
!During a cold start with low engine oil tem-
peratures (below 32 ‡) (0 †), the maximum
engine speed is restricted in order to protect
the engine. To protect the engine and main-
tain smooth engine operation, avoid driving at
full throttle when the engine is cold.
Key positions
Start/Stop button
General notes
All vehicles are equipped with a Start/Stop but-
ton.
The Start/Stop button is located in the center
console and is illuminated when the vehicle is
unlocked.
The SmartKey must be in the vehicle.
Pressing the Start/Stop button several times in
succession corresponds to the different Smart-
Key positions in the ignition lock. This is only the
case if you are not depressing the brake pedal.
If you depress the brake pedal and press the
Start/Stop button, the engine starts immedi-
ately.
A check which periodically establishes a radio
connection between the vehicle and the Smart-
Key determines whether a valid SmartKey is in
the vehicle. This occurs, for example, when
starting the engine.
If there is a SmartKey in the ignition lock, this
takes precedence over the KEYLESS-GO start
function.
To start the vehicle without actively using the
SmartKey:
Rthe SmartKey must be in the vehicle
Rthe vehicle must not be locked with the
SmartKey or KEYLESS-GO (Ypage 67) Do not keep the SmartKey:
Rwith electronic devices, e.g. a mobile phone
or another SmartKey
Rwith metallic objects, e.g. coins or metal foil
Rinside metallic objects, e.g. a metal case
This can affect the functionality of the Smart-
Key.
If you lock the vehicle with the SmartKey remote control or with KEYLESS-GO, after a short time:
Ryou will not be able to switch on the ignition
with the Start/Stop button
Ryou will no longer be able to start the engine
with the Start/Stop button until the vehicle is
unlocked again
If you lock the vehicle centrally using the button
on the driver's door (
Ypage 72), you can con-
tinue to start the engine with the Start/Stop
button.
The engine can be switched off while the vehicle
is in motion by pressing and holding the Start/
Stop button for three seconds. This function
operates independently of the ECO start/stop
automatic engine switch-off function.
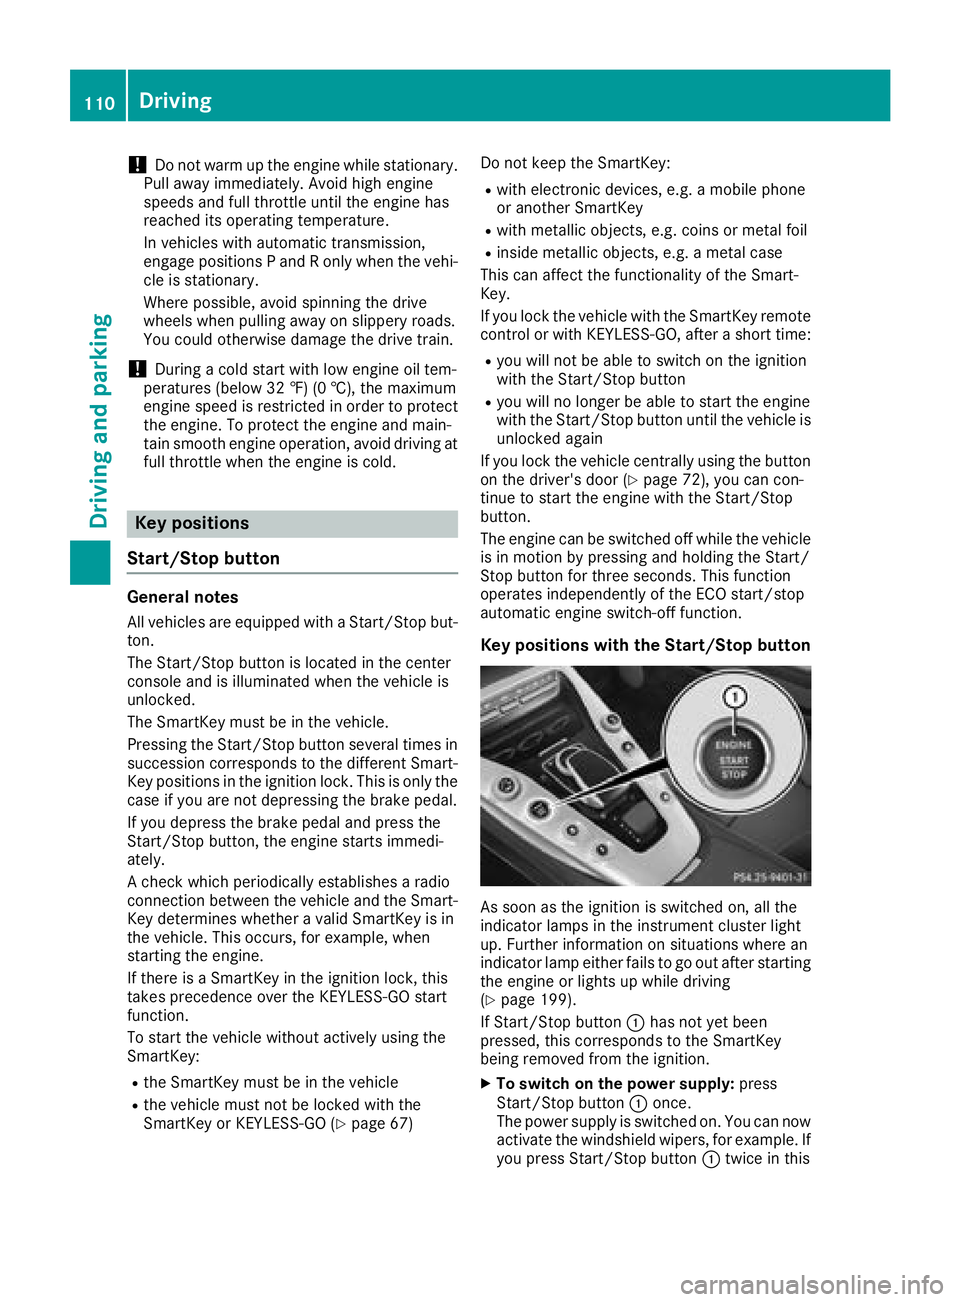
Key positions with the Start/Stop button
As soon as the ignition is switched on, all the
indicator lamps in the instrument cluster light
up. Further information on situations where an
indicator lamp either fails to go out after starting
the engine or lights up while driving
(
Ypage 199).
If Start/Stop button :has not yet been
pressed, this corresponds to the SmartKey
being removed from the ignition.
XTo switch on the power supply: press
Start/Stop button :once.
The power supply is switched on. You can now
activate the windshield wipers, for example. If you press Start/Stop button :twice in this
110Driving
Driving and parking
Page 147 of 294

Deactivating theHOL Dfunction
The HOLD function is deactivated if:
Ryou depress th eaccelerator and th etrans -
missio nis in position hork
Ryou shift th etransmissio nto position j
Ryou apply th ebrake sagain wit h acertain
amount of pressure until th eHOL Ddisplay dis -
appears from th emultifunction display
Ryou secure th evehicle usin gth eelectric park-
in g brake
iAfte r atime, th eelectric parking brake
secure sth evehicle and relieves th eservic e
brake .
The electric parking brake secure sth evehicle
automatically if th eHOLD function is activated
when th evehicle is stationary and :
Rthedriver's seat belt is no tfastene dand th e
driver's doo ris ope n
Rtheengin eis switched off, unless it is auto-
matically switched of fby th eEC Ostart/sto p
function
Ra syste mmalfunction occur s
Rthepowe rsupply is no tsufficien t
If th eelectric parking brake is no toperational, a
hor nwill soun dat regular intervals. The HOLD
function mus tthen be deactivated.
If amalfunction occurs, th etransmissio nmay
also be shifted to position jautomatically.
The Brake Immediately
messag emay also
appear in th emultifunction display.
XImmediately depress th ebrake firmly until th e
warnin gmessag ein th emultifunction display
goe sout .
The HOLD function is deactivated. If you turn of f
th eengine, take of fyour seat belt or ope nth e
driver's doo rwhen th eHOLD function is activa-
ted, ahor nwill soun dat regular intervals. The
soundin gof th ehor nalerts you to th efac tthat
th eHOLD function is still activated. If you
attempt to loc kth evehicle, th etone becomes
louder. The vehicle canno tbe locke duntil you
hav edeactivated th eHOLD function .
iAfterswitchin gof fth eengine, it can only be
started again once you hav edeactivated th e
HOLD function .
RACE START
Important safet ynotes
iRAC ESTART mus tno tbe used on normal
roads. RAC ESTART mus tonly be activated
and used on dedicated road circuits, outsid e
of publi croad use.
RAC ESTART enable soptimal acceleration from
a standin gstart .Fo rthis, asuitably high-grip
road surfac eis require dand th evehicle and tires
mus tbe in goo dworking order .
GWARNING
If you use RAC ESTART ,individual tires may
start to spi nand th evehicle could skid.
Dependin gon th eselecte dES P
®mode, there
is an increase dris kof skidding and havin gan
accident. Mak esur ethat no persons, animals
or obstacles are within range of th evehicle.
iObserv eth esafet ynote son drivin gsafet y
systems (Ypage 58).
Be sur eto rea dth esafet ynote sand informa-
tion on ES P
®(Ypage 62).
iObserveth especific servic erequirements
fo rracetrac kmode operation (Ypage 240).
Activation conditions
You can activateRAC ESTART under th efollow -
in g conditions:
Rth edoors are close d
Rtheengin eis running and th eengin eand
transmissio nare at operatin gtemperature .
Thi sis th ecas ewhen th eoil temperature dis -
play in th emultifunction display is shown in
whit e (
Ypage 170).
RESP®is functionin gcorrectl y (Ypage 62 )
Rthesteerin gwhee lis in th estraight-ahead
position
Rth evehicle is stationary and th ebrake peda lis
depressed sufficientl y(lef tfoot )
Rthetransmissio nis in position h
Rdrive program S,S+ orRAC Eis selecte d
(Ypage 116).
Driving systems14 5
Driving an d parking
Z
Page 172 of 294

The selected unit of measurement for distance
applies to:
RDigital speedometer in theTripmenu
ROdometer and the trip odometer
RTrip computer
RRange
RNavigation instructions in the Navimenu
RCruise control
RDistance Pilot DISTRONIC
RASSYST PLUS service interval display
Switching the additional speedometer
on/off
If the additional speedometer is switched on,
the speed is shown in the status bar in the mul-
tifunction display instead of the outside tem-
perature.
The additional speedometer displays the speed
in the respective unit that is not shown in the
multifunction display.
XPressòon the steering wheel to open the
menu list.
XPress :or9 on the steering wheel to
select the Settingsmenu.
XConfirm by pressing aon the steering
wheel.
XPress :or9 to select the Instru‐ment Clustersubmenu.
XPressato confirm.
XPress :or9 to select the Addi‐tional Speedometer [km/h]function.
The current selection appears.
XTo switch on/off: pressaagain.
Restoring the factory settings
XPress òon the steering wheel to open the
menu list.
XPress :or9 on the steering wheel to
select the Settingsmenu.
XConfirm by pressing aon the steering
wheel.
XPress :or9 to select the FactorySettingssubmenu.
XPressato confirm.
The Reset All Settings?function
appears.
XPress :or9 to select NoorYes.
XPress ato confirm the selection.
If you have selected Yes, the multifunction
display shows a confirmation message.
For safety reasons, the Daytime Running
Lightsfunction in theLightssubmenu is only
reset when the vehicle is stationary.
AMG menu
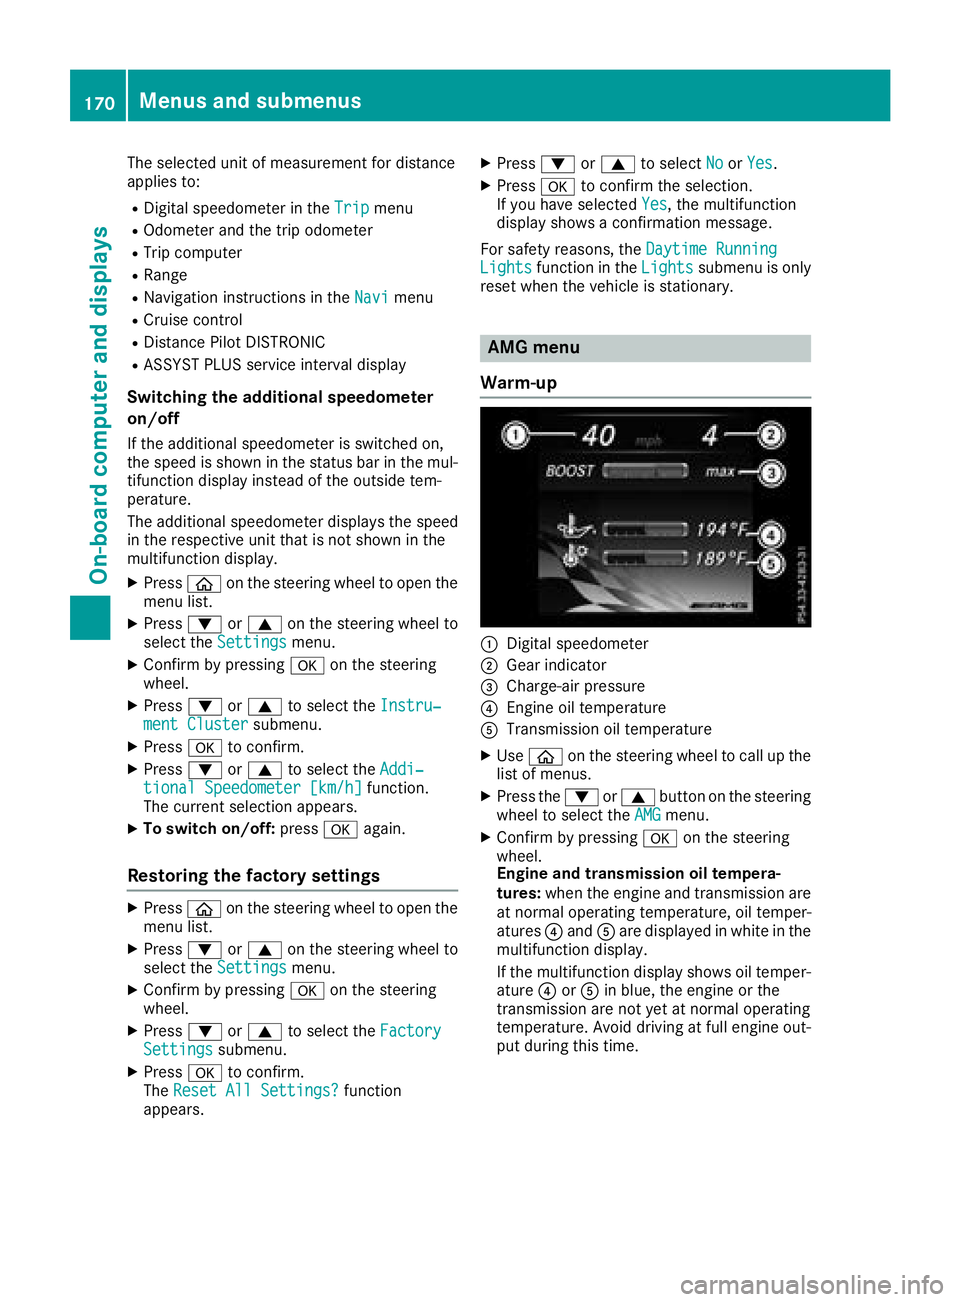
Warm-up
:Digital speedometer
;Gear indicator
=Charge-air pressure
?Engine oil temperature
ATransmission oil temperature
XUse ò on the steering wheel to call up the
list of menus.
XPress the :or9 button on the steering
wheel to select the AMGmenu.
XConfirm by pressing aon the steering
wheel.
Engine and transmission oil tempera-
tures: when the engine and transmission are
at normal operating temperature, oil temper-
atures ?and Aare displayed in white in the
multifunction display.
If the multifunction display shows oil temper-
ature ?orA in blue, the engine or the
transmission are not yet at normal operating
temperature. Avoid driving at full engine out-
put during this time.
170Menus and submenus
On-board computer and displays
Page 196 of 294

Display messagesPossible causes/consequences andMSolutions
ReversingNotPossi‐bleServiceRequiredThe sub-transmission wit hth eeve ngear shas failed. You can no longer
engage revers egear .The smoothness of th egear chang eis restricted.
The transmission is in emergenc ymode.
A warning tone also sounds.
XVisit aqualified specialist workshop .
Transmission Mal‐function StopAmalfunction has occurred in th emechanical transmission compo -
nents.
A warning tone also sounds. The transmission shift sautomatically to
position i.
XPull overand stop th evehicl esafely as soo nas possible, payin g
attention to roa dand traffic conditions.
XShift th eselector lever to position j.
XSecureth evehicl eagainst rollin gaway (Ypage 127).
XNotify aqualified specialist workshop or breakdown service.
Depres sBrake toStart EngineYou canno tstart th eengine. The engin ehas been switched off in hor
k.
XDepress th ebrak epedal and start th eengine.
Onl yShift to 'P'whe nVehicl eisSta‐tionar y
The vehicl eis moving .
XPull overand stop th evehicl esafely as soo nas possible, payin g
attention to roa dand traffic conditions.
XShift th etransmission to position j.
j
ParkingLoc kMal ‐funct. Apply Park‐ing Brake
The transmission position jcanno tbe selected.
XMak esur ethat th eelectric parking brak eis applied.
XPreven tth evehicl efrom rollin gaway before you leav eit
(Ypage 280).
XVisit aqualified specialist workshop .
d
Transmission OilCoolingMalfunction
The transmission coolan tpump is faulty. The transmission may over-
heat .
XIn th eon-boar dcomputer, select th eAMGmen uand chec kth e
transmission oil temperature (Ypage 170).
XAvoid excessive loading,e.g. due to dynamic driving.
XIf th etransmission oil temperature is belo w24 8°F (12 0°C) ,drive
on to th eneares tqualified specialist workshop .
d
Trans. Oil Overhea‐ted Drive on withCare
The transmission oil has overheated.
Manual mod eM and temporar ymanual drive progra mare no longer
available. Only th eComfor tdrive progra mis available for th etrans -
mission .The engin eoutput is reduce daccording to th edegree of
overheating .
XAllow thetransmission oil to cool by adopting adefensiv edrivin g
style.
194Display messages
On-board computer and displays
Page 237 of 294

XMake sure that the windshield wipers are
turned off.
XPull release lever:on the hood.
The hood is released.
XReach into the gap, pull hood catch handle ;
up and lift the hood.
If you lift the hood, the hood is opened and
held open automatically by the gas-filled
strut.
Closing the hood
GWARNING
When opening and closing the hood, it may
suddenly fall into the closed position. There is a risk of injury to persons within range of
movement of the hood.
Open and close the hood only when no one is
within its range of movement.
XLower the hood and let it fall from a height of
approximately 8 in (20 cm).
XCheck that the hood has engaged properly.
If the hood can be raised slightly, it is not
properly engaged. Open it again and close it
with a little more force.
Engine oil
Notes on the oil level
Depending on your driving style, the vehicle
consumes up to 0.9 US qt (0.8 liters) of oil per
600 miles (1,000 km). The oil consumption may be higher than this when the vehicle is new or if
you frequently drive at high engine speeds.
Depending on the engine, the oil dipstick may be
in a different location.
It is only possible to correctly measure the oil
level when:
Rthe engine is at normal operating temperature
Rthe vehicle is parked on a level surface
Rthe engine is left running in neutral for at least
30 seconds before switching off
This applies when checking the oil level using
the oil dipstick or on-board computer.
Checking the oil level using the oil dip-
stick
GWARNING
Certain components in the engine compart-
ment, such as the engine, radiator and parts
of the exhaust system, can become very hot.
Working in the engine compartment poses a
risk of injury.
Where possible, let the engine cool down and touch only the components described in the
following.
It is only possible to correctly measure the oil
level with the oil dipstick when the engine is at
normal operating temperature and in a period of
2 to minutes after the engine has been switched
off.
Engine compartment235
Maintenance and care
Z