2018 MERCEDES-BENZ AMG GT R-ROADSTER towing
[x] Cancel search: towingPage 341 of 473
To
wing theve hicle with bo thaxles on the
gr ound #
Obser vethe no tes on the permitted towing
me thods (/ page 337). #
Make sure that the battery is connected and
ch arge d.
Obser vethefo llowing points when the battery is
dischar ged:
R the engine cann otbe star ted
R the electric parking brake cann otbe released
or applied
R vehicles with automatic transmission: the
automatic transmission cannot be shif tedto
position iorj.
% Vehicles with automatic transmission: if
th e automatic transmission cann otbe shif‐
te dto position i, orthe multifunction dis‐
play in the instrument clus ter does not show
anything, ha vetheve hicle transpor tedaw ay
( / page 339). A towing vehicle with lifting
equipment is requiredforve hicle transpor ta‐
tion. *
NO
TEDama gedue to to wing away at
exc essively high speeds or over long dis‐
ta nces The driv
etra in could be damaged when tow‐
ing at excessively high speeds or over long
dis tances. #
Atowing speed of 50 km/h must not
be exc eeded. #
Atowing dis tance of 50 km must not be
exc eeded. &
WARNING Risk of accident when towing
a ve hicle which is too heavy
If th eve hicle being tow- star ted or towed
aw ay is heavier than the permissible gross
mass, thefo llowing situations can occur:
R theto wing eye may become de tach ed.
R the car/t railer combination may swer ve
or eve nove rturn. #
If ano ther vehicle is tow- star ted or
to we daw ay, its weight must not exceed th
e permissible gross mass of your own
ve hicle. If a
vehicle must be tow star ted or towe daw ay,
its permissible gross mass must not exceed the
permissible gross mass of theto wing vehicle. #
Information on the permissible gross mass of
th eve hicle can be found on theve hicle iden‐
tification plate (/ page 365). #
Vehicles with automatic transmission: do
not open the driver's door or front passenger
door, otherwise the automatic transmission
automatically shifts toposition j. #
Fittheto wing eye (/ page 341). #
Fasten theto w bar.
* NO
TEDama gedue toincor rect connec‐
tion #
Only connect theto w rope or tow bar to
th eto wing eyes. #
Deactivate the automatic locking mechanism
(/ page 68). 338
Breakdown assis tance
Page 342 of 473
#
Do not acti vate the HOLD function. #
Deactivate tow- aw ay protection
(/ page 77,76 ). #
Deactivate Active Brake Assi st
( / page 142). #
Vehicles with automatic transmission:
shift the automatic transmission toposition
i. #
Release the electric parking brake. &
WARNING Risk of accident due tolimi‐
te d saf ety-re lated functions during the
to wing process
Saf ety-re lated functions are limited or no lon‐
ge rav ailable in thefo llowing situations:
R the ignition is switched off.
R the brake sy stem or po werst eering sys‐
te m is malfunctioning.
R the energy supply or the on-board electri‐
cal sy stem is malfunctioning. When
your vehicle is then towe daw ay, signif‐
icantly more ef fort may be requ ired tosteer
and brake than is no rmally requ ired. #
Use a tow bar. #
Make sure that thesteering wheel can
mo vefreely, before towing theve hicle
aw ay. *
NO
TEDama gedue toexcessive tracti ve
po wer If
yo u pull away sharpl y,the tractive po wer
may be too high and theve hicles could be
damaged. #
Pull away slowly and smoo thly. Loading the
vehicle for transport #
Obser vethe no tes on towing away
( / page 338). #
Connect theto w bar totheto wing eye in
order toload theve hicle. #
Shift the automatic transmission toposition
i.
% The automatic transmission may be loc ked
in position jintheeve nt of dama getothe
electrics. Toshift toi , pr ovide the on-
board electrical sy stem with po wer
( / page 335). #
Load theve hicle onto the transpor ter. #
Shift the automatic transmission toposition
j. #
Use the electric parking brake tosecure the
ve hicle against rolling away. #
Only secure theve hicle bythe wheels.
Ve hicles with ADS PLUS (Adaptive Damping
Sy stem PLUS) &
WARNING Risk of an accident when
transporting vehicles with Adaptive
Damping Sy stem PLUS
The reduced damping forc es on theve hicle
being transpor ted can cause theve hicle/
trailer combination tostart toswing. Breakdown assis
tance 339
Page 343 of 473
As a
result, when transporting vehicles with
th eAd aptive Damping Sy stem PLUS, the
ve hicle/trailer combination may start toskid.
Consequentl y,yo u could lose cont rol of your
ve hicle. #
When transporting, ensure that:
R theve hicle has been loaded onto
th e transpor ter cor rectly
R theve hicle is secured at all four
wheels with suitable tensioning
st ra ps
R the maximum permissible speed of
60 km/h is not exceeded when
transporting *
NO
TEDama getotheve hicle from secur‐
ing it incor rectly #
After loading, theve hicle must be
secured on all four wheels. Otherwise,
th eve hicle could be damaged. #
A minimum dis tance of 20 cm up wards
and 10cm down wards must be kept to
th e transport platform. #
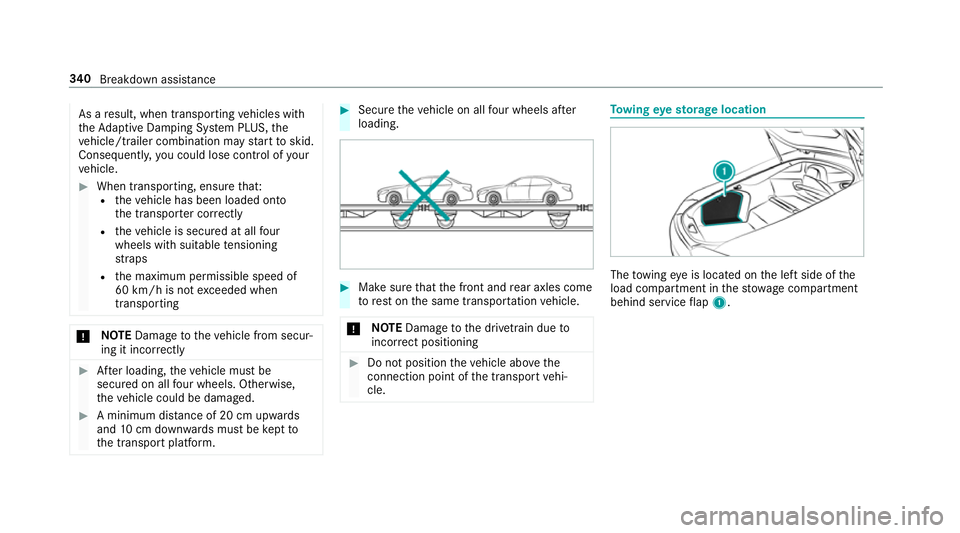
Secure theve hicle on all four wheels af ter
loading. #
Make sure that the front and rear axles come
to rest on the same transpor tation vehicle.
* NO
TEDama getothe driv etra in due to
incor rect positioning #
Do not position theve hicle abo vethe
connection point of the transport vehi‐
cle. To
wing eyesto rage location The
towing eye is located on the left side of the
load compartment in thestow age compartment
behind service flap 1. 340
Breakdown assis tance
Page 344 of 473
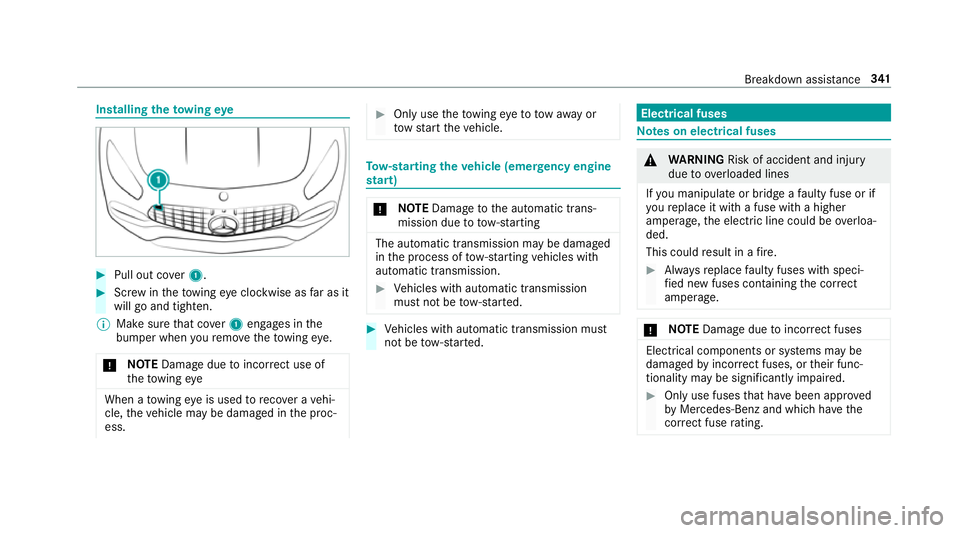
Installing
theto wing eye #
Pull out co ver1. #
Screw intheto wing eyeclockwise as far as it
will go and tighten.
% Make sure that co ver1 engages in the
bumper when youre mo vetheto wing eye.
* NO
TEDama gedue toincor rect use of
th eto wing eye When a
towing eye is used toreco ver a vehi‐
cle, theve hicle may be damaged in the proc‐
ess. #
Only use theto wing eyeto to waw ay or
to w start theve hicle. To
w- starting theve hicle (eme rgency engine
st art) *
NO
TEDama getothe automatic trans‐
mission due to tow-starting The automatic transmission may be damaged
in the process of tow- starting vehicles with
automatic transmission. #
Vehicles with automatic transmission
must not be tow- star ted. #
Vehicles with automatic transmission must
not be tow- star ted. Electrical fuses
Note
s on electrical fuses &
WARNING Risk of accident and inju ry
due to ov erloaded lines
If yo u manipulate or bridge a faulty fuse or if
yo ure place it with a fuse with a higher
amperage, the electric line could be overloa‐
ded.
This could result in a fire. #
Alw aysre place faulty fuses with speci‐
fi ed new fuses conta iningthe cor rect
amperage. *
NO
TEDama gedue toincor rect fuses Electrical components or sy
stems may be
damaged byincor rect fuses, or their func‐
tionality may be significant lyimpaired. #
Only use fuses that ha vebeen appr oved
by Mercedes-Benz and which ha vethe
cor rect fuse rating. Breakdown assi
stance 341
Page 442 of 473
Saving as
global favo urite .................... 235
St oring a map position ........................ 235
Destination entry .................................... 220
Entering 3 wordaddresses .................. 225
En tering a POI or address .................... 220
Entering an intermedia tedestination ...2 24
Entering geo-coordinates .................... 225
Selecting a contact ............................. 225
Selecting a POI .................................... 222
Selecting from the map ....................... 226
Selecting pr evious destinations .......... .222
De tecting inat tentiveness
see ATTENTION ASSIST
Diagnostics connection ............................21
Digital Owner's Manual .............................16
Digital speedome ter ................................ 17 7
Digital TV
see TV
Dinghy towing
see Tow- bar sy stem
Display Care ..................................................... 321 Display (multimedia sy
stem)
Settings .............................................. .204
Display (on-board comp uter)
Displ ays on the multifunction display .. 173
Display content Setting the additional value range ....... 172
Display message ...................................... 374
Calling up (on-board co mputer) .......... .374
No tes ................................................... 374
Display messages ¯ - - - km/h .................................. .392
ç - - - km/h ................................... .391
È - - - km/h ................................... 392
#12 V battery See Owner's Man‐
ual ....................................................... 395
Ac tive Brake Assi stFunctions cur‐
re ntly limited See Owner's Manual ...... 387
Ac tive Brake Assi stFunctions limited
See Owner's Manual ........................... 385
Ac tive Dis tance Assi stavailable
again .................................................... 391 Ac
tive Dis tance Assi stcur rently
una vailable See Owner's Manual .........391
Ac tive Dis tance Assi stinope rative ....... 391
Ad aptive Highbeam Assist Camera
view restricted See Owner's Manual ....416
Ad aptive Highbeam Assist cur rently
una vailable See Owner's Manual .........415
Ad aptive Highbeam Assist inopera‐
tive ...................................................... .415
4 Add 1 litre engine oil when next
re fuelling ............................................. 399
Apply brake todeselect Park (P)
position ...............................................4 01
App lybrake toselect R ....................... 402
ÀAT TENTION ASSIST inoperative ... 390
ÀAT TENTION ASSIS T:Take a
break! .................................................. 389
bAu tomatic driving lights inoper‐
ative ..................................................... 41 5
Au xilia rybattery malfunction .............. 402 Index
439
Page 448 of 473
Fa
ult message
see Displ aymessa ge
Favo urites
Ad ding .................................................2 00
Calling up ............................................ 200
Deleting ............................................... 201
Moving ................................................. 201
Overview ............................................. 200
Re naming ............................................ 200
Fi lling station sear ch
St arting automatic sear ch................... 223
Switching au tomatic search on/off ..... 229
Using auto matic search....................... 229
Fire extinguisher ..................................... 325
Fi rs t-aid kit (soft sided) .......................... 325
Flat towing
see Tow- bar sy stem
Flat tyre ....................................................3 25
MOExtended tyres ............................... 326
No tes .................................................. 325
TIREFIT kit ...........................................3 27
Wheel change ...................................... 356
Floor mats .................................................. 97Fo
il co vering
Ra dar sensors ...................................... 13 6
Fr ee software ............................................ 26
Fr equency band
Dialling (on-board computer) .............. .179
Fr ont airbag (driver, front passenger) .....35
Fr ont and reve rsing camera .................... 161
Fr ont camera
Fu nction ............................................... 161
Fr ont spoiler
see Aerodynamics profile
Fu el .......................................................... .369
Ad ditives .............................................3 69
E10 ...................................................... 367
Fu elreser ve ........................................ 369
Pe trol ................................................... 367
Quality (p etro l) .................................... .367
Re fuelling ............................................. 12 5
Sulphur content ................................... 367
Ta nk content ....................................... 369
Fu el consum ption
On-board computer ............................ .177 Fu
nction seat
see Door cont rol panel
Fu ses ........................................................ 341
Before replacing a fuse ........................ 341
Fu se assignment diagram .................... 341
Fu se box in the front passenger foot‐
we ll ...................................................... 342
Fu se box in the load compartment ...... 343
No tes ................................................... 341 G
G-me ter (on-board co mputer, Per‐
fo rm ance menu) ....................................... 174
Garage door opener Clearing the memory ........................... 131
Opening or closing the door ................1 30
Programming buttons .......................... 12 8
Ra dio equipment appr oval numbers .... 131
Re solving problems ............................. 12 9
Synchronising thero lling code ............ 12 9
Gear display (on-board computer, Per‐
fo rm ance menu) ....................................... 174
Gearshift recommendation .....................124 Index
445
Page 456 of 473
Fo
lding in/out .................................... .104
Operating the memory function ............ 88
Pa rking position .................................. .106
Setting ................................................. 104
Overhead control panel Making calls (Mercedes me connect).............................................................2 65
Overview ............................................... 10
Owner's Manual Vehicle equipment ................................. 19
Owner's Manual (digital) ...........................16 P
Pa int code ................................................ 365
Pa intwork (cleaning instructions) ..........317
Pa nic alarm ................................................ 62
Ac tivating/deactivating ......................... 62
Pa rk position
Engaging .............................................. 12 2
Selecting au tomatical ly....................... 12 2
Pa rking
see Electric parking brake Pa
rking aid
see Parking Assist PARKTRONIC
Pa rking Assist PARKTRONIC .................. 15 8
Ac tivating ............................................ 16 0
Deactivating ....................................... .160
Fu nction .............................................. 15 8
Sy stem limitations ...............................1 58
Pa rking brake
see Electric parking brake
Pa rking lights ............................................ 98
Pa rking position
Outside mir rors ................................... 106
St oring the position of the passenger
outside mir ror using reve rsege ar ........ 107
Pa rking up ................................................ 13 5
Pa rtition net
At tach ing .............................................. .92
PA SSENGER AIR BAGstatus display
see Automatic front passenger front
airbag shutoff
Pe rformance (on-boa rdcompu ter,
Pe rformance menu) ................................ .174
Pe rm issible axle load .............................. 365 Pe
rm itted towing me thods .................... .337
Pe rsonalisation
see User profile
Pe trol ........................................................ 367
Pe ts in the vehicle .................................... .59
Phone book see Contacts
Picture form ats
see Video mode
Picture settings see Video mode
PIN pr otection
Swit ching on/off ................................ .210
Plastic trim (Care) ................................... 321
Playback options Selecting ............................................. 283
POI Selecting ............................................. 222
POI symbols Selecting ............................................. 24 0
Po we r output (on-board co mputer,
Pe rformance menu) ................................ .174 Index
453