2018 MERCEDES-BENZ AMG GT R-ROADSTER clock
[x] Cancel search: clockPage 94 of 473
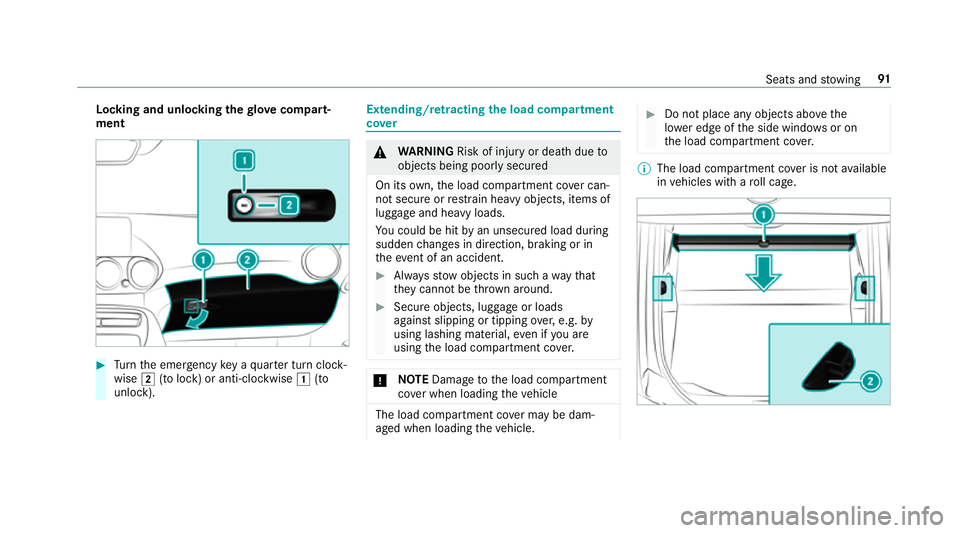
Locking and unlocking
thegl ove compa rt‐
ment #
Turn the emer gency key a quarter turn clock‐
wise 2(to lock) or anti-clockwise 1(to
unlock). Extending/r
etra cting the load compa rtment
co ver &
WARNING Risk of inju ryor death due to
objects being poorly secured
On its own,the load compartment co ver can‐
not secure or restra in heavy objects, items of
luggage and heavy loads.
Yo u could be hit byan unsecured load during
sudden changes in direction, braking or in
th eev ent of an accident. #
Alw aysstow objects in such a wayth at
th ey cannot be thro wn around. #
Secure objects, luggage or loads
against slipping or tipping over,e.g. by
using lashing material, even if you are
using the load compartment co ver. *
NO
TEDama getothe load compartment
co ver when loading theve hicle The load compartment co
ver may be dam‐
aged when loading theve hicle. #
Do not place any objects abo vethe
lo we r edge of the side windo wsor on
th e load compartment co ver. %
The load compartment co ver is not available
in vehicles with a roll cage. Seats and
stowing 91
Page 130 of 473
*
NO
TEDo not use diesel torefuel vehi‐
cles with a petrol engine. If
yo u acciden tally refuel with the wrong fuel:
R Do not switch the ignition on. Otherwise
fuel can enter the engine.
Even small amounts of the wrong fuel
could result in damage tothe fuel sy stem
and the engine. The repair costs are high. #
Consult a qualified specialist workshop. #
Have the fuel tank and fuel lines
drained compl etely. *
NO
TEDama getothe fuel sy stem caused
by ove rfilled fuel tanks. #
Only fill th e fuel tank until the pump
nozzle switches off. *
NO
TEFuel may spr ayout when you
re mo vethe fuel pump nozzle. #
Only fill th e fuel tank until the pump
nozzle switches off. Re
quirements:
R The vehicle is unloc ked.
% Do not get into theve hicle again during the
re fuelling process. Otherwise, electros tatic
ch arge could build up again.
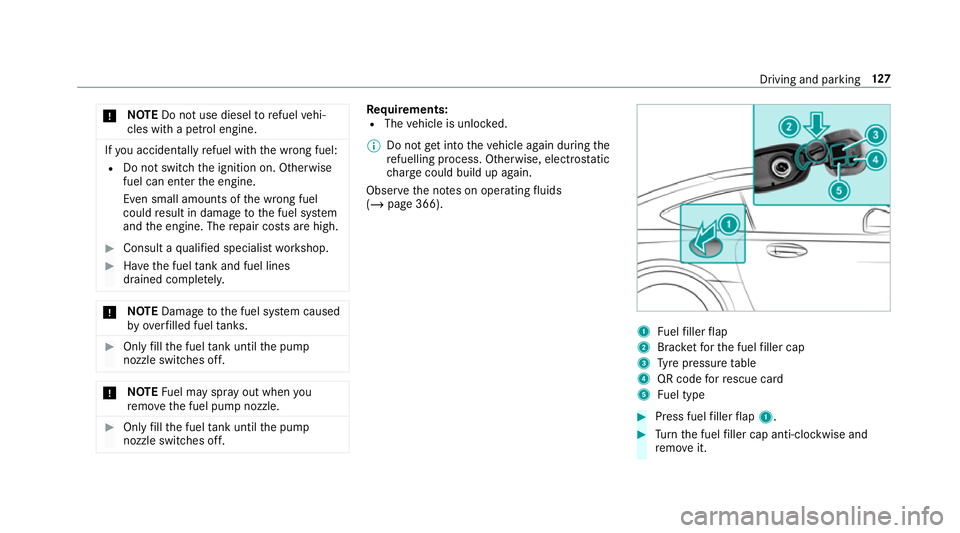
Obser vethe no tes on operating fluids
(/ page 366). 1
Fuelfiller flap
2 Brac ketfo rth e fuel filler cap
3 Tyre pressure table
4 QR code forre scue card
5 Fuel type #
Press fuel filler flap 1. #
Turn the fuel filler cap anti-clockwise and
re mo veit. Driving and parking
127
Page 131 of 473
#
Insert the fuel filler cap into brac ket2. #
Comp lete ly inse rtthe pump nozzle into the
ta nk filler nec k,hook in place and refuel. #
Only fill th e fuel tank until the pump nozzle
switches off. #
Replace the cap on thefiller neck and turn
clockwise until it engages audibl y.#
Close the fuel filler flap. Pa
rking Garage door opener
Prog
ramming buttons for the garage door
opener &
DANG ER Risk of fata l injuries due to
ex haust gases
Combustion engines emit poisonous exhaust
ga ses such as carbon monoxide. Inhaling
th ese exhaust gases is hazardous tohealth
and can lead topoisoning. #
Never lea vethe engine running in an
enclosed space wi thout suf ficient venti‐
lation. &
WARNING Risk of inju rywhen opening
or closing a door with thega rage door
opener
When you operate or program the door with
th e integrated garage door opener, people in
th era nge of mo vement of the door may
become trapped or stru ck bythe door. #
When using the integrated garage door
opener, alw ays make sure that nobody
is within thera nge of mo vement of the
door. Re
quirements:
R The vehicle has been par ked outside the
ga rage and outside thera nge of mo vement
of the door.
R The engine is switched off.
R The ignition is switched on. %
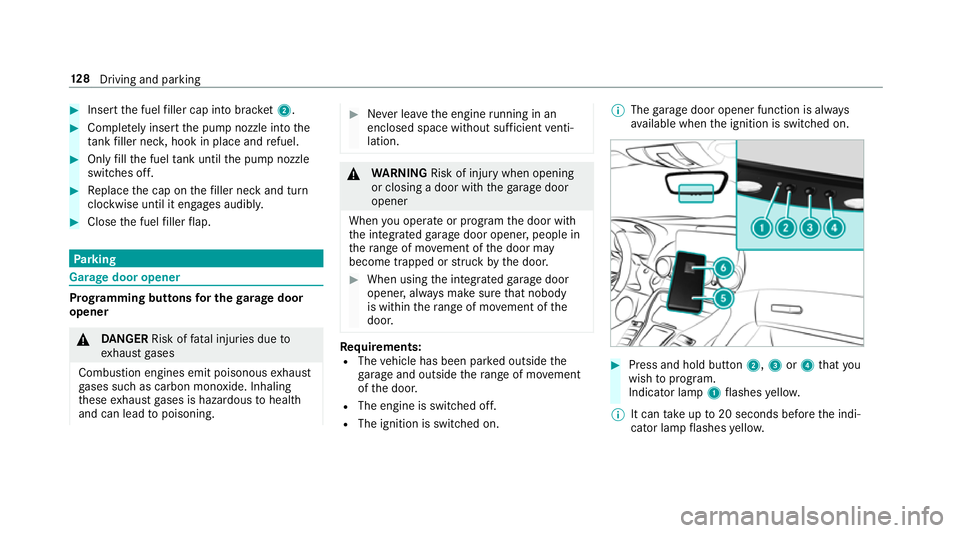
The garage door opener function is alw ays
av ailable when the ignition is switched on. #
Press and hold button 2,3or4 that you
wish toprog ram.
Indicator lamp 1flashes yello w.
% It can take up to20 seconds before the indi‐
cator lamp flashes yello w. 12 8
Driving and pa rking
Page 158 of 473
R
type of tyre used
R road characteristics
R tyre conditions, such as temp erature or wear
R personal driving style #
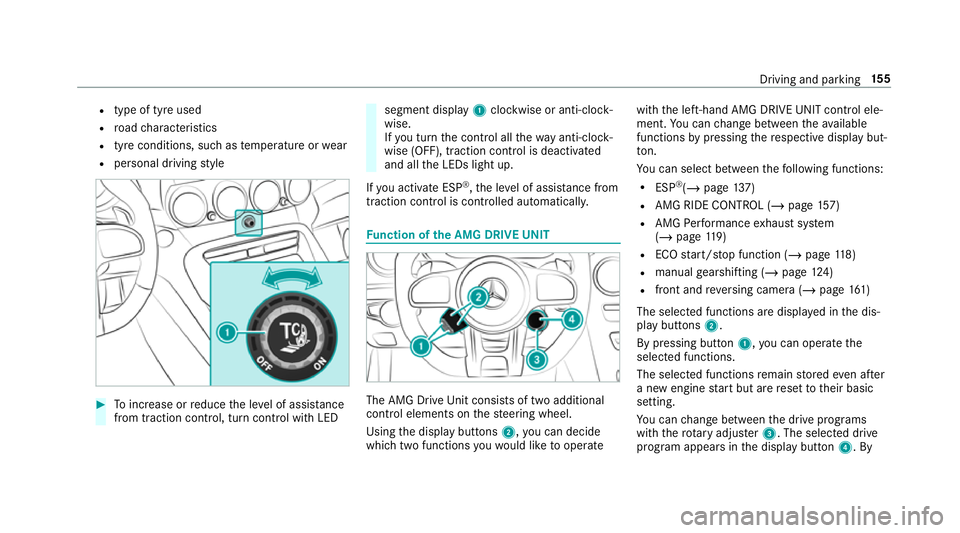
Toinc rease or reduce the le vel of assis tance
from traction control, turn control wi thLED segment display
1clockwise or anti-clock‐
wise.
If yo u turn the control all thewa y anti-clo ck‐
wise (OFF), traction control is deactivated
and all the LEDs light up.
If yo u activate ESP ®
,th e le vel of assis tance from
traction control is controlled au tomatically. Fu
nction of the AMG DRIVE UNIT The AMG Drive
Unit consists of two additional
control elements on thesteering wheel.
Using the display buttons 2,you can decide
which two functions youwo uld like tooperate with
the left-hand AMG DRIVE UNIT control ele‐
ment. You can change between theav ailable
functions bypressing there spective display but‐
to n.
Yo u can select between thefo llowing functions:
R ESP ®
(/ page 137)
R AMG RIDE CONTROL (/ page157)
R AMG Performance exhaust sy stem
(/ page 119)
R ECO start/ stop function (/ page118)
R manual gearshifting (/ page124)
R fron t and reve rsing camera (/ page161)
The selected functions are displa yed in the dis‐
play buttons 2.
By pressing button 1,you can operate the
selected functions.
The selected functions remain stored even af ter
a new engine start but are reset totheir basic
setting.
Yo u can change between the drive programs
with thero tary adjus ter3. The selected drive
program appears in the display button 4. By Driving and parking
15 5
Page 201 of 473
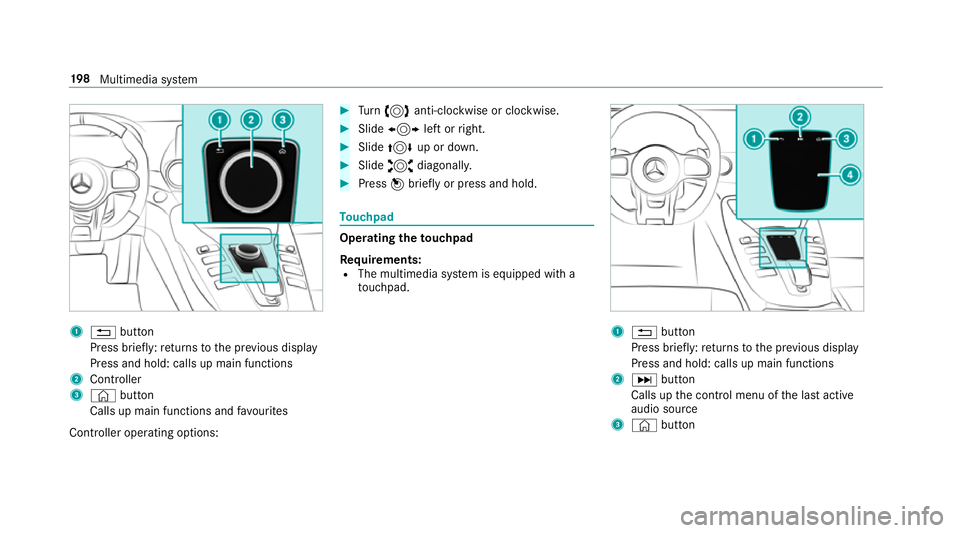
1
% button
Press brief ly:re turns tothe pr evious display
Press and hold: calls up main functions
2 Cont roller
3 © button
Calls up main functions and favo urites
Controller operating options: #
Turn 3 anti-clockwise or clo ckwise. #
Slide 1 left orright. #
Slide 4 up or down. #
Slide 2 diagonally. #
Press 7brief lyor press and hold. To
uchpad Operating
theto uchpad
Re quirements:
R The multimedia sy stem is equipped with a
to uchpad. 1
% button
Press brief ly:re turns tothe pr evious display
Press and hold: calls up main functions
2 D button
Calls up the control menu of the last active
audio source
3 © button 19 8
Multimedia sy stem
Page 315 of 473
#
Allow the engine tocool down and only
to uch co mponent parts described in
th efo llowing. &
WARNING Risk offire and injury from
engine oil
If engine oil comes into con tact wi thhot
component parts in the engine compart‐
ment, it may ignite. #
Make sure that no engine oil is spilled
next tothefiller opening. #
Allow the engine tocool off and thor‐
oughly clean the engine oil from compo‐
nent parts before starting theve hicle. *
NO
TEEngine dama gecaused byan
incor rect oil filter, incor rect oil or addi‐
tives #
Do not use engine oils or oil filters
which do not cor respond tothe specifi‐
cations explicitly prescribed forthe
service inter vals. #
Do not alter the engine oil or oil filter in
order toachie velonger change inter vals
th an presc ribed. #
Do not use additives. #
Follow the instructions in the service
inter val display rega rding the oil
ch ange. *
NO
TEDama gecaused bytopping up too
much engine oil To
o much engine oil can damage the engine
or the catalytic con verter. #
Have excess engine oil remo ved at a
qu alified specialist workshop. #
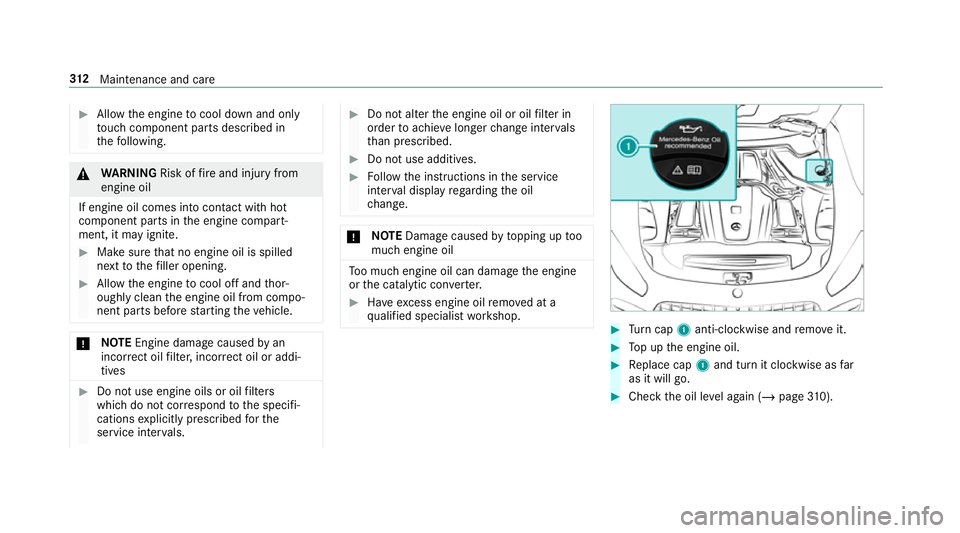
Turn cap 1anti-clockwise and remo veit. #
Top up the engine oil. #
Replace cap 1and turn it clockwise as far
as it will go. #
Check the oil le vel again (/ page310). 312
Maintenance and care
Page 316 of 473
Checking
the coolant le vel &
WARNING Risk of bu rns from hot com‐
ponent parts in the engine compartment
Cer tain components in the engine compart‐
ment can be very hot, e.g. the engine, the
ra diator and parts of theex haust sy stem. #
Allow the engine tocool down and only
to uch co mponent parts described in
th efo llowing. &
WARNING Risk of scalding from hot
coolant
The engine cooling sy stem is pressurised,
particularly when the engine is warm. If you
open the cap, you could be scalded byhot
coolant spr aying out. #
Let the engine cool down before open‐
ing the cap. #
When opening the cap, wear pr otective
gl ove s and saf etygl asses. #
Open the cap slowly torelease pres‐
sure. #
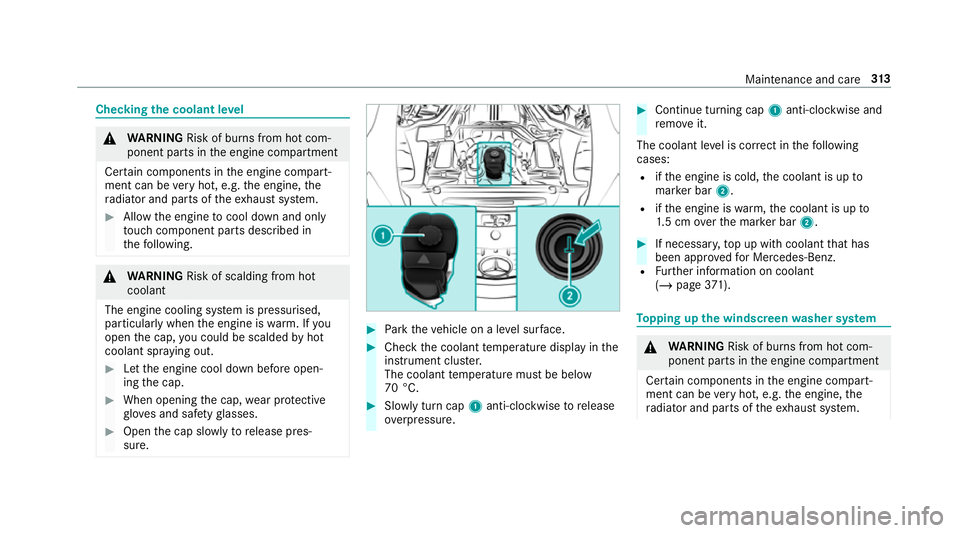
Park theve hicle on a le vel sur face. #
Check the coolant temp erature display in the
instrument clus ter.
The coolant temp erature must be below
70 °C. #
Slowly turn cap 1anti-clockwise torelease
ove rpressure. #
Continue turning cap 1anti-clockwise and
re mo veit.
The coolant le vel is cor rect in thefo llowing
cases:
R ifth e engine is cold, the coolant is up to
mar ker bar 2.
R ifth e engine is warm,th e coolant is up to
1. 5 cm overth e mar ker bar 2. #
If necessar y,top up with coolant that has
been appr ovedfo r Mercedes-Benz.
R Further information on coolant
(/ page 371). To
pping up the windsc reen washer sy stem &
WARNING Risk of bu rns from hot com‐
ponent parts in the engine compartment
Cer tain components in the engine compart‐
ment can be very hot, e.g. the engine, the
ra diator and parts of theex haust sy stem. Maintenance and care
313
Page 344 of 473
Installing
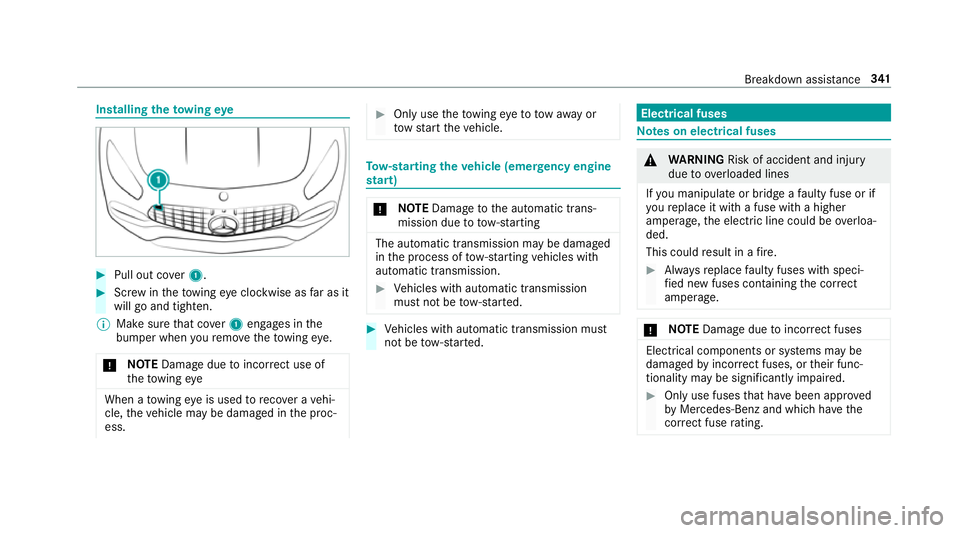
theto wing eye #
Pull out co ver1. #
Screw intheto wing eyeclockwise as far as it
will go and tighten.
% Make sure that co ver1 engages in the
bumper when youre mo vetheto wing eye.
* NO
TEDama gedue toincor rect use of
th eto wing eye When a
towing eye is used toreco ver a vehi‐
cle, theve hicle may be damaged in the proc‐
ess. #
Only use theto wing eyeto to waw ay or
to w start theve hicle. To
w- starting theve hicle (eme rgency engine
st art) *
NO
TEDama getothe automatic trans‐
mission due to tow-starting The automatic transmission may be damaged
in the process of tow- starting vehicles with
automatic transmission. #
Vehicles with automatic transmission
must not be tow- star ted. #
Vehicles with automatic transmission must
not be tow- star ted. Electrical fuses
Note
s on electrical fuses &
WARNING Risk of accident and inju ry
due to ov erloaded lines
If yo u manipulate or bridge a faulty fuse or if
yo ure place it with a fuse with a higher
amperage, the electric line could be overloa‐
ded.
This could result in a fire. #
Alw aysre place faulty fuses with speci‐
fi ed new fuses conta iningthe cor rect
amperage. *
NO
TEDama gedue toincor rect fuses Electrical components or sy
stems may be
damaged byincor rect fuses, or their func‐
tionality may be significant lyimpaired. #
Only use fuses that ha vebeen appr oved
by Mercedes-Benz and which ha vethe
cor rect fuse rating. Breakdown assi
stance 341