2018 MERCEDES-BENZ AMG GT COUPE warning lights
[x] Cancel search: warning lightsPage 63 of 294
ESP®(Electronic Stability Program)
General notes
iObserve the "Important safety notes" sec-
tion (Ypage 57).
ESP
®monitors driving stability and traction, i.e.
power transmission between the tires and the
road surface.
If ESP
®detects that the vehicle is deviating from
the direction desired by the driver, one or more
wheels are braked to stabilize the vehicle. The
engine output is also modified to keep the vehi-
cle on the desired course within physical limits.
ESP
®assists the driver when pulling away on
wet or slippery roads. ESP®can also stabilize
the vehicle during braking.
ETS (Electronic Traction System)
iObserve the "Important safety notes" sec-
tion (Ypage 57).
ETS traction control is part of ESP
®.
Traction control brakes the drive wheels indi-
vidually if they spin. This enables you to pull
away and accelerate on slippery surfaces, for
example if the road surface is slippery on one
side. In addition, more drive torque is transfer-
red to the wheel or wheels with traction.
Traction control remains active, even if you
deactivate ESP
®.
Important safety notes
iObserve the "Important safety notes" sec-
tion (Ypage 57).
GWARNING
If ESP
®is malfunctioning, ESP®is unable to
stabilize the vehicle. Additionally, further driv-
ing safety systems are deactivated. This
increases the risk of skidding and an accident.
Drive on carefully. Have ESP
®checked at a
qualified specialist workshop.
ESP
®is only deactivated if the åwarning
lamp is lit continuously.
When SPORT handling mode is activated, the
M warning lamp lights up in the instrument
panel. When the
åandh warning lamps light up
continuously, ESP
®is not available due to a mal-
function.
Observe the information on warning lamps
(
Ypage 196) and display messages which may
be shown in the instrument cluster
(
Ypage 170).
Only use wheels with the recommended tire
sizes. Only then will ESP
®function properly.
Characteristics of ESP®
General information
If the ÷ ESP®warning lamp goes out before
beginning the journey, ESP®is automatically
active.
If ESP
®intervenes, the ÷ESP®warning lamp
flashes in the instrument cluster.
If ESP
®intervenes:
XDo not deactivate ESP®under any circum-
stances.
XOnly depress the accelerator pedal as far as
necessary when pulling away.
XAdapt your driving style to suit the prevailing
road and weather conditions.
ECO start/stop function
The ECO start/stop function switches the
engine off automatically when the vehicle stops
moving. The engine starts automatically when
the driver wants to pull away again. ESP
®
remains in its previously selected status. Exam-
ple: if ESP®was deactivated before the engine
was switched off, ESP®remains deactivated
when the engine is switched on again.
Deactivating/activating ESP®
Important safety notes
iObserve the "Important safety notes" sec-
tion (Ypage 57).
You can select between the following states of
ESP
®:
RESP®is activated
RSPORT handling mode is activated
RESP®is deactivated
Driving safety systems61
Safety
Z
Page 64 of 294
GWARNING
If you deactivate ESP
®, ESP®no longer sta-
bilizes the vehicle. There is an increased risk
of skidding and an accident.
Only deactivate ESP
®in the situations descri-
bed in the following.
GWARNING
When SPORT handling mode is activated,
there is a greater risk of skidding and acci-
dents.
Only activate SPORT handling mode in the sit-
uations described in the following.
In the following situations, it may be better to
activate SPORT handling mode or deactivate
ESP
®:
Rwhen using snow chains
Rin deep snow
Ron sand or gravel
Ron specially designated roads when the vehi-
cle's own oversteering and understeering
characteristics are desired
Driving in SPORT handling mode or without
ESP
®requires an extremely qualified and expe-
rienced driver.
Activate ESP
®as soon as the situations descri-
bed above no longer apply. ESP®will otherwise
not be able to stabilize the vehicle if the vehicle
starts to skid or a wheel starts to spin.
!Avoid spinning the driven wheels for an
extended period with ESP®deactivated. You
could otherwise damage the drivetrain.
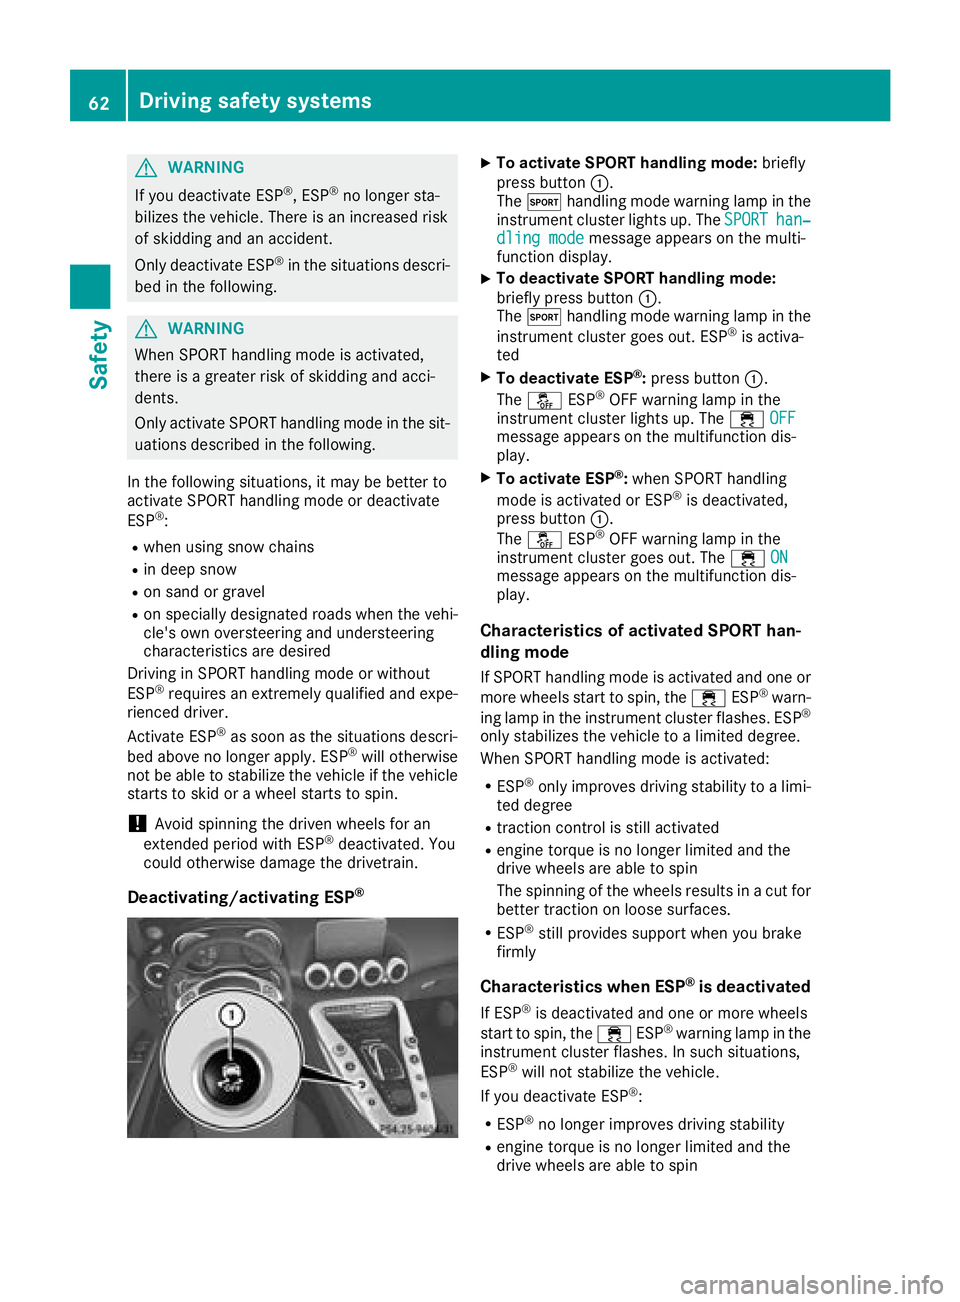
Deactivating/activating ESP®
XTo activate SPORT handling mode: briefly
press button :.
The M handling mode warning lamp in the
instrument cluster lights up. The SPORT
han‐dling modemessage appears on the multi-
function display.
XTo deactivate SPORT handling mode:
briefly press button :.
The M handling mode warning lamp in the
instrument cluster goes out. ESP
®is activa-
ted
XTo deactivate ESP®: press button :.
The å ESP®OFF warning lamp in the
instrument cluster lights up. The ÷OFF
message appears on the multifunction dis-
play.
XTo activate ESP®:when SPORT handling
mode is activated or ESP®is deactivated,
press button :.
The å ESP
®OFF warning lamp in the
instrument cluster goes out. The ÷ON
message appears on the multifunction dis-
play.
Characteristics of activated SPORT han-
dling mode
If SPORT handling mode is activated and one or
more wheels start to spin, the ÷ESP®warn-
ing lamp in the instrument cluster flashes. ESP®
only stabilizes the vehicle to a limited degree.
When SPORT handling mode is activated:
RESP®only improves driving stability to a limi-
ted degree
Rtraction control is still activated
Rengine torque is no longer limited and the
drive wheels are able to spin
The spinning of the wheels results in a cut for
better traction on loose surfaces.
RESP®still provides support when you brake
firmly
Characteristics when ESP®is deactivated
If ESP®is deactivated and one or more wheels
start to spin, the ÷ESP®warning lamp in the
instrument cluster flashes. In such situations,
ESP
®will not stabilize the vehicle.
If you deactivate ESP®:
RESP®no longer improves driving stability
Rengine torque is no longer limited and the
drive wheels are able to spin
62Driving safety systems
Safety
Page 93 of 294

Exterior lighting
General notes
For reasons of safety, Mercedes-Benz recom-
mends that you drive with the lights switched on
even during the daytime. In some countries,
operation of the headlamps varies due to legal
requirements and self-imposed obligations.
Setting the exterior lighting
Setting options
Exterior lighting can be set using the:
Rlight switch
Rcombination switch (Ypage 92)
Light switch
Operation
1 WLeft-hand standing lamps
2XRight-hand standing lamps
3TParking lamps, license plate and
instrument cluster lighting
4ÃAutomatic headlamp mode, controlled
by the light sensor
5 LLow-beam/high-beam headlamps
BRRear fog lamp
If you hear a warning tone when you leave the
vehicle, the lights may still be switched on.
XTurn the light switch to the Ãposition.
The exterior lighting, except the side/parking
lamps, switches off automatically in the follow-
ing situations:
Rthe engine is switched off with the Start/Stop button
Rthe driver's door is opened
Automatic headlamp mode
GWARNING
When the light switch is set to Ã, the low-
beam headlamps may not be switched on
automatically if there is fog, snow or other
causes of poor visibility due to the weather
conditions such as spray. There is a risk of an
accident.
In such situations, turn the light switch to
L.
The automatic headlamp mode is only an aid.
The driver is responsible for the vehicle's light-
ing at all times.
à is the preferred light switch position.
The light setting is automatically selected
according to the brightness of the ambient light,
but not in the event of poor visibility due to
weather conditions such as fog, snow or spray.
RIf the Start/Stop button is pressed once:
depending on the brightness of the ambient
light, the parking lamps will switch on or off
automatically.
RIf you have switched on the Daytime Run‐ning Lightsfunction via the on-board com-
puter, the daytime running lamps or the park-
ing lamps and low-beam headlamps will
switch on or off automatically while the
engine is running.
XTo switch on automatic headlamp mode:
turn the light switch to the Ãposition.
Canada only:
The daytime running lamps improve the visibility of your vehicle during the day. The daytime run-
ning lamps function is required by law in Can-
ada. It cannot therefore be deactivated.
When the engine is running and the vehicle is
stationary: if you move the selector lever from a
driving position to position j, the daytime run-
ning lamps and low-beam headlamps go out
after three minutes.
When the engine is running, the vehicle is sta-
tionary and in bright ambient light: if you turn the
light switch to the Tposition, the daytime
running lamps and parking lamps switch on.
If the engine is running and you turn the light
switch to the Lposition, the manual settings
take precedence over the daytime running
lamps.
USA only:
Exterior lighting91
Lights and windshield wipers
Z
Page 94 of 294

The daytime running lamps improve the visibility
of your vehicle during the day. Here, theDay‐
time Running Lightsfunction must be
switched on via the on-board computer
(
Ypage 164).
If the engine is running and you turn the light
switch to the TorL position, the manual
settings take precedence over the daytime run-
ning lamps.
Low-beam headlamps
GWARNING
When the light switch is set to Ã, the low-
beam headlamps may not be switched on
automatically if there is fog, snow or other
causes of poor visibility due to the weather
conditions such as spray. There is a risk of an
accident.
In such situations, turn the light switch to
L.
When the ignition is switched on and the light
switch is in the Lposition, the parking lamps
and low-beam headlamps are switched on even
if the light sensor does not sense dark condi-
tions. This is a particularly useful function in the
event of rain and fog.
XTo switch on the low-beam headlamps:
select key position 2with the Start/Stop
button or start the engine.
XTurn the light switch to the Lposition.
The green Lindicator lamp in the instru-
ment cluster lights up.
Rear fog lamp
The rear fog lamp improves visibility of your
vehicle for the traffic behind in the event of thick
fog. You must observe the legal requirements
for the country in which you are currently driving when operating the rear fog lamp.
XTo switch on the rear fog lamp: select key
position 2with the Start/Stop button or
start the engine.
XTurn the light switch to the LorÃ
position.
XPress the Rbutton.
The yellow Rindicator lamp in the instru-
ment cluster lights up.
XTo switch off the rear fog lamp: press the
R button.
The yellow Rindicator lamp in the instru-
ment cluster goes out.
Parking lamps
!If the battery charge is very low, the parking
lamps or standing lamps are automatically
switched off to enable the next engine start.
Always park your vehicle safely and in a well lit
area, in accordance with the relevant legal
stipulations. Avoid using the Tparking
lamps over a period of several hours. If pos-
sible, switch on the right-hand Xor left-
hand W standing lamps.
XTo switch on the parking lamps: turn the
light switch to the Tposition.
The green Tindicator lamp in the instru-
ment cluster lights up.
Standing lamps
Switching on the standing lamps ensures the
correspondin g side of the vehicle is illuminated.
XTo switch on the standing lamps: switch off
the engine with the Start/Stop button.
XTurn the light switch to the Wposition (left-
hand side of the vehicle) or Xposition
(right-hand side of the vehicle).
Combination switch
:High-beam headlamps
;Turn signal, right
=High-beam flasher
?Turn signal, left
92Exterior lighting
Lights and windshield wipers
Page 95 of 294

XTo indicate briefly:press the combination
switch briefly to the pressure point in the
direction of arrow ;or?.
The corresponding turn signal flashes three
times.
XTo indicate: press the combination switch
beyond the pressure point in the direction of
arrow ;or?.
XTo switch on the high-beam headlamps:
select key position 2with the Start/Stop
button or start the engine.
XTurn the light switch to the LorÃ
position.
XPress the combination switch beyond the
pressure point in the direction of arrow :.
In the Ãposition, the high-beam head-
lamps are only switched on when it is dark and
the engine is running.
The K indicator lamp in the instrument
cluster lights up when the high-beam head-
lamps are switched on.
XTo switch off the high-beam headlamps:
move the combination switch back to its nor-
mal position.
The K indicator lamp in the instrument
cluster goes out.
Vehicles with Adaptive Highbeam Assist: when
Adaptive Highbeam Assist is active, it controls
switching on/off of the high-beam headlamps
(
Ypage 93).
XTo switch on the high-beam flasher: pull
the combination switch in the direction of
arrow =.
Hazard warning lamps
XTo switch on the hazard warning lamps:
press button :.
All turn signals flash. If you now switch on a
turn signal using the combination switch, only
the turn signal lamp on the corresponding
side of the vehicle will flash.
XTo switch off the hazard warning lamps:
press button :.
The hazard warning lamps automatically switch
on if:
Ran air bag is deployed or
Rthe vehicle decelerates rapidly from a speed
of above 45 mph (70 km/h) and comes to a
standstill
The hazard warning lamps switch off automati-
cally if the vehicle reaches a speed of above
6 mph (10 km/h) again after a full brake appli-
cation.
iThe hazard warning lamps still operate if the
ignition is switched off.
Adaptive Highbeam Assist
General notes
You can use this function to set the headlamps
to change between low beam and high beam
automatically. The system recognizes vehicles
with their lights on, either approaching from the
opposite direction or traveling in front of your
vehicle, and consequently switches the head-
lamps from high beam to low beam.
The system automatically adapts the low-beam
headlamp range depending on the distance to
the other vehicle. Once the system no longer
detects any other vehicles, it reactivates the
high-beam headlamps.
The system's optical sensor is located behind
the windshield near the overhead control panel.
Important safety notes
GWARNING
Adaptive Highbeam Assist does not recognize
road users:
Rwho have no lights, e.g. pedestrians
Rwho have poor lighting, e.g. cyclists
Rwhose lighting is blocked, e.g. by a barrier
Exterior lighting93
Lights and windshield wiper s
Z
Page 98 of 294
Replacing the wiper blades
Important safety notes
GWARNING
If the windshield wipers begin to move while
you are changing the wiper blades, you could be trapped by the wiper arm. There is a risk of
injury.
Always switch off the windshield wipers and
ignition before changing the wiper blades.
!Never open the hood if a windshield wiper
arm has been folded away from the wind-
shield.
Never fold a windshield wiper arm without a
wiper blade back onto the windshield.
Hold the windshield wiper arm firmly when
you change the wiper blade. If you release the
windshield wiper arm without a wiper blade
and it falls onto the windshield, the windshield
may be damaged by the force of the impact.
Mercedes-Benz recommends that you have
the wiper blades changed at a qualified spe-
cialist workshop.
!To avoid damaging the wiper blades, make
sure that you touch only the wiper arm of the
wiper.
Replacing the wiper blades
Adjusting the wiper blades so that they
are vertical
XSwitch off the engine.
XRemove your foot from the brake pedal.
XSet the windshield wiper to the °position.
XPress the Start/Stop button repeatedly until
the windshield wiper starts.
XWhen the wiper arms are in a vertical position
to the hood, press the Start/Stop button.
XFold the wiper arm away from the windshield.
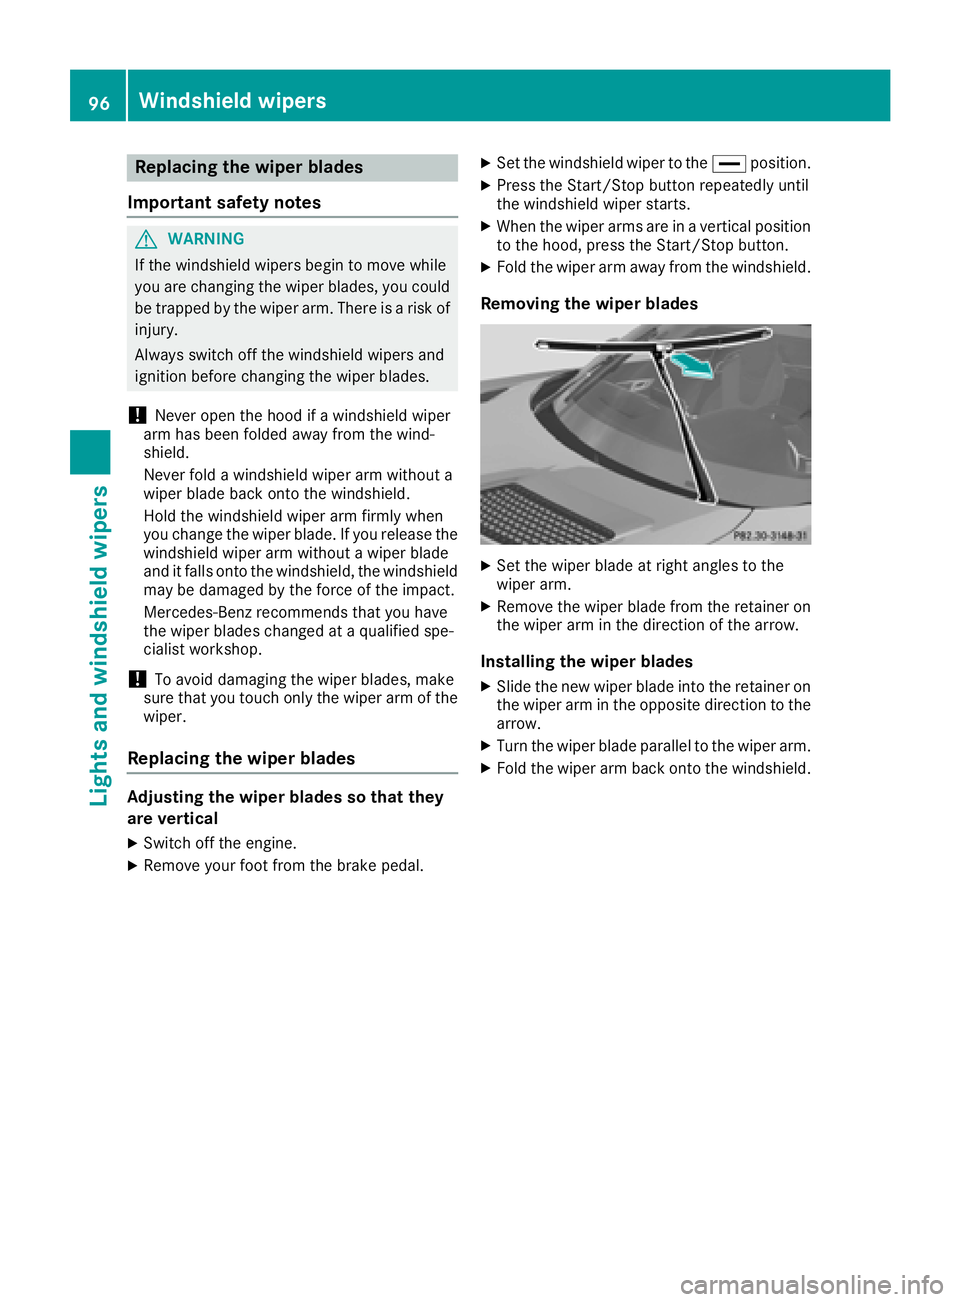
Removing the wiper blades
XSet the wiper blade at right angles to the
wiper arm.
XRemove the wiper blade from the retainer on
the wiper arm in the direction of the arrow.
Installing the wiper blades
XSlide the new wiper blade into the retainer on
the wiper arm in the opposite direction to the
arrow.
XTurn the wiper blade parallel to the wiper arm.
XFold the wiper arm back onto the windshield.
96Windshield wipers
Lights and windshield wipers
Page 104 of 294
Activating/deactivating
XSelectke yposition 2withth eStart/Sto p
butto n (Ypage 106).
XPress th e¤ rockerswitch up or down .
The indicator lamp abov eth e¤ rocker
switch lights up or goe sout .
Problems with the rear window defros ter
ProblemPossible causes/consequences and MSolutions
The rear window
defrosterhas deactiva-
te dprematurel yor can -
no tbe activated.The battery has no tbeen sufficientl ycharged.
XSwitc hoff any consumer sthat are no trequired, e.g. reading lamps,
interior lighting or th eseat heating .
When th ebattery is sufficientl ycharged, th erear window defroste r
can be activated again .
Switching air-recirculati on mode
on/off
Gene ral notes
You can also temporarily deactivat eth eflo wof
fresh air manually if unpleasant odor sare enter-
ing th evehicl efrom outside .The air already
inside th evehicl ewill then be recirculated.
If you switch on air-recirculation mode, th ewin -
dows can fog up mor equickly, in particular at
low temperatures .Only use air-recirculation
mod ebriefl yto preven tth ewindows from fog -
gin gup.
Activating/deactivating
XSelec tke yposition 2withth eStart/Sto p
butto n (Ypage 106).
XTo activate: press theg rockerswitch up
or down .
The indicator lamp abov eth eg rocker
switch lights up.
Air-recirculation mod eswitches on automati-
cally:
Rat high outside temperatures
Rin atunne l(vehicles wit h anavigation system
only)
The indicator lamp abov eth eg rocker
switch is no tlit when automatic air-recirculation
mod eis activated. Outside air is added after
about 30 minutes.
XTo deactivate: press theg rockerswitch
up or down .
The indicator lamp abov eth eg rocker
switch goes out .
Air-recirculation mod edeactivates automati-
cally:
Rafter approximately fiv eminute sat outside
temperatures belo wapproximately 41 ‡
(5 †)
Rafter approximately five minutes if cooling
with air dehumidification is deactivated
Rafter approximately 30 minutes at outside
temperatures above approximately 41 ‡
(5 †) if the "Cooling with dehumidification"
function is activated
Air vents
Important safety notes
GWARNING
Very hot or very cold air can flow from the air
vents. This could result in burns or frostbite in
the immediate vicinity of the air vents. There
is a risk of injury.
Make sure that all vehicle occupants always
maintain a sufficient distance to the air out-
lets. If necessary, redirect the airflow to
another area of the vehicle interior.
102Air vents
Climate control
Page 114 of 294
display goes out and the symbol of the selec-
ted drive program appears.
The drive program indicator on DYNAMIC
SELECT controller:lights up in red.
In addition, the current drive program settings
are displayed in the multimedia system dis-
play.
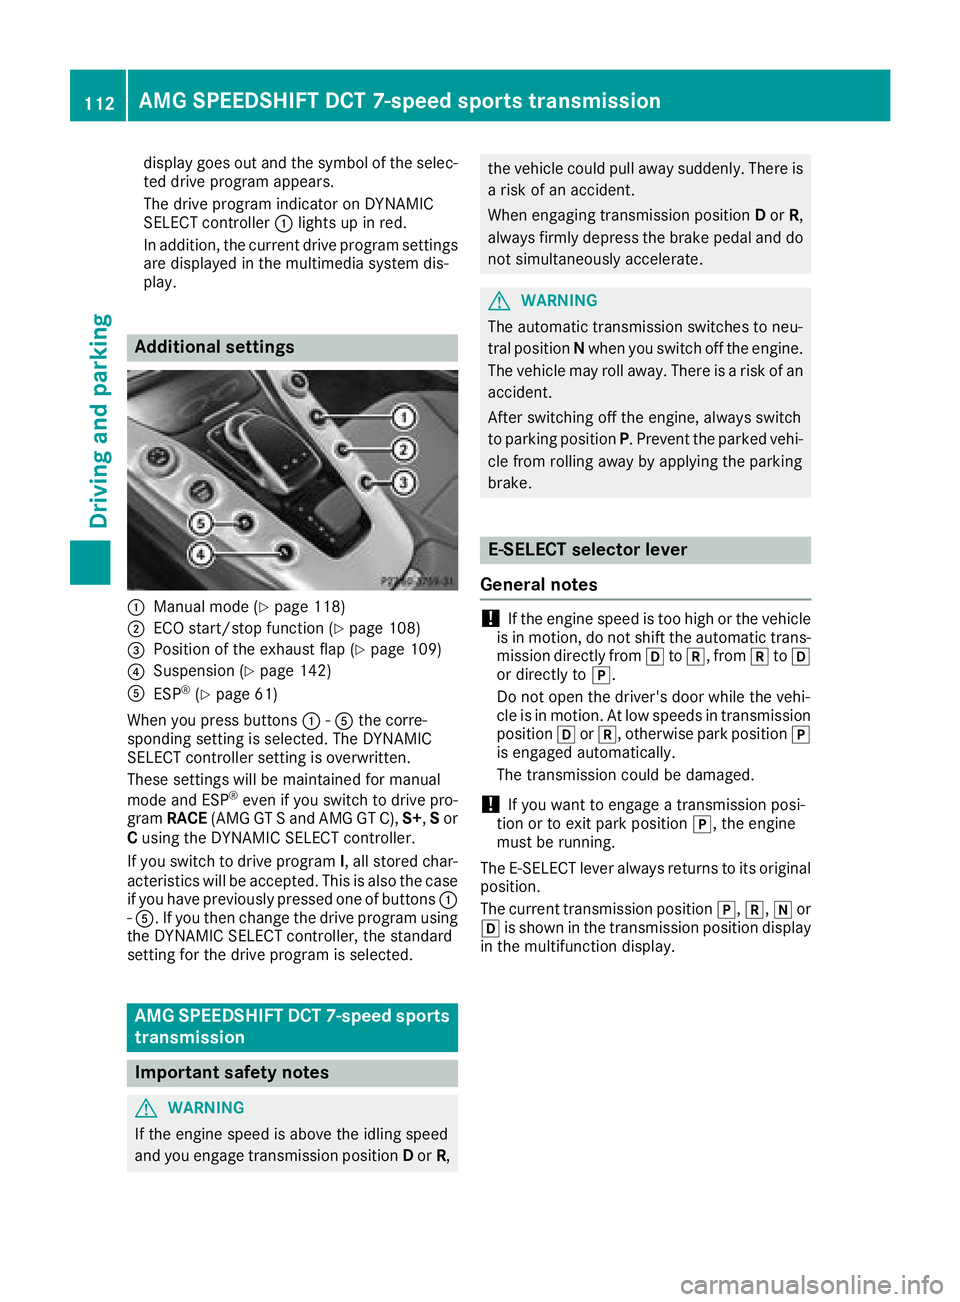
Additional settings
:Manual mode (Ypage 118)
;ECO start/stop function (Ypage 108)
=Position of the exhaust flap (Ypage 109)
?Suspension (Ypage 142)
AESP®(Ypage 61)
When you press buttons :-A the corre-
sponding setting is selected. The DYNAMIC
SELECT controller setting is overwritten.
These settings will be maintained for manual
mode and ESP
®even if you switch to drive pro-
gram RACE (AMG GT S and AMG GT C), S+,Sor
C using the DYNAMIC SELECT controller.
If you switch to drive program I, all stored char-
acteristics will be accepted. This is also the case
if you have previously pressed one of buttons :
- A. If you then change the drive program using
the DYNAMIC SELECT controller, the standard
setting for the drive program is selected.
AMG SPEEDSHIFT DCT 7-speed sports
transmission
Important safety notes
GWARNING
If the engine speed is above the idling speed
and you engage transmission position Dor R,
the vehicle could pull away suddenly. There is
a risk of an accident.
When engaging transmission position Dor R,
always firmly depress the brake pedal and do
not simultaneously accelerate.
GWARNING
The automatic transmission switches to neu-
tral position Nwhen you switch off the engine.
The vehicle may roll away. There is a risk of an
accident.
After switching off the engine, always switch
to parking position P. Prevent the parked vehi-
cle from rolling away by applying the parking
brake.
E-SELECT selector lever
General notes
!If the engine speed is too high or the vehicle
is in motion, do not shift the automatic trans- mission directly from htok, from ktoh
or directly to j.
Do not open the driver's door while the vehi-
cle is in motion. At low speeds in transmission
position hork, otherwise park position j
is engaged automatically.
The transmission could be damaged.
!If you want to engage a transmission posi-
tion or to exit park position j, the engine
must be running.
The E-SELECT lever always returns to its original
position.
The current transmission position j,k, ior
h is shown in the transmission position display
in the multifunction display.
112AMG SPEEDSHIFT DCT 7-speed sports transmission
Driving and parking