2018 MERCEDES-BENZ AMG GT COUPE stop start
[x] Cancel search: stop startPage 49 of 294
Requirements
To be classified correctly, the front passenger
must sit:
Rwith the seat belt fastened correctly
Rin an almost upright position with their back
against the seat backrest
Rwith their feet resting on the floor, if possible
If the front passenger does not observe these
conditions, OCS may produce a false classifica-
tion, e.g. because the front passenger:
Rtransfers their weight by supporting them-
selves on a vehicle armrest
Rsits in such a way that their weight is raised
from the seat cushion
If you install a child restraint system on the
front-passenger seat, be sure to observe the
correct positioning of the child restraint system.
Never place objects under or behind the child
restraint system, e.g. a cushion. The entire base
of the child restraint system must always rest on
the seat cushion of the front-passenger seat.
The backrest of the forward-facing child
restraint system must lie as flat as possible
against the backrest of the front-passenger
seat.
The child restraint system must not touch the
roof or be subjected to a load by the head
restraint. Adjust the angle of the seat backrest
and the head restraint position accordingly.
Only then can OCS be guaranteed to function
correctly. Always observe the child restraint sys-
tem manufacturer's installation and operating
instructi
ons.
Occupant Classification System opera-
tion (OCS)
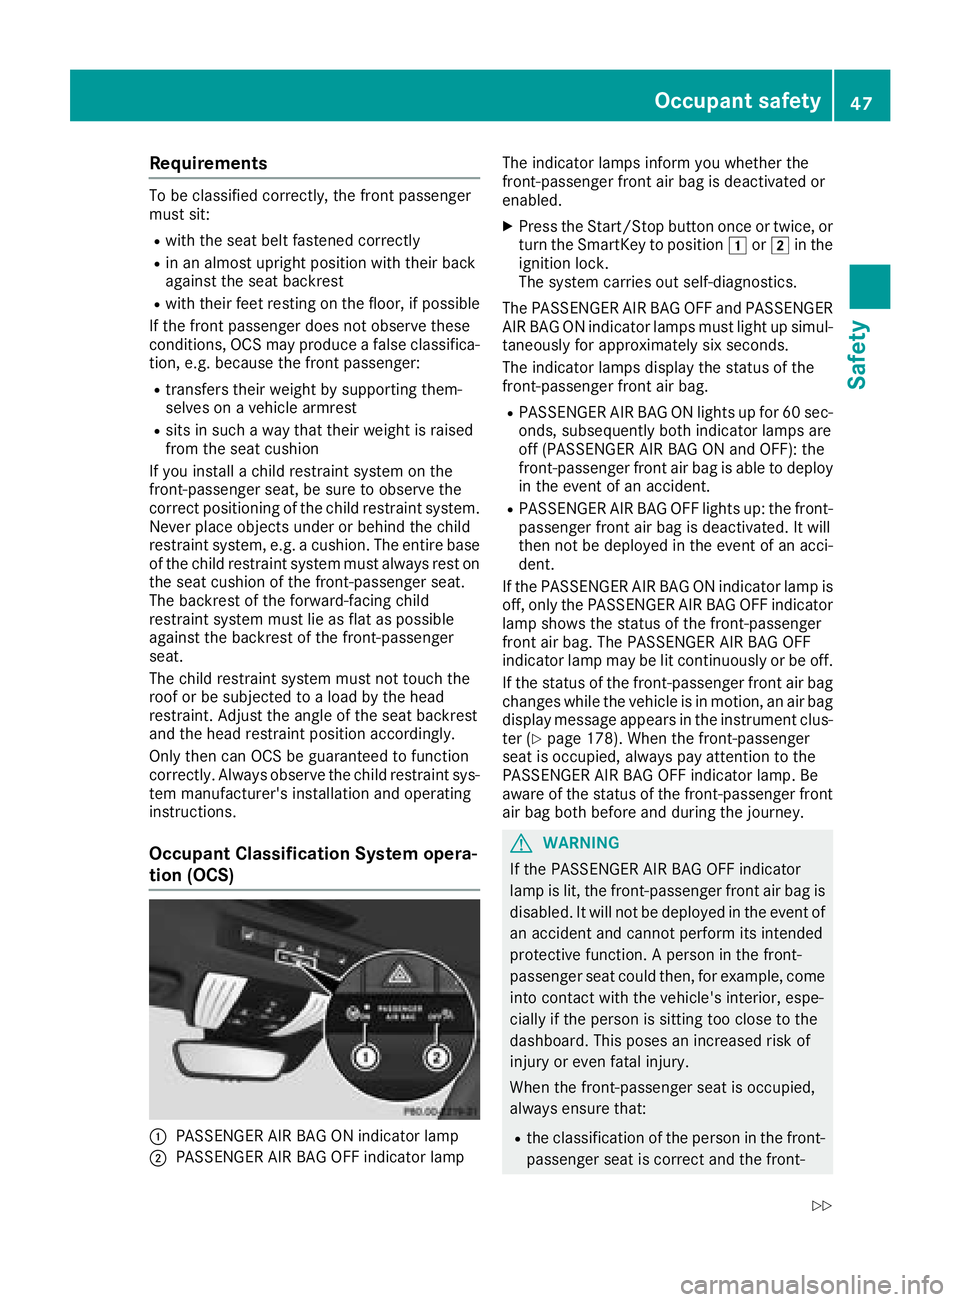
:PASSENGER AIR BAG ON indicator lamp
;PASSENGER AIR BAG OFF indicator lamp The indicator lamps inform you whether the
front-passenger front air bag is deactivated or
enabled.
XPress the Start/Stop button once or twice, or
turn the SmartKey to position
1or2 in the
ignition lock.
The system carries out self-diagnostics.
The PASSENGER AIR BAG OFF and PASSENGER AIR BAG ON indicator lamps must light up simul-
taneously for approximately six seconds.
The indicator lamps display the status of the
front-passenger front air bag.
RPASSENGER AIR BAG ON lights up for 60 sec-
onds, subsequently both indicator lamps are
off (PASSENGER AIR BAG ON and OFF): the
front-passenger front air bag is able to deploy
in the event of an accident.
RPASSENGER AIR BAG OFF lights up: the front-
passenger front air bag is deactivated. It will
then not be deployed in the event of an acci-
dent.
If the PASSENGER AIR BAG ON indicator lamp is
off, only the PASSENGER AIR BAG OFF indicator lamp shows the status of the front-passenger
front air bag. The PASSENGER AIR BAG OFF
indicator lamp may be lit continuously or be off.
If the status of the front-passenger front air bag
changes while the vehicle is in motion, an air bag
display message appears in the instrument clus-
ter (
Ypage 178). When the front-passenger
seat is occupied, always pay attention to the
PASSENG ER AIR BAG OFF i
ndicator lamp. Be
aware of the status of the front-passenger front air bag both before and during the journey.
GWARNING
If the PASSENGER AIR BAG OFF indicator
lamp is lit, the front-passenger front air bag is
disabled. It will not be deployed in the event of
an accident and cannot perform its intended
protective function. A person in the front-
passenger seat could then, for example, come
into contact with the vehicle's interior, espe-
cially if the person is sitting too close to the
dashboard. This poses an increased risk of
injury or even fatal injury.
When the front-passenger seat is occupied,
always ensure that:
Rthe classification of the person in the front- passenger seat is correct and the front-
Occupant safety47
Safety
Z
Page 61 of 294
You can activate or deactivate Active Brake
Assist (Ypage 163) in the on-board computer.
When deactivated, the distance warning func-
tion and the autonomous braking function are
also deactivated.
If Active Brake Assist is deactivated, the æ
symbol appears in the assistance graphic dis-
play.
Distance warning function
General information
The distance warning function can help you to
minimize the risk of a front-end collision with a
vehicle ahead or reduce the effects of such a
collision. If the distance warning function
detects that there is a risk of a collision, you will
be warned visually and acoustically.
Important safety notes
iObserve the "Important safety notes" sec-
tion for driving safety systems (Ypage 57).
GWARNING
The distance warning function does not react:
Rto people or animals
Rto oncoming vehicles
Rto crossing traffic
Rwhen cornering
The distance warning function may not give
warnings in all critical situations. There is a
risk of an accident.
Always pay careful attention to the traffic sit-
uation and be ready to brake.
Always adapt your speed to suit the prevailing
road and traffic conditions.
GWARNING
The distance warning function cannot always
clearly identify objects and complex traffic
situations.
In such cases, the distance warning function
may:
Rgive an unnecessary warning
Rnot give a warning
There is a risk of an accident.
Always pay careful attention to the traffic sit- uation and do not rely solely on the distance
warning function.
Function
Starting at a speed of approximately 4 mph
(7 km/h), the distance warning function warns
you if you rapidly approach a vehicle in front. Anintermittent warning tone will then sound, and
the · distance warning lamp will light up in
the instrument cluster.
XBrake immediately in order to increase the
distance from the vehicle in front.
or
XTake evasive action provided it is safe to do
so.
Due to the nature of the system, particularly
complicated but non-critical driving conditions
may also cause the system to display a warning.
With the help of the radar sensor system, the
distance warning function can detect obstacles
that are in the path of your vehicle for an exten-
ded period of time.
Up to a speed of approximately 44 mph
(70 km/h), the distance warning function can
also react to stationary obstacles, such as stop-
ped or parked vehicles.
Autonomous braking function
If the driver does not react to the distance warn-
ing signal in a critical situation, Active Brake
Assist can assist the driver with the autonomous
braking function.
The autonomous braking function:
Rgives the driver more time to react to critical
driving situations
Rcan help the driver to avoid an accident or
Rreduces the effects of an accident
Vehicles without Distance Pilot DISTRONIC: the autonomous braking function is available in
the following speed ranges:
R4 - 65 mph (7 - 105 km/h) for moving objects
R4 - 31 mph (7 - 50 km/h) for stationary
objects
Driving safety systems59
Safety
Z
Page 63 of 294
ESP®(Electronic Stability Program)
General notes
iObserve the "Important safety notes" sec-
tion (Ypage 57).
ESP
®monitors driving stability and traction, i.e.
power transmission between the tires and the
road surface.
If ESP
®detects that the vehicle is deviating from
the direction desired by the driver, one or more
wheels are braked to stabilize the vehicle. The
engine output is also modified to keep the vehi-
cle on the desired course within physical limits.
ESP
®assists the driver when pulling away on
wet or slippery roads. ESP®can also stabilize
the vehicle during braking.
ETS (Electronic Traction System)
iObserve the "Important safety notes" sec-
tion (Ypage 57).
ETS traction control is part of ESP
®.
Traction control brakes the drive wheels indi-
vidually if they spin. This enables you to pull
away and accelerate on slippery surfaces, for
example if the road surface is slippery on one
side. In addition, more drive torque is transfer-
red to the wheel or wheels with traction.
Traction control remains active, even if you
deactivate ESP
®.
Important safety notes
iObserve the "Important safety notes" sec-
tion (Ypage 57).
GWARNING
If ESP
®is malfunctioning, ESP®is unable to
stabilize the vehicle. Additionally, further driv-
ing safety systems are deactivated. This
increases the risk of skidding and an accident.
Drive on carefully. Have ESP
®checked at a
qualified specialist workshop.
ESP
®is only deactivated if the åwarning
lamp is lit continuously.
When SPORT handling mode is activated, the
M warning lamp lights up in the instrument
panel. When the
åandh warning lamps light up
continuously, ESP
®is not available due to a mal-
function.
Observe the information on warning lamps
(
Ypage 196) and display messages which may
be shown in the instrument cluster
(
Ypage 170).
Only use wheels with the recommended tire
sizes. Only then will ESP
®function properly.
Characteristics of ESP®
General information
If the ÷ ESP®warning lamp goes out before
beginning the journey, ESP®is automatically
active.
If ESP
®intervenes, the ÷ESP®warning lamp
flashes in the instrument cluster.
If ESP
®intervenes:
XDo not deactivate ESP®under any circum-
stances.
XOnly depress the accelerator pedal as far as
necessary when pulling away.
XAdapt your driving style to suit the prevailing
road and weather conditions.
ECO start/stop function
The ECO start/stop function switches the
engine off automatically when the vehicle stops
moving. The engine starts automatically when
the driver wants to pull away again. ESP
®
remains in its previously selected status. Exam-
ple: if ESP®was deactivated before the engine
was switched off, ESP®remains deactivated
when the engine is switched on again.
Deactivating/activating ESP®
Important safety notes
iObserve the "Important safety notes" sec-
tion (Ypage 57).
You can select between the following states of
ESP
®:
RESP®is activated
RSPORT handling mode is activated
RESP®is deactivated
Driving safety systems61
Safety
Z
Page 65 of 294
The spinning of the wheels results in a cut for
better traction on loose surfaces.
Rtraction control is still activated
RAdaptive Brake Assist is unavailable
Active Brake Assist is also not activated if you
brake firmly with assistance from ESP
®.
RPRE-SAFE®is unavailable
PRE-SAFE®is also not activated if you brake
firmly with assistance from ESP®.
RESP®still provides support when you brake
firmly
EBD (electronic brake force distribu-
tion)
General information
EBD monitors and controls the brake pressure
on the rear wheels to improve driving stability
while braking.
Important safety notes
iObserve the "Important safety notes" sec-
tion (Ypage 57).
GWARNING
If EBD is malfunctioning, the rear wheels can
lock, e.g. under full braking. This increases the
risk of skidding and an accident.
You should therefore adapt your driving style
to the different handling characteristics. Have
the brake system checked at a qualified spe-
cialist workshop.
Observe information regarding indicator and
warning lamps (
Ypage 196) as well as display
messages (Ypage 172).
ADAPTIVE BRAKE
ADAPTIVE BRAKE enhances braking safety and
offers increased braking comfort. In addition to
the braking function, ADAPTIVE BRAKE also fea-
tures the hill start assist function (
Ypage 107).
Protection against theft
Immobilizer
The immobilizer prevents your vehicle from
being started without the correct SmartKey.
XTo activate with KEYLESS-GO start-func-
tion or KEYLESS-GO: switch the ignition off
and open the driver's door.
XTo activate with the SmartKey: remove the
SmartKey from the ignition lock.
XTo deactivate: switch on the ignition.
When leaving the vehicle, always take the
SmartKey with you and lock the vehicle. Anyone
can start the engine if a valid SmartKey has been
left inside the vehicle.
iThe immobilizer is always deactivated when
you start the engine.
In the event that the engine cannot be started
(yet the vehicle's battery is charged), the sys-
tem is not operational. Contact an authorized
Mercedes-Benz Center or call
1-800-FOR-MERCedes (in the USA) or
1-800-387-0100 (in Canada).
ATA (anti-theft alarm system)
XTo arm: lock the vehicle with the SmartKey or
KEYLESS-GO.
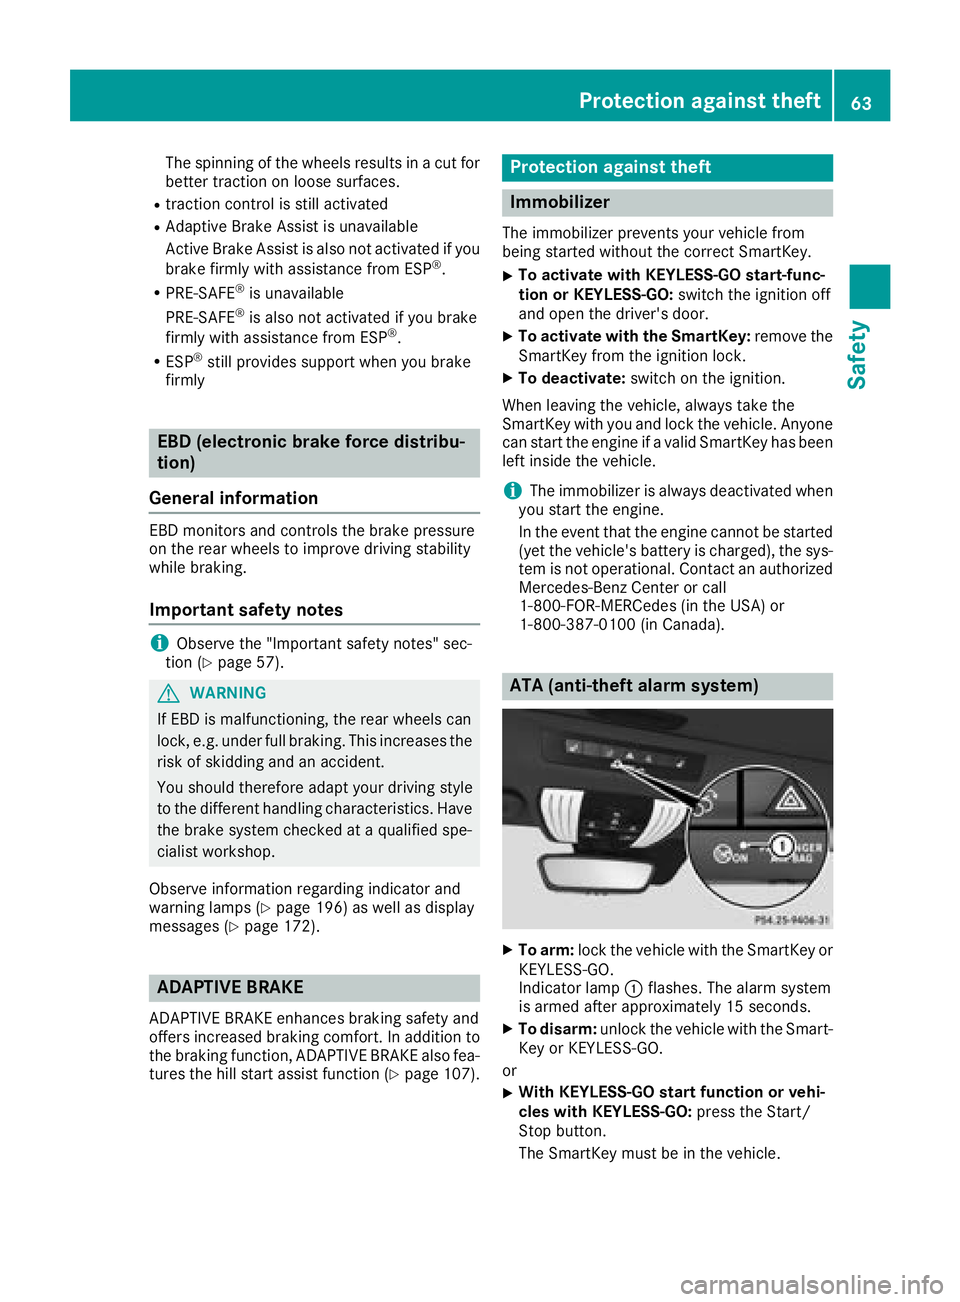
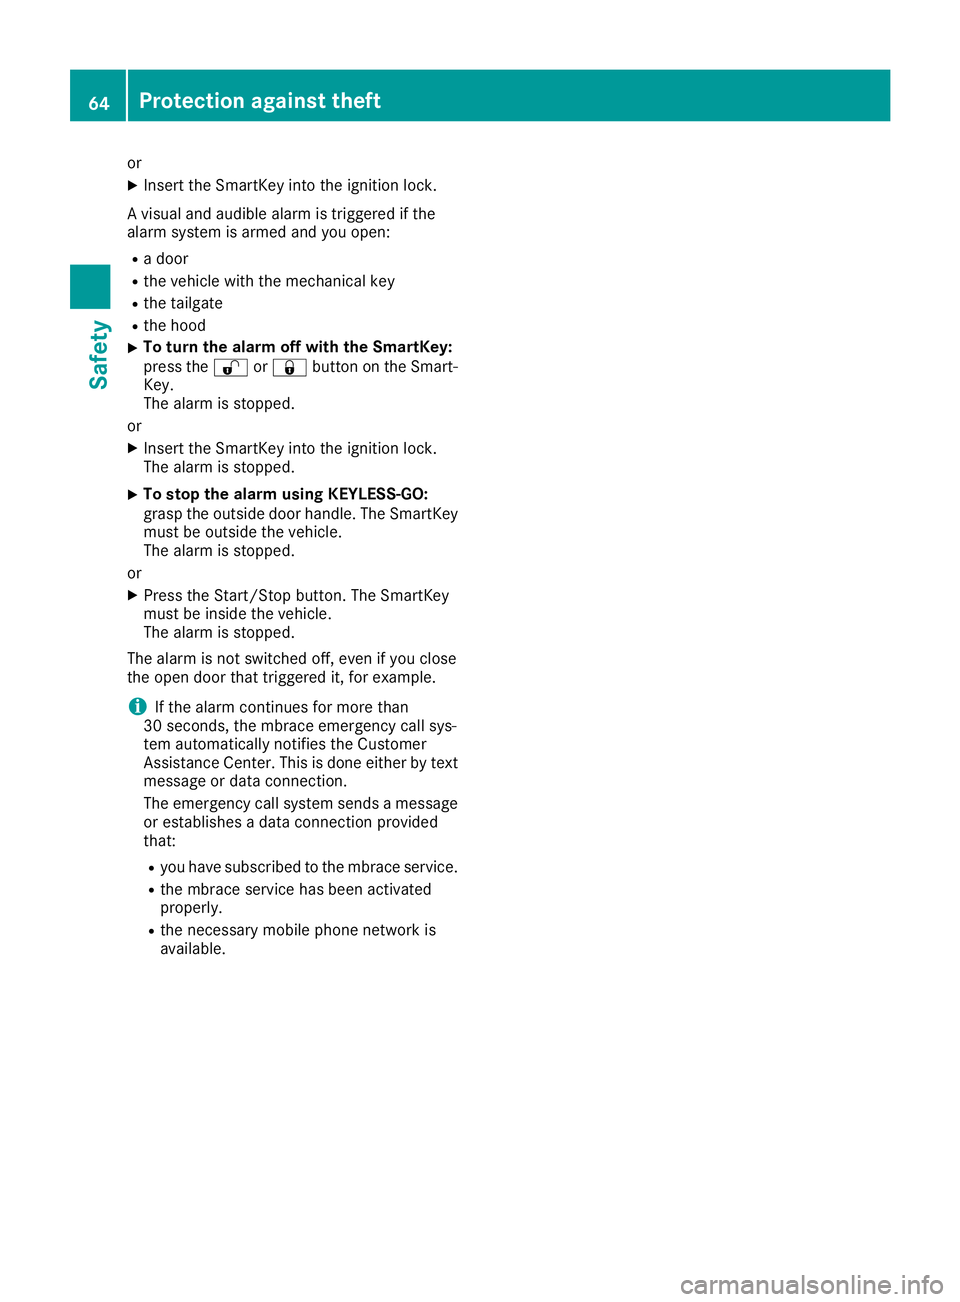
Indicator lamp :flashes. The alarm system
is armed after approximately 15 seconds.
XTo disarm: unlock the vehicle with the Smart-
Key or KEYLESS-GO.
or
XWith KEYLESS-GO start function or vehi-
cles with KEYLESS-GO: press the Start/
Stop button.
The SmartKey must be in the vehicle.
Protection against theft63
Safety
Z
Page 66 of 294
or
XInsert the SmartKey into the ignition lock.
A visual and audible alarm is triggered if the
alarm system is armed and you open:
Ra door
Rthe vehicle with the mechanical key
Rthe tailgate
Rthe hood
XTo turn the alarm off with the SmartKey:
press the %or& button on the Smart-
Key.
The alarm is stopped.
or
XInsert the SmartKey into the ignition lock.
The alarm is stopped.
XTo stop the alarm using KEYLESS-GO:
grasp the outside door handle. The SmartKey
must be outside the vehicle.
The alarm is stopped.
or
XPress the Start/Stop button. The SmartKey
must be inside the vehicle.
The alarm is stopped.
The alarm is not switched off, even if you close
the open door that triggered it, for example.
iIf the alarm continues for more than
30 seconds, the mbrace emergency call sys-
tem automatically notifies the Customer
Assistance Center. This is done either by text message or data connection.
The emergency call system sends a message
or establishes a data connection provided
that:
Ryou have subscribed to the mbrace service.
Rthe mbrace service has been activated
properly.
Rthe necessary mobile phone network is
available.
64Protection against theft
Safety
Page 67 of 294
SmartKey
Important safety notes
GWARNING
If children are left unsupervised in the vehicle,
they could:
Ropen the doors, thus endangering other
people or road users.
Rget out and disrupt traffic.
Roperate the vehicle's equipment.
Additionally, children could set the vehicle in
motion if, for example, they:
Rrelease the parking brake.
Rshifting the automatic transmission out of
park position P
RStart the engine.
There is a risk of an accident and injury.
When leaving the vehicle, always take the
SmartKey with you and lock the vehicle. Never
leave children or animals unattended in the
vehicle. Always keep the SmartKey out of
reach of children.
GWARNING
If you attach heavy or large objects to the
SmartKey, the SmartKey could be uninten-
tionally turned in the ignition lock. This could
cause the engine to be switched off. There is a risk of an accident.
Do not attach any heavy or large objects to the
SmartKey. Remove any bulky key rings before
inserting the SmartKey into the ignition lock.
!Keep the SmartKey away from strong mag-
netic fields. Otherwise, the remote control
function could be affected.
Strong magnetic fields can occur in the vicin-
ity of powerful electrical installations.
Do not keep the SmartKey:
Rwith electronic devices, e.g. a mobile phone
or another SmartKey
Rwith metallic objects, e.g. coins or metal foil
Rinside metallic objects, e.g. a metal case
This can affect the functionality of the Smart-
Key. Vehicles with KEYLESS-GO start function:
do
not keep the SmartKey on the cargo compart-
ment cover or in the cargo compartment. Oth-
erwise, the SmartKey may not be detected, e.g.
when starting the engine using the Start/Stop
button.
A brief radio connection between the vehicle
and the SmartKey determines whether a valid
SmartKey is in, or in the direct vicinity of, the
vehicle. This occurs, for example:
Rwhen starting the engine
Rwhile driving
Rwhen using the tailgate unlocking sensor
Rwhen the external door handles are touched
Rduring convenience closing
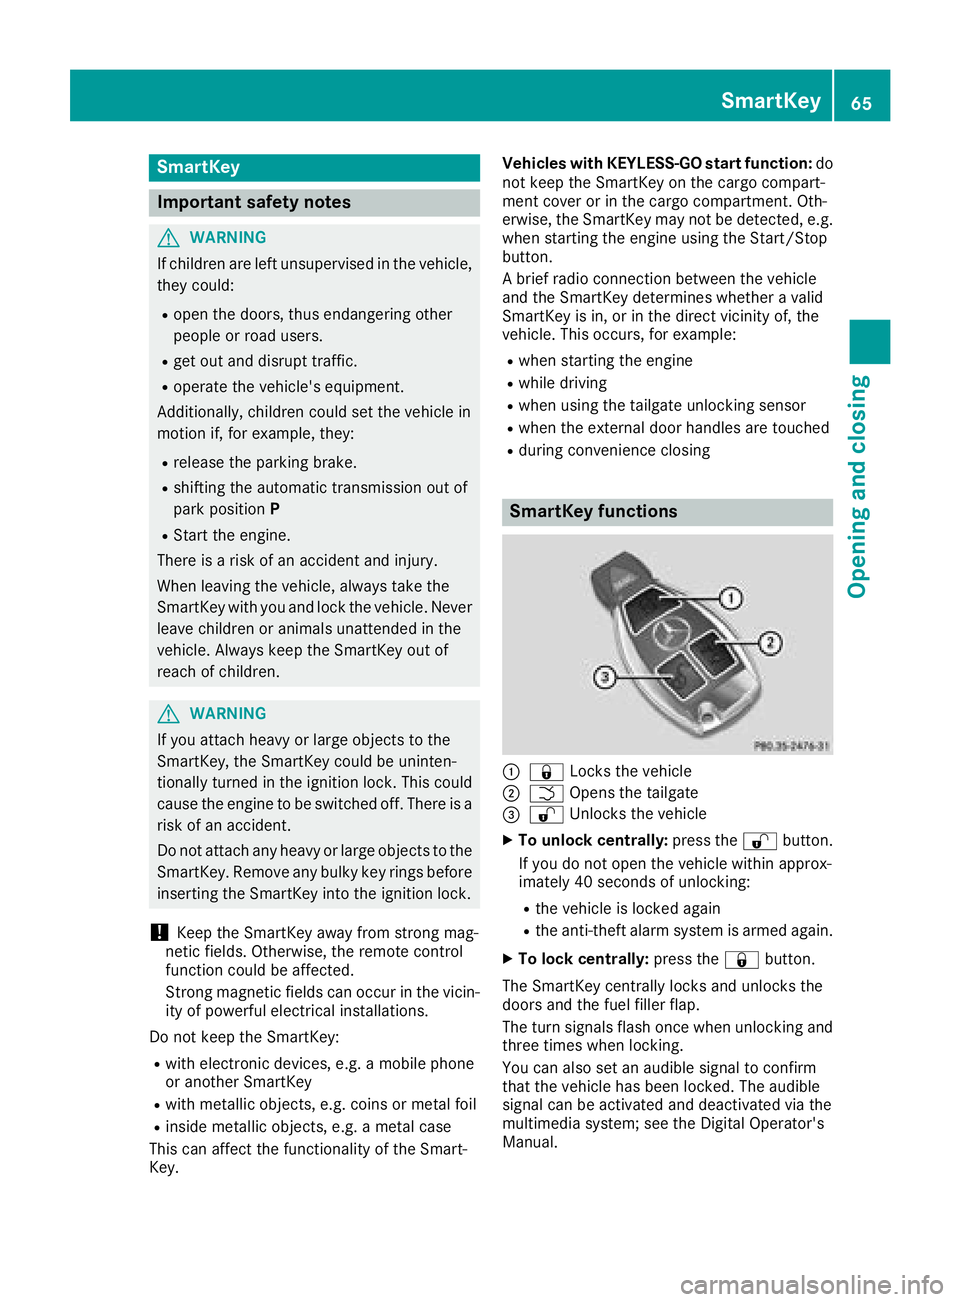
SmartKey functions
:& Locks the vehicle
;FOpens the tailgate
=%Unlocks the vehicle
XTo unlock centrally: press the%button.
If you do not open the vehicle within approx-
imately 40 seconds of unlocking:
Rthe vehicle is locked again
Rthe anti-theft alarm system is armed again.
XTo lock centrally: press the&button.
The SmartKey centrally locks and unlocks the
doors and the fuel filler flap.
The turn signals flash once when unlocking and
three times when locking.
You can also set an audible signal to confirm
that the vehicle has been locked. The audible
signal can be activated and deactivated via the
multimedia system; see the Digital Operator's
Manual.
SmartKey65
Opening and closing
Z
Page 72 of 294
ProblemPossible causes/consequences andMSolutions
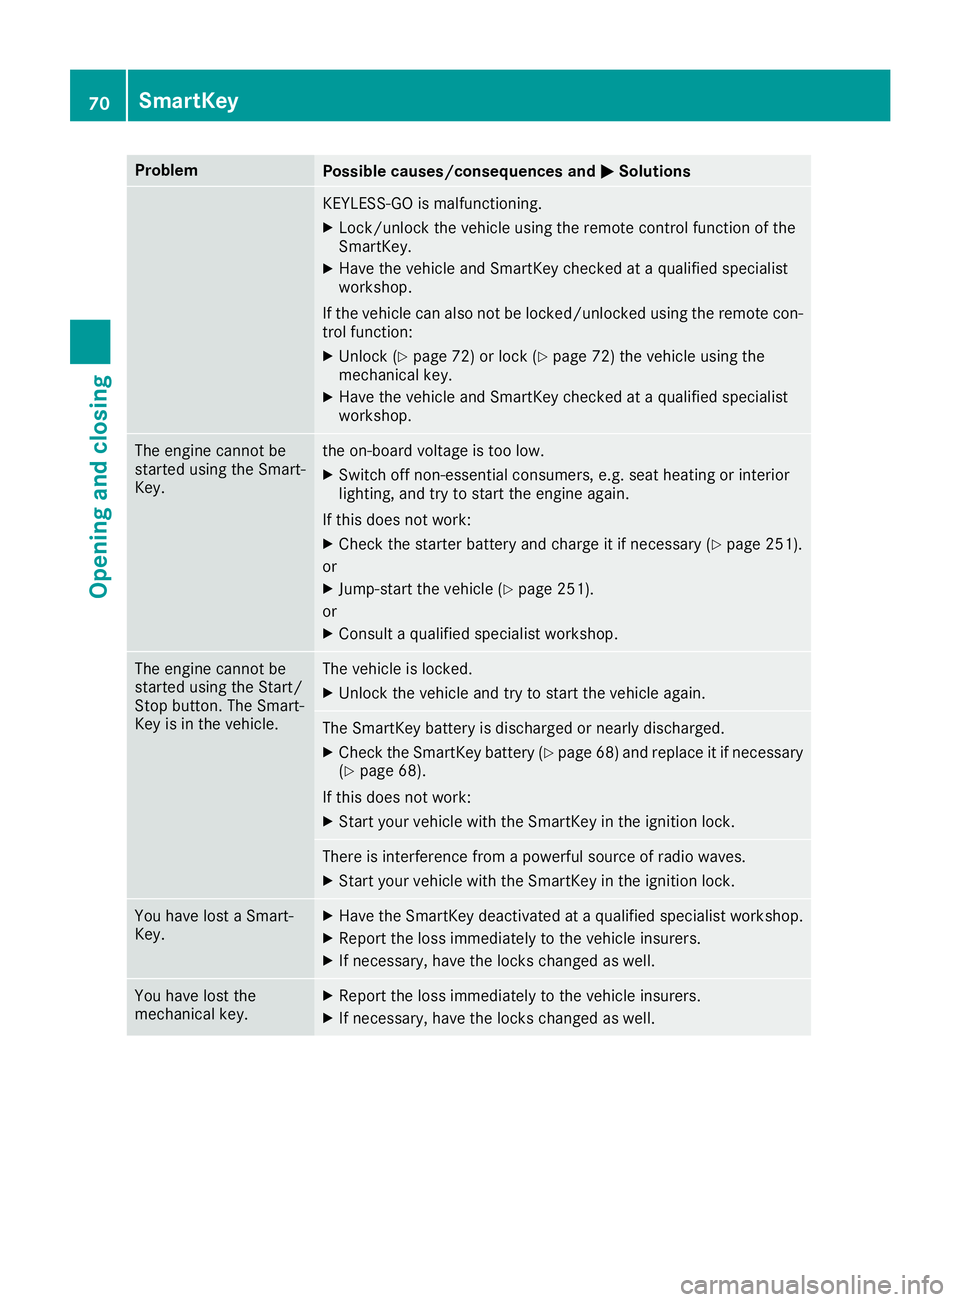
KEYLESS-GO is malfunctioning.
XLock/unlock the vehicle using the remote control function of the
SmartKey.
XHave the vehicle and SmartKey checked at a qualified specialist
workshop.
If the vehicle can also not be locked/unlocked using the remote con-
trol function:
XUnlock (Ypage 72) or lock (Ypage 72) the vehicle using the
mechanical key.
XHave the vehicle and SmartKey checked at a qualified specialist
workshop.
The engine cannot be
started using the Smart-
Key.the on-board voltage is too low.
XSwitch off non-essential consumers, e.g. seat heating or interior
lighting, and try to start the engine again.
If this does not work:
XCheck the starter battery and charge it if necessary (Ypage 251).
or
XJump-start the vehicle (Ypage 251).
or
XConsult a qualified specialist workshop.
The engine cannot be
started using the Start/
Stop button. The Smart-
Key is in the vehicle.The vehicle is locked.
XUnlock the vehicle and try to start the vehicle again.
The SmartKey battery is discharged or nearly discharged.
XCheck the SmartKey battery (Ypage 68) and replace it if necessary
(Ypage 68).
If this does not work:
XStart your vehicle with the SmartKey in the ignition lock.
There is interference from a powerful source of radio waves.
XStart your vehicle with the SmartKey in the ignition lock.
You have lost a Smart-
Key.XHave the SmartKey deactivated at a qualified specialist workshop.
XReport the loss immediately to the vehicle insurers.
XIf necessary, have the locks changed as well.
You have lost the
mechanical key.XReport the loss immediately to the vehicle insurers.
XIf necessary, have the locks changed as well.
70SmartKey
Opening and closing
Page 78 of 294
only opens again automatically after the corre-
sponding switch is released. The automatic
reversing feature is only an aid and does not
relieve you of the responsibility of paying atten-
tion when closing a side window.
GWARNING
The reversing feature does not react:
Rto soft, light and thin objects, e.g. small fin-
gers
Rwhile resetting
This means that the reversing feature cannot
prevent someone being trapped in these sit-
uations. There is a risk of injury.
Make sure that no body parts are in close
proximity during the closing procedure. If
someone becomes trapped, press the switch
to open the side window again.
Opening and closing the side win-
dows
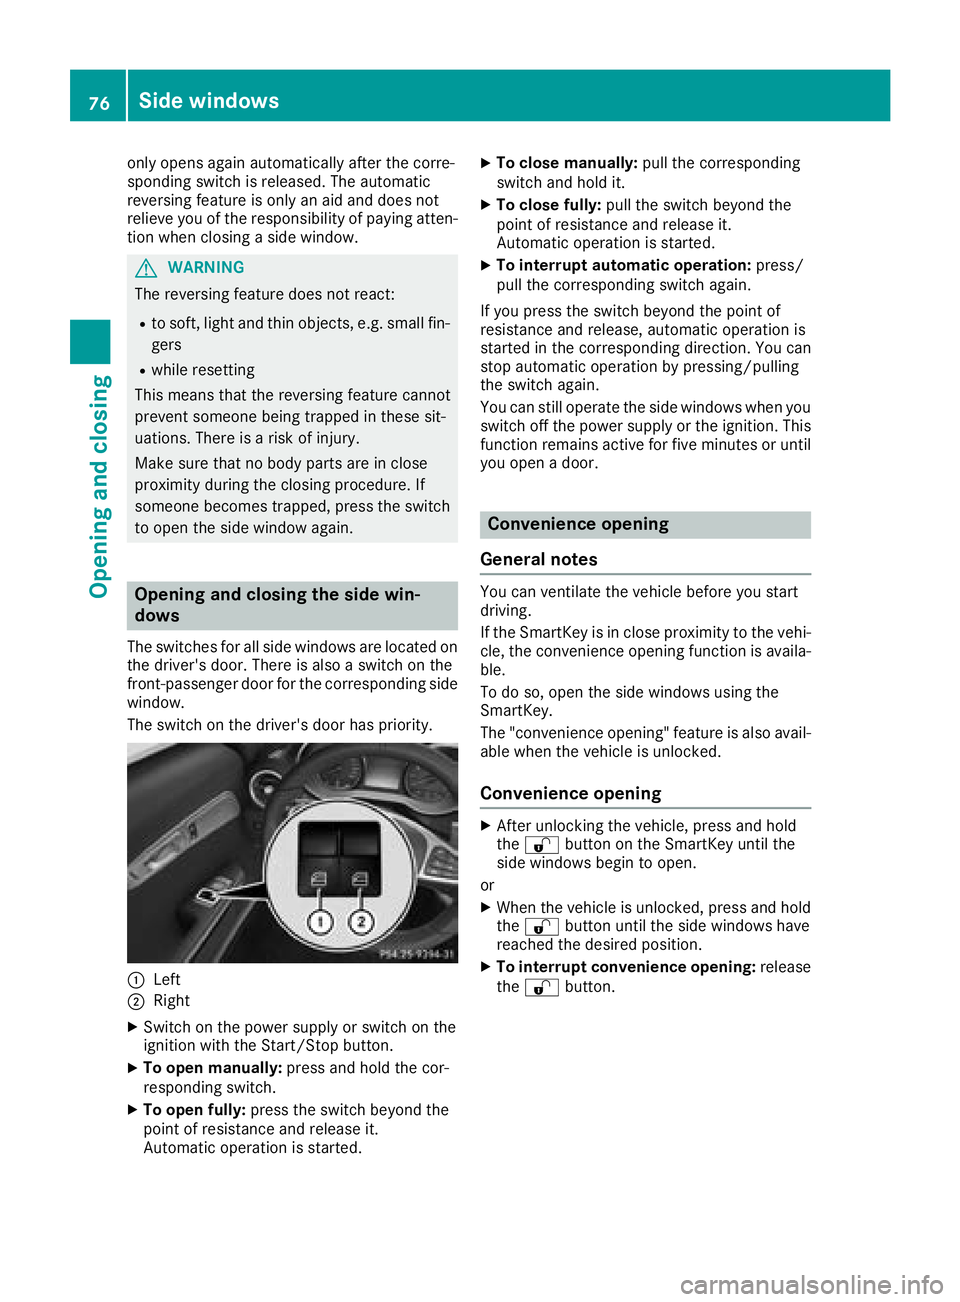
The switches for all side windows are located on the driver's door. There is also a switch on the
front-passenger door for the corresponding side
window.
The switch on the driver's door has priority.
:Left
;Right
XSwitch on the power supply or switch on the
ignition with the Start/Stop button.
XTo open manually: press and hold the cor-
responding switch.
XTo open fully: press the switch beyond the
point of resistance and release it.
Automatic operation is started.
XTo close manually: pull the corresponding
switch and hold it.
XTo close fully: pull the switch beyond the
point of resistance and release it.
Automatic operation is started.
XTo interrupt automatic operation: press/
pull the corresponding switch again.
If you press the switch beyond the point of
resistance and release, automatic operation is
started in the corresponding direction. You can
stop automatic operation by pressing/pulling
the switch again.
You can still operate the side windows when you
switch off the power supply or the ignition. This
function remains active for five minutes or until
you open a door.
Convenience opening
General notes
You can ventilate the vehicle before you start
driving.
If the SmartKey is in close proximity to the vehi-
cle, the convenience opening function is availa-
ble.
To do so, open the side windows using the
SmartKey.
The "convenience opening" feature is also avail-
able when the vehicle is unlocked.
Convenience opening
XAfter unlocking the vehicle, press and hold
the % button on the SmartKey until the
side windows begin to open.
or
XWhen the vehicle is unlocked, press and hold
the % button until the side windows have
reached the desired position.
XTo interrupt convenience opening: release
the % button.
76Side windows
Opening and closing