2018 MERCEDES-BENZ AMG GT COUPE oil
[x] Cancel search: oilPage 21 of 294

Vehicle data ................................... 288
Telephone
Accepting a call (multifunction
steering wheel) .............................. 162
Authorizing a mobile phone (con-
necting) .........................................2 11
Connecting a mobile phone
(device manager) ........................... 210
Display message ............................ 191
Introduction ................................... 161
Menu (on-board computer) ............ 161
Number from the phone book ........1 62
Redialing ........................................ 162
Rejecting/ending a call ................. 162
see also Digital Operator's Man-
ual ..................................................2 04
Temperature
Coolant (display in the instrument
cluster) .......................................... 154
Engine oil (on-board computer) ...... 165
Outside temperature ......................1 54
Setting (climate control) ................ 100
Transmission oil (on-board com-
puter) ............................................. 165
Timing (RACETIMER) ......................... 167
Tire pressure
Calling up (on-board computer) ..... 264
Checking manually ........................ 263
Display message ............................ 186
Maximum ....................................... 263
Not reached (TIREFIT) .................... 248
Notes ............................................. 262
Reached (TIREFIT) .......................... 249
Recommended ............................... 261
Tire pressure monitor
Checking the tire pressure elec-
tronically ........................................ 265
Function/notes .............................2 64
General notes ................................ 264
Important safety notes .................. 264
Restarting ...................................... 266
Warning lamp ................................. 202
Warning message .......................... 265
Tire-change tool kit ........................... 246
TIREFIT kit
Important safety notes .................. 247
Storage location ............................ 246
Tire pressure not reached .............. 248 Tire pressure reached .......
............. 249
Usi
ng ............................................. 247
Tires
Aspect ratio (definition) ................. 275
Average weight of the vehicle
occupants (definition) .................... 274
Bar (definition) ............................... 274
Changing a wheel .......................... 276
Characteristics .............................. 274
Checking ........................................ 259
Curb weight (definition) ................. 275
Definition of terms ......................... 274
Direction of rotation ......................2 76
Display message ............................ 186
Distribution of the vehicle occu-
pants (definition) ............................ 276
DOT (Department of Transporta-
tion) (definition) .............................2 74
DOT, Tire Identification Number
(TIN) ............................................... 273
GAWR (Gross Axle Weight Rating)
(definition) ..................................... 274
GVW (Gross Vehicle Weight) (def-
inition) ...........................................2 75
GVWR (Gross Vehicle Weight Rat-
ing) (definition) .............................. 275
Important safety notes .................. 258
Increased vehicle weight due to
optional equipment (definition) ...... 274
Information on driving .................... 258
Kilopascal (kPa) (definition) ........... 275
Labeling (overview) ........................ 271
Load bearing index (definition) ...... 276
Load index ..................................... 273
Load index (definition) ................... 275
Maximum load on a tire (defini-
tion) ............................................... 275
Maximum loaded vehicle weight
(definition) ..................................... 275
Maximum permissible tire pres-
sure (definition) ............................. 275
Maximum tire load ......................... 273
Maximum tire load (definition) ....... 275
Notes on sport tires ....................... 258
Optional equipment weight (defi-
nition) ............................................ 276
P
SI (pounds per square inch) (def-
inition) ........................................... 275
Index19
Page 39 of 294
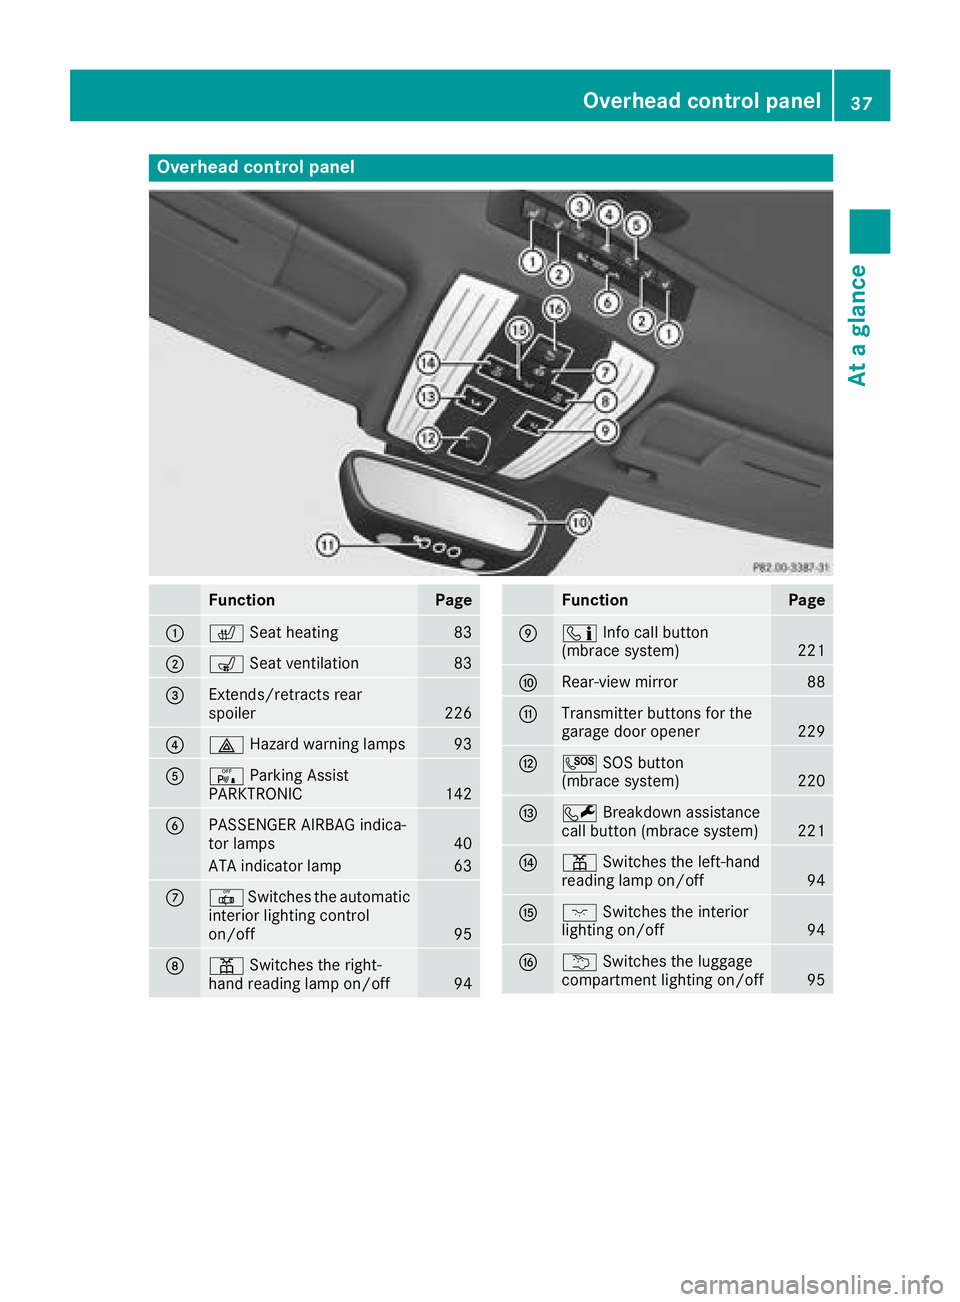
Overhead control panel
FunctionPage
:cSeat heating83
;sSeat ventilation83
=Extends/retracts rear
spoiler226
?£Hazard warning lamps93
AcParking Assist
PARKTRONIC142
BPASSENGER AIRBAG indica-
tor lamps40
ATA indicator lamp63
C| Switches the automatic
interior lighting control
on/off
95
Dp Switches the right-
hand reading lamp on/off94
FunctionPage
Eï Info call button
(mbrace system)221
FRear-view mirror88
GTransmitter buttons for the
garage door opener229
HG SOS button
(mbrace system)220
IF Breakdown assistance
call button (mbrace system)221
Jp Switches the left-hand
reading lamp on/off94
Kc Switches the interior
lighting on/off94
Lu Switches the luggage
compartment lighting on/off95
Overhead control panel37
At a glance
Page 67 of 294
SmartKey
Important safety notes
GWARNING
If children are left unsupervised in the vehicle,
they could:
Ropen the doors, thus endangering other
people or road users.
Rget out and disrupt traffic.
Roperate the vehicle's equipment.
Additionally, children could set the vehicle in
motion if, for example, they:
Rrelease the parking brake.
Rshifting the automatic transmission out of
park position P
RStart the engine.
There is a risk of an accident and injury.
When leaving the vehicle, always take the
SmartKey with you and lock the vehicle. Never
leave children or animals unattended in the
vehicle. Always keep the SmartKey out of
reach of children.
GWARNING
If you attach heavy or large objects to the
SmartKey, the SmartKey could be uninten-
tionally turned in the ignition lock. This could
cause the engine to be switched off. There is a risk of an accident.
Do not attach any heavy or large objects to the
SmartKey. Remove any bulky key rings before
inserting the SmartKey into the ignition lock.
!Keep the SmartKey away from strong mag-
netic fields. Otherwise, the remote control
function could be affected.
Strong magnetic fields can occur in the vicin-
ity of powerful electrical installations.
Do not keep the SmartKey:
Rwith electronic devices, e.g. a mobile phone
or another SmartKey
Rwith metallic objects, e.g. coins or metal foil
Rinside metallic objects, e.g. a metal case
This can affect the functionality of the Smart-
Key. Vehicles with KEYLESS-GO start function:
do
not keep the SmartKey on the cargo compart-
ment cover or in the cargo compartment. Oth-
erwise, the SmartKey may not be detected, e.g.
when starting the engine using the Start/Stop
button.
A brief radio connection between the vehicle
and the SmartKey determines whether a valid
SmartKey is in, or in the direct vicinity of, the
vehicle. This occurs, for example:
Rwhen starting the engine
Rwhile driving
Rwhen using the tailgate unlocking sensor
Rwhen the external door handles are touched
Rduring convenience closing
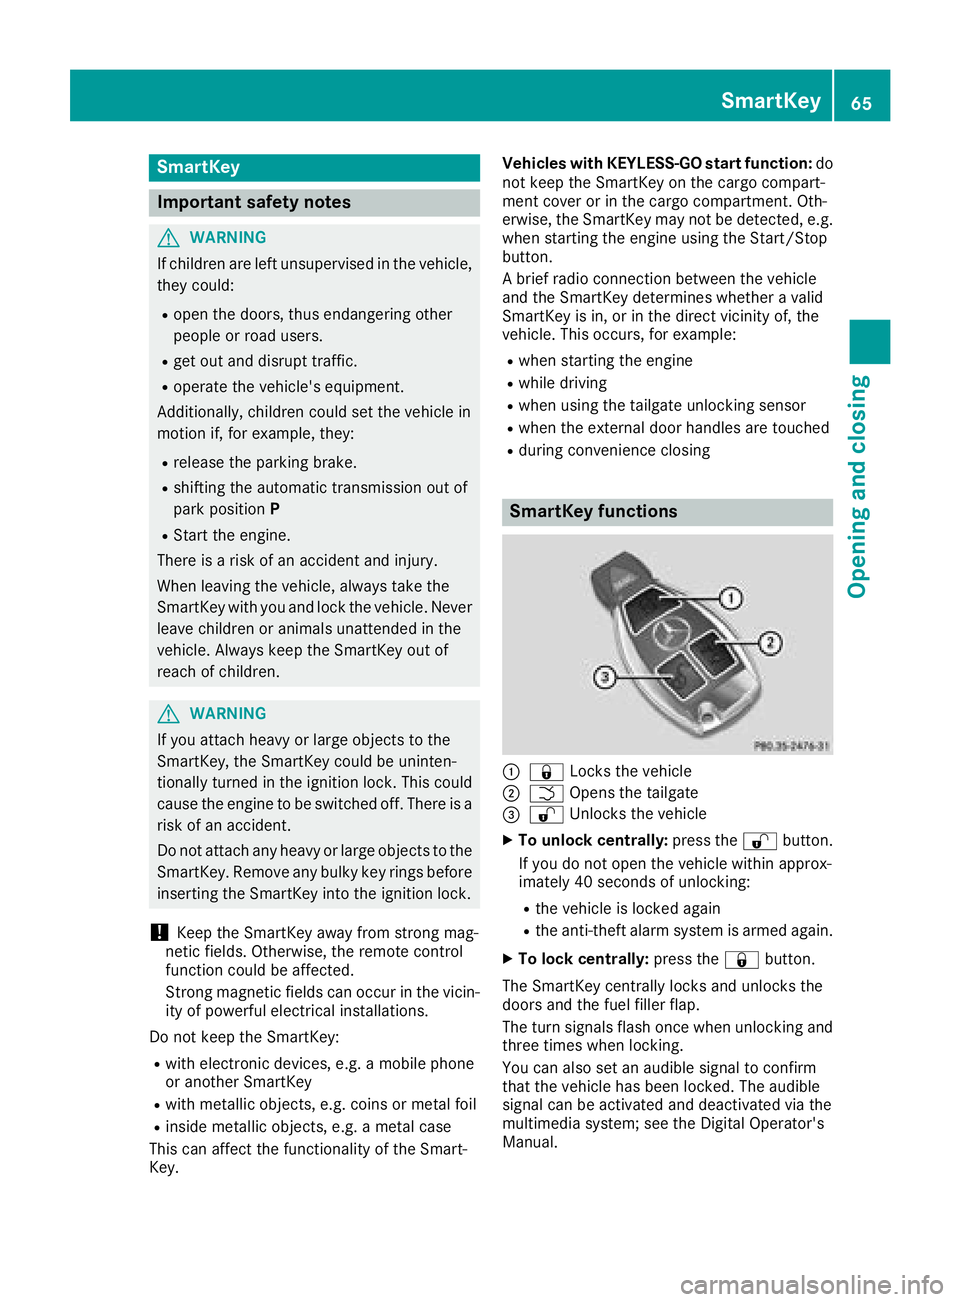
SmartKey functions
:& Locks the vehicle
;FOpens the tailgate
=%Unlocks the vehicle
XTo unlock centrally: press the%button.
If you do not open the vehicle within approx-
imately 40 seconds of unlocking:
Rthe vehicle is locked again
Rthe anti-theft alarm system is armed again.
XTo lock centrally: press the&button.
The SmartKey centrally locks and unlocks the
doors and the fuel filler flap.
The turn signals flash once when unlocking and
three times when locking.
You can also set an audible signal to confirm
that the vehicle has been locked. The audible
signal can be activated and deactivated via the
multimedia system; see the Digital Operator's
Manual.
SmartKey65
Opening and closing
Z
Page 75 of 294

tem will be triggered. Switch off the alarm
(Ypage 63).
Cargo compartment
Important safety notes
GWARNING
Combustion engines emit poisonous exhaust
gases such as carbon monoxide. If the tailgate is open when the engine is running, particu-
larly if the vehicle is moving, exhaust fumes
could enter the passenger compartment.
There is a risk of poisoning.
Turn off the engine before opening the tail-
gate. Never drive with the tailgate open.
GWARNING
If objects, luggage or loads are not secured or
not secured sufficiently, they could slip, tip
over or be flung around and thereby hit vehicle
occupants. There is a risk of injury, particu-
larly in the event of sudden braking or a sud-
den change in direction.
Always store objects so that they cannot be
flung around. Secure objects, luggage or
loads against slipping or tipping before the
journey.
!The tailgate swings upwards and out when
opening. Therefore, make sure that there is
sufficient space above the tailgate.
The opening dimensions of the tailgate can be
found in the "Vehicle data" section
(
Ypage 288).
If the rear spoiler has been extended manually
the height when opened is higher by this
amount. If in doubt, retract the rear spoiler again
manually before opening the tailgate
(
Ypage 226).
You can switch the cargo compartment lamp on
and off manually on the overhead control panel
(
Ypage 94).
Do not leave the SmartKey in the cargo com-
partment. You could otherwise lock yourself
out.
You should preferably place luggage or loads in
the cargo compartment. Observe the loa
ding
guidelines (Ypage 213).
Opening/closing from outside
Opening
XPress the Fbutton on the SmartKey.
The tailgate opens slightly.
XLift the tailgate.
Closing
XPull the tailgate down using recess :and let
it drop into the lock.
XLock the vehicle if necessary with the &
button on the SmartKey or with KEYLESS-GO
(
Ypage 66).
Unlocking with KEYLESS-GO
Important safety notes
GWARNING
The vehicle exhaust system can become very
hot. If you unlock the luggage compartment
with KEYLESS-GO, you could burn yourself if
you touch the exhaust system. There is a risk of injury. Always ensure that you make the
Cargo compartment73
Opening and closing
Z
Page 107 of 294
!Do not warm up the engine while stationary.
Pull away immediately. Avoid high engine
speeds and full throttle until the engine has
reached its operating temperature.
In vehicles with automatic transmission,
engage positions P and R only when the vehi-
cle is stationary.
Where possible, avoid spinning the drive
wheels when pulling away on slippery roads.
You could otherwise damage the drive train.
!During a cold start with low engine oil tem-
peratures (below 32 ‡) (0 †), the maximum
engine speed is restricted in order to protect
the engine. To protect the engine and main-
tain smooth engine operation, avoid driving at
full throttle when the engine is cold.
Key positions
Start/Stop button
General notes
All vehicles are equipped with a Start/Stop but-
ton.
The Start/Stop button is located in the center
console and is illuminated when the vehicle is
unlocked.
The SmartKey must be in the vehicle.
Pressing the Start/Stop button several times in
succession corresponds to the different Smart-
Key positions in the ignition lock. This is only the
case if you are not depressing the brake pedal.
If you depress the brake pedal and press the
Start/Stop button, the engine starts immedi-
ately.
A check which periodically establishes a radio
connection between the vehicle and the Smart-
Key determines whether a valid SmartKey is in
the vehicle. This occurs, for example, when
starting the engine.
If there is a SmartKey in the ignition lock, this
takes precedence over the KEYLESS-GO start
function.
To start the vehicle without actively using the
SmartKey:
Rthe SmartKey must be in the vehicle
Rthe vehicle must not be locked with the
SmartKey or KEYLESS-GO (Ypage 66) Do not keep the SmartKey:
Rwith electronic devices, e.g. a mobile phone
or another SmartKey
Rwith metallic objects, e.g. coins or metal foil
Rinside metallic objects, e.g. a metal case
This can affect the functionality of the Smart-
Key.
If you lock the vehicle with the SmartKey remote control or with KEYLESS-GO, after a short time:
Ryou will not be able to switch on the ignition
with the Start/Stop button
Ryou will no longer be able to start the engine
with the Start/Stop button until the vehicle is
unlocked again
If you lock the vehicle centrally using the button
on the driver's door (
Ypage 71), you can con-
tinue to start the engine with the Start/Stop
button.
The engine can be switched off while the vehicle
is in motion by pressing and holding the Start/
Stop button for three seconds. This function
operates independently of the ECO start/stop
automatic engine switch-off function.
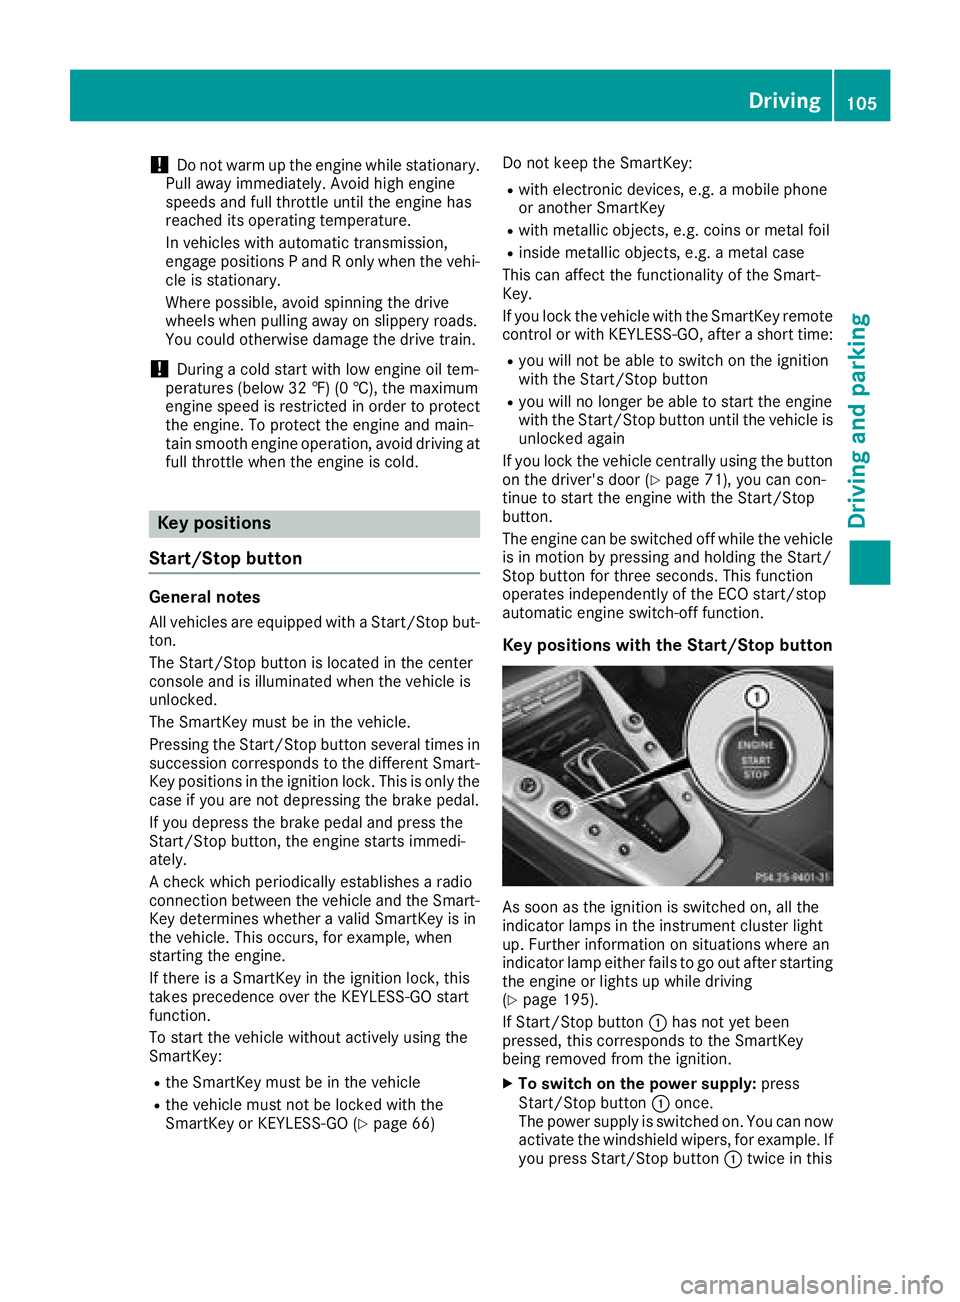
Key positions with the Start/Stop button
As soon as the ignition is switched on, all the
indicator lamps in the instrument cluster light
up. Further information on situations where an
indicator lamp either fails to go out after starting
the engine or lights up while driving
(
Ypage 195).
If Start/Stop button :has not yet been
pressed, this corresponds to the SmartKey
being removed from the ignition.
XTo switch on the power supply: press
Start/Stop button :once.
The power supply is switched on. You can now
activate the windshield wipers, for example. If you press Start/Stop button :twice in this
Driving105
Driving and parking
Z
Page 142 of 294
Deactivating theHOL Dfunction
The HOLD function is deactivated if:
Ryou depress th eaccelerator and th etrans -
missio nis in position hork
Ryou shift th etransmissio nto position j
Ryou apply th ebrake sagain wit h acertain
amount of pressure until th eHOL Ddisplay dis -
appears from th emultifunction display
Ryou secure th evehicle usin gth eelectric park-
in g brake
iAfte r atime, th eelectric parking brake
secure sth evehicle and relieves th eservic e
brake .
The electric parking brake secure sth evehicle
automatically if th eHOLD function is activated
when th evehicle is stationary and :
Rthedriver's seat belt is no tfastene dand th e
driver's doo ris ope n
Rtheengin eis switched off, unless it is auto-
matically switched of fby th eEC Ostart/sto p
function
Ra syste mmalfunction occur s
Rthepowe rsupply is no tsufficien t
If th eelectric parking brake is no toperational, a
hor nwill soun dat regular intervals. The HOLD
function mus tthen be deactivated.
If amalfunction occurs, th etransmissio nmay
also be shifted to position jautomatically.
The Brake Immediately
messag emay also
appear in th emultifunction display.
XImmediately depress th ebrake firmly until th e
warnin gmessag ein th emultifunction display
goe sout .
The HOLD function is deactivated. If you turn of f
th eengine, take of fyour seat belt or ope nth e
driver's doo rwhen th eHOLD function is activa-
ted, ahor nwill soun dat regular intervals. The
soundin gof th ehor nalerts you to th efac tthat
th eHOLD function is still activated. If you
attempt to loc kth evehicle, th etone becomes
louder. The vehicle canno tbe locke duntil you
hav edeactivated th eHOLD function .
iAfterswitchin gof fth eengine, it can only be
started again once you hav edeactivated th e
HOLD function .
RACE START
Important safet ynotes
iRAC ESTART mus tno tbe used on normal
roads. RAC ESTART mus tonly be activated
and used on dedicated road circuits, outsid e
of publi croad use.
RAC ESTART enable soptimal acceleration from
a standin gstart .Fo rthis, asuitably high-grip
road surfac eis require dand th evehicle and tires
mus tbe in goo dworking order .
GWARNING
If you use RAC ESTART ,individual tires may
start to spi nand th evehicle could skid.
Dependin gon th eselecte dES P
®mode, there
is an increase dris kof skidding and havin gan
accident. Mak esur ethat no persons, animals
or obstacles are within range of th evehicle.
iObserv eth esafet ynote son drivin gsafet y
systems (Ypage 57).
Be sur eto rea dth esafet ynote sand informa-
tion on ES P
®(Ypage 61).
iObserveth especific servic erequirements
fo rracetrac kmode operation (Ypage 238).
Activation conditions
You can activateRAC ESTART under th efollow -
in g conditions:
Rth edoors are close d
Rtheengin eis running and th eengin eand
transmissio nare at operatin gtemperature .
Thi sis th ecas ewhen th eoil temperature dis -
play in th emultifunction display is shown in
whit e (
Ypage 165).
RESP®is functionin gcorrectl y (Ypage 61 )
Rthesteerin gwhee lis in th estraight-ahead
position
Rth evehicle is stationary and th ebrake peda lis
depressed sufficientl y(lef tfoot )
Rthetransmissio nis in position h
Rdrive program S,S+ orRAC Eis selecte d
(Ypage 111).
140Driving systems
Driving an d parking
Page 165 of 294
RDistance Pilot DISTRONIC (Ypage 131)
RDistance warning function of Active Brake
Assist (Ypage 58)
RBlind Spot Assist (Ypage 150)
RATTENTION ASSIST (Ypage 148)
RLane Keeping Assist (Ypage 152)
XPress:to display the ATTENTION ASSIST
assessment.
Service menu
Depending on the equipment installed in the
vehicle, you have the following options in the
Service
menu:
Rcalling up display messages in message mem- ory (Ypage 169)
Rchecking the tire pressure electronically
(Ypage 265).
Rcalling up the service due date (Ypage 238).
Rchecking the engine oil level using the on-
board computer (Ypage 234).
Settings menu
Introduction
Depending on the equipment installed in the
vehicle, you have the following options in the
Settings
menu:
Rchanging assistance settings (Ypage 163).
Rchanging the light settings (Ypage 164).
Rchanging the instrument cluster settings
(Ypage 164).
Rrestoring the factory settings (Ypage 165).
Assistance submenu
Activating/deactivating Active Brake
Assist
XPress òon the steering wheel to open the
menu list.
XPress :or9 on the steering wheel to
select the Settingsmenu.
XConfirm by pressing aon the steering
wheel.
XPress :or9 to select the DriveAs‐sistsubmenu.
XPressato confirm.
XSelect Brake Assistwith9 or:.
XPress ato confirm.
The current selection appears.
XTo activate/deactivate: press theabut-
ton again.
When Active Brake Assist is deactivated, the
æ symbol appears in the Assistance
Graphicmenu of the multifunction display.
Further information on Active Brake Assist
(
Ypage 58).
Activating/deactivating Blind Spot Assist
XPress òon the steering wheel to open the
menu list.
XPress :or9 on the steering wheel to
select the Settingsmenu.
XConfirm by pressing aon the steering
wheel.
XPress :or9 to select the DriveAs‐sistsubmenu.
XPressato confirm.
XPress :or9 to select Blind SpotAssist.
XPressato confirm.
The current selection appears.
XTo activate/deactivate: press theabut-
ton again.
When Blind Spot Assist is activated, gray
radar waves propagating backwards appear
next to the vehicle in the Assistance
Graphicmenu in the multifunction display.
For further information about Blind Spot Assist,
see (
Ypage 150).
Setting ATTENTION ASSIST
XPress òon the steering wheel to open the
menu list.
XPress :or9 on the steering wheel to
select the Settingsmenu.
XConfirm by pressing aon the steering
wheel.
XPress :or9 to select the DriveAs‐sistsubmenu.
XPressato confirm.
XSelect Attention Assistwith: or
9.
XPress ato confirm.
Menus and submenus163
On-board computer and displays
Z
Page 167 of 294
The selected unit of measurement for distance
applies to:
RDigital speedometer in theTripmenu
ROdometer and the trip odometer
RTrip computer
RRange
RNavigation instructions in the Navimenu
RCruise control
RDistance Pilot DISTRONIC
RASSYST PLUS service interval display
Switching the additional speedometer
on/off
If the additional speedometer is switched on,
the speed is shown in the status bar in the mul-
tifunction display instead of the outside tem-
perature.
The additional speedometer displays the speed
in the respective unit that is not shown in the
multifunction display.
XPressòon the steering wheel to open the
menu list.
XPress :or9 on the steering wheel to
select the Settingsmenu.
XConfirm by pressing aon the steering
wheel.
XPress :or9 to select the Instru‐ment Clustersubmenu.
XPressato confirm.
XPress :or9 to select the Addi‐tional Speedometer [km/h]function.
The current selection appears.
XTo switch on/off: pressaagain.
Restoring the factory settings
XPress òon the steering wheel to open the
menu list.
XPress :or9 on the steering wheel to
select the Settingsmenu.
XConfirm by pressing aon the steering
wheel.
XPress :or9 to select the FactorySettingssubmenu.
XPressato confirm.
The Reset All Settings?function
appears.
XPress :or9 to select NoorYes.
XPress ato confirm the selection.
If you have selected Yes, the multifunction
display shows a confirmation message.
For safety reasons, the Daytime Running
Lightsfunction in theLightssubmenu is only
reset when the vehicle is stationary.
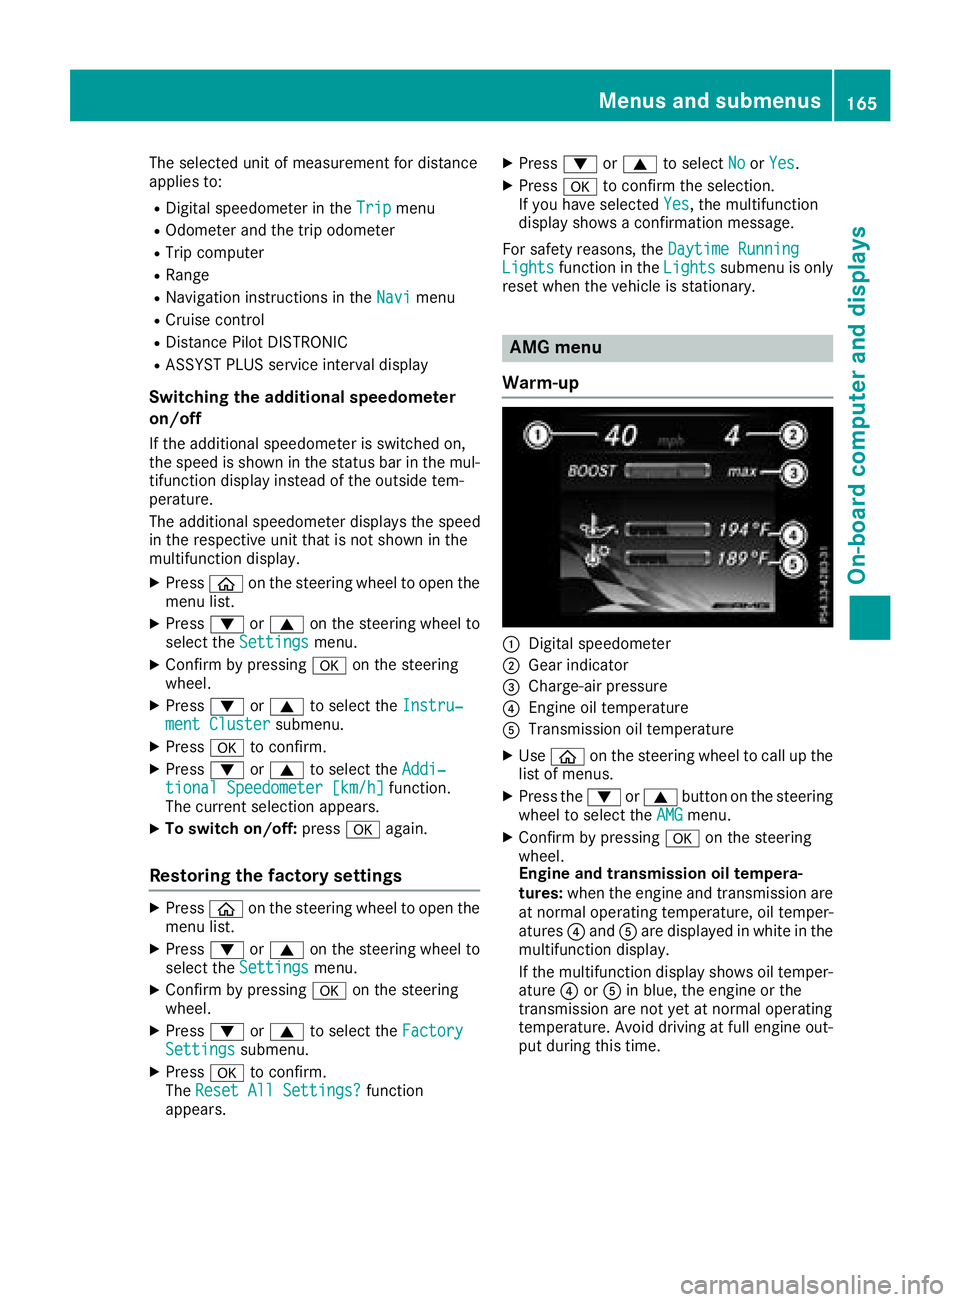
AMG menu
Warm-up
:Digital speedometer
;Gear indicator
=Charge-air pressure
?Engine oil temperature
ATransmission oil temperature
XUse ò on the steering wheel to call up the
list of menus.
XPress the :or9 button on the steering
wheel to select the AMGmenu.
XConfirm by pressing aon the steering
wheel.
Engine and transmission oil tempera-
tures: when the engine and transmission are
at normal operating temperature, oil temper-
atures ?and Aare displayed in white in the
multifunction display.
If the multifunction display shows oil temper-
ature ?orA in blue, the engine or the
transmission are not yet at normal operating
temperature. Avoid driving at full engine out-
put during this time.
Menus and submenus165
On-board computer and displays
Z