2018 MERCEDES-BENZ AMG GT COUPE lock
[x] Cancel search: lockPage 230 of 294
of movement of it. Release the switch imme-
diately if somebody becomes trapped. The
active aerodynamics profile then extends
again.
When leaving the vehicle, always take the
SmartKey with you and lock the vehicle. Never
leave children unsupervised in the vehicle.
!Take the restricted ground clearance into
account when the active aerodynamics pro-
file is extended.
You can extend and retract the active aerody-
namics profile manually for cleaning.
XSelect key position 2with the Start/Stop
button (Ypage 106).
XTo extend: press and hold button :until the
active aerodynamics profile is fully extended.
Button :flashes until the active aerodynam-
ics profile has extended and then lights up in
red. Extending Spoilers Press and Hold
Switchappears in the display.
XTo retract:
press and hold button :until the
active aerodynamics profile is fully retracted.
Button :flashes until the active aerodynam-
ics profile has retracted and then goes out.
Retracting Spoilers Press and Hold
Switchappears in the display.
If you release button :while retracting the
active aerodynamics profile, retracting stops.
Retracting continues when you press the button
again.
If you release button :while extending the
active aerodynamics profile, extending stops.
Extending continues when you press the button
again.
Problems with the active aerodynamics profile
ProblemPossible causes/consequences and MSolutions
The active aerodynamics
profile stops moving
when retracting or
extending manually.You have switched off the ignition.
XSwitch the ignition back on.
XPress button:.
The active aerodynamics profile then retracts or extends.
The active aerodynamics
profile does not extend
manually.The active aerodynamics profile can only be retracted or extended
manually when the vehicle is stationary and position jis engaged.
The active aerodynamics profile retracts automatically, as soon as the
vehicle starts moving.
The active aerodynamics
profile does not retract
or extend automatically.The active aerodynamics profile's movement is blocked, e.g. by a
trapped object.
XRemove the object.
Garage door opener
General notes
The HomeLink®garage door opener integrated
in the rear-view mirror allows you to operate up
to three different door and gate systems.
Use the integrated garage door opener only on
garage doors that:
Rhave safety stop and reverse features and
Rmeet current U.S. federal safety standards Once programed, the integrated garage door
opener in the rear-view mirror will assume the
function of the garage door system's remote
control. Please also read the operating instruc-
tions for the garage door system.
When programming a garage door opener, park
the vehicle outside the garage. Do not run the
engine while programming.
Certain garage door drives are incompatible
with the integrated garage door opener. If you
have difficulty programing the integrated garage
228Features
Stowage and features
Page 234 of 294
Engine compartment
Hood
Important safety notes
GWARNING
If the hood is unlatched, it may open up when the vehicle is in motion and block your view.
There is a risk of an accident.
Never unlatch the hood while driving. Before
every trip, ensure that the hood is locked.
GWARNING
When opening and closing the hood, it may
suddenly fall into the closed position. There is a risk of injury to persons within range of
movement of the hood.
Open and close the hood only when no one is
within its range of movement.
GWARNING
Opening the hood when the engine is over-
heated or when there is a fire in the engine
compartment could expose you to hot gases
or other service products. There is a risk of
injury.
Let an overheated engine cool down before
opening the hood. If there is a fire in the
engine compartment, keep the hood closed
and contact the fire department.
GWARNING
The engine compartment contains moving
components. Certain components, such as
the radiator fan, may continue to run or start
again suddenly when the ignition is off. There is a risk of injury.
If you need to do any work inside the engine
compartment:
Rswitch off the ignition
Rnever reach into the area where there is a
risk of danger from moving components,
such as the fan rotation area
Rremove jewelry and watches
Rkeep items of clothing and hair, for exam-
ple, away from moving parts
GWARNING
The ignition system and the fuel injection sys-
tem work under high voltage. If you touch
components which are under voltage, you
could get an electric shock. There is a risk of
injury.
Never touch components of the ignition sys-
tem or fuel injection system when the ignition
is switched on.
Opening the hood
GWARNING
Certain components in the engine compart-
ment, such as the engine, radiator and parts
of the exhaust system, can become very hot.
Working in the engine compartment poses a
risk of injury.
Where possible, let the engine cool down and touch only the components described in the
following.
GWARNING
When the hood is open and the windshield
wipers are set in motion, you can be injured by
the wiper linkage. There is a risk of injury.
Always switch off the windshield wipers and
the ignition before opening the hood.
!Make sure that the windshield wipers are
not folded away from the windshield. You
could otherwise damage the windshield wip-
ers or the hood.
232Engine compartment
Maintenance and care
Page 237 of 294
Display messagesPossible causes/consequences andMSolutions
Engine Oil LevelCorrectMeasurementOnlyif Vehicl eIson Level Ground
The vehicl eis no tparked on alevel surface.
XPark th evehicl eon alevel surface.
Engine Oil LevelNot Measurabl e
Oil level measuremen twit hth eoil dipstick is possible. The measurin g
system is malfunctioning .
XVisitaqualified specialist workshop .
Adding engine oil
GWARNING
Certain component sin th eengin ecompart-
ment, suc has th eengine, radiato rand part s
of th eexhaust system, can become ver yhot .
Working in th eengin ecompartmen tposes a
ris kof injury.
Where possible, let th eengin ecool down and
touch only th ecomponent sdescribed in th e
following.
GWARNIN G
If engin eoil comes int ocontact wit hhot com-
ponents in th eengin ecompartment, it may
ignite. There is aris kof fir eand injury.
Mak esur ethat engin eoil is no tspilled next to
th efiller neck .Let th eengin ecool down and
thoroughly clean th eengin eoil off th ecom-
ponents before starting th eengine.
HEnvironmenta lnot e
Whe naddin goil, tak ecar eno tto spil lany. If
oil enters th esoil or waterways, it is harmful to
th eenvironment.
!Use only engin eoils and oil filters that are
approve dfor vehicles wit h aservic esystem. A
list of th eengin eoils and oil filters that hav e
been tested and approve din accordanc ewit h
Mercedes-Ben zSpecification sfor Service
Products is available at any authorize d
Mercedes-Ben zCenter. The followin
gcaus eengin efailure or damag e
to th eexhaust system:
RUse of engin eoils and oil filters that hav e
no tbeen expressl yapprove dfor th eservic e
system
RReplacement of engin eoil and oil filter after
th ereplacemen tinterval specified by th e
servic esystem has expired
RUse of engin eoil additive s
!Do notadd to omuc hoil. If th eoil level is
abov eth e"max "mar kon th edipstick ,to o
muc hoil has been added .This can lead to
damag eto th eengin eor th ecatalytic con-
verter. Hav eexcess oil siphoned off .
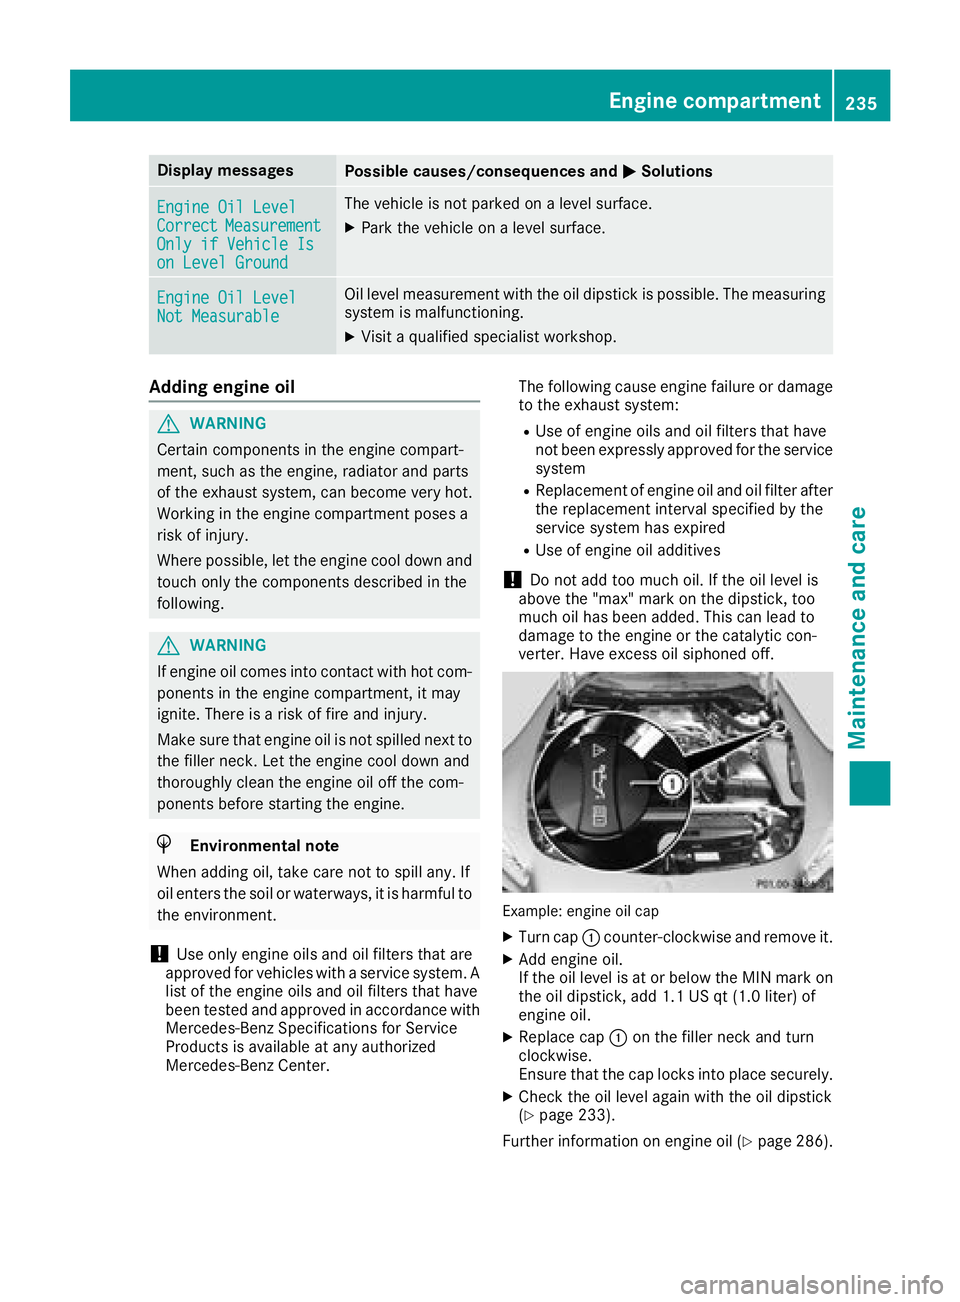
Example: engineoil cap
XTurn cap :counter-clockwise and remove it .
XAddengin eoil.
If th eoil level is at or belo wtheMIN mar kon
th eoil dipstick ,add 1. 1US qt (1. 0liter) of
engin eoil.
XReplac ecap :on th efiller neck and tur n
clockwise .
Ensur ethat th ecap locks int oplac esecurely.
XChec kth eoil level again wit hth eoil dipstick
(Ypage 233).
Further information on engin eoil (
Ypage 286).
Engine compartment235
Maintenance and care
Z
Page 238 of 294
Additional service products
Checking coolant level
GWARNIN G
Certain component sin th eengin ecompart-
ment, suc has th eengine, radiato rand part s
of th eexhaust system, can become ver yhot .
Working in th eengin ecompartmen tposes a
ris kof injury.
Wher epossible, let th eengin ecool down and
touch only th ecomponent sdescribed in th e
following.
GWARNIN G
Opening th ehoo dwhen th eengin eis over-
heated or when there is afir ein th eengin e
compartmen tcould expos eyou to hot gase s
or other servic eproducts .There is aris kof
injury.
Let an overheate dengin ecool down before
opening th ehood. If there is afir ein th e
engin ecompartment, keep th ehoo dclosed
and contact th efir edepartment.
GWARNIN G
The coolin gsystem is pressurized, particularly
when th emotor is warm .If you open th ecap ,
you could be scalded if hot coolan tsprays out .
There is aris kof injury.
Let th eengin ecool down before you open th e
cap .Wear gloves and eye protection .Slowly
open th ecap to reliev epressure.
!Befor estarting your journey, mak esur ethat
all engin ecover sare installed. Otherwise ,th e
engin ecan be damaged, e.g. throug hover-
heating .
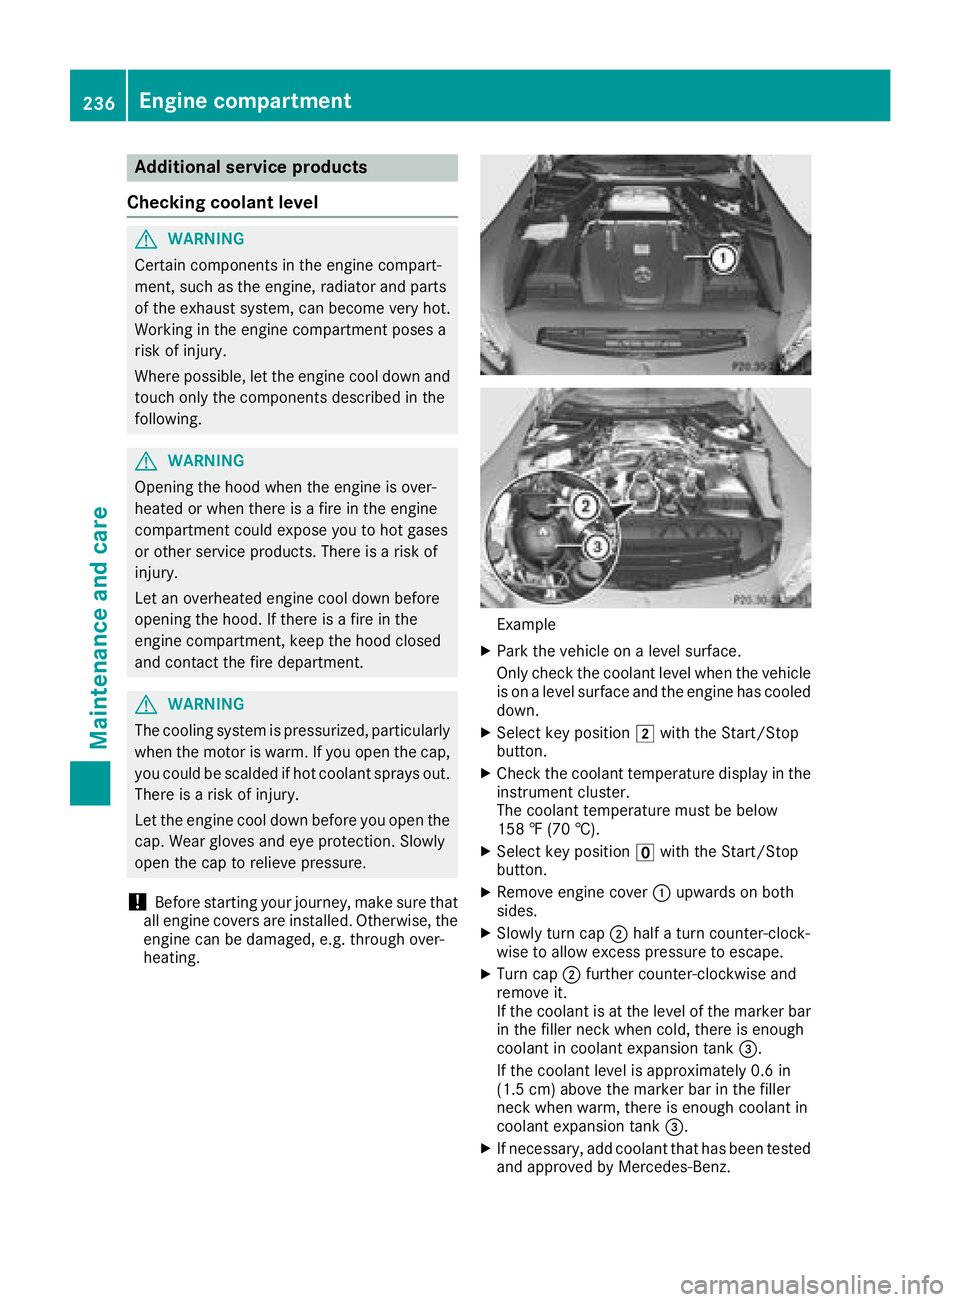
Example
XPark thevehicl eon alevel surface.
Only chec kth ecoolan tlevel when th evehicl e
is on alevel surfac eand th eengin ehas cooled
down .
XSelec tke yposition 2withth eStart/Sto p
button.
XChec kth ecoolan ttemperature display in th e
instrumen tcluster.
The coolan ttemperature mus tbe belo w
15 8 ‡ (70 †).
XSelec tke yposition uwithth eStart/Sto p
button.
XRemove engin ecover :upwards on bot h
sides.
XSlowly tur ncap ;half atur ncounter-clock -
wise to allow excess pressur eto escape.
XTurn cap ;further counter-clockwise and
remove it .
If th ecoolan tis at th elevel of th emarke rbar
in th efiller neck when cold, there is enough
coolan tin coolan texpansion tan k=.
If th ecoolan tlevel is approximately 0. 6in
(1. 5cm) abov eth emarke rbar in th efiller
neck when warm ,there is enough coolan tin
coolan texpansion tan k=.
XIf necessary, add coolan tthat has been tested
and approve dby Mercedes-Benz .
236Engine compartment
Maintenance and care
Page 239 of 294
XReplacecap ;and tur nit clockwise as far as
it will go.
XReplac eengin ecover :.
Fo rfurther information on coolant, see
(
Ypage 287).
Windshield washer system
GWARNIN G
Certain component sin th eengin ecompart-
ment, suc has th eengine, radiato rand part s
of th eexhaust system, can become ver yhot .
Workin gin th eengin ecompartmen tposes a
ris kof injury.
Wher epossible, let th eengin ecool down and
touch only th ecomponent sdescribe din th e
following.
GWARNIN G
Windshield washe rconcentrate could ignit eif
it comes int ocontact wit hhot engin ecompo -
nent sor th eexhaust system. There is aris kof
fir eand injury.
Mak esur ethat no windshield washe rcon-
centrat eis spilled next to th efiller neck .
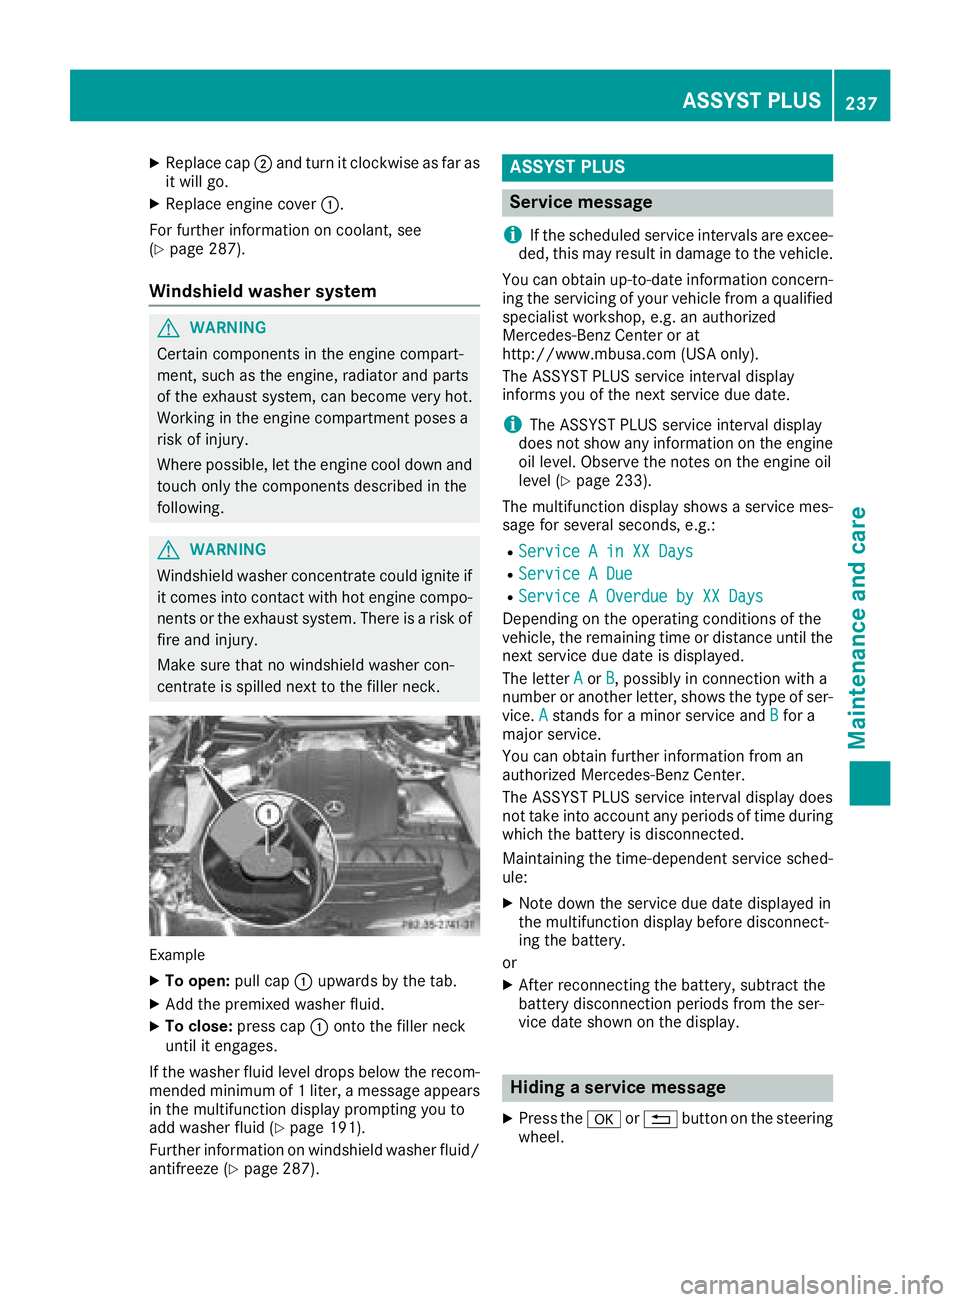
Example
XTo open :pull cap :upwards by th etab .
XAddth epremixed washe rfluid .
XTo close: press cap :onto th efiller neck
until it engages.
If th ewashe rfluid level drops belo wtherecom-
mended minimum of 1liter, amessage appear s
in th emultifunction display prompting you to
add washe rfluid (
Ypage 191).
Further information on windshield washe rfluid /
antifreez e (
Ypage 287).
ASSYST PLUS
Service message
i
If th escheduled servic eintervals are excee-
ded, this may result in damag eto th evehicle.
You can obtain up-to-date information concern -
ing th eservicing of your vehicl efrom aqualified
specialist workshop, e.g. an authorize d
Mercedes-Benz Cente ror at
http://www.mbusa.co m(US Aonly).
The ASSYS TPLU Sservic einterval display
inform syou of th enext servic edue date.
iThe ASSYS TPLU Sservic einterval display
does no tsho wany information on th eengin e
oil level. Observ eth enote son th eengin eoil
level (
Ypage 233).
The multifunction display shows aservic emes -
sage for several seconds, e.g. :
RService Ain XX Day s
RService ADue
RServic e AOverdu eby XX Day s
Dependingon th eoperating condition sof th e
vehicle, th eremaining time or distanc euntil th e
next servic edue dat eis displayed.
The lette rA
or B,possibl yin connection wit h a
number or another letter, shows th etyp eof ser -
vice. A
stand sfor aminor servic eand Bfora
major service.
You can obtain further information from an
authorize dMercedes-Benz Center.
The ASSYS TPLU Sservic einterval display does
no ttak eint oaccoun tany periods of time during
whic hth ebattery is disconnected.
Maintainin gth etime-dependen tservic esched-
ule:
XNot edown th eservic edue dat edisplayed in
th emultifunction display before disconnect -
ing th ebattery.
or
XAfte rreconnecting th ebattery, subtrac tth e
battery disconnection periods from th eser -
vic edat eshown on th edisplay.
Hiding a service message
XPress th ea or% buttonon th esteering
wheel.
ASSYST PLUS237
Maintenance and care
Z
Page 241 of 294
Regular careof your vehicl eis acondition for
retaining th equalit yin th elon gterm .
Use car eproducts and cleaning agents recom-
mended and approve dby Mercedes-Benz.
Washing the vehicle and cleaning the
paintwork
Automatic car wash
GWARNIN G
Braking efficiency is reduce dafter washing
th evehicle. There is aris kof an accident.
Afte rth evehicl ehas been washed, brak e
carefully while payin gattention to th etraffic
condition suntil full braking power is restored .
!When Active Brake Assist,Distanc ePilot
DISTRONI Cor th eHOLD function is activated,
th evehicl ebrakes automatically in certain
situations.
To avoi ddamag eto th evehicle, deactivat e
these systems in th efollowin gor similar sit -
uations:
Rwhen towin gth evehicl e
Rin thecar wash
!Never clean your vehicl ein aTouchles s
Automatic Car Wash as these use special
cleaning agents .These cleaning agents can
damag eth epaintwork or plastic parts.
If you hav eyour vehicl ecleane din ahigh -
pressur eautomatic car wash, small amounts
of water may ente rth evehicle.
!If th eSmartKey is within th erear detection
range of KEYLESS-GO ,th efollowin gsitua-
tions, for example, could lead to th euninten-
tional opening of th etailgate:
Rwhen usin gan automatic car wash
Rwhen usin g apowe rwashe r
Mak esur ethat th eSmartKey is at least 10 ft
(3 m) away from th evehicle.
!Mak esur ethat:
Rth eside windows are fully closed.
Rth eblowe rfor th eventilation/heating is
switched off .
Rthewindshield wiper switch is at position 0.
Rtherear vie wcamera is switched off .The vehicl
emay otherwise be damaged.
!When washing your vehicl ein atow-through
car wash, use th eSmartKey instead of th e
Start/Sto pbutton.
Start th eengin eusin gth eSmartKey. Se tth e
transmission to iwithth eE-SELECT selec-
to rlever. Switc hth eengin eoff again wit hth e
SmartKey by turnin gth eSmartKey to position
2. Mak esur ethat you then leav eth eSmart -
Key in position 2.You may otherwise dam-
age th evehicle, th etransmission or th ecar
wash.
Chec kth etransmission position in th einstru-
men tcluster.
!Befor eswitching off th eengine, set th e
transmission to iusin gth eE-SELECT selec-
to rlever. If you open th edriver' sdoor or front-
passenger door ,th etransmission remain sin
this position for up to 30 minute sif th eSmart -
Key is in th eignition ,eve nif th eengin eis
switched off .If you do no tshif tth etransmis -
sion to iusin gth eE-SELECT selector lever
beforehand, it shifts automatically to parking
position jand locks th ewheels if th edriv -
er' sdoor or front-passen ger d
oor is opened
and th eengin eis switched off .This may dam-
age th evehicle, th etransmission or th ecar
wash.
You can wash th evehicl ein an automatic car
wash from th ever ystart .
If th evehicl eis ver ydirty, pre-was hit before
cleaning it in an automatic car wash.
Afte rusin gan automatic car wash, wipe off wax
from th ewindshield and th ewiper blades. This
will preven tsmears and reduce wipin gnoises
caused by residue on th ewindshield.
Washing by hand
In som ecountries, washing by han dis only
allowe dat specially equipped washing bays.
Observ eth elegal requirements in eac hcountry.
XDo no tuse hot water and do no twash th e
vehicl ein direct sunlight.
XUse asof tspong eto clean.
XUse amild cleaning agent, suc has acar
shampoo approve dby Mercedes-Benz .
XThoroughly hosedown th evehicl ewit h a gen -
tl e je tof water.
XDo no tpoin tth ewater je tdirectly towards th e
air inlet .
Care239
Maintenance and care
Z
Page 248 of 294
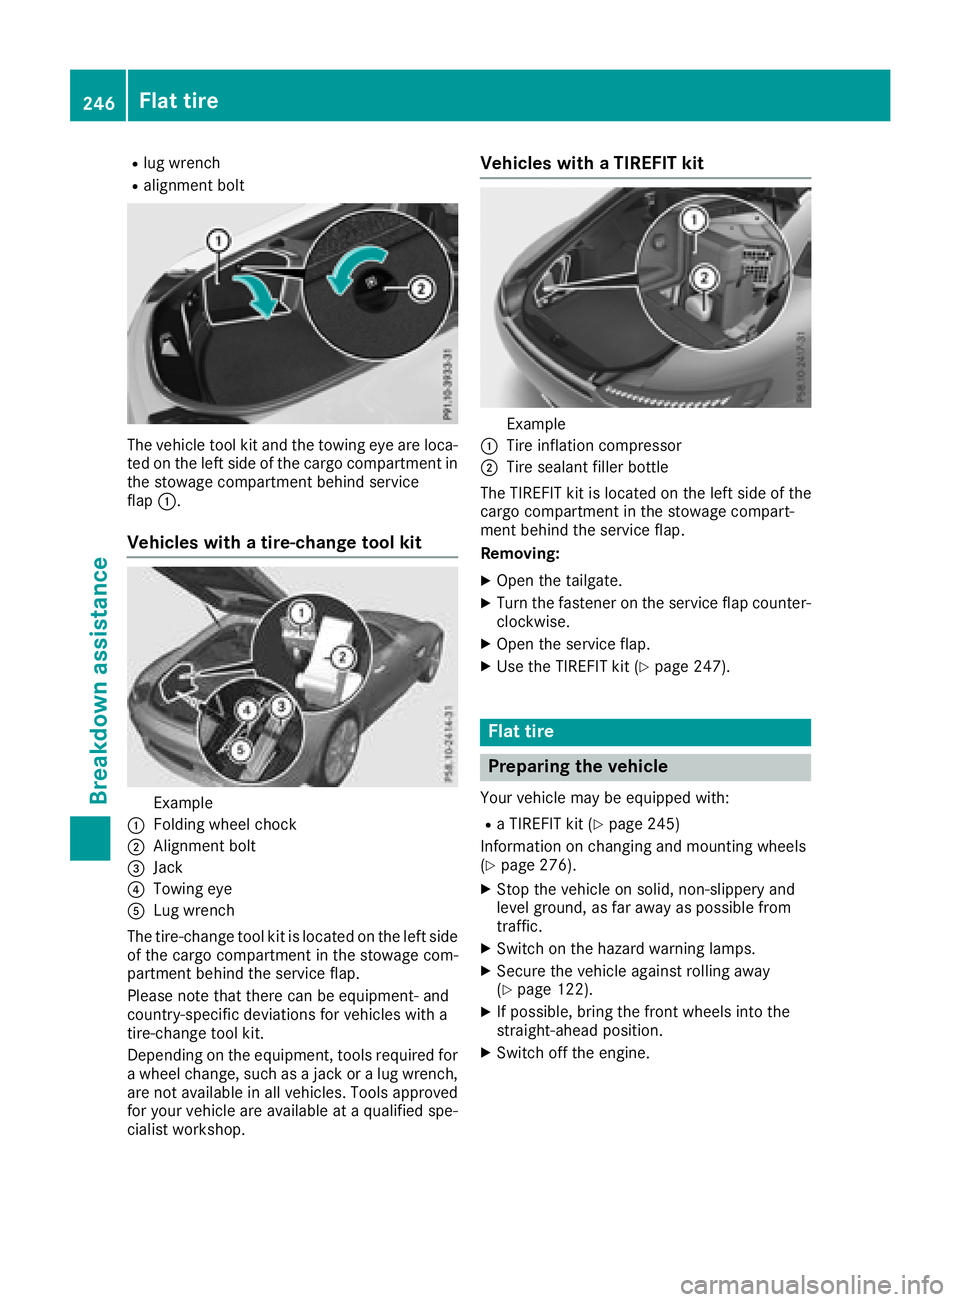
Rlug wrench
Ralignment bolt
The vehicle tool kit and the towing eye are loca-
ted on the left side of the cargo compartment in
the stowage compartment behind service
flap:.
Vehicles with a tire-change tool kit
Example
:Folding wheel chock
;Alignment bolt
=Jack
?Towing eye
ALug wrench
The tire-change tool kit is located on the left side
of the cargo compartment in the stowage com-
partment behind the service flap.
Please note that there can be equipment- and
country-specific deviations for vehicles with a
tire-change tool kit.
Depending on the equipment, tools required for
a wheel change, such as a jack or a lug wrench, are not available in all vehicles. Tools approved
for your vehicle are available at a qualified spe-
cialist workshop.
Vehicles with a TIREFIT kit
Example
:Tire inflation compressor
;Tire sealant filler bottle
The TIREFIT kit is located on the left side of the
cargo compartment in the stowage compart-
ment behind the service flap.
Removing:
XOpen the tailgate.
XTurn the fastener on the service flap counter-
clockwise.
XOpen the service flap.
XUse the TIREFIT kit (Ypage 247).
Flat tire
Preparing the vehicle
Your vehicle may be equipped with:
Ra TIREFIT kit (Ypage 245)
Information on changing and mounting wheels
(
Ypage 276).
XStop the vehicle on solid, non-slippery and
level ground, as far away as possible from
traffic.
XSwitch on the hazard warning lamps.
XSecure the vehicle against rolling away
(Ypage 122).
XIf possible, bring the front wheels into the
straight-ahead position.
XSwitch off the engine.
246Flat tire
Breakdown assistance
Page 249 of 294
XWith KEYLESS-GO start function or vehi-
cles with KEYLESS-GO:open the driver's
door.
The vehicle electronics are now in key posi-
tion u. This is the same as the SmartKey
having been removed.
or
XRemove the SmartKey from the ignition lock.
XMake sure that the passengers are not endan-
gered as they do so. Make sure that no one is
near the danger area while a wheel is being
changed. Anyone who is not directly assisting in the wheel change should, for example,
stand behind the barrier.
XGet out of the vehicle. Pay attention to traffic
conditions when doing so.
XClose the driver's door.
TIREFIT kit
Important safety notes
TIREFIT is a tire sealant.
You can use TIREFIT to seal punctures of up to
0.16 in (4 mm), particularly those in the tire
tread. You can use TIREFIT at outside tempera-
tures down to Ò4 ‡ (Ò20 †).
GWARNING
In the following situations, the tire sealant is
unable to provide sufficient breakdown assis-
tance, as it is unable to seal the tire properly:
Rthere are cuts or punctures in the tire larger
than those mentioned above.
Rthe wheel rim is damaged.
Ryou have driven at very low tire pressures or on a flat tire.
There is a risk of an accident.
Do not drive the vehicle. Contact a qualified
specialist workshop.
GWARNING
The tire sealant is harmful and causes irrita-
tion. It must not come into contact with your
skin, eyes or clothing or be swallowed. Do not inhale TIREFIT fumes. Keep tire sealant away
from children. There is a risk of injury.
If you come into contact with the tire sealant,observe the following:
RRinse off the tire sealant from your skin
immediately with water.
RIf the tire sealant comes into contact with
your eyes, immediately rinse them thor-
oughly with clean water.
RIf tire sealant is swallowed, immediately
rinse your mouth out thoroughly and drink
plenty of water. Do not induce vomiting,
and seek medical attention immediately.
RImmediately change out of clothing which
has come into contact with tire sealant.
RIf an allergic reaction occurs, seek medical
attention immediately.
!Do not operate the tire inflation compressor
for longer than ten minutes at a time without a break. It may otherwise overheat.
The tire inflation compressor can be operated
again once it has cooled down.
Comply with the manufacturer's safety instruc-
tions on the tire inflation compressor label and
on the tire sealant bottle.
Using the TIREFIT kit
XDo not remove any foreign objects which have
penetrated the tire, e.g. screws or nails.
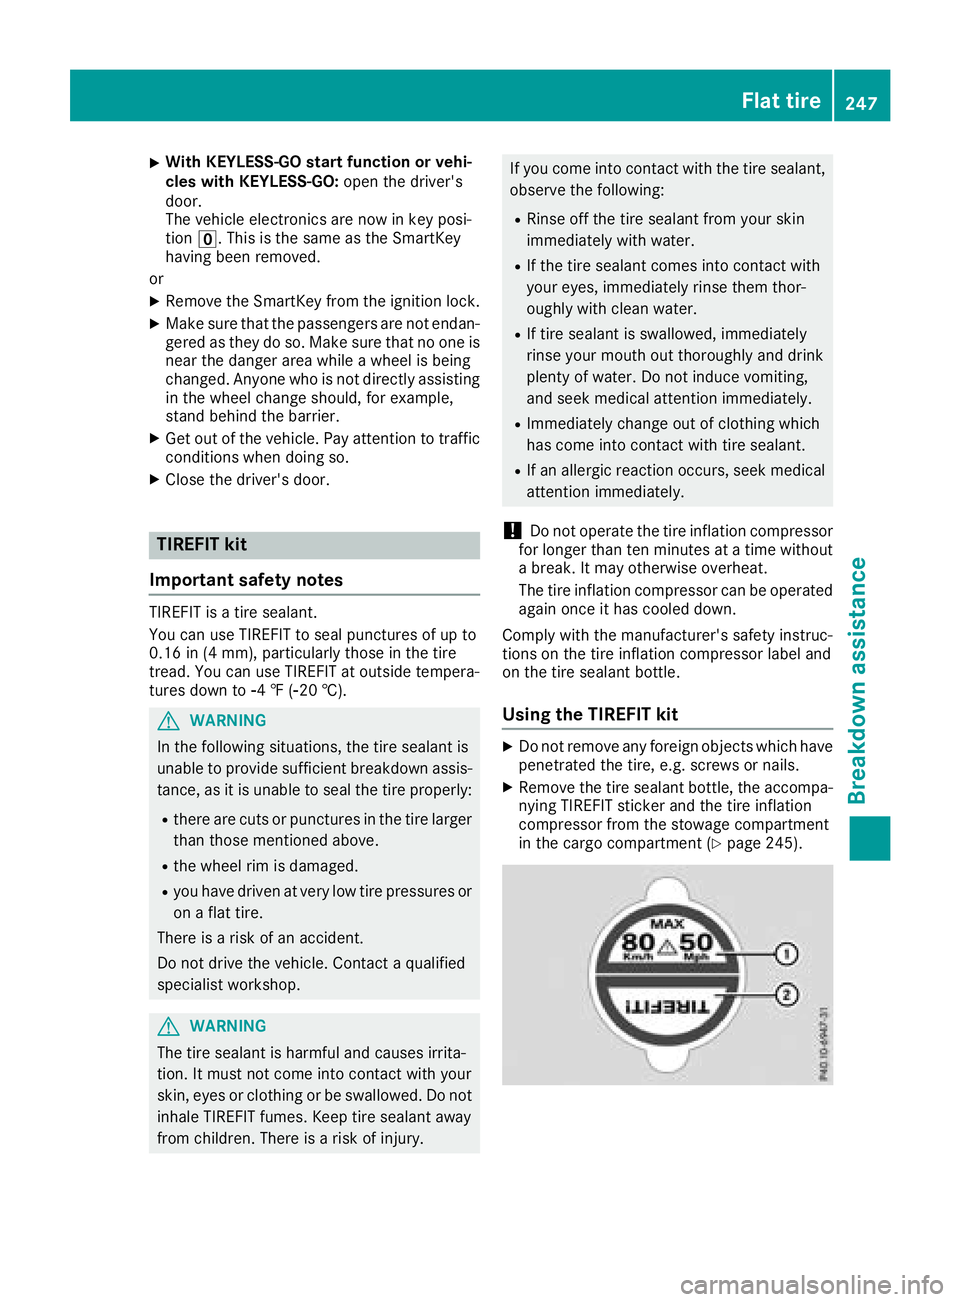
XRemove the tire sealant bottle, the accompa-
nying TIREFIT sticker and the tire inflation
compressor from the stowage compartment
in the cargo compartment (
Ypage 245).
Flat tire247
Breakdown assistance
Z