2018 MERCEDES-BENZ AMG GT COUPE key battery
[x] Cancel search: key batteryPage 7 of 294

Anti-skid chainssee Snow chains
Anti-theft ala rmsystem
see ATA (Anti-Theft Alarm system)
Asht ray.............................................. .217
Assistance display (on-board com-
puter) ..................................................1 62
Assistance menu (on-board com-
puter) ..................................................1 63
Assistance system
see Driving systems
ASSYST PLUS
Displaying a service message ........2 38
Hiding a service message .............. 237
Resetting the service interval dis-
play ................................................ 238
Service message ............................ 237
Special service requirements ......... 238
ATA (Anti-Theft Alarm system)
Activating/deactivating ................... 63
Function ...........................................6 3
Switching off the alarm .................... 63
ATTENTION ASSIST
Activating/deactivating ................. 163
Display message ............................ 183
Function/notes ............................. 148
Authorized Mercedes-Benz Center
see Qualified specialist workshop
Authorized workshop
see Qualified specialist workshop
AUTO lights
Display message ............................ 180
see Lights
Automatic car wash (care) ............... 239
Automatic engine start (ECO start/
stop function) .................................... 109
Automatic engine switch-off (ECO
start/stop function) .......................... 108
Automatic headlamp mode ................ 91
Automatic transmission
Accelerator pedal position ............. 115
Automatic drive program ............... 117
Changing gear ............................... 115
Display message ............................ 188
Double-clutch function .................. 115
Drive program display .................... 114
Driving tips .................................... 115 Emergency running mode
.............. 120
Eng
aging neutral ............................ 113
Engaging park position automati-
cally ............................................... 113
Engaging reverse gear ................... 113
Engaging the park position ............ 113
Gearshift recommendation ............ 118
Gliding mode ................................. 115
Important safety notes .................. 112
Kickdown ....................................... 115
Manual drive program .................... 117
Manual mode ................................. 118
Oil temperature (on-board com-
puter) ............................................. 165
Overview ........................................ 112
Problem (malfunction) ................... 120
Pulling away ................................... 107
Rocking the vehicle free ................ 115
Shift override ................................. 119
Starting the engine ........................ 107
Steering wheel paddle shifters ...... 116
Transmission position display ........ 114
Transmission positions .................. 114
Automatic transmission emer-
gency mode ....................................... 120
B
Back button ....................................... 205
BAS (Brake Assist System) ................. 58
Basic settings
see Settings
Battery (SmartKey)
Checking .......................................... 68
Important safety notes .................... 67
Replacing ......................................... 68
Battery (vehicle)
Charging ........................................ 251
Display message ............................ 182
Important safety notes .................. 250
Jump starting ................................. 251
Belt
see Seat belts
Belt warning ......................................... 43
Blind Spot Assist
Activating/deactivating (on-
board computer) ............................ 163
Display message ............................ 184
Index5
Page 19 of 294

Introduction .....................................40
Releasin g ......................................... 43
Warning lamp ................................. 193
Warning lamp (function) ................... 43
Seat function
see Seat
Seats
Adjusting (electrically) ..................... 82
Adjusting (manually) ........................ 81
Adjusting (Performance Seat) .......... 83
Adjusting lumbar support ................ 82
Adjusting the head restraint ............ 82
Calling up a stored setting (mem-
ory function) .................................... 90
Cleaning the cover ......................... 244
Important safety notes .................... 80
Seat heating problem ...................... 84
Seat ventilation problem .................. 84
Storing settings (memory func-
tion) ................................................. 89
Switching seat heating on/off ......... 83
Switching seat ventilation on/off .... 84
Selecting a gear
see Automatic transmission
Selector lever
Cleaning ......................................... 243
Positions ........................................ 112
Sensors (cleaning instructions) ....... 242
Service menu (on-board com-
puter) .................................................. 163
Service message
see ASSYST PLUS
Service products
Brake fluid ..................................... 286
Coolant (engine) ............................ 287
Engine oil ....................................... 286
Fuel ................................................ 283
Important safety notes .................. 283
Refrigerant (air-conditioning sys-
tem) ............................................... 288
Washer fluid ................................... 287
Setting the date/time format
see also Digital Operator's Man-
ual .................................................. 204
Setting the language
see also Digital Operator's Man-
ual .................................................. 204 Setting the time
see also Digital Operator's Man-
ual .................................................. 204
Settings
Factory (on-board computer) ......... 165
On-board computer ....................... 163
SETUP (on-board computer,
Mercedes-AMG vehicles) .................. 166
Side impact air bag ............................. 46
Si de marke
r lamp (display mes-
sage) ................................................... 180
Side windows
Cleaning ......................................... 241
Convenience closing feature ............ 77
Convenience opening feature .......... 76
Important safety information ........... 75
Opening/closing .............................. 76
Problem (malfunction) ..................... 78
Resetting ......................................... 77
Reversing feature ............................. 75
SIRIUS services
see also Digital Operator's Man-
ual .................................................. 204
SmartKey
Changing the battery ....................... 68
Changing the programming ............. 67
Checking the battery ....................... 68
Convenience closing feature ............ 77
Convenience opening feature .......... 76
Display message ............................ 192
Door central locking/unlocking ....... 65
Important safety notes .................... 65
KEYLESS-GO start function .............. 66
Loss ................................................. 69
Mechanical key ................................ 67
Overview .......................................... 65
Positions (ignition lock) ................. 106
Problem (malfunction) ..................... 69
Starting the engine ........................ 107
SMS
see also Digital Operator's Man-
ual .................................................. 204
Snow chains ...................................... 260
Sockets
General notes ................................ 218
Luggage compartment ................... 219
Sound
Switching on/off ........................... 205
Index17
Page 23 of 294

USB devicesConnecting to the Media Inter-
face .............................................. .212
V
Vanity mirror (in the sun visor) ........217
Vehicle
Correct use ...................................... 28
Data acquisition ............................... 29
Display message ............................ 188
Electronics ..................................... 282
Equipment ....................................... 25
Individual settings .......................... 163
Limited Warranty .............................2 9
Loading .......................................... 266
Locking (in an emergency) ............... 72
Locking (SmartKey) .......................... 65
Lowering ........................................ 280
Maintenance .................................... 26
Operating safety .............................. 27
Parking .......................................... 122
Parking for a long period ................ 125
Pulling away ................................... 107
Raising ........................................... 277
Reporting problems ......................... 28
Securing from rolling away ............ 277
Towing away .................................. 254
Transporting .................................. 256
Unlocking (in an emergency) ........... 72
Unlocking (SmartKey) ...................... 65
Vehicle data ................................... 288
Vehicle battery
see Battery (vehicle)
Vehicle data
Trunk load (maximum) ................... 288
Vehicle dimensions ........................... 288
Vehicle emergency locking ................ 72
Vehicle identification number
see VIN
Vehicle identification plate .............. 282
Vehicle maintenance
see ASSYST PLUS
Vehicle tool kit .................................. 245
Ventilation
see Climate control
Video
Operating the DVD ......................... 161 see also Digital Operator's Man-
ual .................................................. 204
VIN
Seat ............................................... 283
Type plate ...................................... 282W
Warning and indicator lampsABS ................................................ 196
Active Brake Assist ........................ 201
Brakes ........................................... 195
Check Engine ................................. 199
Coolant .......................................... 199
Distance warning ........................... 201
ESP
®.............................................. 196
ESP®OFF ....................................... 197
Fuel tank ........................................ 199
Overview .......................................... 34
Parking brake ................................ 198
PASSENGER AIR BAG ...................... 40
Reserve fuel ................................... 199
Restraint system ............................ 198
Seat belt ........................................ 193
SPORT handling mode ................... 198
Steering ......................................... 203
Tire pressure monitor .................... 202
Warranty .............................................. 25
Washer fluid
Display message ............................ 191
Weather display (COMAND)
see also Digital Operator's Man-
ual .................................................. 204
Wheel and tire combinations
Tires ............................................... 280
Wheel bolt tightening torque ........... 280
Wheel chock ...................................... 277
Wheels
Changing a wheel .......................... 276
Checking ........................................ 259
Cleaning ......................................... 241
Important safety notes .................. 258
Information on driving .................... 258
Interchanging/changing ................ 276
Mounting a new wheel ................... 279
Mounting a wheel .......................... 277
Notes on sport tires ....................... 258
Removing a wheel .......................... 279
Index21
Page 65 of 294
The spinning of the wheels results in a cut for
better traction on loose surfaces.
Rtraction control is still activated
RAdaptive Brake Assist is unavailable
Active Brake Assist is also not activated if you
brake firmly with assistance from ESP
®.
RPRE-SAFE®is unavailable
PRE-SAFE®is also not activated if you brake
firmly with assistance from ESP®.
RESP®still provides support when you brake
firmly
EBD (electronic brake force distribu-
tion)
General information
EBD monitors and controls the brake pressure
on the rear wheels to improve driving stability
while braking.
Important safety notes
iObserve the "Important safety notes" sec-
tion (Ypage 57).
GWARNING
If EBD is malfunctioning, the rear wheels can
lock, e.g. under full braking. This increases the
risk of skidding and an accident.
You should therefore adapt your driving style
to the different handling characteristics. Have
the brake system checked at a qualified spe-
cialist workshop.
Observe information regarding indicator and
warning lamps (
Ypage 196) as well as display
messages (Ypage 172).
ADAPTIVE BRAKE
ADAPTIVE BRAKE enhances braking safety and
offers increased braking comfort. In addition to
the braking function, ADAPTIVE BRAKE also fea-
tures the hill start assist function (
Ypage 107).
Protection against theft
Immobilizer
The immobilizer prevents your vehicle from
being started without the correct SmartKey.
XTo activate with KEYLESS-GO start-func-
tion or KEYLESS-GO: switch the ignition off
and open the driver's door.
XTo activate with the SmartKey: remove the
SmartKey from the ignition lock.
XTo deactivate: switch on the ignition.
When leaving the vehicle, always take the
SmartKey with you and lock the vehicle. Anyone
can start the engine if a valid SmartKey has been
left inside the vehicle.
iThe immobilizer is always deactivated when
you start the engine.
In the event that the engine cannot be started
(yet the vehicle's battery is charged), the sys-
tem is not operational. Contact an authorized
Mercedes-Benz Center or call
1-800-FOR-MERCedes (in the USA) or
1-800-387-0100 (in Canada).
ATA (anti-theft alarm system)
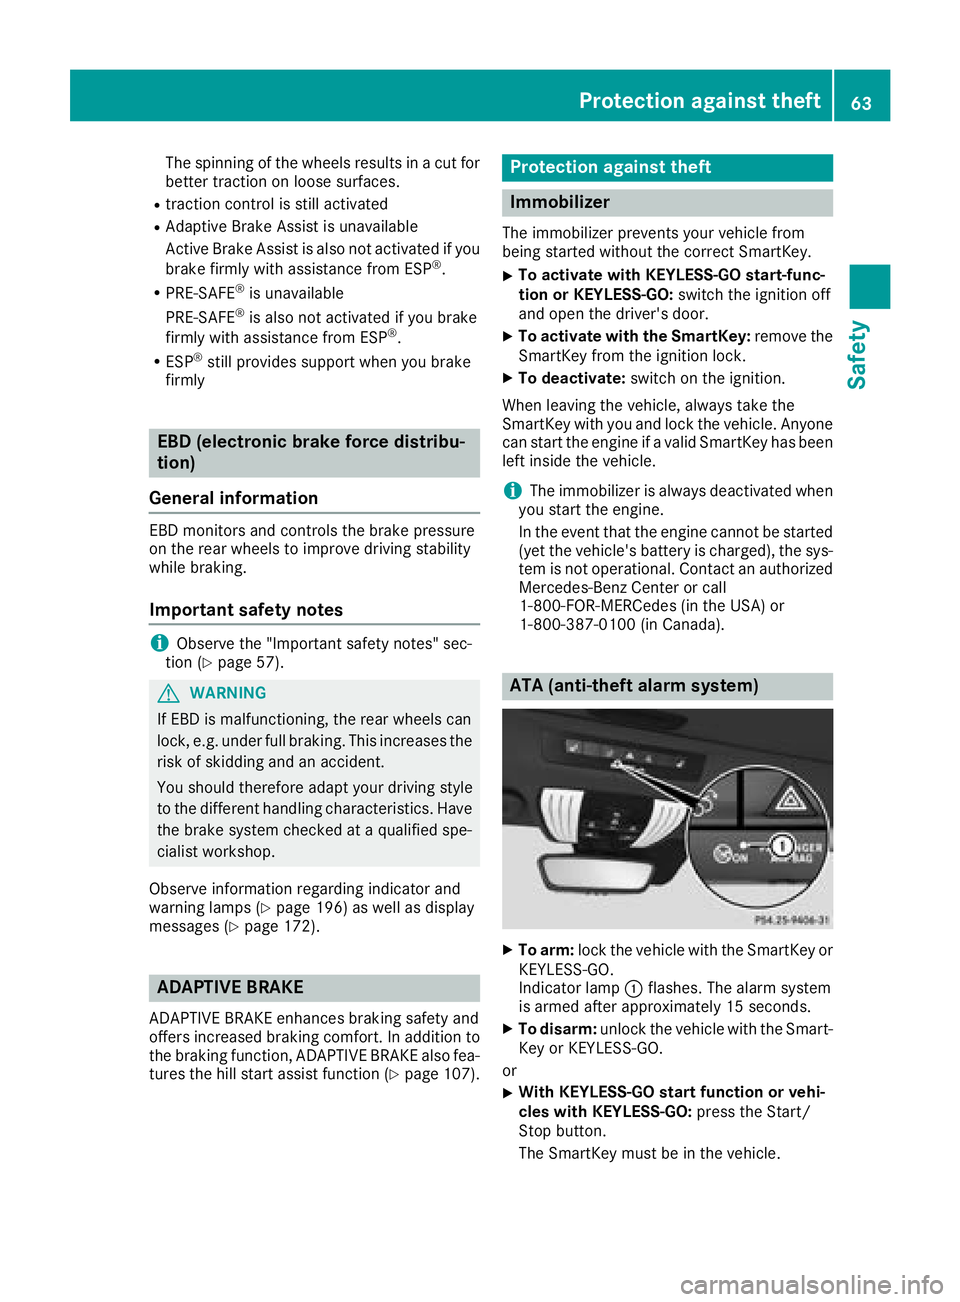
XTo arm: lock the vehicle with the SmartKey or
KEYLESS-GO.
Indicator lamp :flashes. The alarm system
is armed after approximately 15 seconds.
XTo disarm: unlock the vehicle with the Smart-
Key or KEYLESS-GO.
or
XWith KEYLESS-GO start function or vehi-
cles with KEYLESS-GO: press the Start/
Stop button.
The SmartKey must be in the vehicle.
Protection against theft63
Safety
Z
Page 68 of 294
When the locator lighting is activated via the
multimedia system, it lights up when it is dark
after the vehicle is unlocked with the SmartKey.
Information on activating and deactivating the
locator lighting can be found in the Digital Oper-
ator's Manual.
XTo open the tailgate:press and hold the
F button until the tailgate opens.
KEYLESS-GO
General notes
Bear in mind that the engine can be started by
any of the vehicle occupants if there is a Smart-
Key in the vehicle (
Ypage 107).
Locking/unlocking centrally
You can start, lock or unlock the vehicle using
KEYLESS-GO. To do this, you only need carry the
SmartKey with you. You can combine the func-
tions of KEYLESS-GO with those of a conven-
tional SmartKey. Unlock the vehicle by using
KEYLESS-GO, for instance, and lock it using the
& button on the SmartKey.
The driver's door and the door at which the han-
dle is used, must both be closed. The SmartKey
must be outside the vehicle. When locking or
unlocking with KEYLESS-GO, the distance
between the SmartKey and the corresponding
door handle must not be greater than 3 ft (1 m).
A check which periodically establishes a radio
connection between the vehicle and the Smart-
Key determines whether a valid SmartKey is in
the vehicle. This occurs, for example:
Rwhen starting the engine
Rwhile driving
Rwhen using the tailgate unlocking sensor
Rwhen the external door handles are touched
Rduring convenience closing
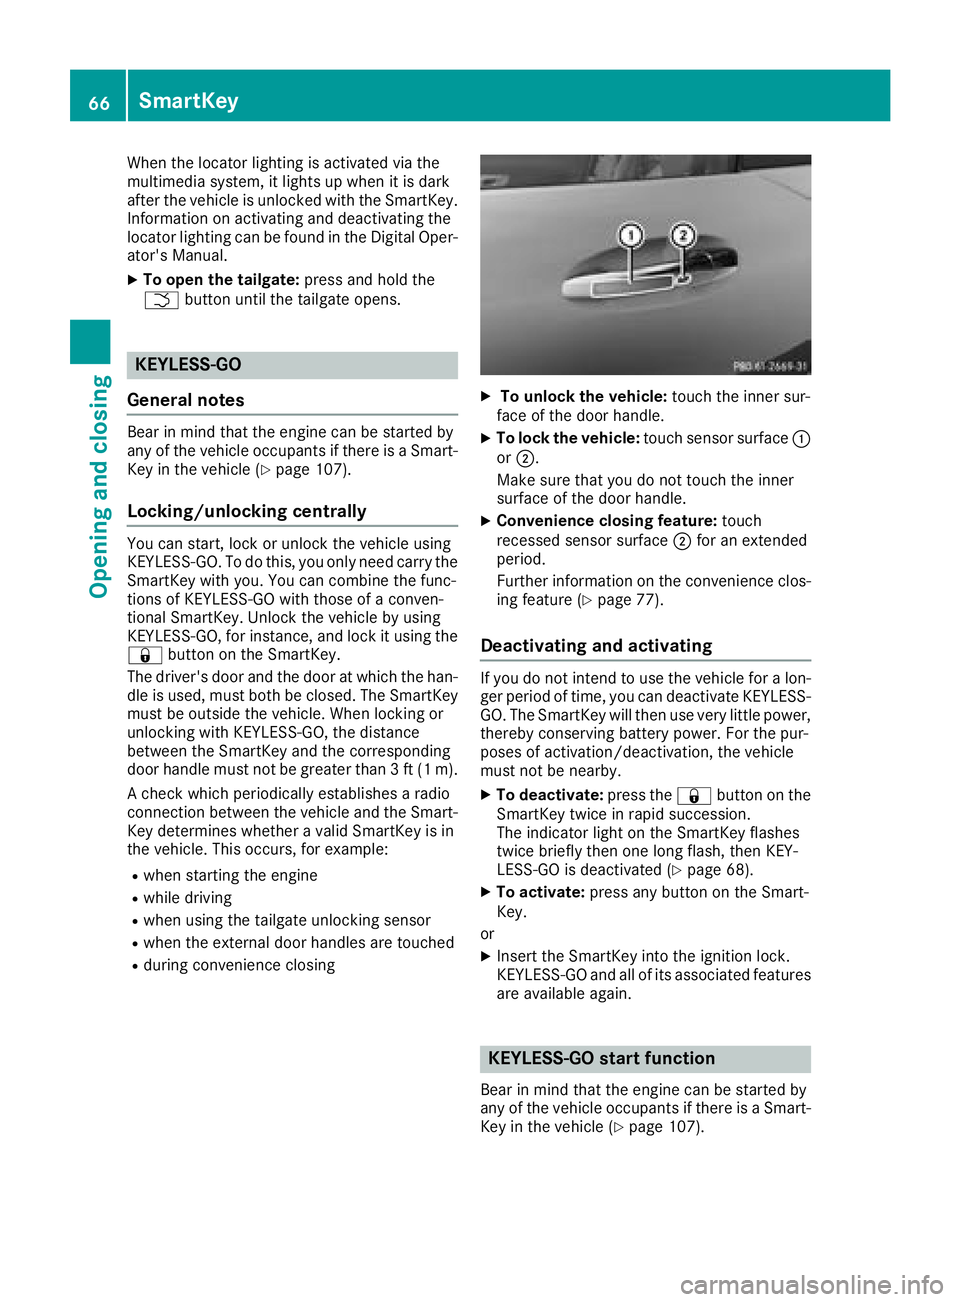
XTo unlock the vehicle: touch the inner sur-
face of the door handle.
XTo lock the vehicle: touch sensor surface :
or ;.
Make sure that you do not touch the inner
surface of the door handle.
XConvenience closing feature: touch
recessed sensor surface ;for an extended
period.
Further information on the convenience clos-
ing feature (
Ypage 77).
Deactivating and activating
If you do not intend to use the vehicle for a lon-
ger period of time, you can deactivate KEYLESS-
GO. The SmartKey will then use very little power,
thereby conserving battery power. For the pur-
poses of activation/deactivation, the vehicle
must not be nearby.
XTo deactivate: press the&button on the
SmartKey twice in rapid succession.
The indicator light on the SmartKey flashes
twice briefly then one long flash, then KEY-
LESS-GO is deactivated (
Ypage 68).
XTo activate: press any button on the Smart-
Key.
or
XInsert the SmartKey into the ignition lock.
KEYLESS-GO and all of its associated features
are available again.
KEYLESS-GO start function
Bear in mind that the engine can be started by
any of the vehicle occupants if there is a Smart-
Key in the vehicle (
Ypage 107).
66SmartKey
Opening and closing
Page 69 of 294
Changing the settings of the locking
system
You can change the settings of the locking sys-
tem. This means that only the driver's door and
the fuel filler flap are unlocked when the vehicle
is unlocked. This is useful if you frequently travel
on your own.
XTo change the setting:press and hold down
the % and& buttons simultaneously
for about six seconds until the battery indica-
tor lamp flashes twice (
Ypage 68).
If the setting of the locking system is changed
within the signal range of the vehicle, pressing
the & or% button:
Rlocks or
Runlocks the vehicle
The SmartKey now functions as follows:
XTo unlock: press the%button once.
XTo unlock centrally: press the%button
twice.
XTo lock: press the &button.
The KEYLESS-GO functions can be changed as
follows:
XTo unlock the driver's door: touch the inner
surface of the door handle on the driver's
door.
XTo unlock centrally: touch the inner surface
of the front-passenger door handle.
XTo lock centrally: touch the outer sensor
surface on one of the door handles.
Restoring factory settings:
XPress the %and& buttons simultane-
ously for approximately six seconds until the
battery check lamp flashes twice
(
Ypage 68).
Mechanical key
General notes
If the vehicle can no longer be locked or
unlocked with the SmartKey or KEYLESS-GO,
use the mechanical key.
If you use the mechanical key to unlock and
open the driver's door, the anti-theft alarm sys-
tem will be triggered. Switch off the alarm
(
Ypage 63). If you unlock the vehicle using the mechanical
key, the fuel filler flap will not be unlocked auto-
matically.
XTo unlock the fuel filler flap:
insert the
SmartKey into the ignition lock.
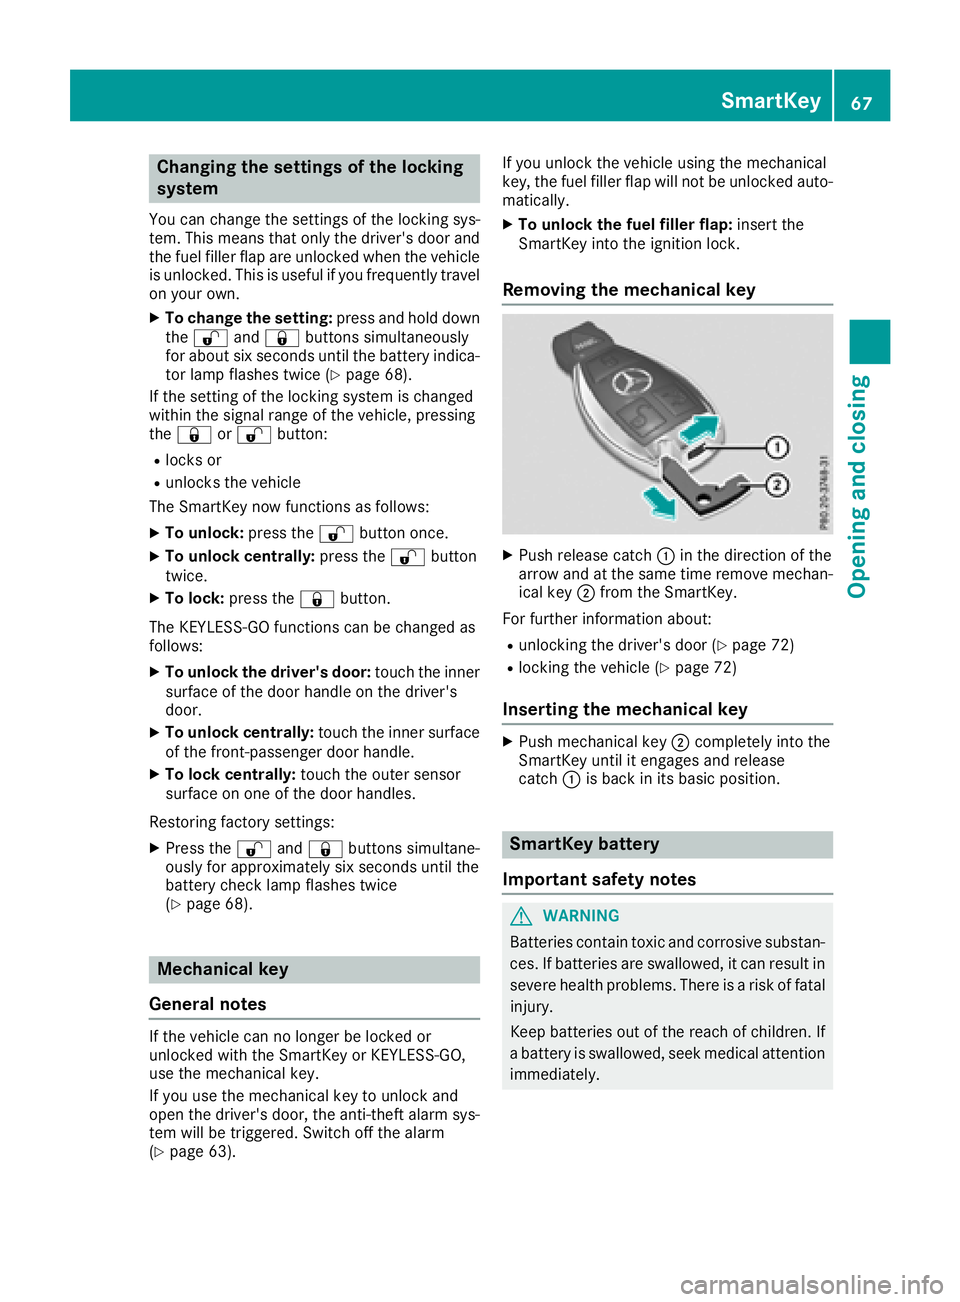
Removing the mechanical key
XPush release catch :in the direction of the
arrow and at the same time remove mechan- ical key ;from the SmartKey.
For further information about:
Runlocking the driver's door (Ypage 72)
Rlocking the vehicle (Ypage 72)
Inserting the mechanical key
XPush mechanical key ;completely into the
SmartKey until it engages and release
catch :is back in its basic position.
SmartKey battery
Important safety notes
GWARNING
Batteries contain toxic and corrosive substan- ces. If batteries are swallowed, it can result in
severe health problems. There is a risk of fatalinjury.
Keep batteries out of the reach of children. If
a battery is swallowed, seek medical attention
immediately.
SmartKey67
Opening and closing
Z
Page 70 of 294
HEnvironmental note
Batteries contain dangerous
substances. It is against the
law to dispose of them with
the household rubbish. They
must be collected separatelyand recycled to protect the
environment.
Dispose of batteries in an
environmentally friendly
manner. Take discharged
batteries to a qualified spe-
cialist workshop or a special
collection point for used bat-
teries.
The SmartKey batteries contain perchlorate
material, which may require special handling
and regard for the environment. National guide-
lines must be observed during disposal. In Cal-
ifornia, see www.dtsc.ca.gov/
HazardousWaste/Perchlorate/index.cfm .
Mercedes-Benz recommends that you have the
batteries replaced at a qualified specialist work-
shop.
Checking the battery
XPress the &or% button.
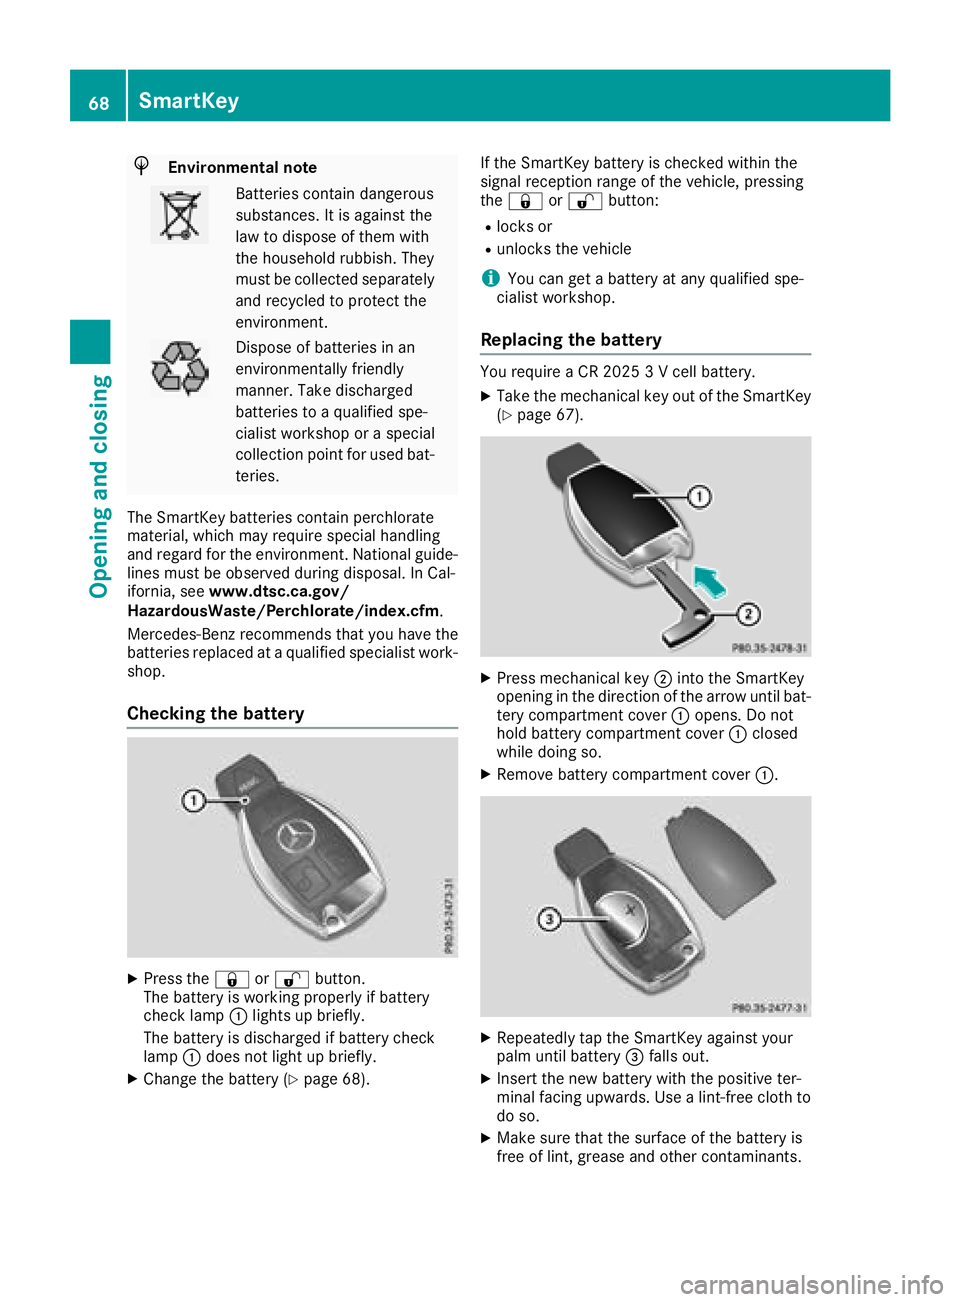
The battery is working properly if battery
check lamp :lights up briefly.
The battery is discharged if battery check
lamp :does not light up briefly.
XChange the battery (Ypage 68). If the SmartKey battery is checked within the
signal reception range of the vehicle, pressing
the
& or% button:
Rlocks or
Runlocks the vehicle
iYou can get a battery at any qualified spe-
cialist workshop.
Replacing the battery
You require a CR 2025 3 V cell battery.
XTake the mechanical key out of the SmartKey
(Ypage 67).
XPress mechanical key ;into the SmartKey
opening in the direction of the arrow until bat-
tery compartment cover :opens. Do not
hold battery compartment cover :closed
while doing so.
XRemove battery compartment cover :.
XRepeatedly tap the SmartKey against your
palm until battery=falls out.
XInsert the new battery with the positive ter-
minal facing upwards. Use a lint-free cloth to
do so.
XMake sure that the surface of the battery is
free of lint, grease and other contaminants.
68SmartKey
Opening and closing
Page 71 of 294
XInsert the front tabs of battery compartment
cover:into the housing first and then press
to close it.XInsert mechanical key ;into the SmartKey
(Ypage 67).
XCheck the function of all SmartKey buttons on
the vehicle.
Problems with the SmartKey
ProblemPossible causes/consequences and MSolutions
You can no longer lock or
unlock the vehicle using
the SmartKey.The SmartKey battery is discharged or nearly discharged.
XCheck the SmartKey battery (Ypage 68) and replace it if necessary
(Ypage 68).
If this does not work:
XUnlock (Ypage 72) or lock (Ypage 72) the vehicle using the
mechanical key.
There is interference from a powerful source of radio waves.
XUnlock (Ypage 72) or lock (Ypage 72) the vehicle using the
mechanical key.
The SmartKey is faulty.
XUnlock (Ypage 72) or lock (Ypage 72) the vehicle using the
mechanical key.
XHave the SmartKey checked at a qualified specialist workshop.
You can no longer lock or
unlock the vehicle using
KEYLESS-GO.KEYLESS-GO was deactivated.
XReactivate KEYLESS-GO (Ypage 66).
The SmartKey battery is discharged or nearly discharged.
XCheck the SmartKey battery (Ypage 68) and replace it if necessary
(Ypage 68).
If this does not work:
XUnlock (Ypage 72) or lock (Ypage 72) the vehicle using the
mechanical key.
There is interference from a powerful source of radio waves.
XUnlock (Ypage 72) or lock (Ypage 72) the vehicle using the
mechanical key.
SmartKey69
Opening and closing
Z