2018 MERCEDES-BENZ A-CLASS HATCHBACK trip computer
[x] Cancel search: trip computerPage 251 of 609

Instrument display
overview &
WARNING Risk of accident due toan
instrument display malfunction
If th e Instrument Display has failed or mal‐
functioned, you may not recognise function
re strictions applying tosaf etyre leva nt sys‐
te ms.
The operating saf ety of your vehicle may be
impaired. #
Drive on carefull y.#
Have theve hicle checked immediately
at a qualified specialist workshop. If
th e operating saf ety of your vehicle is
impaired, park theve hicle safely as soon as pos‐
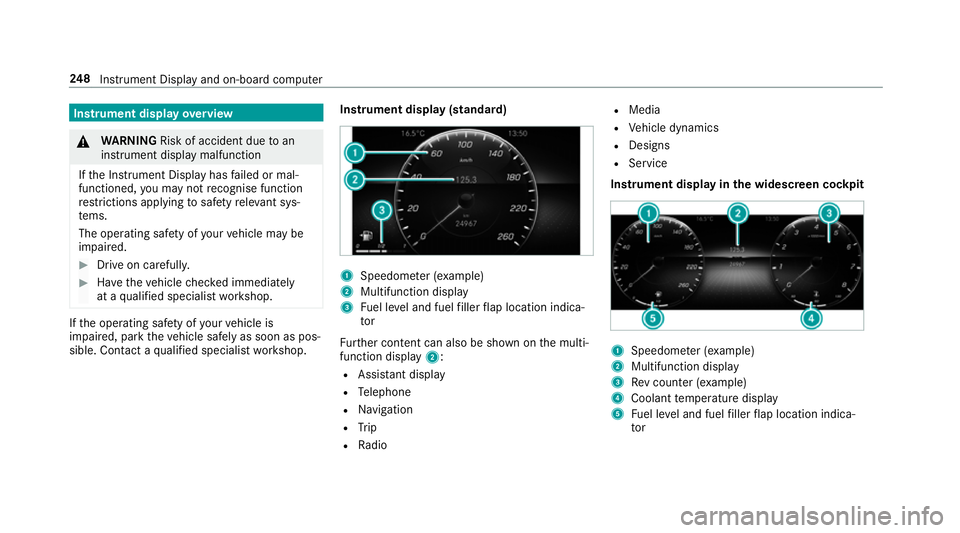
sible. Contact a qualified specialist workshop. Instrument display (standard) 1
Speedome ter (e xamp le)
2 Multifunction display
3 Fuel le vel and fuel filler flap location indica‐
tor
Fu rther content can also be shown on the multi‐
function display 2:
R Assis tant displ ay
R Telephone
R Navigation
R Trip
R Radio R
Media
R Vehicle dynamics
R Designs
R Service
Instrument display in the widescreen cockpit 1
Speedome ter (e xamp le)
2 Multifunction display
3 Rev counter (e xample)
4 Coolant temp erature display
5 Fuel le vel and fuel filler flap location indica‐
tor 248
Instrument Display and on-board computer
Page 253 of 609

6
Makes/accepts a call
~ Rejects/ends a call
5 ò Calls up the home screen
6 Touch Control multimedia sy stem
7 % Back button (press and hold) Operating
the on-boa rdcompu ter &
WARNING Risk of di stra ction from infor‐
mation sy stems and communications
equipment
If yo u operate information and communica‐
tion equipment integ rated in theve hicle
when driving, you will be distracted from the
traf fic situation. This could also cause youto
lose control of theve hicle. #
Only operate this equipment when the
traf fic situation permits. #
Ifyo u cannot be sure of this, stop the
ve hicle whilst paying attention toroad
and traf fic conditions and ope rate the
equipment with theve hicle stationar y. Obser
vethe legal requ irements forth e count ry
in which you are cur rently driving when operat‐
ing the on-board computer.
% The on-board computer displa ysappear on
th e multifunction display (→ page 253). The on-board computer can be operated using
left-hand Touch Control 2and left-hand back/
home but ton1. When
the on-board computer is being operated,
dif fere nt acoustic signals sound as operating
fe edbac k,e.g. when the end of a list is reached
or when sc rolling thro ugh a list.
The following menus are available:
R Assistance
R Telephone
R Navigation
R Trip
R Radio
R Media
R Styles & display
R Service
The menus can be called up from the menu bar
on the multifunction displa y. #
Tocall up the menu bar: pressthe back
button on the left 1until the menu bar is
displa yed.
% Ve
hicles without Active Di stance Assist
DISTRO NIC:press theò button tocall
up the menu bar of the on-board computer. 250
Instrument Display and on-board computer
Page 254 of 609

#
Toscroll in the menu bar: swipe left or
ri ght on the left-hand Touch Control 2. #
Tocall up a menu or confirm the selec‐
tion: press the left-hand Touch Control 2. #
Toscroll through displa ysor lists on the
menu: swipe upwards or down wards on the
left-hand Touch Control 2. #
Tocall up a submenu or confirm the
selection: pressthe left-hand Touch Control
2. #
Toexit a submenu: pressthe back button
on the left 1. Selecting
the head-up display #
Ifth e head-up display is switched on: swipe
upwards on the left-hand Touch Control 2. #
Ifth e head-up display is switched off: press
th e left-hand Touch Control 2.
Fu ll-sur face menu display
Ve hicles with an instrument display in the
widescreen cockpit: thefo llowing menus can
be shown in full on the instrument display:
R Assistance
R Trip
R Navigation #
Inthe cor responding menu, use left-hand
To uch Control 2toscroll tothe end of the
list. #
Press left-hand Touch Control 2.
The selected menu is displ ayed in full. Ad
justing the design of the in stru ment dis‐
play
On-boa rdcompu ter:
, Styles & display
Setting the design #
Swipe up wards or down wards on the left-
hand Touch Control. #
Press the left-hand Touch Control.
The instrument displ ayis shown in the selec‐
te d design.
The following designs can be selec ted, depend‐
ing on theve hicle equipment:
R Classic
R Sport
R Progressive
R Understated
R Standard displays Instrument Display and on-board computer
251
Page 255 of 609

Showing display content on
the instrument
clus ter
Ve hicles with an instrument display in the
widescreen cockpit: additional display content
can be shown on the instrument displa y.1
Displ aycontent, right (e xamp lerev counter)
2 The index points show the selected display
conte nt. #
Toselect display content: swipetothe
ri ght on the left-hand Touch Control. #
Swipe upwards or down wards on the left-
hand Touch Control toselect there qu ired
display con tent.
When the display conte nt is selected1, it is
brie fly highligh ted.
Display con tent selection, le ft:
R Speedom eter
R Time/date
R Trip computer From startandFrom reset
R Range
R Audio
Display con tent selection, centre:
R Assi stant display
R Telephone
R Navigation
R Trip
R Radio
R Media
R Styles and display
R Service Display conte
nt selection,right:
R Rev counter
R Average fuel consum ption
R ECO display
R Navigation
R G-me ter
R Assi stant display 252
Instru ment Display and on-board computer
Page 258 of 609

Calling up displa
yson the trip menu On-board computer:
, Trip #
Toselect a displa y:swipe upwards or down‐
wa rds on the left-hand Touch Control.
Trip menu in thest andard cockpi t:
R Speedom eter
R Rev counter
R Range and cur rent fuel consu mption
R ECO display(→ page 160)
R Trip computer From startandFrom reset
Trip menu in the widescreen cockpit:
R Standard display
R Cur rent fuel consu mption
R ECO display (→ page 160)
R Trip computer From startandFrom reset
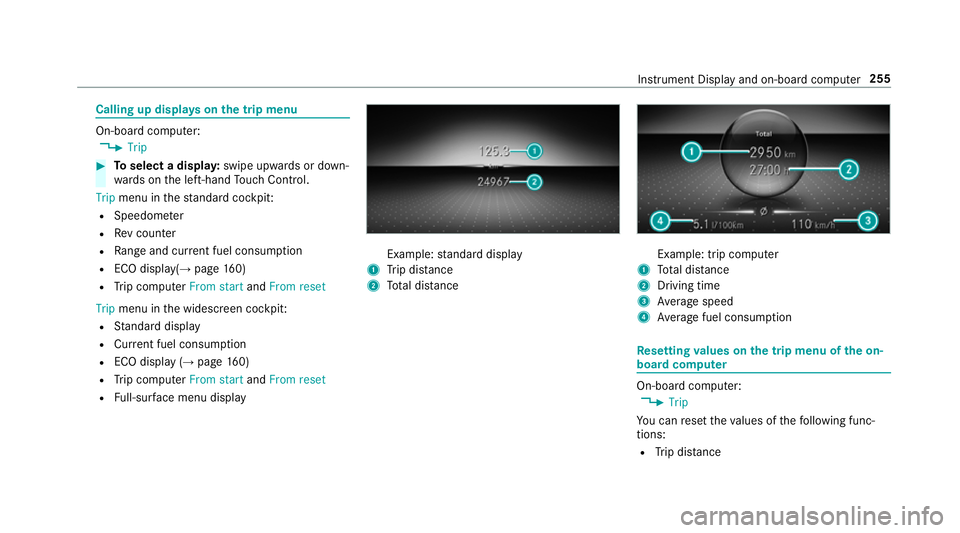
R Full-sur face menu displ ay Example:
standard display
1 Trip dis tance
2 Total dis tance Example: trip compu
ter
1 Total dis tance
2 Driving time
3 Average speed
4 Average fuel consum ption Re
setting values on the trip menu of the on-
board compu ter On-board computer:
, Trip
Yo u can reset theva lues of thefo llowing func‐
tions:
R Trip dis tance Instrument Display and on-boa
rdcompu ter255
Page 259 of 609

R
Trip computer From startandFrom reset
R ECO displa y(→ page 160) #
Toselect the function tobe rese t:swipe
upwards or down wards on the left-hand
To uch Control. #
Press the left-hand Touch Control. #
Select Yes. #
Press the left-hand Touch Control.
If yo u press and hold the left-hand Touch Con‐
trol, theva lues of the function will be reset
immediatel y. Calling up navigation instructions on
the on-
board compu ter On-board computer:
, Navigation Example: no
change of direction announced
1 Distance tothe next change of direction
2 Distance tothe next destination
3 Estimated ar riva l time at next destination
4 Current road Example:
change of direction announced
1 Distance tothech ange of direction
2 Road towhich thech ange of direction leads
3 Chan ge-of-direction symbol
4 Recommended lane (white)
5 Possible lane
6 Lane not recommended (da rkgrey)
Fu rther possible displa yson theNavigation
menu:
R Direction of travel: display of direction of
tra vel and road cur rently being tr avelled on.
R New route... orCalculating route… : a new
ro ute is being calculated. 256
Instru ment Display and on-board computer
Page 600 of 609

No
tes ................................................... 24 2
Overhang dimension ........................... 495
Soc ket ................................................. 24 4
To ngue weight .................................... .497
To wing capacity .................................. .496
Tr ailer operation
Ac tive Blind Spot Assi st....................... 238
Ac tive Lane Keeping Assist .................. 24 0
Bicycle rack ......................................... 24 5
Coupling up/uncoupling a trailer ........ .244
Fo lding the ball neck out/in ................2 42
No tes ................................................... 24 2
Soc ket ................................................. 24 4
Tr ailer stabilisation
Fu nction/no tes ................................... 189
Tr ansfer redve hicle data
Android Auto ....................................... 387
Apple CarPl ay™ ................................... 387
Baidu CarLife ....................................... 387
Tr ansmission (problem) ..........................16 8
Tr ansmission position display ................16 4
Tr anspo rting
Ve hicle ................................................ 452 Tr
im element (Care) ................................ 434
Tr ip
Menu (on-board computer) .................. 255
Tr ip computer
Displaying ............................................ 255
Re setting ............................................. 255
Tr ip distance ............................................ 255
Displaying ............................................ 255
Re setting ............................................. 255
Tr ip me ter
see Trip dis tance
Tu rn signal indicator
see Turn signal lights
Tu rn signal lights .....................................1 24
Changing bulbs (rear) .......................... 13 3
Switching on/off ................................. 124
Tw o phone mode
see Second telephone
Tw o-w ayradios
Fr equencies ......................................... 482
No tes on ins tallation ............................ 481
Tr ansmission output (maximum) ........ .482 Ty
re inflation compressor
see TIREFIT kit
Ty re pressure ........................................... 460
Checking (ty repressure monitoring
sy stem) ................................................ 461
No tes .................................................. 459
Re starting the tyre pressure loss
wa rning sy stem ................................... 467
Re starting the tyre pressure monitor‐
ing sy stem ...........................................4 62
TIREFIT kit .......................................... .440
Ty re pressure loss warning sy stem
(function) ............................................. 467
Ty re pressure monitoring sy stem
(function) ............................................. 461
Ty re pressure table .............................. 460
Ty re pressure loss warning sy stem
Fu nction .............................................. 467
Re starting ............................................ 467
Ty re pressure moni toring sy stem
Checking the tyre pressure .................. 461
Checking the tyre temp erature ............ 461
Fu nction ............................................... 461
Re starting ............................................ 462
Te ch nical da ta..................................... 463 Index
597