Page 332 of 628

Clock
Audio display
Audio control dial
Hour/Minute set switch:00 button
Menu button
Clock button
▼ Setting the time
The clock can be set at any time when the
ignition is switched to ACC or ON.
1. To adjust the time, press the clock
button (
) for about 2 seconds
until a beep is heard.
2. The clock's current time will flash. Time adjustment
•To adjust the time, press the hour/
minute set button (
, ) while the
clock's current time is flashing.
•The hours advance while the hour
set button (
) is pressed. The
minutes advance while the minute
set button (
) is pressed.
3. Press the clock button (
) again to
start the clock.
▼ Time resetting
1. Press the clock button () for
about 2 seconds until a beep is heard.
2. Press the :00 button (1).
3. When the button is pressed, the time will be reset as follows:
(Example)
12:01―12:29→12:00
12:30―12:59→1:00
NOTE
•When the :00 button (1) is pressed, the
seconds will start at “00”.
•Switching between 12 and 24-hour clock
time:
Press the menu button (
) several
times until 12 and 24-hour clock time
are displayed. Turn the audio control
dial in either direction, select the
desired clock setting while the preferred
clock time is flashing.
Interior Features
Audio Set [Type A (non-touchscreen)]
5-22
CX-5_8GN5-EA-17J_Edition1 2017-8-18 12:58:27
Page 354 of 628

NOTE
Only the names of paired devices can
be displayed. If only one device is
paired, only the name for this device is
displayed.
5. If a selection other than “GO BACK” is made and the audio control dial is
pressed, “SURE ? NO” is displayed.
6. Rotate the audio control dial clockwise and switch the display to “SURE ?
YES”.
NOTE
The display changes as follows
depending on whether the audio
control dial is rotated clockwise or
counterclockwise.
-Clockwise: “SURE ? YES” displayed
-Counterclockwise: “SURE ? NO”
displayed
7. Press the audio control dial to delete the selected device.
NOTE
Select “GO BACK” and press the
audio control dial to return to the
“PAIR DELETE” display.
8. “PAIR DELETED” is displayed for
three seconds after the deletion is
completed, and then it returns to the
normal display.
NOTE
If an error occurs while trying to
delete the paired device, “Err” flashes
in the display for three seconds and the
display returns to “LINK DELETE”.
▼Bluetooth® audio device information
display
1. Using the audio control dial, select the
pair device information display mode
“DEVICE INFO” in the “BT SETUP”
mode. (Refer to “Bluetooth
® audio
device set-up” for details.)
2. Press the audio control dial to determine the mode.
3. The name of the Bluetooth
® unit
device is displayed.
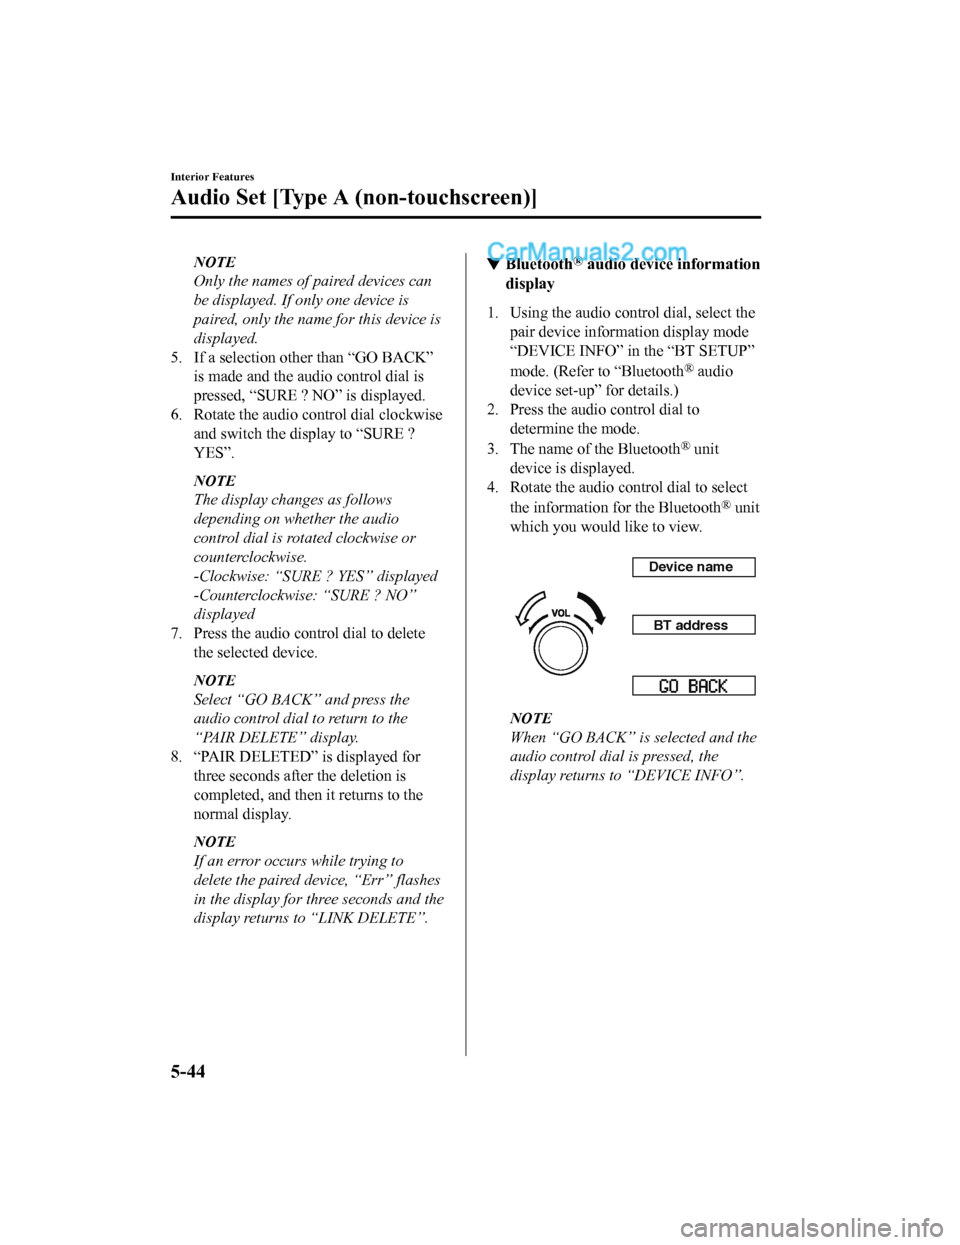
4. Rotate the audio control dial to select
the information fo r the Bluetooth
® unit
which you would like to view.
Device name
BT address
NOTE
When “GO BACK” is selected and the
audio control dial is pressed, the
display returns to “DEVICE INFO”.
Interior Features
Audio Set [Type A (non-touchscreen)]
5-44
CX-5_8GN5-EA-17J_Edition1 2017-8-18 12:58:27
Page 375 of 628

Basic Operation Method
NOTE
•The explanation of functions described in this manual may differ from the actual
operation, and the shapes of screens and buttons and the letters and characters displayed
may also differ from the actual appearance.
Additionally, depending on future software updates, the content may successively change
without notice.
•For additional information regarding Mazda Connect, please refer to the following
We b s i t e .
http://infotainment.mazdahandsfree.com/
Audio Set (Type B) has three different human interfaces.
•Commander switch
•Touch panel
•Voice recognition with steering switch and microphone
Refer to Voice Recogn ition on page 5-112.
▼Commander switch operation
NOTE
For safety reasons, some operations are disabled while the vehicle is being driven.
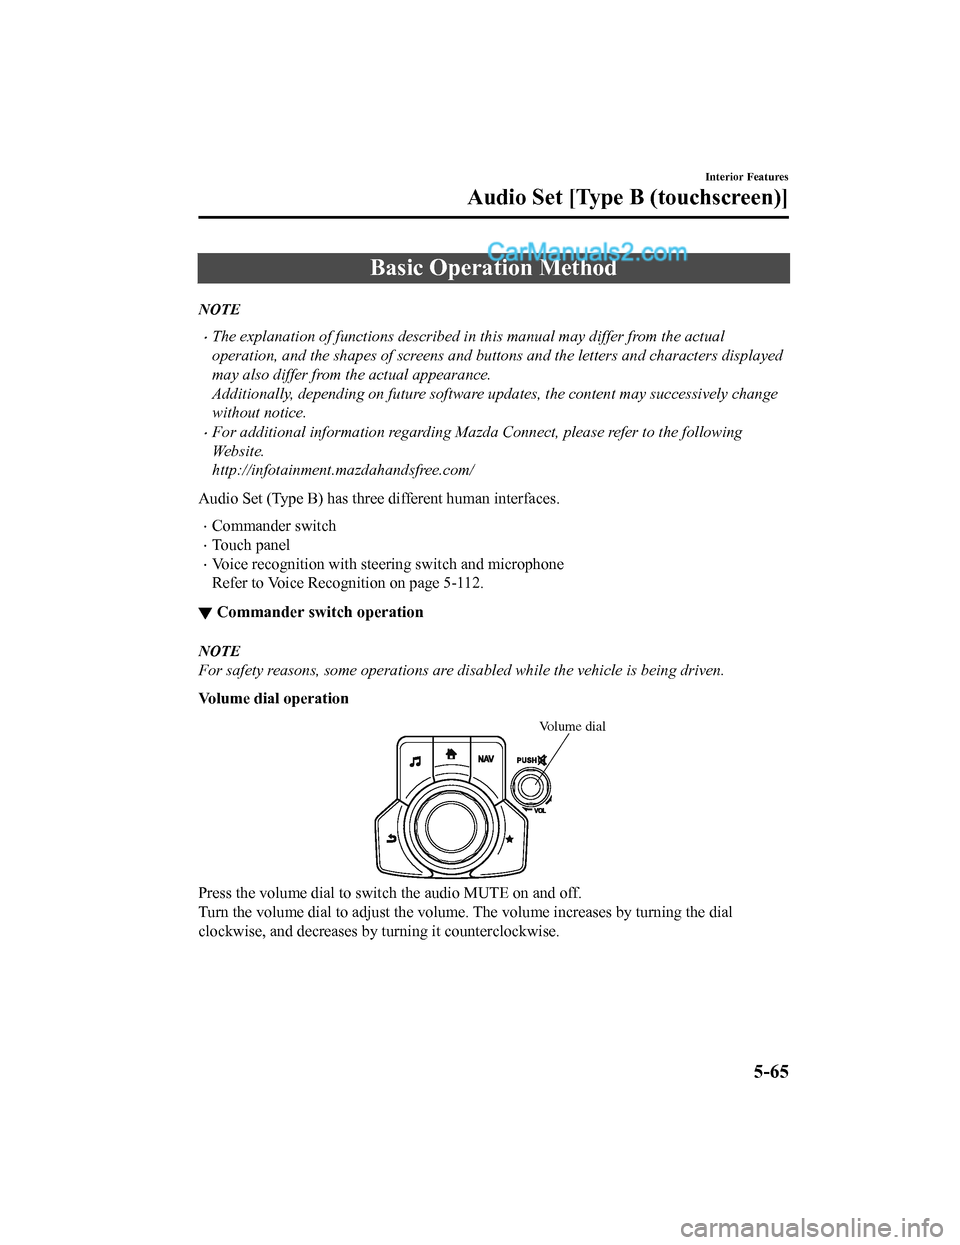
Volume dial operation
Volume dial
Press the volume dial to switch the audio MUTE on and off.
Turn the volume dial to adjust t
he volume. The volume increases by turning the dial
clockwise, and decreases by t urning it counterclockwise.
Interior Features
Audio Set [Type B (touchscreen)]
5-65
CX-5_8GN5-EA-17J_Edition1 2017-8-18 12:58:27
Page 380 of 628

Volume/Display/Sound Controls
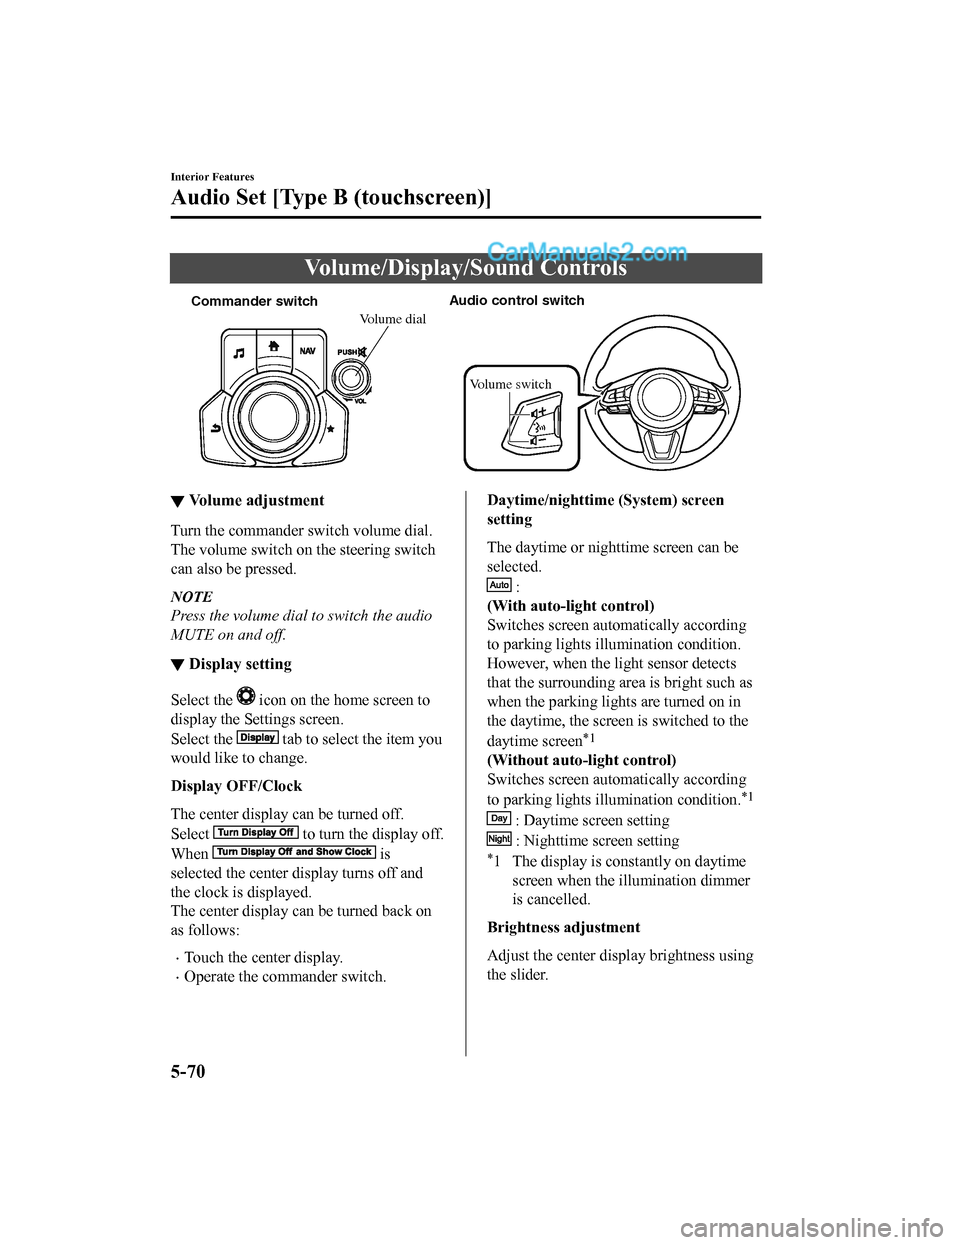
Commander switchAudio control switch
Volume switch
Volume dial
▼Volume adjustment
Turn the commander switch volume dial.
The volume switch on the steering switch
can also be pressed.
NOTE
Press the volume dial to switch the audio
MUTE on and off.
▼Display setting
Select the icon on the home screen to
display the Settings screen.
Select the
tab to select the item you
would like to change.
Display OFF/Clock
The center display can be turned off.
Select
to turn the display off.
When
is
selected the center di splay turns off and
the clock is displayed.
The center display can be turned back on
as follows:
•Touch the center display.
•Operate the commander switch.
Daytime/nighttime (System) screen
setting
The daytime or nighttime screen can be
selected.
:
(With auto-light control)
Switches screen automatically according
to parking lights illumination condition.
However, when the li ght sensor detects
that the surrounding area is bright such as
when the parking lights are turned on in
the daytime, the screen is switched to the
daytime screen
*1
(Without auto-light control)
Switches screen automatically according
to parking lights illumination condition.
*1
: Daytime screen setting
: Nighttime screen setting
*1 The display is constantly on daytime screen when the il lumination dimmer
is cancelled.
Brightness adjustment
Adjust the center display brightness using
the slider.
Interior Features
Audio Set [Type B (touchscreen)]
5-70
CX-5_8GN5-EA-17J_Edition1 2017-8-18 12:58:27
Page 425 of 628

Settings
NOTE
Depending on the grade and specification, the screen display may differ.
Select the
icon on the home screen and display the Settings screen.
Switch the tab and select the setting item you want to change.
You can customize settings in the setup display as follows:
Ta b I t e m F u n c t i o n
AD-Disp Height
Brightness Control
Other
Refer to Active Driving
Display on page 4-27.
Display Refer to Volume/Display /Sound Controls on page 5-70.
Safety Distance Recognition Support System
SBS/SCBS
Other Refer to Personalization Features on page 9-
9.
Sound Refer to Volume/Display/Sound Controls on page 5-70.
Clock Adjust Time
Displays the currently s
et time is displayed.
Press
to advance the hour/minute, and select to move the hour/minute back.
AM/PM can only be selected with the 12-hour
clock display.
GPS Sync Synchronizes with GPS when turned on.
When turned off, the time can be changed
from “Adjust Time”.
Time Format Changes the display between 12 and 24-hour
clock time.
Time Zone Select When it's not synchronized with GPS, select
the region you want to specify.
Daylight Savings Time Turns the daylight saving time setting on/off.
When ON, the time ad
vances 1 hour. When
OFF, it returns to normal time.
Ve h i c l e Rain Sensing Wiper
Door Locks
Other Refer to Personalization Features on page 9-
9.
Devices Bluetooth Refer to Bluetooth
® Preparation on page 5-89.
Interior Features
Audio Set [Type B (touchscreen)]
5-115
CX-5_8GN5-EA-17J_Edition1 2017-8-18 12:58:27
Page 487 of 628

CAUTION
When removing the lens or lamp unit using
a flathead screwdriver, make sure that the
flathead screwdriver does not contact the
interior terminal. If the flathead screwdriver
contacts the terminal, a short circuit may
occur.
NOTE
•To replace the bulb, contact an
Authorized Mazda Dealer.
•Use the protective cover and carton for
the replacement bulb to dispose of the
old bulb promptly and out of the reach
of children.
▼Replacing Exterior Light Bulbs
Headlights/Daytime
running lights,
Daytime running lig hts/Parking lights
(Type A), Front side-marker lights
(Type A), Fog lights*, Brake lights (Type
A), Taillights (Type A), Reverse lights,
High-mount brake light, Side turn
signal lights, Rear side-marker lights
(Type A)
The LED bulb cannot be replaced as a
single unit because it is an integrated unit.
The LED bulb has to be replaced with the
unit. We recommend an Authorized
Mazda Dealer when the replacement is
necessary.
Front turn signal lig hts/Parking lights
1. Make sure the ignition is switched off,
and the headlight switch is off.
2. Lift the hood. Refer to Hood on page 6-14.
3. Turn the socket and bulb assembly counterclockwise and remove it.
4. Disconnect the bulb from the socket.
5. Install the new bulb in the reverseorder of the removal procedure.
Front side-marker lights (Type B)
1. Make sure the ignition is switched off, and the headlight switch is off.
2. If you are changing the right bulb, start the engine, turn the steering wheel all
the way to the left, and turn off engine.
If you are changing the left bulb, turn
the steering wheel to the right.
3. Pull the center of each plastic retainer using a flathead screwdriver and
remove the retainers, and then partially
peel back the over fender.
Removal
Installation
Maintenance and Care
Owner Maintenance
*Some models.6-37
CX-5_8GN5-EA-17J_Edition1 2017-8-18 12:58:27
Page 488 of 628
4. Pull the center of each plastic retainer
using a flathead screwdriver and
remove the retainers, and then partially
peel back the mudguard.
Removal
Installation
5. Turn the socket and bulb assembly counterclockwise and remove it.
6. Disconnect the bulb from the socket.
7. Install the new bulb in the reverse order of the removal procedure.
Rear turn signal lights, Brake lights/
Taillights/Rear side- marker lights (Type
B)
1. Make sure the ignition is switched off,
and the turn signa l switch is off.
2. Wrap a small flathead screwdriver with a soft cloth to prev ent damage to the
cover, and then remove the cover with
the flathead screwdriver.
3. Turn the screws counterclockwise and
remove them.
Maintenance and Care
Owner Maintenance
6-38
CX-5_8GN5-EA-17J_Edition1 2017-8-18 12:58:27
Page 489 of 628
4. Pull the unit rearward to remove it.
5. Turn the socket and bulb assemblycounterclockwise and remove it.
6. Disconnect the bulb from the socket. Rear turn signal lights
Brake lights/Taillights/Rear
side-marker lights
7. Install the new bulb in the reverseorder of the removal procedure.
License plate lights
1. Make sure the ignition is switched off,
and the headlight switch is off.
2. Wrap a flathead screwdriver with a soft cloth to prevent damage to the
lens, and then remove the lens by
carefully prying on t he edge of the lens
with a flathead screwdriver.
3. Disconnect the bulb by pulling it out.
4. Install the new bulb in the reverse order of the removal procedure.
Maintenance and Care
Owner Maintenance
6-39
CX-5_8GN5-EA-17J_Edition1 2017-8-18 12:58:27