2018 LINCOLN MKZ tow
[x] Cancel search: towPage 275 of 595

If you need to tow your vehicle, contact aprofessional towing service or, if you are amember of a roadside assistance program,your roadside assistance service provider.
We recommend the use of a wheel lift anddollies or flatbed equipment to tow yourvehicle. Do not tow with a slingbelt. LincolnMotor Company does not approve a slingbelttowing procedure. If you tow your vehicleincorrectly, or by any other means, vehicledamage may occur.
Lincoln Motor Company produces a towingmanual for all authorized tow truck operators.Have your tow truck operator refer to thismanual for proper hook-up and towingprocedures for your vehicle.
It is acceptable to have your front-wheeldrive vehicle towed from the front if usingproper wheel lift equipment to raise the frontwheels off the ground. When towing in thismanner, the rear wheels can remain on theground.
Front-wheel drive vehicles must have thefront wheels placed on a tow dolly whentowing your vehicle from the rear usingwheel lift equipment. This prevents damageto the transmission.
Towing an all-wheel drive vehicle requiresthat all wheels be off the ground, such asusing a wheel lift and dollies or flatbedequipment. This prevents damage to thetransmission, all-wheel drive system andvehicle.
TOWING POINTS
Due to local market requirements in somecountries, some vehicles may be equippedwith a recovery hook.
Recovery Hook Location
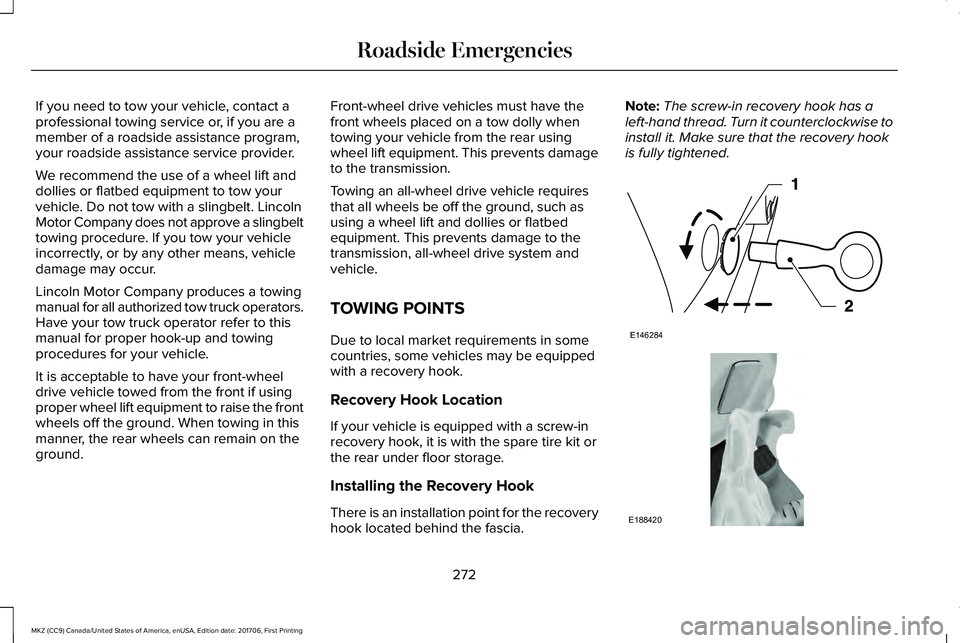
If your vehicle is equipped with a screw-inrecovery hook, it is with the spare tire kit orthe rear under floor storage.
Installing the Recovery Hook
There is an installation point for the recoveryhook located behind the fascia.
Note:The screw-in recovery hook has aleft-hand thread. Turn it counterclockwise toinstall it. Make sure that the recovery hookis fully tightened.
272
MKZ (CC9) Canada/United States of America, enUSA, Edition date: 201706, First Printing
Roadside EmergenciesE146284 E188420
Page 292 of 595

1.Release the two latches, located on bothsides of the fuse box.
2. Raise the inboard side of the fuse boxfrom the cradle.
3. Move the fuse box toward the center ofthe engine compartment.
4. Pivot the outboard side of the fuse boxto access the bottom side.
289
MKZ (CC9) Canada/United States of America, enUSA, Edition date: 201706, First Printing
FusesE145983
Page 306 of 595

2.Go to the front of the vehicle and find thesecondary release lever, which is locatedunder the front of the hood, near theLincoln badge.
3. Release the hood latch by pushing thesecondary release lever to your left,toward the passenger side of the vehicle.
4. Raise the hood. A gas strut will supportthe hood.
5. To close the hood, lower the hood andapply closing force to the hood as itdrops the last 8 to 11 inches (20 to 30centimeters).
Note:Make sure that the hood is closed fullybefore operating your vehicle. A warningindicator will appear in the informationdisplay if not closed properly.
303
MKZ (CC9) Canada/United States of America, enUSA, Edition date: 201706, First Printing
Maintenance
Page 315 of 595

Alcohol and other liquids can cause enginedamage from overheating or freezing.
Do not add extra inhibitors or additives tothe coolant. These can be harmful andcompromise the corrosion protection of thecoolant.
Recycled Coolant
We do not recommend the use of recycledcoolant as an approved recycling process isnot yet available.
Dispose of used engine coolant in anappropriate manner. Follow yourcommunity's regulations and standards forrecycling and disposing of automotive fluids.
Severe Climates
If you drive in extremely cold climates:
•It may be necessary to increase thecoolant concentration above 50%.
•A coolant concentration of 60% providesimproved freeze point protection. Coolant concentrations above 60%decrease the overheat protectioncharacteristics of the coolant and maycause engine damage.
If you drive in extremely hot climates:
•It may be necessary to decrease thecoolant concentration to 40%.
•A coolant concentration of 40% providesimproved overheat protection. Coolantconcentrations below 40% decrease thefreeze and corrosion protectioncharacteristics of the coolant and maycause engine damage.
Vehicles driven year-round in non-extremeclimates should use prediluted coolant foroptimum cooling system and engineprotection.
Fail-Safe Cooling
Fail-safe cooling allows you to temporarilydrive your vehicle before any incrementalcomponent damage occurs. The fail-safedistance depends on ambient temperature,vehicle load and terrain.
How Fail-Safe Cooling Works
If the engine begins to overheat, the coolanttemperature gauge moves toward the redzone:
A warning lamp illuminates and amessage may appear in theinformation display.
If the engine reaches a presetover-temperature condition, the engineautomatically switches to alternating cylinderoperation. Each disabled cylinder acts as anair pump and cools the engine.
312
MKZ (CC9) Canada/United States of America, enUSA, Edition date: 201706, First Printing
Maintenance
Page 317 of 595

If you tow a trailer with your vehicle, theengine may temporarily reach a highertemperature during severe operatingconditions, for example ascending a long orsteep grade in high ambient temperatures.
At this time, you may notice the coolanttemperature gauge moves toward the redzone and a message may appear in theinformation display.
You may notice a reduction in vehicle speedcaused by reduced engine power in orderto manage the engine coolant temperature. Your vehicle may enter this mode if certainhigh-temperature and high-load conditionstake place. The amount of speed reductiondepends on vehicle loading, grade andambient temperature. If this occurs, there isno need to pull off the road. You cancontinue to drive your vehicle.
The air conditioning may automatically turnon and off during severe operatingconditions to protect the engine fromoverheating. When the coolant temperaturedecreases to the normal operatingtemperature, the air conditioning turns on.
If the coolant temperature gauge moves fullyinto the red zone, or if the coolanttemperature warning or service engine soonmessages appear in your information display,do the following:
1. Pull off the road as soon as safelypossible and shift the transmission intopark (P).
2. Leave the engine running until thecoolant temperature gauge needlereturns to the normal position. If thetemperature does not drop after severalminutes, follow the remaining steps.
3. Switch the engine off and wait for it tocool. Check the coolant level.
4. If the coolant level is at or below theminimum mark, add prediluted coolantimmediately.
5. If the coolant level is normal, restart theengine and continue.
AUTOMATIC TRANSMISSION
FLUID CHECK
6F35/HF35 transmission (If Equipped)
Note:Transmission fluid should be checkedby an authorized dealer. If required, fluidshould be added by an authorized dealer.
The automatic transmission does not havea transmission fluid dipstick.
Refer to your scheduled maintenanceinformation for scheduled intervals for fluidchecks and changes. Your transmission doesnot consume fluid. However, the fluid levelshould be checked if the transmission is notworking properly, (For example: if thetransmission slips or shifts slowly) or if younotice some sign of fluid leakage. SeeScheduled Maintenance (page 509).
Do not use supplemental transmission fluidadditives, treatments or cleaning agents. Theuse of these materials may affecttransmission operation and result in damageto internal transmission components.
314
MKZ (CC9) Canada/United States of America, enUSA, Edition date: 201706, First Printing
Maintenance
Page 330 of 595

SpecificationName
Motorcraft® Spot and Stain Remover, ZC-14 (U.S.)
ESR-M14P5-AMotorcraft® Ultra-Clear Spray Glass Cleaner, ZC-23 (U.S.)
Motorcraft® Wheel and Tire Cleaner, ZC-37-A (U.S. & Canada)
CLEANING THE EXTERIOR
Wash your vehicle regularly with cool orlukewarm water and a neutral pH shampoo,we recommend Motorcraft Detail Wash.
•Never use strong household detergentsor soap, for example dish washing orlaundry liquid. These products candiscolor and spot painted surfaces.
•Never wash your vehicle when it is hotto the touch, or during strong or directsunlight.
•Dry your vehicle with a chamois or softterry cloth towel to eliminate waterspotting.
•Immediately remove fuel spillages, birddroppings, insect deposits and road tar.These may cause damage to yourvehicle’s paintwork or trim over time. Werecommend Motorcraft Bug and TarRemover.
•Remove any exterior accessories, forexample antennas, before entering a carwash.
Note:Suntan lotions and insect repellentscan damage painted surfaces. If thesesubstances come in contact with yourvehicle, wash the affected area as soon aspossible.
Cleaning the Headlamps
Note:Do not scrape the headlamp lensesor use abrasives, alcoholic solvents orchemical solvents to clean them.
Note:Do not wipe the headlamps when theyare dry.
Exterior Chrome Parts
•Apply a high quality-cleaning product tobumpers and other chrome parts. Followthe manufacturer’s instructions. Werecommend Motorcraft Custom BrightMetal Cleaner.
•Do not apply the cleaning product to hotsurfaces. Do not leave the cleaningproduct on chrome surfaces longer thanthe time recommended.
•Using non-recommended cleaners canresult in severe and permanent cosmeticdamage.
Note:Never use abrasive materials, forexample steel wool or plastic pads as theycan scratch the chrome surface.
327
MKZ (CC9) Canada/United States of America, enUSA, Edition date: 201706, First Printing
Vehicle Care
Page 340 of 595

Loss of air pressure may adversely affect tireperformance. For this reason:
Note:Do not drive the vehicle above 50 mph(80 km/h).
Note:Do not drive further than 120 mi(200 km). Drive only to the closest authorizedLincoln dealer or tire repair shop to haveyour tire inspected.
•Drive carefully and avoid abrupt steeringmaneuvers.
•Periodically monitor tire inflation pressurein the affected tire; if the tire is losingpressure, have the vehicle towed.
•Read the information in the Tips for Useof the Kit section to make sure safeoperation of the kit and your vehicle.
Tips for Use of the Kit
To ensure safe operation of the kit:
•Read all instructions and cautions fully.
•Before operating the kit, make sure yourvehicle is safely off the road and awayfrom moving traffic. Turn on the hazardlights.
•Always set the parking brake to ensurethe vehicle doesn't move unexpectedly.
•Do not remove any foreign objects, suchas nails or screws, from the tire.
•When using the kit, leave the enginerunning (only if the vehicle is outdoors orin a well-ventilated area) so thecompressor does not drain the vehicle'sbattery.
•Do not allow the compressor to operatecontinuously for more than 15 minutes.This will help prevent the compressorfrom overheating.
•Never leave the kit unattended duringoperation.
•Sealant compound contains latex. Thosewith latex sensitivities should useappropriate precautions to avoid anallergic reaction.
•Keep the kit away from children.
•Only use the kit when the ambienttemperature is between -22°F (-30°C) and158°F (70°C).
•Only use the sealing compound beforethe use-by date. The use-by date is on alabel on the sealant canister and can beseen through the rectangular viewingwindow on the bottom of the compressor.Check the use-by date regularly andreplace the canister after four years ofnon-use.
•Do not store the kit unsecured inside thepassenger compartment of the vehicleas it may cause injury during a suddenstop or crash. Always store the kit in itsoriginal location.
•After sealant use, the tire pressuremonitoring system sensor and valve stemon the wheel must be replaced by anauthorized Lincoln dealer.
•Operating the kit could cause anelectrical disturbance in radio, CD, andDVD player operation.
* When inflation only is required fora tire or other objects, the selectormust be in the Air position.
337
MKZ (CC9) Canada/United States of America, enUSA, Edition date: 201706, First Printing
Wheels and TiresE175978
Page 343 of 595

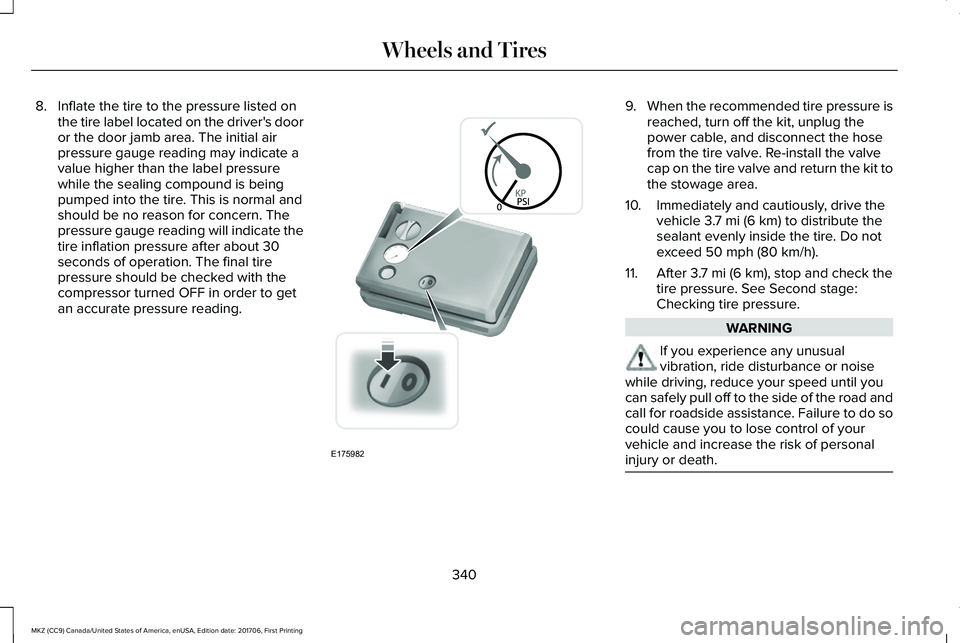
8. Inflate the tire to the pressure listed onthe tire label located on the driver's dooror the door jamb area. The initial airpressure gauge reading may indicate avalue higher than the label pressurewhile the sealing compound is beingpumped into the tire. This is normal andshould be no reason for concern. Thepressure gauge reading will indicate thetire inflation pressure after about 30seconds of operation. The final tirepressure should be checked with thecompressor turned OFF in order to getan accurate pressure reading.
9.When the recommended tire pressure isreached, turn off the kit, unplug thepower cable, and disconnect the hosefrom the tire valve. Re-install the valvecap on the tire valve and return the kit tothe stowage area.
10. Immediately and cautiously, drive thevehicle 3.7 mi (6 km) to distribute thesealant evenly inside the tire. Do notexceed 50 mph (80 km/h).
11. After 3.7 mi (6 km), stop and check thetire pressure. See Second stage:Checking tire pressure.
WARNING
If you experience any unusualvibration, ride disturbance or noisewhile driving, reduce your speed until youcan safely pull off to the side of the road andcall for roadside assistance. Failure to do socould cause you to lose control of yourvehicle and increase the risk of personalinjury or death.
340
MKZ (CC9) Canada/United States of America, enUSA, Edition date: 201706, First Printing
Wheels and TiresE175982