2018 LINCOLN CONTINENTAL change time
[x] Cancel search: change timePage 176 of 615

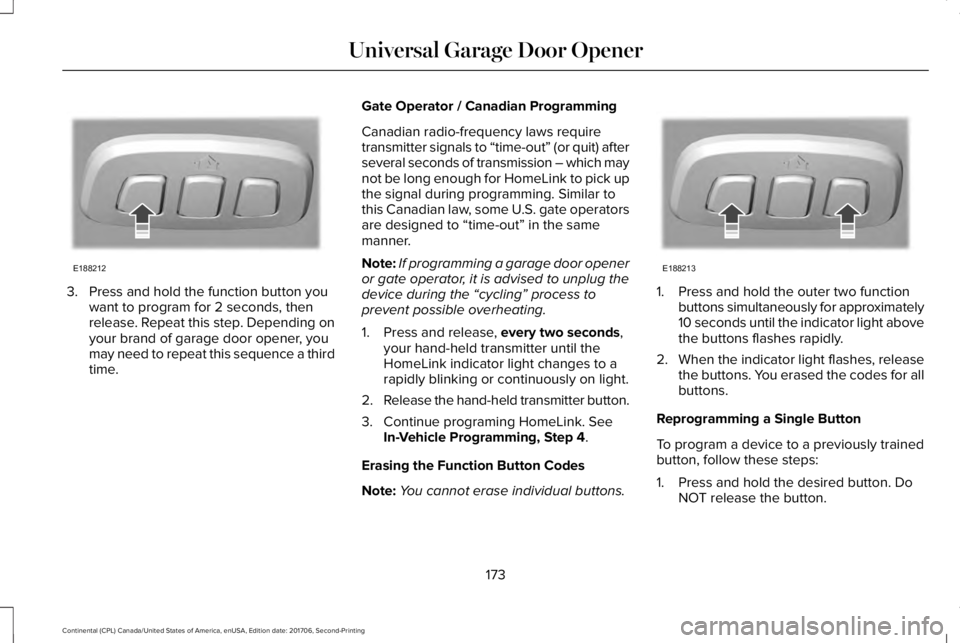
3. Press and hold the function button youwant to program for 2 seconds, thenrelease. Repeat this step. Depending onyour brand of garage door opener, youmay need to repeat this sequence a thirdtime.
Gate Operator / Canadian Programming
Canadian radio-frequency laws requiretransmitter signals to “time-out” (or quit) afterseveral seconds of transmission – which maynot be long enough for HomeLink to pick upthe signal during programming. Similar tothis Canadian law, some U.S. gate operatorsare designed to “time-out” in the samemanner.
Note:If programming a garage door openeror gate operator, it is advised to unplug thedevice during the “cycling” process toprevent possible overheating.
1. Press and release, every two seconds,your hand-held transmitter until theHomeLink indicator light changes to arapidly blinking or continuously on light.
2.Release the hand-held transmitter button.
3. Continue programing HomeLink. SeeIn-Vehicle Programming, Step 4.
Erasing the Function Button Codes
Note:You cannot erase individual buttons.
1. Press and hold the outer two functionbuttons simultaneously for approximately10 seconds until the indicator light abovethe buttons flashes rapidly.
2.When the indicator light flashes, releasethe buttons. You erased the codes for allbuttons.
Reprogramming a Single Button
To program a device to a previously trainedbutton, follow these steps:
1. Press and hold the desired button. DoNOT release the button.
173
Continental (CPL) Canada/United States of America, enUSA, Edition date: 201706, Second-Printing
Universal Garage Door OpenerE188212 E188213
Page 195 of 615

The scheduled maintenance items listed inscheduled maintenance information areessential to the life and performance of yourvehicle and to its emissions system.
If you use anything other than Ford,Motorcraft or Ford-authorized parts formaintenance replacements or for service ofcomponents affecting emission control, suchnon-Ford parts should be equivalent togenuine Ford Motor Company parts inperformance and durability.
Illumination of the service engine soonindicator, charging system warning light orthe temperature warning light, fluid leaks,strange odors, smoke or loss of enginepower could indicate that the emissioncontrol system is not working properly.
An improperly operating or damaged exhaustsystem may allow exhaust to enter thevehicle. Have a damaged or improperlyoperating exhaust system inspected andrepaired immediately.
Do not make any unauthorized changes toyour vehicle or engine. By law, vehicleowners and anyone who manufactures,repairs, services, sells, leases, tradesvehicles, or supervises a fleet of vehicles arenot permitted to intentionally remove anemission control device or prevent it fromworking. Information about your vehicle’semission system is on the Vehicle EmissionControl Information Decal located on or nearthe engine. This decal also lists enginedisplacement.
Please consult your warranty information forcomplete details.
On-Board Diagnostics (OBD-II)
Your vehicle has a computer known as theon-board diagnostics system (OBD-II) thatmonitors the engine’s emission controlsystem. The system protects the environmentby making sure that your vehicle continuesto meet government emission standards. TheOBD-II system also assists a servicetechnician in properly servicing your vehicle.
When the service engine soonindicator illuminates, the OBD-IIsystem has detected a malfunction.Temporary malfunctions may cause theservice engine soon indicator to illuminate.Examples are:
1. Your vehicle has run out of fuel—theengine may misfire or run poorly.
2.Poor fuel quality or water in the fuel—theengine may misfire or run poorly.
3. The fuel fill inlet may not have closedproperly. See Refueling (page 186).
4. Driving through deep water—theelectrical system may be wet.
You can correct these temporarymalfunctions by filling the fuel tank with goodquality fuel, properly closing the fuel fill inletor letting the electrical system dry out. Afterthree driving cycles without these or anyother temporary malfunctions present, theservice engine soon indicator should stay offthe next time you start the engine. A drivingcycle consists of a cold engine startupfollowed by mixed city and highway driving.No additional vehicle service is required.
192
Continental (CPL) Canada/United States of America, enUSA, Edition date: 201706, Second-Printing
Engine Emission Control
Page 199 of 615

A message will appear in your informationdisplay screen when your vehicle hasentered Stay in Neutral mode.
Note:During this mode the N button willflash continuously and your instrumentcluster will display N as the selected gear.
Exiting Stay in Neutral mode
To disable Stay in Neutral mode selectanother gear. See the Putting the Vehiclein Gear for instructions on how to do this.
Entering a Carwash
Note:Always put your vehicle in Stay inNeutral mode when entering an automaticcar wash. Failure to do this could result invehicle damage not covered by warranty.
Drive (D)
The normal driving position for the best fueleconomy.
Sport (S)
Putting the vehicle in sport (S):
•Provides additional engine braking andextends lower gear operation to enhanceperformance for uphill climbs, hilly terrainor mountainous areas. This will increaseengine RPM during engine braking.
•Provides additional lower gear operationthrough the automatic transmission shiftstrategy.
•Provides gear selection more quickly andat higher engine speeds.
SelectShift™ Automatic Transmission
Your vehicle is equipped with a SelectShiftAutomatic transmission gearshift lever. TheSelectShift Automatic transmission gives youthe ability to change gears up or down asdesired.
In order to prevent the engine from runningat too low an RPM, which may cause it tostall, SelectShift still automatically makessome downshifts if it has determined thatyou have not downshifted in time. AlthoughSelectShift makes some downshifts for you,it still allows you to downshift at any time aslong as the SelectShift determines thatdamage will not be caused to the enginefrom over-revving.
Note:Engine damage may occur if youmaintain excessive engine revving withoutshifting.
SelectShift does not automatically upshift,even if the engine is approaching the RPMlimit. It must be shifted manually by pressingthe + button. Notice should be taken of theshift indicator lamp, which alerts the driverwhen to shift to ensure the highest level ofefficiency and fuel economy.
Pull the + paddle on the steering wheel toactivate SelectShift.
•Pull the right paddle (+) to upshift.
•Pull the left paddle (–) to downshift.
196
Continental (CPL) Canada/United States of America, enUSA, Edition date: 201706, Second-Printing
Transmission
Page 207 of 615

acceleration or braking which could resultin an increased risk of loss of vehiclecontrol, vehicle rollover and/or personalinjury. Use all available road surface toreturn the vehicle to a safe direction oftravel.
•In the event of an emergency stop, avoidskidding the tires and do not attempt anysharp steering wheel movements.
•If the vehicle goes from one type ofsurface to another (that is, from concreteto gravel) there will be a change in theway the vehicle responds to a maneuver(steering, acceleration or braking). Again,avoid these abrupt inputs.
Sand
Most of the time traction control improvestire traction by managing wheel slip throughBrake, Engine, and AWD calibrations.However, during low speed driving, disablingtraction control in deep sand can help keepthe wheels moving to maintain vehiclemomentum.
When driving over sand, try to keep all fourwheels on the most solid area of the trail.Avoid reducing the tire pressures but shiftto a lower gear and drive steadily throughthe terrain. Apply the accelerator slowly andavoid spinning the wheels.
Do not drive your vehicle in deep sand foran extended period of time. This could causethe AWD system to overheat and default tofront-wheel drive. If this occurs, an AWD OFFmessage displays in the information display.To resume normal AWD function as soon aspossible, stop the vehicle in a safe locationand stop the engine for at least 10 minutes.After the engine has been restarted and theAWD system has adequately cooled, theAWD OFF message turns off and normalAWD function returns. In the event theengine is not stopped, the AWD OFFmessage turns off when the system coolsand normal AWD function returns.
When driving at slow speeds in deep sandunder high outside temperatures, use L (Low)gear when possible. L (Low) gear operationwill maximize the engine and transmissioncooling capability.
Under severe operating conditions, the A/Cmay cycle on and off to protect overheatingof the engine.
Avoid excessive speed because vehiclemomentum can work against you and causethe vehicle to become stuck to the point thatassistance may be required from anothervehicle. Remember, you may be able to backout the way you came if you proceed withcaution.
Mud and Water
If you must drive through high water, driveslowly. Traction or brake capability may belimited.
When driving through water, determine thedepth; avoid water higher than the bottomof the wheel rims (for cars) or the bottom ofthe hubs (for trucks) (if possible) and proceedslowly. If the ignition system gets wet, thevehicle may stall.
204
Continental (CPL) Canada/United States of America, enUSA, Edition date: 201706, Second-Printing
All-Wheel Drive (If Equipped)
Page 220 of 615

PRINCIPLE OF OPERATION
WARNING: Vehicle modificationsinvolving braking system, aftermarket roofracks, suspension, steering system, tireconstruction and wheel and tire size maychange the handling characteristics of yourvehicle and may adversely affect theperformance of the electronic stability controlsystem. In addition, installing any stereoloudspeakers may interfere with andadversely affect the electronic stabilitycontrol system. Install any aftermarket stereoloudspeaker as far as possible from the frontcenter console, the tunnel, and the frontseats in order to minimize the risk ofinterfering with the electronic stability controlsensors. Reducing the effectiveness of theelectronic stability control system could leadto an increased risk of loss of vehicle control,vehicle rollover, personal injury and death.
WARNING: Remember that evenadvanced technology cannot defy the lawsof physics. It’s always possible to lose controlof a vehicle due to inappropriate driver inputfor the conditions. Aggressive driving on anyroad condition can cause you to lose controlof your vehicle increasing the risk of personalinjury or property damage. Activation of theelectronic stability control system is anindication that at least some of the tires haveexceeded their ability to grip the road; thiscould reduce the operator’s ability to controlthe vehicle potentially resulting in a loss ofvehicle control, vehicle rollover, personalinjury and death. If your electronic stabilitycontrol system activates, SLOW DOWN.
The system automatically turns on each timeyou switch the ignition on.
If a fault occurs in either the stability controlor the traction control system, you mayexperience the following conditions:
•The stability and traction control lightilluminates steadily.
•The stability control and traction controlsystems do not enhance your vehicle'sability to maintain traction of the wheels.
•The adaptive steering system (ifequipped) automatically changes thesteering function to a fixed steering ratio.See Steering (page 259).
If a driving condition activates either thestability control or the traction control systemyou may experience the following conditions:
•The stability and traction control lightflashes.
•Your vehicle slows down.
•Reduced engine power.
•A vibration in the brake pedal.
•The brake pedal is stiffer than usual.
•If the driving condition is severe and yourfoot is not on the brake, the brake pedalmay move as the system applies higherbrake force.
217
Continental (CPL) Canada/United States of America, enUSA, Edition date: 201706, Second-Printing
Stability Control
Page 227 of 615

Note:Keep the sensors free from snow, iceand large accumulations of dirt.
Note:Do not cover up the sensors.
Note:Do not clean the sensors with sharpobjects.
Note:The sensors may not detect objectswith surfaces that absorb ultrasonic waves.The sensors may falsely detect objects dueto ultrasonic interference caused bymotorcycle exhausts, truck air brakes orhorns, for example.
Note:If you change any tires, the systemmust recalibrate and may not correctlyoperate for a short time.
The system may not correctly operate in anyof the following conditions:
•You use a spare tire or a tire that issignificantly worn more than the othertires.
•One or more tires are incorrectly inflated.
•You try to park on a tight curve.
•Something passes between the frontbumper and the parking space. Forexample, a pedestrian or cyclist.
•The edge of the neighboring parkedvehicle is high off the ground. Forexample, a bus, tow truck or flatbedtruck.
•The weather conditions are poor. Forexample, during heavy rain, snow, fog,high humidity and high temperatures.
Do not use the system if:
•You have attached an add-on accessoryclose to the sensors on the front or rearof your vehicle. For example, a bike rackor trailer.
•You have attached an overhangingobject to the roof. For example, asurfboard.
•The front bumper, rear bumper or theside sensors are damaged.
•The correct tire size is not in use on yourvehicle. For example, a mini-spare tire.
Using Active Park Assist
Selecting an Active Park Assist Mode
Press the button once to activateparallel parking. Press the buttona second time to activateperpendicular parking. If you press thebutton again the system switches off.
If your vehicle is parked and after you switchthe ignition on, you can use the informationdisplay to toggle through the modes. Pressthe button to switch the system on and openthe system menu in the information display.
Note:If your vehicle is parked, the defaultmode is parallel park out assist. However, ifyou did not use active park assist to parallelpark your vehicle, use the informationdisplay to select park out assist.
Note:You can repeatedly press the activepark assist button to toggle through themodes only after moving your vehicleapproximately 33 ft (10 m).
224
Continental (CPL) Canada/United States of America, enUSA, Edition date: 201706, Second-Printing
Parking AidsE146186
Page 233 of 615

Possible CauseSymptom
The parking space is more than 5 ft (1.5 m) or less than 2 ft (0.5 m) away.
The vehicle speed is greater than 22 mph (35 km/h) for parallel parking or greater than19 mph (30 km/h) for perpendicular parking.
You recently disconnected or replaced the battery. After you reconnect the battery youmust drive your vehicle on a straight road for a short period of time.
Your vehicle is rolling in the opposite direction of the current transmission position. Forexample, rolling forward when in reverse (R).The system does not correctly position your vehiclein a parking space.
An irregular curb along the parking space prevents the system from correctly aligningyour vehicle.
Vehicles or objects bordering the space may not be correctly parked.
Your vehicle stopped too far past the parking space.
The tires may not be correctly installed or maintained. For example, not inflated correctly,improper size, or of different sizes.
A repair or alteration changes the detection capabilities.
230
Continental (CPL) Canada/United States of America, enUSA, Edition date: 201706, Second-Printing
Parking Aids
Page 237 of 615

The system uses red, yellow and greenhighlights that appear on top of the videoimage when any of the sensing systemsdetect an object.
Manual Zoom
WARNING: When manual zoom is on,the full area behind your vehicle may notshow. Be aware of your surroundings whenusing the manual zoom feature.
Note:Manual zoom is only available whenthe transmission is in reverse (R).
Note:When you enable manual zoom, onlythe centerline is shown.
Selectable settings for this feature are zoomin (+) and zoom out (-). Press the symbol inthe camera screen to change the view. Thedefault setting is zoom off.
This allows you to get a closer view of anobject behind your vehicle. The zoomedimage keeps the bumper in the image toprovide a reference. The zoom is only activewhile the transmission is in reverse (R).
Rear Camera Delay
Selectable settings for this feature are onand off.
The default setting for the rear camera delayis off.
When shifting the transmission out of reverse(R) and into any gear other than park (P), thecamera image remains in the display until:
•Your vehicle speed sufficiently increases.
•You shift your vehicle into park (P).
360 DEGREE CAMERA (If Equipped)
WARNING: The 360 degree camerasystem still requires the driver to use it inconjunction with looking out of the windows,and checking the interior and exterior mirrorsfor maximum coverage.
WARNING: You may not see objectsthat are close to either corner of the bumperor under the bumper due to the limitedcoverage of the camera system.
WARNING: Use caution when turningcamera features on or off when thetransmission is not in park (P). Make sureyour vehicle is not moving.
WARNING: At all times, you areresponsible for controlling your vehicle,supervising the system and intervening, ifrequired. Failure to take care may result inthe loss of control of your vehicle, seriouspersonal injury or death.
Note:Use caution using the 360 view whenany of the doors are ajar. If a door is ajar,the camera will be out of position and thevideo image may be incorrect.
The 360 degree camera system consists offront, side and rear cameras. The system:
•Allows you to see what is directly in frontor behind your vehicle.
•Provides cross traffic view in front andbehind your vehicle.
234
Continental (CPL) Canada/United States of America, enUSA, Edition date: 201706, Second-Printing
Parking Aids