2018 LEXUS LS500 heater
[x] Cancel search: heaterPage 325 of 514
3255-3. Using the air conditio ning system and defogger
LS500_OM_OM50F54U_(U) 5
Interior features
Rear Multi Operation Panel
1 Select “AUTO” on the rear air con-
ditioning control screen. ( → P.324)
2 To stop the operation, select “OFF”
on the rear air co nditioning control
screen. ( → P.323)
If the fan speed setting or air flow
modes are operated , the automatic
mode indicator goes off. However,
automatic mode for functions other
than that operated is maintained. ■
Using automatic mode
Fan speed is adjusted automatically accord-
ing to the temperature setting and the
ambient conditions.
Therefore, the fan may stop for a while until
warm or cool air is ready to flow immedi-
ately after “Rear AUTO” is selected or
“AUTO” is touched.
Cool air may blow around the upper body
even when the heater is on due to sunlight.
The temperature setting of the rear
seats can be adjusted using the follow-
ing methods:
When the “4-ZONE” indicator is
off: Adjust the driv er’s seat tempera-
ture. Adjust the temperature setting of each
rear seat using the Center Display or Rear
Multi Operation Panel.
Adjust the temperature setting of
each rear seat using the Center Dis-
play (rear air conditioning control
screen) or Rear Multi Operation
Panel. The temperature setting of each rear seat
can be changed independently.
■
Rear center outlets and rear side
outlets
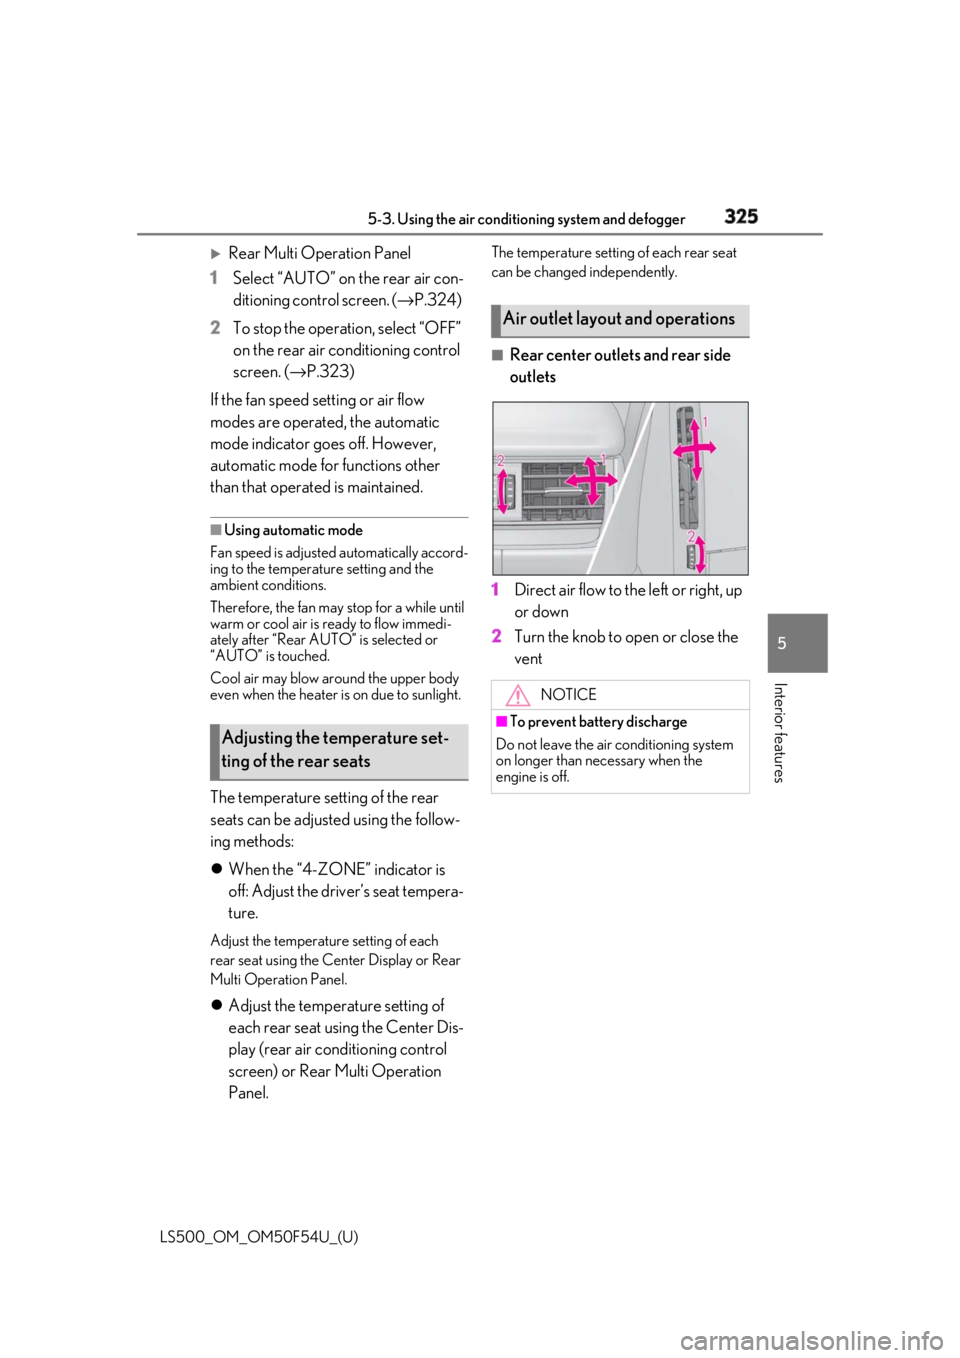
1 Direct air flow to the left or right, up
or down
2 Turn the knob to open or close the
vent
Adjusting the temperature set-
ting of the rear seats Air outlet layout and operations
NOTICE■
To prevent battery discharge
Do not leave the air conditioning system
on longer than necessary when the
engine is off.
Page 326 of 514
326 5-3. Using the air conditioning system and defogger
LS500_OM_OM50F54U_(U) *
:If equipped
Heated steering wheel *
/seat
heaters *
/seat ventilators *
Heated steering wheel Warms up the grip of the steering wheel
Front seat heaters/Rear seat
heaters Warm up the seat upholstery
Front seat ventilators/Rear seat
ventilators Maintain good ventilation by pulling air
through the seat upholstery
The Center Display and Rear Multi
Operation Panel/rear control
panel can be used to operate the
heated steering wheel, seat heaters
and seat ventilators as follows: Center Display Press the “MENU” button on the
Remote Touch to display the main menu
and move the cursor to to display
the shortcut button s. Then, select
to display the heated steering
wheel/front seat heater/front seat venti-
lator control screen.
To display the rear seat heater/rear seat
ventilator control sc reen, select . (if
equipped)
Rear Multi Operation Panel Touch “Climate” on the home screen to
display the air conditioning control
screen.( →
P.308 )
Touching the shortc ut button on the
home screen will di splay operation but-
tons for the rear seat heaters and rear
seat ventilators.
Rear control panel The rear seat heaters can be operated.
WARNING■
To prevent minor burn injuries
Care should be taken if anyone in the fol-
lowing categories comes in contact with
the steering wheel or seats when the
heater is on:
●
Babies, small children, the elderly, the
sick and the physically challenged
●
Persons with sensitive skin
●
Persons who are fatigued
●
Persons who have taken alcohol or
drugs that induce sleep (sleeping
drugs, cold remedies, etc.)
Page 327 of 514
3275-3. Using the air conditio ning system and defogger
LS500_OM_OM50F54U_(U) 5
Interior features ■
Center Display
Main screen
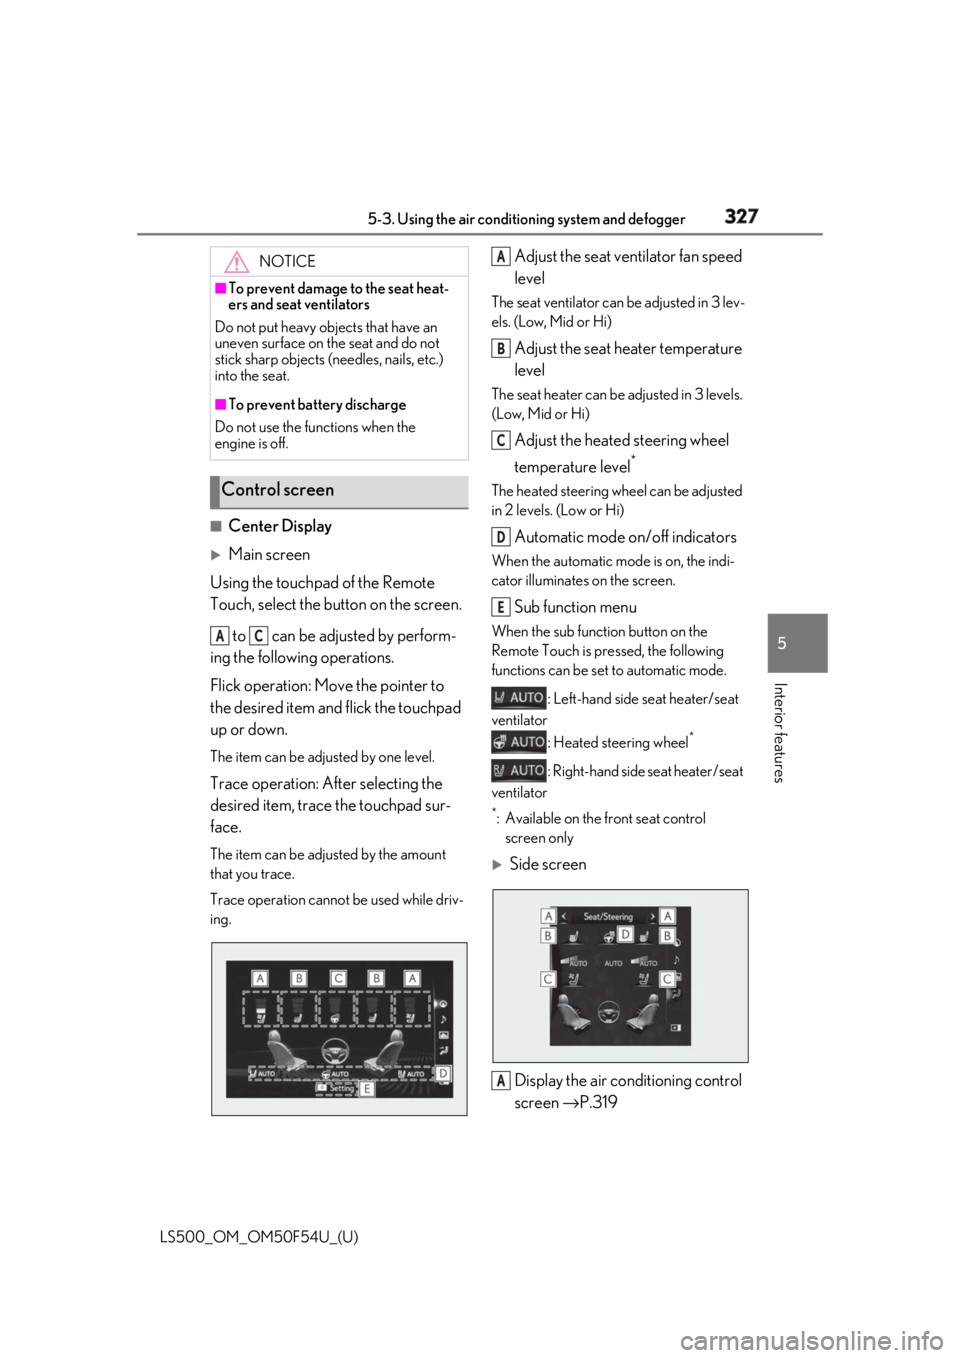
Using the touchpad of the Remote
Touch, select the button on the screen.
to can be adjusted by perform-
ing the following operations.
Flick operation: Move the pointer to
the desired item and flick the touchpad
up or down. The item can be adjusted by one level.
Trace operation: After selecting the
desired item, trace the touchpad sur-
face. The item can be adjusted by the amount
that you trace.
Trace operation cannot be used while driv-
ing. Adjust the seat ventilator fan speed
level The seat ventilator can be adjusted in 3 lev-
els. (Low, Mid or Hi)
Adjust the seat heater temperature
level The seat heater can be adjusted in 3 levels.
(Low, Mid or Hi)
Adjust the heated steering wheel
temperature level *
The heated steering wheel can be adjusted
in 2 levels. (Low or Hi)
Automatic mode on/off indicators When the automatic mode is on, the indi-
cator illuminates on the screen.
Sub function menu When the sub function button on the
Remote Touch is pressed, the following
functions can be set to automatic mode.
: Left-hand side seat heater/seat
ventilator
: Heated steering wheel *
: Right-hand side seat heater/seat
ventilator *
: Available on the front seat control
screen only
Side screen
Display the air conditioning control
screen → P.319NOTICE■
To prevent damage to the seat heat-
ers and seat ventilators
Do not put heavy objects that have an
uneven surface on the seat and do not
stick sharp objects (needles, nails, etc.)
into the seat. ■
To prevent battery discharge
Do not use the functions when the
engine is off.
Control screen A C A
B
C
D
E
A
Page 328 of 514
328 5-3. Using the air conditioning system and defogger
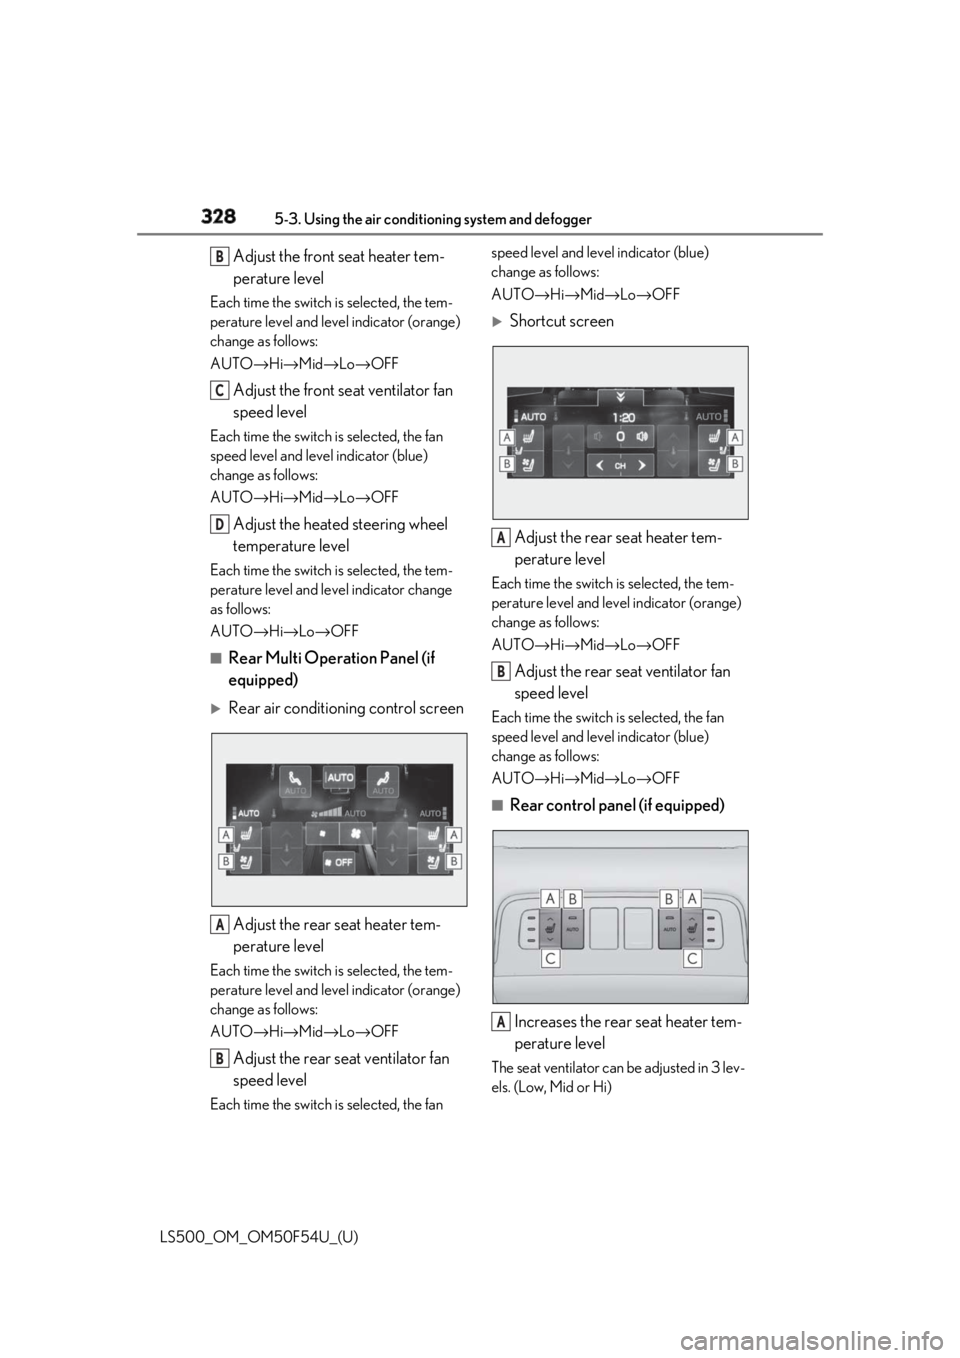
LS500_OM_OM50F54U_(U) Adjust the front seat heater tem-
perature levelEach time the switch is selected, the tem-
perature level and leve l indicator (orange)
change as follows:
AUTO → Hi → Mid → Lo → OFF
Adjust the front seat ventilator fan
speed levelEach time the switch is selected, the fan
speed level and leve l indicator (blue)
change as follows:
AUTO → Hi → Mid → Lo → OFF
Adjust the heated steering wheel
temperature levelEach time the switch is selected, the tem-
perature level and le vel indicator change
as follows:
AUTO → Hi → Lo → OFF■
Rear Multi Operation Panel (if
equipped)
Rear air conditioning control screen
Adjust the rear seat heater tem-
perature levelEach time the switch is selected, the tem-
perature level and leve l indicator (orange)
change as follows:
AUTO → Hi → Mid → Lo → OFF
Adjust the rear seat ventilator fan
speed levelEach time the switch is selected, the fan speed level and level indicator (blue)
change as follows:
AUTO → Hi → Mid → Lo → OFF
Shortcut screen
Adjust the rear seat heater tem-
perature level Each time the switch is selected, the tem-
perature level and level indicator (orange)
change as follows:
AUTO → Hi → Mid → Lo → OFF
Adjust the rear seat ventilator fan
speed level Each time the switch is selected, the fan
speed level and level indicator (blue)
change as follows:
AUTO → Hi → Mid → Lo → OFF■
Rear control panel (if equipped)
Increases the rear seat heater tem-
perature level The seat ventilator can be adjusted in 3 lev-
els. (Low, Mid or Hi)B
C
D
A
B A
B
A
Page 329 of 514
3295-3. Using the air conditio ning system and defogger
LS500_OM_OM50F54U_(U) 5
Interior features Enables/Disables the automatic
mode of the rear seat heaters
Decreases the rear seat heater
temperature levelIf this switch is select ed when the rear seat
heater temperature level is set to Lo, the
rear seat heater will turn off. ■
The heated steering wheel, seat heaters
and seat ventilators wheel can be used
when
The engine switch is in IGNITION ON
mode. ■
Air conditioning system-linked control
mode
When the seat ventilato r fan speed level is
Hi, the seat ventilator fan speed becomes
higher according to the fan speed of the air
conditioning system. ■
Customization
Some functions can be customized.
( → P.468)
WARNING■
To prevent overheating and minor
burn injuries
Observe the following precautions when
using the seat heaters. ●
Do not cover the seat with a blanket or
cushion when using the seat heater.
●
Do not use seat heater more than nec-
essary. B
C
Page 366 of 514

366 6-1. Maintenance and care
LS500_OM_OM50F54U_(U) Remove dirt using a water-damp-
ened soft cloth or synthetic chamois.
Wipe the surface with a dry, soft
cloth to remove any remaining
moisture. ■
Cleaning the areas with satin-finish
metal accents
The metal areas use a layer of real metal for
the surface. It is necessary to clean them
regularly. If dirty area s are left uncleaned for
long periods of time, they may be difficult to
clean.
Remove dirt and dust using a vac-
uum cleaner.
Wipe off any excess dirt and dust
with a soft cloth dampened with
diluted detergent. Use a diluted water solution of approxi-
mately 5% neutral wool detergent.
Wring out any excess water from
the cloth and thoroughly wipe off all
remaining traces of detergent.
Wipe the surface with a dry, soft
cloth to remove any remaining
moisture. Allow the leather to dry in
a shaded and ventilated area. ■
Caring for leather areas
Lexus recommends cleani ng the interior of
the vehicle at least twice a year to maintain
the quality of the vehicle’s interior.NOTICE■
Preventing damage to leather sur-
faces
Observe the following precautions to
avoid damage to and deterioration of
leather surfaces: ●
Remove any dust or dirt from leather
surfaces immediately.●
Do not expose the vehicle to direct
sunlight for extended periods of time.
Park the vehicle in the shade, espe-
cially during summer.●
Do not place items made of vinyl, plas-
tic, or containing wax on the uphol-
stery, as they may stick to the leather
surface if the vehicle interior heats up
significantly.■
Water on the floor
Do not wash the vehicle floor with water.
Vehicle systems such as the audio system
may be damaged if water comes into
contact with electrical components such
as the audio system above or under the
floor of the vehicle. Water may also
cause the body to rust. ■
When cleaning the inside of the wind-
shield
Do not allow glass cleaner to contact the
camera sensor lens. Also, do not touch
the lens. ( → P.188, 195)
■
Cleaning the inside of the rear win-
dow●
Do not use glass cleaner to clean the
rear window, as this may cause dam-
age to the rear window defogger
heater wires or antenna. Use a cloth
dampened with lukewarm water to
gently wipe the window clean. Wipe
the window in strokes running parallel
to the heater wires or antenna.
●
Be careful not to scratch or damage
the heater wires or antenna. Cleaning the areas with satin-fin-
ish metal accents
Cleaning the leather areas
Page 432 of 514

432 7-2. Steps to take in an emergency
LS500_OM_OM50F54U_(U) Take your vehicle to the nearest Lexus
dealer or authorized tire dealer as
soon as possible if any tire goes flat. The vehicle can be driven for a maximum
of 100 miles (160 km) at a speed below 50
mph (80 km/h) after the tire pressure
warning light comes on. ( → P.422)
A run-flat tire has a mark on the
side wall.
■
In some conditions (s uch as at high tem-
peratures)
You cannot continue driving for up to 160
miles (100 km).
■
For the detailed information on run-flat
tires
See the tire warranty booklet.NOTICE■
If “High Power Consumption Partial
Limit On AC/Heater Operation” is
displayed frequently
There is a possible malfunction relating
to the charging system or the battery
may be deteriorating. Have the vehicle
inspected by your Lexus dealer.
If you have a flat tire Your vehicle is not equipped with a
spare tire, but instead you can con-
tinue driving the vehicle with
run-flat tires even if any tire goes
flat.
In this case, slow down and drive
with extra caution.
Run-flat tires
Page 464 of 514
462 8-1. Specifications
LS500_OM_OM50F54U_(U) ■
Traction AA, A, B, C
The traction grades, from highest to
lowest, are AA, A, B and C, and they
represent the tire’s ability to stop on
wet pavement as measured under con-
trolled conditions on specified govern-
ment test surfaces of asphalt and
concrete. A tire marked C may have poor traction
performance.
Warning: The traction grade assigned to
this tire is based on braking (straight
ahead) traction tests and does not include
cornering (turning) traction. ■
Temperature A, B, C
The temperature grades are A (the
highest), B, and C, representing the
tire’s resistance to the generation of
heat and its ability to dissipate heat when tested under controlled condi-
tions on a specified indoor laboratory
test wheel. Sustained high temperature can cause the
material of the tire to degenerate and
reduce tire life, and excessive temperature
can lead to sudd en tire failure.
Grade C corresponds to a level of perfor-
mance which all passenger car tires must
meet under the Fede ral Motor Vehicle
Safety Standard No. 109.
Grades B and A represent higher levels of
performance on the laboratory test wheel
than the minimum required by law.
Warning: The temperature grades of a tire
assume that it is prop erly inflated and not
overloaded.
Excessive speed, unde rinflation, or exces-
sive loading, either separately or in combi-
nation, can cause heat buildup and
possible tire failure.
Glossary of tire terminology Tire related term Meaning
Cold tire inflation pressure Tire pressure when the vehicle has been parked for
three hours or more, or has not been driven more
than 1 mile or 1.5 km under that condition
Maximum inflation pressure The maximum cold inflated pressure to which a tire
may be inflated, shown on the sidewall of the tire
Recommended inflation pressure Cold tire inflation pressure recommended by a
manufacturer
Accessory weight The combined weight (in excess of those standard
items which may be replaced) of automatic trans-
mission, power steering, power brakes, power win-
dows, power seats, radio and heater, to the extent
that these items are available as factory-installed
equipment (whether installed or not)