Page 25 of 102
25
ES350_QG_OM06136U_(U)
Automatic Transmission
■Shifting the shift lever
While the engine switch is in IGNITION ON mode, move the shift lever with the
brake pedal depressed.
When shifting the shift lever between P and D, make sure that the vehicle is com-
pletely stopped.
■ Shift position purpose
*1: Shifting to the D position allows the system to select a gear suitable for the driving con-
ditions.
Setting the shift lever to the D positi on is recommended for normal driving.
*2: Selecting shift ranges using S mode restrict s the upper limit of the possible gear ranges,
controls engine braking force, and prevents unnecessary upshifting.
Shift positionObjective or function
PParking the vehicle/starting the engine
RReversing
NNeutral
DNormal driving*1
SS mode driving*2
Page 26 of 102
26
ES350_QG_OM06136U_(U)
■Selecting gears in the S position
When the shift lever is in the S position, the shift lever can be operated as follows:
Upshifting
Downshifting
The selected shift range, from 1 to 6,
will be displayed in the meter.
The initial shift range in S mode is set
automatically to 5 or 4 according to
vehicle speed. But, the initial shift range
may be set to 3 if AI-SHIFT has oper-
ated while the shift lever was in the D
position.
1
2
■ Shift ranges and their functions
• Automatically selecting gears between 1 and 6 according to vehicle speed and driving
conditions. But, the gear is limited according to selected shift range.
• You can choose from 6 levels of engine braking force.
• A lower shift range will provide greater engi ne braking force than a higher shift range,
and the engine speed will also increase.
Page 27 of 102
27
ES350_QG_OM06136U_(U)
Turn Signal Lever
Right turn
Lane change to the right (move the
lever partway and then release it)
The right hand signal s will flash 3 times.
Lane change to the left (move the lever
partway and then release it)
The left hand signals will flash 3 times.
Left turn1
2
3
4
■ Customization
The number of times the turn signals flas h during a lane change can be changed.
Page 28 of 102
28
ES350_QG_OM06136U_(U)
Multi-information Display
Drive information
Select to display various drive data.
Navigation system-linked display (if equipped)
Select to display the following navigation system-linked information.
• Route guidance
• Compass display (north-up display/heading-up display)
Audio system-linked display
Select to enable selection of an audio source or track on the display using the
meter control switches.
Driving assist information
Select to display the cruise control or dynamic radar cruise control/LDA
(Lane Departure Alert with steering co ntrol) (if equipped) information, when
the system is used. ( →P.37, 39, 43)
Warning message display
Select to display warning messages and me asures to be taken if a malfunction
is detected.
Settings display
Select to change the meter display settings.
The multi-information display presents the driver with a variety of vehicle data.
Page 29 of 102
29
ES350_QG_OM06136U_(U)
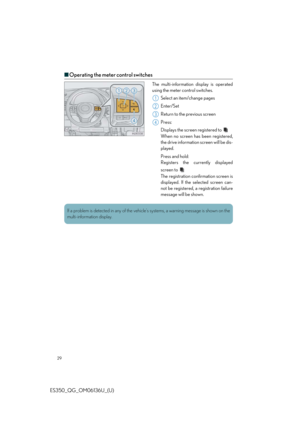
■Operating the meter control switches
The multi-information display is operated
using the meter control switches.
Select an item/change pages
Enter/Set
Return to the previous screen
Press:
Displays the screen registered to
When no screen has been registered,
the drive information screen will be dis-
played.
Press and hold:
Registers the currently displayed
screen to
The registration confirmation screen is
displayed. If the se lected screen can-
not be registered, a registration failure
message will be shown.
1
2
3
4
If a problem is detected in any of the vehicl e’s systems, a warning message is shown on the
multi-information display.
Page 30 of 102
 30
ES350_QG_OM06136U_(U)
Eco Driving Indicator
Eco Driving Indicator Light
During Eco-friendly acceleration (Eco
driving), the Eco Driving Indicator
Light will turn on. When the accelera-
tion excee")
30
ES350_QG_OM06136U_(U)
Eco Driving Indicator
Eco Driving Indicator Light
During Eco-friendly acceleration (Eco
driving), the Eco Driving Indicator
Light will turn on. When the accelera-
tion exceeds the Zone of Eco driving,
or when the vehicle is stopped, the light
turns off.
Eco Driving Indicator Zone Display
Suggests the Zone of Eco driving with
current Eco driving ratio based on
acceleration.
Eco driving ratio based on accelera-
tion
If the acceleration exceeds the Zone of
Eco driving, the right side of the Eco
Driving Indicator Zone Display will illu-
minate.
When this happens, the Eco Driving
Indicator Light will turn off.
Zone of Eco driving
Eco Driving Indicator will not operate
under the following conditions:
● The engine is not running.
● The shift lever is in any position other
than D.
● Neither normal mode nor Eco drive
mode is selected. ( →P.46)
● The vehicle speed is approximately
80 mph (130 km/h) or higher.
Settings of the display and non-display of
the Eco Driving Indicator Light can be
changed.1
2
3
4
Page 31 of 102
 31
ES350_QG_OM06136U_(U)
Headlights
The side marker, parking, tail,
license plate, instrument panel
lights and daytime running lights
turn on.
The headlights, parking and all
lights listed above (exce")
31
ES350_QG_OM06136U_(U)
Headlights
The side marker, parking, tail,
license plate, instrument panel
lights and daytime running lights
turn on.
The headlights, parking and all
lights listed above (except day-
time running lights) turn on.
The headlights, daytime
running lights and all the lights
listed above turn on and off
automatically. (When the
engine switch is in IGNITION
ON mode.)
Off
The daytime running lights turn
on.
■Turning on the high beam headlights
With the headlights on, push the lever
away from you to turn on the high
beams.
Pull the lever toward you to the center
position to turn the high beams off.
Pull the lever toward you and release it
to flash the high beams once.
You can flash the high beams with the
headlights on or off.
■AFS (Adaptive Front-light ing System) (if equipped)
AFS (Adaptive Front-lighting System) improves visibility at intersections and on curves by
automatically adjusting the lateral angle of the headlights according to vehicle speed and
the degree of the tire angle that are controlled by steering input.
Operates at speed of 6 mph (10 km/h) or higher.
■Deactivating AFS
Select “AFS” on (settings display) of the multi-information display.
Press the meter control switch.
(Canada)
(U.S.A.)
1
2
3
4
(U.S.A.)
(Canada)
1
2
1
2
Page 32 of 102
32
ES350_QG_OM06136U_(U)
Automatic High Beam (if equipped)
■Activating the Automatic High Beam system
Push the lever away from you with the
headlight switch in the or
position.
Press the Automatic High Beam
switch.
The Automatic High Beam indicator
will come on when the headlights are
turned on automatically to indicate
that the system is active.
The Automatic High Beam uses an in-vehicle camera sensor to assess the brightness of
streetlights, the lights of vehicles ahead, etc., and automatically turns the high beam on or
off as necessary.
1
2


 25
ES350_QG_OM06136U_(U)
Automatic Transmission
■Shifting the shift lever
While the engine switch is in IGNITION ON mode, move the shift lever with the
brake pedal depressed.
When shifting the shif")
 26
ES350_QG_OM06136U_(U)
■Selecting gears in the S position
When the shift lever is in the S position, the shift lever can be operated as follows:
Upshifting
Downshifting
The selected shift range,")
 27
ES350_QG_OM06136U_(U)
Turn Signal Lever
Right turn
Lane change to the right (move the
lever partway and then release it)
The right hand signal s will flash 3 times.
Lane change to the left (move t")
 28
ES350_QG_OM06136U_(U)
Multi-information Display
Drive information
Select to display various drive data.
Navigation system-linked display (if equipped)
Select to display the following navigation sys")
 29
ES350_QG_OM06136U_(U)
■Operating the meter control switches
The multi-information display is operated
using the meter control switches.
Select an item/change pages
Enter/Set
Return to the previou")
 32
ES350_QG_OM06136U_(U)
Automatic High Beam (if equipped)
■Activating the Automatic High Beam system
Push the lever away from you with the
headlight switch in the or
position.
Press the Automati")