2018 KIA STINGER navigation
[x] Cancel search: navigationPage 18 of 551
Safety features of your vehicle
23
You will find many safety precautions
and recommendations throughout
this section, and throughout this man-
ual. The safety precautions in this sec-
tion are among the most important.
Always wear your seat belt
A seat belt is your best protection in
all types of accidents. Air bags are
designed to supplement seat belts,
not replace them. So even though
your vehicle is equipped with air
bags, ALWAYS make sure you and
your passengers wear your seat
belts, and wear them properly.
Restrain all children
All children under age 13 should ride
in your vehicle properly restrained in
a rear seat, not the front seat. Infants
and small children should be
restrained in an appropriate child
restraint. Larger children should use
a booster seat with the lap/shoulder
belt until they can use the seat belt
properly without a booster seat.
Air bag hazards
While air bags can save lives, they
can also cause serious or fatal
injuries to occupants who sit too
close to them, or who are not prop-
erly restrained. Infants, young chil-
dren, and shorter adults are at the
greatest risk of being injured by an
inflating air bag. Follow all instruc-
tions and warnings in this manual.
Driver distraction
Driver distraction presents a serious
and potentially deadly danger, espe-
cially for inexperienced drivers.
Safety should be the first concern
when behind the wheel and drivers
need to be aware of the wide array of
potential distractions, such as drowsi-
ness, reaching for objects, eating,
personal grooming, other passen-
gers, and using cellular phones.
Drivers can become distracted when
they take their eyes and attention off
the road or their hands off the wheel
to focus on activities other than driv-
ing. To reduce your risk of distraction
or getting into an accident:
• ALWAYS set up your mobiledevices (i.e., MP3 players, phones,
navigation units, etc.) when your
vehicle is parked or safely stopped.
IMPORTANT SAFETY PRECAUTIONS
Page 165 of 551
Features of your vehicle
78
4
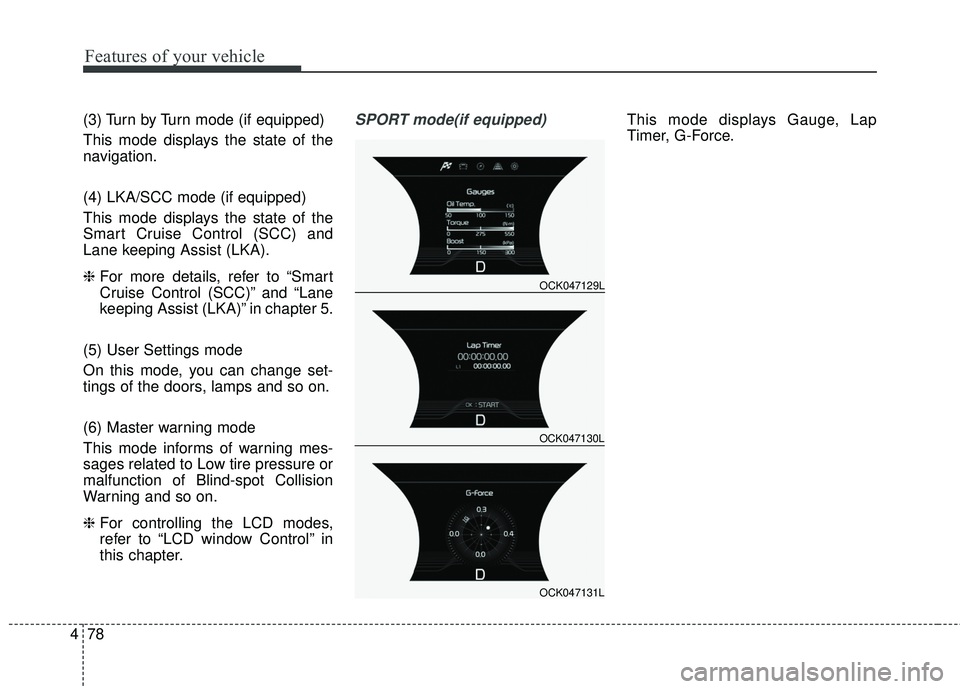
(3) Turn by Turn mode (if equipped)
This mode displays the state of the
navigation.
(4) LKA/SCC mode (if equipped)
This mode displays the state of the
Smart Cruise Control (SCC) and
Lane keeping Assist (LKA).
❈ For more details, refer to “Smart
Cruise Control (SCC)” and “Lane
keeping Assist (LKA)” in chapter 5.
(5) User Settings mode
On this mode, you can change set-
tings of the doors, lamps and so on.
(6) Master warning mode
This mode informs of warning mes-
sages related to Low tire pressure or
malfunction of Blind-spot Collision
Warning and so on.
❈ For controlling the LCD modes,
refer to “LCD window Control” in
this chapter.SPORT mode(if equipped)This mode displays Gauge, Lap
Timer, G-Force.
OCK047129L
OCK047130L
OCK047131L
Page 166 of 551
479
Features of your vehicle
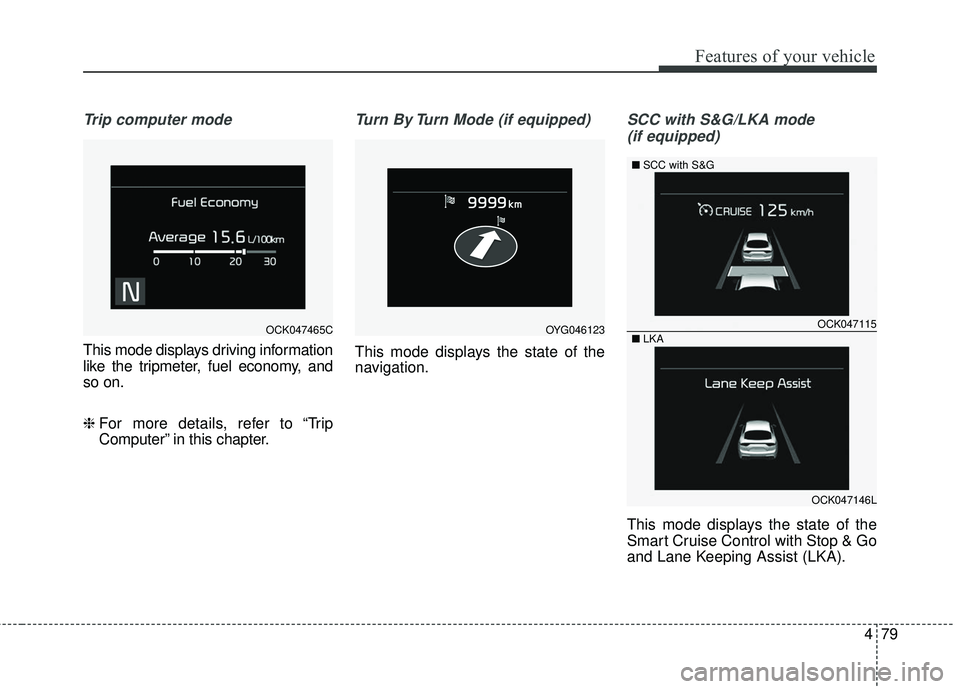
Trip computer mode
This mode displays driving information
like the tripmeter, fuel economy, and
so on.
❈ For more details, refer to “Trip
Computer” in this chapter.
Turn By Turn Mode (if equipped)
This mode displays the state of the
navigation.
SCC with S&G/LKA mode
(if equipped)
This mode displays the state of the
Smart Cruise Control with Stop & Go
and Lane Keeping Assist (LKA).
OCK047465COCK047115
OCK047146L
■
SCC with S&G
■ LKA
OYG046123
Page 192 of 551

4105
Features of your vehicle
Description
The head up display is a transparent
display which projects a shadow of
some information of the instrument
cluster and navigation on the wind-
shield glass. The head up display image on the
windshield glass may be invisible
when:
- Sitting posture is bad.
- Wearing a polarized sunglasses.
- There is an object on the cover ofthe head up display.
- Driving on a wet road.
- An inadequate lighting is turned on inside the vehicle.
- Any light comes from the outside.
- Wearing an inadequate glasses to your eyesight.
If the head up display image is not shown well, adjust the height, rota-
tion or illumination of the head up
display in the LCD window.
❈ For more details, refer to “LCD
window” in this chapter.
When the head up display needs inspection or repair, consult an
authorized Kia dealer.
Do not place any accessories on the clash pad or attach any objects
on the windshield glass.
✽ ✽ NOTICE
Installing window tint or any other
type of metallic coating on the wind-
shield can prevent the driver from
seeing the Head Up Display images.
✽ ✽NOTICE
When replacing the front wind-
shield glass of the vehicles equipped
with the head up display, replace it
with a windshield glass designed for
the head up display operation.
Otherwise, duplicated images may
be displayed on the windshield glass.
HEAD UP DISPLAY (HUD) (IF EQUIPPED)
OCK047467C
WARNING - Head up
display
The Head up display is a supple-
mental system. Do not solely
rely on the system, always drive
safely, and pay attention to the
driving conditions on the road.
Page 193 of 551
Features of your vehicle
106
4
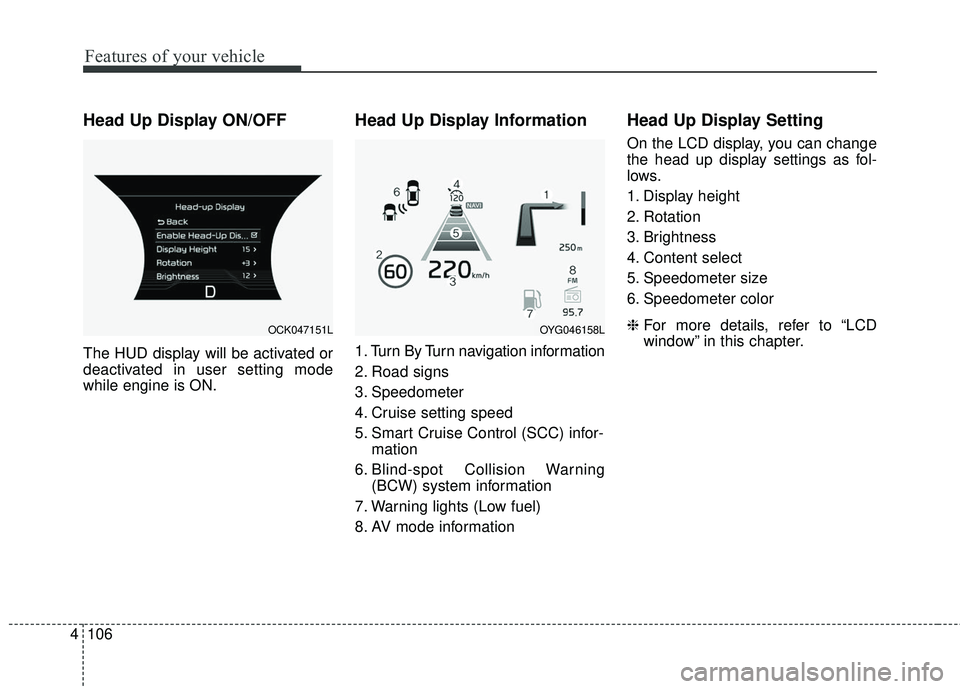
Head Up Display ON/OFF
The HUD display will be activated or
deactivated in user setting mode
while engine is ON.
Head Up Display Information
1. Turn By Turn navigation information
2. Road signs
3. Speedometer
4. Cruise setting speed
5. Smart Cruise Control (SCC) infor-
mation
6. Blind-spot Collision Warning (BCW) system information
7. Warning lights (Low fuel)
8. AV mode information
Head Up Display Setting
On the LCD display, you can change
the head up display settings as fol-
lows.
1. Display height
2. Rotation
3. Brightness
4. Content select
5. Speedometer size
6. Speedometer color
❈ For more details, refer to “LCD
window” in this chapter.
OCK047151LOYG046158L
Page 199 of 551

Features of your vehicle
112
4
The rearview camera will activate
with the ignition switch ON, engine
ON and the shift lever in the R
(Reverse) position. This system is a supplemental sys-
tem that shows behind the vehicle
through the audio screen while back-
ing up unless equipped with a navi-
gation system, then will display on
the navigation screen.
Also, it displays rear view image
when there is driver’s request even in
N/D gear. It provides image opti-
mized for driving mode unlike park-
ing mode image. All three conditions
must be met to operate driving assist
mode.
- IGN Status : ON
- Engine Status : ON
- Gearshift Status : D or N
- Rear view camera switch : ON
This system is a supplementary
function only. It is the responsibility
of the driver to always check the
inside/outside rearview mirrors and
the area behind the vehicle before
and while backing up because
there is a dead zone that can't be
seen by the camera. Always keep the camera lens
clean. If lens is covered with for-
eign matter, the camera may not
operate normally.
REARVIEW CAMERA
OCK047403L
OCK047406L
WARNING - Backing &
using camera
Never rely solely on the rear view
camera when backing. You must
always use methods of viewing
the area behind you including
looking over both shoulders as
well as continuously checking all
three rear view mirrors. Due to
the difficulty of ensuring that the
area behind you remains clear,
always back slowly and stop
immediately if you even suspect
that a person, and especially a
child, might be behind you.
Page 251 of 551
Features of your vehicle
164
4
✽ ✽
NOTICE
If you install an after market HID
head lamp, your vehicle’s audio and
electronic device may malfunction.
❈ If your vehicle is equipped with
AVN(Audio, Video and Navigation)
system, refer to a separately sup-
plied manual for detailed informa-
tion.
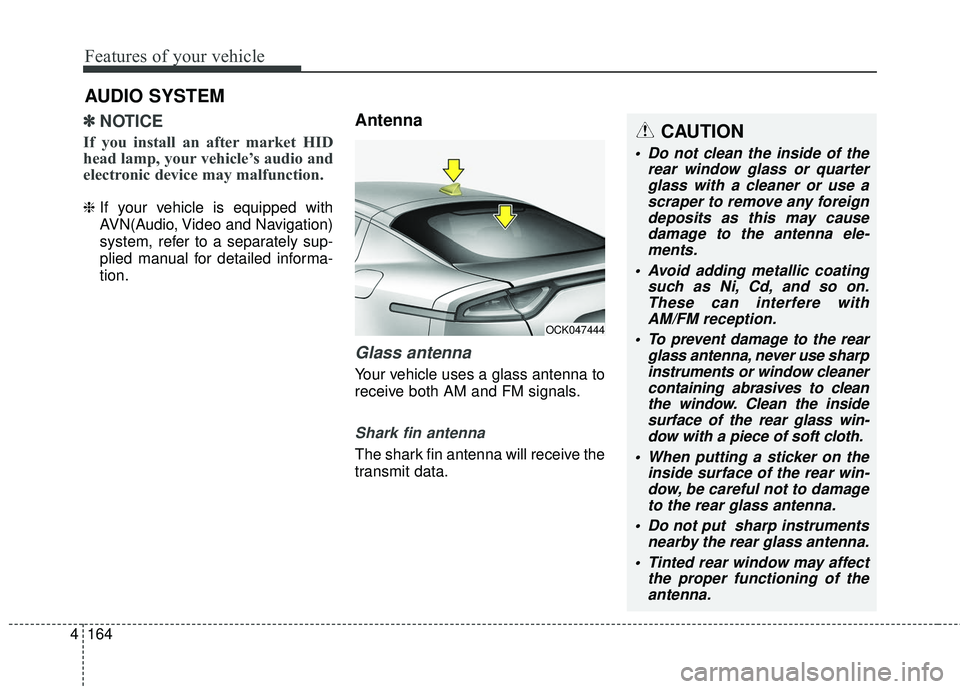
Antenna
Glass antenna
Your vehicle uses a glass antenna to
receive both AM and FM signals.
Shark fin antenna
The shark fin antenna will receive the
transmit data.
AUDIO SYSTEM
OCK047444
CAUTION
Do not clean the inside of the
rear window glass or quarterglass with a cleaner or use ascraper to remove any foreigndeposits as this may causedamage to the antenna ele-ments.
Avoid adding metallic coating such as Ni, Cd, and so on.These can interfere withAM/FM reception.
To prevent damage to the rear glass antenna, never use sharpinstruments or window cleanercontaining abrasives to cleanthe window. Clean the insidesurface of the rear glass win-dow with a piece of soft cloth.
When putting a sticker on the inside surface of the rear win-dow, be careful not to damageto the rear glass antenna.
Do not put sharp instruments nearby the rear glass antenna.
Tinted rear window may affect the proper functioning of theantenna.
Page 411 of 551

611
What to do in an emergency
When you drive your vehicle from a
warm area to a cold area or from a
cold area to a warm area, or the out-
side temperature is greatly higher or
lower, you should check the tire infla-
tion pressure and adjust the tires to
the recommended tire inflation pres-
sure.
When filling tires with more air, con-
ditions to turn off the low tire pres-
sure telltale may not be met. This is
because a tire inflator has a margin
of error in performance. The low tire
pressure telltale will be turned off if
the tire pressure is above the recom-
mended tire inflation pressure.TPMS (Tire PressureMonitoring System)malfunction indicator
The low tire pressure telltale will illu-
minate after it blinks for approximate-
ly one minute when there is a prob-
lem with the Tire Pressure
Monitoring System. If the system is
able to correctly detect an underinfla-
tion warning at the same time as sys-
tem failure then it will illuminate both
the TPMS malfunction and low tire
pressure position telltales e.g. if
Front Left sensor fails, the TPMS
malfunction indicator illuminates, but
if the Front Right, Rear Left, or Rear
Right tire is under-inflated, the low
tire pressure position telltales may
illuminate together with the TPMS
malfunction indicator.
Have the system checked by an
authorized Kia dealer as soon as
possible to determine the cause of
the problem. The TPMS malfunction indicator
may be illuminated if the vehicle is
moving around electric power sup-
ply cables or radios transmitters
such as at police stations, govern-
ment and public offices, broadcast-
ing stations, military installations,
airports, or transmitting towers,
etc. This can interfere with normal
operation of the Tire Pressure
Monitoring System (TPMS).
The TPMS malfunction indicator may be illuminated if snow chains
are used or some separate elec-
tronic devices such as notebook
computer, mobile charger, remote
starter or navigation etc., are used
in the vehicle. This can interfere
with normal operation of the Tire
Pressure Monitoring System
(TPMS).
WARNING- Low pressure
damage
Do not drive on low pressure
tires. Significantly low tire pres-
sure can cause the tires to over-
heat and fail making the vehicle
unstable resulting in increased
braking distances and a loss of
vehicle control.