Page 470 of 551

Maintenance
42
7
Disc brake pads should be inspected
for wear whenever tires are rotated.
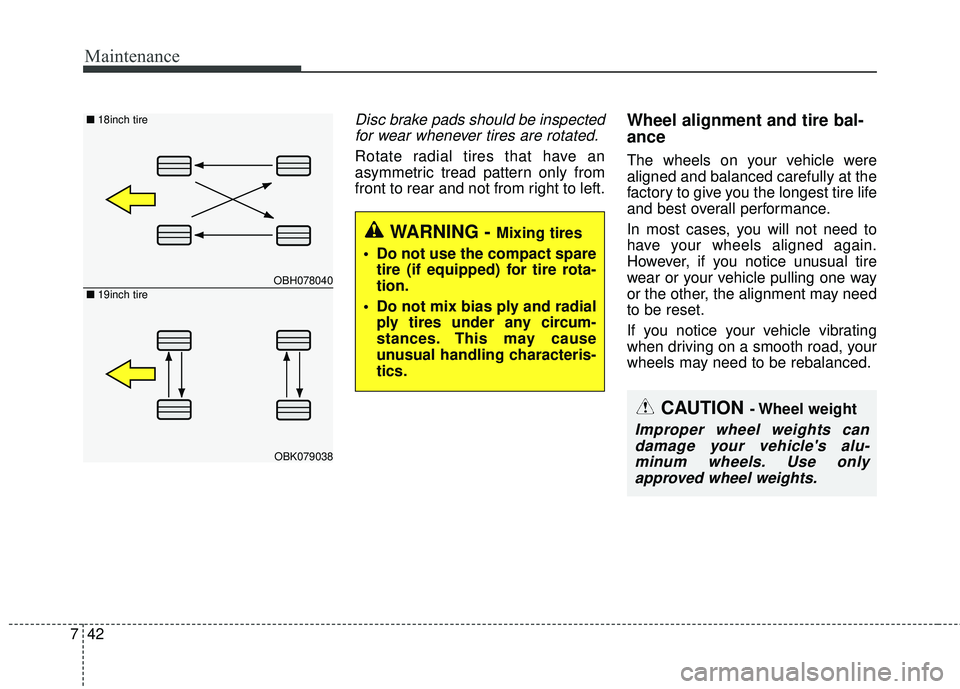
Rotate radial tires that have an
asymmetric tread pattern only from
front to rear and not from right to left.
Wheel alignment and tire bal-
ance
The wheels on your vehicle were
aligned and balanced carefully at the
factory to give you the longest tire life
and best overall performance.
In most cases, you will not need to
have your wheels aligned again.
However, if you notice unusual tire
wear or your vehicle pulling one way
or the other, the alignment may need
to be reset.
If you notice your vehicle vibrating
when driving on a smooth road, your
wheels may need to be rebalanced.
WARNING - Mixing tires
Do not use the compact spare tire (if equipped) for tire rota-
tion.
Do not mix bias ply and radial ply tires under any circum-
stances. This may cause
unusual handling characteris-
tics.
CAUTION - Wheel weight
Improper wheel weights candamage your vehicle's alu-minum wheels. Use onlyapproved wheel weights.
OBH078040
OBK079038
■ 18inch tire
■ 19inch tire
Page 474 of 551

Maintenance
46
7
3. Checking tire life (TIN : Tire
Identification Number)
Any tires that are over 6 years old,
based on the manufacturing date,
(including the spare tire) should be
replaced by new ones. You can find
the manufacturing date on the tire
sidewall (possibly on the inside of the
wheel), displaying the DOT Code.
The DOT Code is a series of num-
bers on a tire consisting of numbers
and English letters. The manufactur-
ing date is designated by the last four
digits (characters) of the DOT code.
DOT : XXXX XXXX OOOO
The front part of the DOT means a
plant code number, tire size and
tread pattern and the last four num-
bers indicate week and year manu-
factured.
For example:
DOT XXXX XXXX 1617 represents
that the tire was produced in the 16th
week of 2017.
4. Tire ply composition and mate-rial
The number of layers or plies of rub-
ber-coated fabric in the tire. Tire
manufacturers also must indicate the
materials in the tire, which include
steel, nylon, polyester, and others.
The letter "R" means radial ply con-
struction; the letter "D" means diago-
nal or bias ply construction; and the
letter "B" means belted-bias ply con-
struction.
5. Maximum permissible inflationpressure
This number is the greatest amount of
air pressure that should be put in the
tire. Do not exceed the maximum per-
missible inflation pressure. Refer to
the Tire and Loading Information label
for recommended inflation pressure.
6. Maximum load rating
This number indicates the maximum
load in kilograms and pounds that can
be carried by the tire. When replacing
the tires on the vehicle, always use a
tire that has the same load rating as
the factory installed tire.
7. Uniform tire quality grading
Quality grades can be found where
applicable on the tire sidewall
between tread shoulder and maxi-
mum section width.
For example:
TREADWEAR 440
TRACTION A
TEMPERATURE A
WARNING - Tire age
Replace tires within the recom-
mended time frame. Failure to
replace tires as recommended
can result in sudden tire failure,
which could lead to a loss of
control and an accident.
Page 482 of 551

Maintenance
54
7
FUSES
❈ Left side : Normal , Right side : Blown
A vehicle’s electrical system is pro-
tected from electrical overload dam-
age by fuses.
This vehicle has 4 (or 5) fuse panels,
one located in the driver’s side panel
bolster, the other in the engine com-
partment near the battery.
If any of your vehicle’s lights, acces-
sories, or controls do not work, check
the appropriate circuit fuse. If a fuse
has blown, the element inside the
fuse will melt.
If the electrical system does not
work, first check the driver’s side
fuse panel.
Always replace a blown fuse with
one of the same rating.
If the replacement fuse blows, this
indicates an electrical problem. Avoid
using the system involved and imme-
diately consult an authorized Kia
dealer.
Three kinds of fuses are used: blade
type for lower amperage rating, car-tridge type, and multi fuse for higheramperage ratings.
Do not arbitrarily modify or add-on electric wiring to the vehicle.
WARNING- Fuse replace-
ment
Never replace a fuse with any- thing but another fuse of the
same rating.
A higher capacity fuse could cause damage and possibly a
fire.
Never install a wire or alu- minum foil instead of the
proper fuse - even as a tem-
porary repair. It may cause
extensive wiring damage and
a possible fire.
CAUTION
Do not use a screwdriver or anyother metal object to removefuses because it may cause ashort circuit and damage thesystem.
OCK077071
■
Blade type
■ Cartridge type
■ Multi fuse
■ Fusible link
Page 483 of 551

755
Maintenance
✽ ✽NOTICE
• When replacing fuse, turn the
ignition “OFF” and turn off
switches of all electrical devices
then remove battery (-) terminal.
• The actual fuse/relay panel label may differ from equipped items.
WARNING- Electrical Fire
Always ensure replacements
fuses and relays are securely
fastened when installed. Failure
to do so can result in a vehicle
fire.
CAUTION
When replacing a blown fuse or relay, make sure the newfuse or relay fits tightly intothe clips. Failure to tightlyinstall the fuse or relay maycause damage to the wiringand electric systems.
Do not remove fuses, relays and terminals fastened withbolts or nuts. The fuses, relaysand terminals may not be fas-tened correctly which maycause vehicle damage.
CAUTION
Do not input any other objects except fuses or relays intofuse/relay terminals such as adriver or wiring. It may causecontact failure and systemmalfunction.
Do not plug in screwdrivers or aftermarket wiring into the ter-minal originally designed forfuse and relays only. The elec-trical system and wiring of thevehicle interior may be dam-aged or burned due to contactfailure.
If you directly connect the wire on the taillight or replacethe bulb which is over the reg-ulated capacity to install trail-ers etc., the inner junctionblock can get burned.
Page 484 of 551

Maintenance
56
7
✽ ✽
NOTICE- Remodeling
Prohibited
Do not rewire your vehicle in any
way as doing so may affect the per-
formance of several safety features
in your vehicle. Rewiring your vehi-
cle may also void your warranty and
cause you to be responsible for any
subsequent vehicle damage which
may result.
✽ ✽ NOTICE- Window tinting
precaution
Window tint(especially metallic
film) might cause communication
disorder or poor radio reception,
and malfunction of the automatic
lighting system due to excessive
change of illumination inside the
vehicle. The solution used might also
flow into electric, electronic devices
causing disorder and failure.
Inner panel fuse replacement
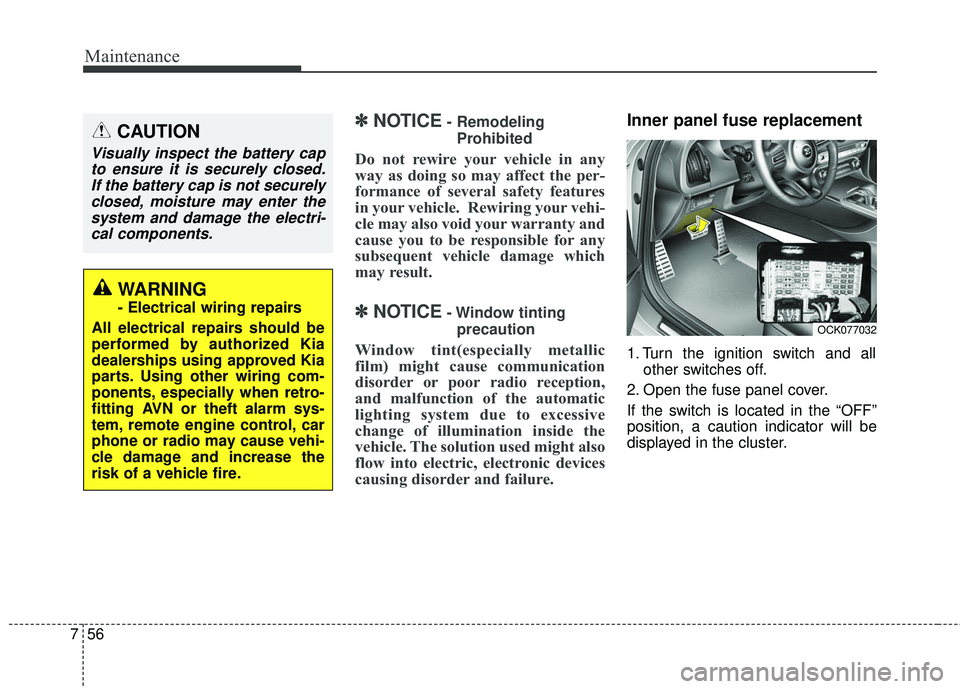
1. Turn the ignition switch and all other switches off.
2. Open the fuse panel cover.
If the switch is located in the “OFF”
position, a caution indicator will be
displayed in the cluster.
CAUTION
Visually inspect the battery cap to ensure it is securely closed.If the battery cap is not securelyclosed, moisture may enter thesystem and damage the electri-cal components.
WARNING
- Electrical wiring repairs
All electrical repairs should be
performed by authorized Kia
dealerships using approved Kia
parts. Using other wiring com-
ponents, especially when retro-
fitting AVN or theft alarm sys-
tem, remote engine control, car
phone or radio may cause vehi-
cle damage and increase the
risk of a vehicle fire.
OCK077032
Page 493 of 551

765
Maintenance
Fuse NameFuse ratingCircuit Protected
MODULE 810ACooling Fan Controller (BLDC Motor), Around View Monitor, Front Air Ventilation Seat Control Module,
Front/Rear Seat Warmer Control Module
MODULE 710A
IBU, ECS Unit, AWD (All Wheel Drive) ECM (Electronic Control Module), Smart Cruise Control Module,
Auto Transmission Shift Lever Indicator, Console Switch (Front/Upper), Blind-Spot Collision Warning Unit
Left Handle side/Right Handle side, Steering Angle Sensor, Steering Tilt & Telescopic Module, Multi-
Function Camera Unit, Crash Pad Switch
POWER HANDLE15ASteering Tilt & Telescopic Module
MODULE 910ADriver Air Lumbar Control Unit
MODULE 110AData Link Connector, Console Switch (Upper), Mood Lamp Control Unit
MODULE 510A
Air Conditioner Control Module, Air Conditioner Switch, Audio, Head Lamp Left Handle side/Right
Handle side, Low DC-DC Converter (Audio/AMP (Amplifier)), Electro Chromic Mirror, AMP (Amplifier),
Driver Integrated memory system Control Module, Front Air Ventilation Seat Control Module, Front/Rear
Seat Warmer Control Module
SUNROOF20ASunroof Control Unit (Glass)
P/WINDOW RH25APassenger Power Window Module, Rear Power Window Module Right Handle side
POWER OUTLET 220ARear Power Outlet
Page 505 of 551

777
Maintenance
LIGHT BULBS
Bulb replacement precaution
Please keep extra bulbs on hand
with appropriate wattage ratings in
case of emergencies.
Refer to “Bulb Wattage” in chapter 8.
When changing lamps, first turn off
the engine at a safe place, firmly
apply the parking brake and detach
the battery’s negative (-) terminal.
Use only bulbs of the specifiedwattage.✽ ✽ NOTICE
• If the light bulb or lamp connector
is removed while the lamp is still
on, the fuse box's electronic sys-
tem may log it as a malfunction.
Therefore, a lamp malfunction
incident may be recorded as a
Diagnostic Trouble Code (DTC) in
the fuse box.
• It is normal for an operating lamp to flicker momentarily. This is due
to a stabilization function of the
vehicle’s electronic control device.
If the lamp lights up normally
after momentarily blinking, then
it is functioning as normal.
However, if the lamp continues to
flicker several times or turns off
completely, there may be an error
in the vehicle’s electronic control
device. Please have the vehicle
checked by an authorized Kia
dealer immediately.
WARNING- Working on
the lights
Prior to working on the light,
firmly apply the parking brake,
ensure that the ignition switch
is turned to the LOCK position
and turn off the lights to avoid
sudden movement of the vehi-
cle and burning your fingers or
receiving an electric shock.
CAUTION -Light replace-
ment
Be sure to replace the burned- out bulb with one of the samewattage rating. Otherwise, itmay cause damage to the fuseor electric wiring system.
CAUTION -Headlamp
Lens
To prevent damage, do notclean the headlamp lens withchemical solvents or strongdetergents.
Page 510 of 551
Maintenance
82
7
Headlamp bulb Never touch the glass with bare
hands. Residual oil may cause the
bulb to overheat and burst when lit.
A bulb should be operated only
when installed in a headlight.
If a bulb becomes damaged or cracked, replace it immediately
and carefully dispose of it.
Wear eye protection when chang- ing a bulb. Allow the bulb to cool
down before handling it.Front turn signal lamp bulb
replacement (Headlamp Type A)
1. Open the hood.
2. Remove the strut bar and the air cleaner assembly.
OQL075058
WARNING- Halogen
bulbs
Halogen bulbs contain pres- surized gas that will produce
flying pieces of glass if broken.
Always handle them carefully, and avoid scratches and abra-
sions. If the bulbs are lit, avoid
contact with liquids.
OCK077077
OCK077078