2018 KIA STINGER navigation
[x] Cancel search: navigationPage 3 of 58
1*IF EQUIPPED ALWAYS CHECK THE OWNER’S MANUAL FOR COMPLE TE OPER ATING INFORMATION AND SAFE T Y WARNINGS.
TABLE OF CONTENTS
Essential Features
Automatic Climate Control System . . . . . . . . . . . . . 31Automatic Transmission / Sport Shift Mode (Shift by Cable) . 32Aux/USB/iPod® Port, Power Outlets & USB Charger . . . . . 30Bluetooth® Wireless Technology . . . . . . . . . . . . . . . 24Front Seat Headrest Adjustment . . . . . . . . . . . . . . . 37Head-Up Display (HUD)* . . . . . . . . . . . . . . . . . . . 10Smart Cruise Control (SCC) with Stop & Go* . . . . . . . . 22
Smart Key . . . . . . . . . . . . . . . . . . . . . . . . . . 40Smart Power Liftgate* . . . . . . . . . . . . . . . . . . . . 38Steering Wheel Adjustment . . . . . . . . . . . . . . . . . 19Tire Pressure Monitoring System (TPMS) . . . . . . . . . . 06UVO with Premium Navigation . . . . . . . . . . . . . . . . 29Windshield Wipers and Washers . . . . . . . . . . . . . . . 21
Videos & QR Codes 02
Instrument Cluster 03-09
Instrument Cluster Overview / Indicators & Warning Lights . 03Drive Mode Integrated Control System . . . . . . . . . . . 04Fuel Economy . . . . . . . . . . . . . . . . . . . . . . . . 05Driver Attention Warning (DAW) . . . . . . . . . . . . . . . 05Tire Pressure Monitoring System (TPMS) . . . . . . . . . . 06LCD Instrument Cluster Modes . . . . . . . . . . . . . . . 07Trip Information / Trip Computer . . . . . . . . . . . . . . . 07User Settings . . . . . . . . . . . . . . . . . . . . . . . . 08Service Mode . . . . . . . . . . . . . . . . . . . . . . . . 08Forward Collision Avoidance (FCA) Assist* . . . . . . . . . 09
Driver’s Panel 10 -18
Head-Up Display (HUD)* . . . . . . . . . . . . . . . . . . 10Idle, Stop and Go (ISG)* . . . . . . . . . . . . . . . . . . . 11Launch Control . . . . . . . . . . . . . . . . . . . . . . . 11Instrument Panel Dimmer . . . . . . . . . . . . . . . . . . 12Electronic Stability Control (ESC) / Traction Control System ( TCS) . . . . . . . . . . . . . . . 12Hill-Start Assist Control (HAC) . . . . . . . . . . . . . . . 12Blind-Spot Collision Warning (BCW ) . . . . . . . . . . . . . 13Lane Keeping Assist (LK A) / Lane Departure Warning (LDW )* . . . . . . . . . . . . . 14Reverse Parking Aid Function . . . . . . . . . . . . . . . . 15Fuel Door Release Button . . . . . . . . . . . . . . . . . . 15Parking Assist System . . . . . . . . . . . . . . . . . . . 16Rear View Monitor* . . . . . . . . . . . . . . . . . . . . . 16Power Windows, Window Lock & Central Door Lock . . . . 17Power Folding Outside Mirrors . . . . . . . . . . . . . . . 17Heated Outside Mirrors . . . . . . . . . . . . . . . . . . . 17Auto Door Lock /Unlock . . . . . . . . . . . . . . . . . . . 17Engine Start /Stop Button . . . . . . . . . . . . . . . . . . 18
Steering Wheel Controls 19 -26
Tilt/ Telescoping Steering Wheel . . . . . . . . . . . . . . 19Heated Steering Wheel . . . . . . . . . . . . . . . . . . . 19Headlights & High Beams . . . . . . . . . . . . . . . . . . 20Windshield Wipers & Washers . . . . . . . . . . . . . . . 21Turn Signals & Fog Lights . . . . . . . . . . . . . . . . . . 21Smart Cruise Control (SCC) with Stop & Go* . . . . . . . . 22Bluetooth® Wireless Technology . . . . . . . . . . . . . . 24Audio Controls . . . . . . . . . . . . . . . . . . . . . . . 26
Audio Systems 27-2 9
UVO / Android Auto™ / Apple CarPlay® Setup* . . . . . . . 27UVO* . . . . . . . . . . . . . . . . . . . . . . . . . . . . . 28UVO with Premium Navigation* . . . . . . . . . . . . . . . 29
Center Panel 30-34
Clock . . . . . . . . . . . . . . . . . . . . . . . . . . . . 30Aux/USB/iPod® Port, Power Outlets & USB Charger . . . . 30Automatic Climate Control System . . . . . . . . . . . . . 31Automatic Transmission / Sport Shift Mode (Shift by Cable) . . 32Electric Parking Brake (EPB) . . . . . . . . . . . . . . . . 33Auto Hold . . . . . . . . . . . . . . . . . . . . . . . . . . 34
Seating 35-37
Seat Warmers / Ventilated Seats . . . . . . . . . . . . . . 35Power Adjustable Driver’s Seats . . . . . . . . . . . . . . 36Front Seat Headrest Adjustment . . . . . . . . . . . . . . 37Driver Position Memory System . . . . . . . . . . . . . . . 37
Other Key Features 38-45
Smart Power Liftgate* . . . . . . . . . . . . . . . . . . . 38Smart Key . . . . . . . . . . . . . . . . . . . . . . . . . . 40Map / Room Lamps . . . . . . . . . . . . . . . . . . . . . 41Sunroof Operation . . . . . . . . . . . . . . . . . . . . . . 42HomeLink® with Auto-Dimming Rearview Mirror . . . . . . 43Sunvisor . . . . . . . . . . . . . . . . . . . . . . . . . . . 44Hood Release Lever and Latch . . . . . . . . . . . . . . . 44Fuel Cap/Malfunction Indicator (Check Engine Light) . . . 45Child-Protector Rear Door Lock . . . . . . . . . . . . . . 45
Safety Features 4 6 - 47
Seat Belts . . . . . . . . . . . . . . . . . . . . . . . . . . 46Pre-Safe Seat Belt (PSB)* . . . . . . . . . . . . . . . . . . 46Occupant Detection System (ODS) / Passenger Airbag Off Indicator . . . . . . . . . . . . . . 47
Normal Maintenance Schedule 4 8
Legal Disclaimers (See Inside Back Cover)
Driving while distracted can result in a loss of vehicle control that may lead to an accident, severe personal injury and death. The driver’s primary responsibility is in the safe and legal operation of a vehicle, and use of any handheld devices, other equipment or vehicle systems which take the driver’s eyes, attention and focus away from the safe operation of a vehicle or that are not permissible by law should never be used during operation of the vehicle.
Page 9 of 58
CRUISE
CANCEL
RESOKSET
INSTRUMENT CLUSTER
7*IF EQUIPPED ALWAYS CHECK THE OWNER’S MANUAL FOR COMPLE TE OPER ATING INFORMATION AND SAFE T Y WARNINGS.
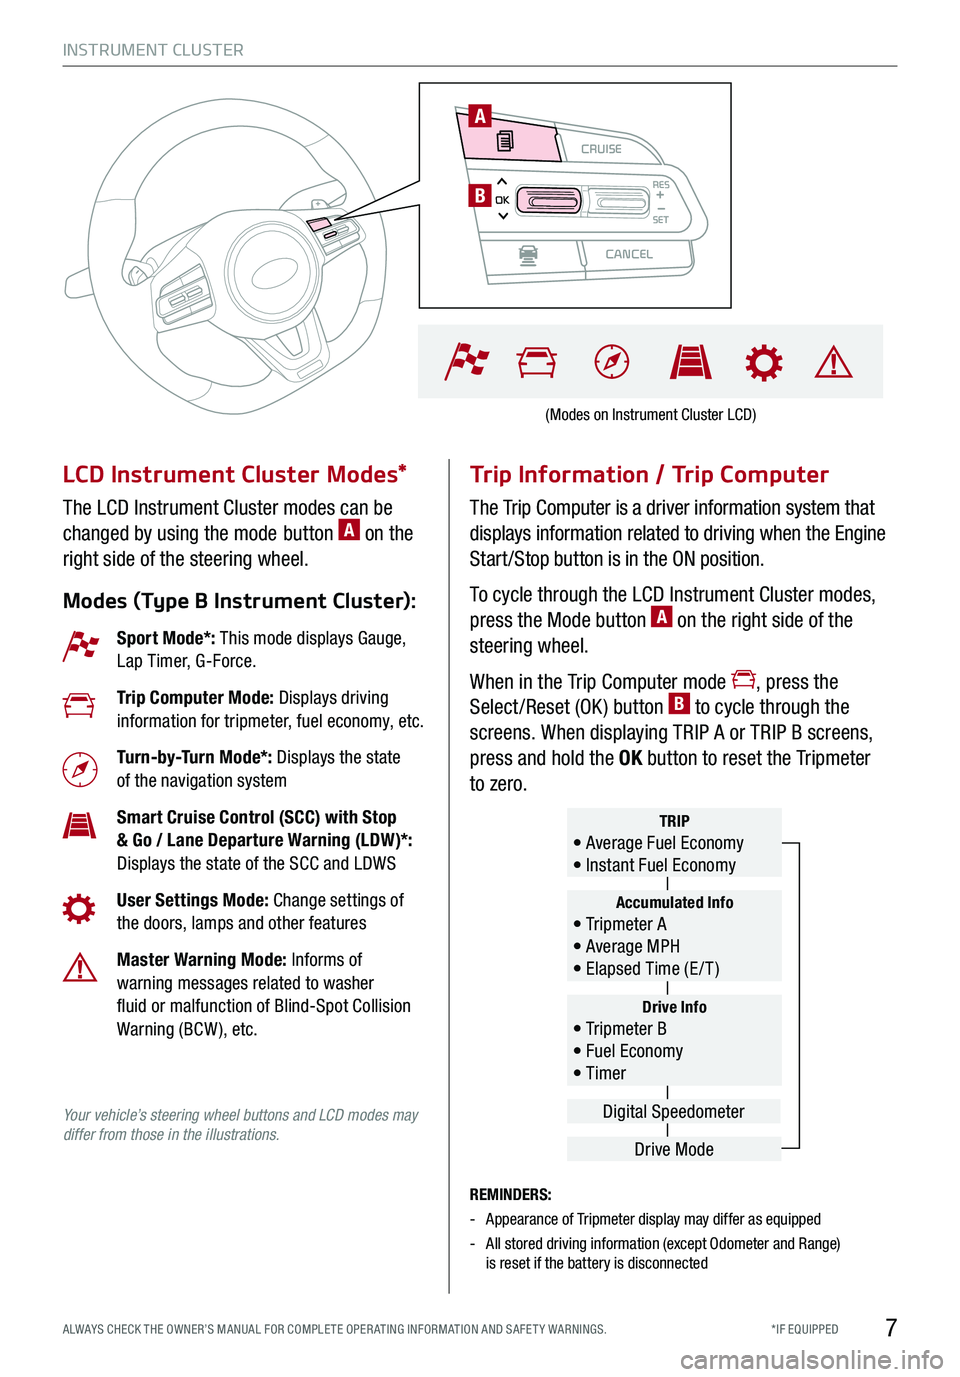
LCD Instrument Cluster Modes*
The LCD Instrument Cluster modes can be
changed by using the mode button A on the
right side of the steering wheel.
Modes (Type B Instrument Cluster):
Trip Information / Trip Computer
The Trip Computer is a driver information system that
displays information related to driving when the Engine
Start /Stop button is in the ON position.
To cycle through the LCD Instrument Cluster modes,
press the Mode button A on the right side of the
steering wheel.
When in the Trip Computer mode , press the
Select /Reset (OK ) button B to cycle through the
screens. When displaying TRIP A or TRIP B screens,
press and hold the OK button to reset the Tripmeter
to zero.
REMINDERS:
-Appearance of Tripmeter display may differ as equipped
- All stored driving information (except Odometer and Range) is reset if the battery is disconnected
Sport Mode*: This mode displays Gauge, Lap Timer, G-Force.
Trip Computer Mode: Displays driving information for tripmeter, fuel economy, etc.
Turn-by-Turn Mode*: Displays the state of the navigation system
Smart Cruise Control (SCC) with Stop & Go / Lane Departure Warning (LDW)*: Displays the state of the SCC and LDWS
User Settings Mode: Change settings of the doors, lamps and other features
Master Warning Mode: Informs of warning messages related to washer fluid or malfunction of Blind-Spot Collision Warning (BCW ), etc.
Your vehicle’s steering wheel buttons and LCD modes may differ from those in the illustrations.
Drive Info• Tripmeter B • Fuel Economy • Timer
Accumulated Info• Tripmeter A • Average MPH • Elapsed Time (E / T )
TRIP• Average Fuel Economy • Instant Fuel Economy
Drive Mode
Digital Speedometer
(Modes on Instrument Cluster LCD)
CRUISE
CANCEL
RESOKSET
A
B
Page 12 of 58
DRIVER’S PANEL
*IF EQUIPPED 10
REMINDERS:
-
The HUD image on the windshield glass may not be visible when:
-
The driver has poor sitting posture
-The driver is wearing polarized sunglasses
-
There is an object covering the HUD
-Driving on a wet road
-Excessive lighting inside or outside the vehicle
-
Modifications made to the windshield, such as tinting or other aftermarket treatments, could affect the HUD. When replacing the front windshield glass of vehicles equipped with the HUD, owners must replace it with windshield glass designed for HUD operation. Otherwise, duplicated images may be displayed on the windshield glass.
**If Turn By Turn (TBT) navigation information is selected as HUD content, TBT information will not be displayed on the LCD.Head-Up Display (HUD) User Settings
Drivers can adjust the HUD settings from the LCD Instrument
Cluster modes in User Settings. HUD settings include:
§ Display Height: Adjust the height of the HUD image on the
windshield glass
§ Rotation: Adjust the degree of HUD rotation
§ Brightness: Adjust the intensity of the HUD brightness
§ Contents Select: Activate or deactivate HUD content
( TBT**, SCC, LDW, BSCW )
§ Speedometer Size: Choose the size of the HUD
speedometer (Small, Medium, Large)
§ Speedometer Color: Choose the color of the HUD
speedometer (White, Amber, Green)
Head-Up Display (HUD)*
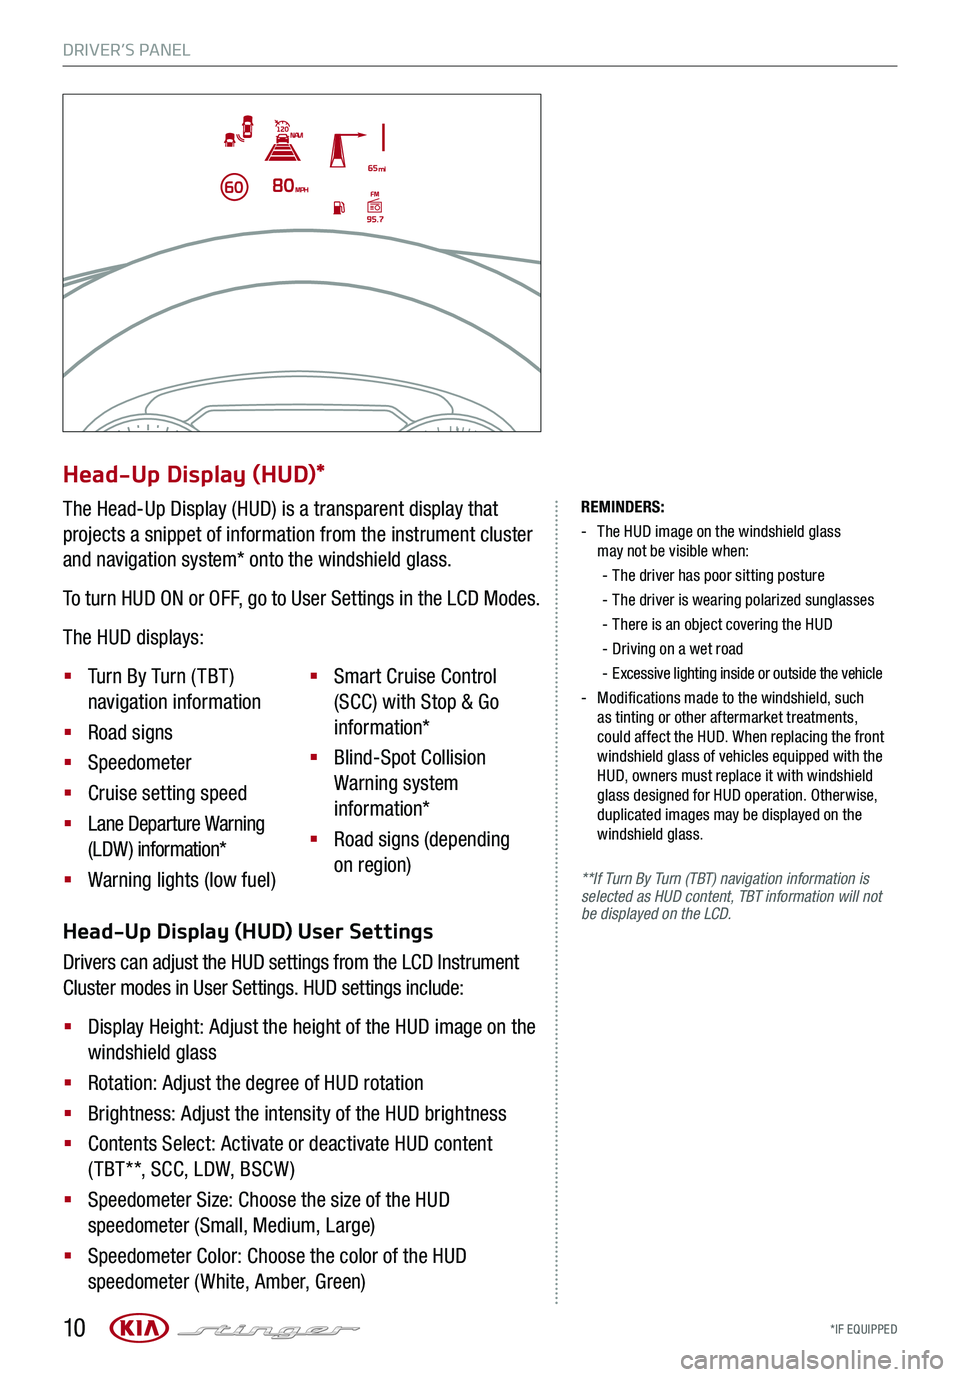
The Head-Up Display (HUD) is a transparent display that
projects a snippet of information from the instrument cluster
and navigation system* onto the windshield glass.
To turn HUD ON or OFF, go to User Settings in the LCD Modes.
The HUD displays:
§ Turn By Turn ( TBT )
navigation information
§ Road signs
§ Speedometer
§ Cruise setting speed
§ Lane Departure Warning
(LDW) information*
§ Warning lights (low fuel)
§ Smart Cruise Control
(SCC) with Stop & Go
information*
§ Blind-Spot Collision
Warning system
information*
§ Road signs (depending
on region)
Page 14 of 58
DRIVER’S PANEL
*IF EQUIPPED 12
P
R
N
D
AUTO
HOLD
DRIVE MODE
OFF
OFF
VIEW
P
AB
Electronic Stability Control (ESC) is designed to help
stabilize the vehicle during cornering maneuvers.
Traction Control System ( TCS) helps improve traction
while accelerating on slippery surfaces. It is a good idea
to keep both ESC and TCS turned on for daily driving
whenever possible.
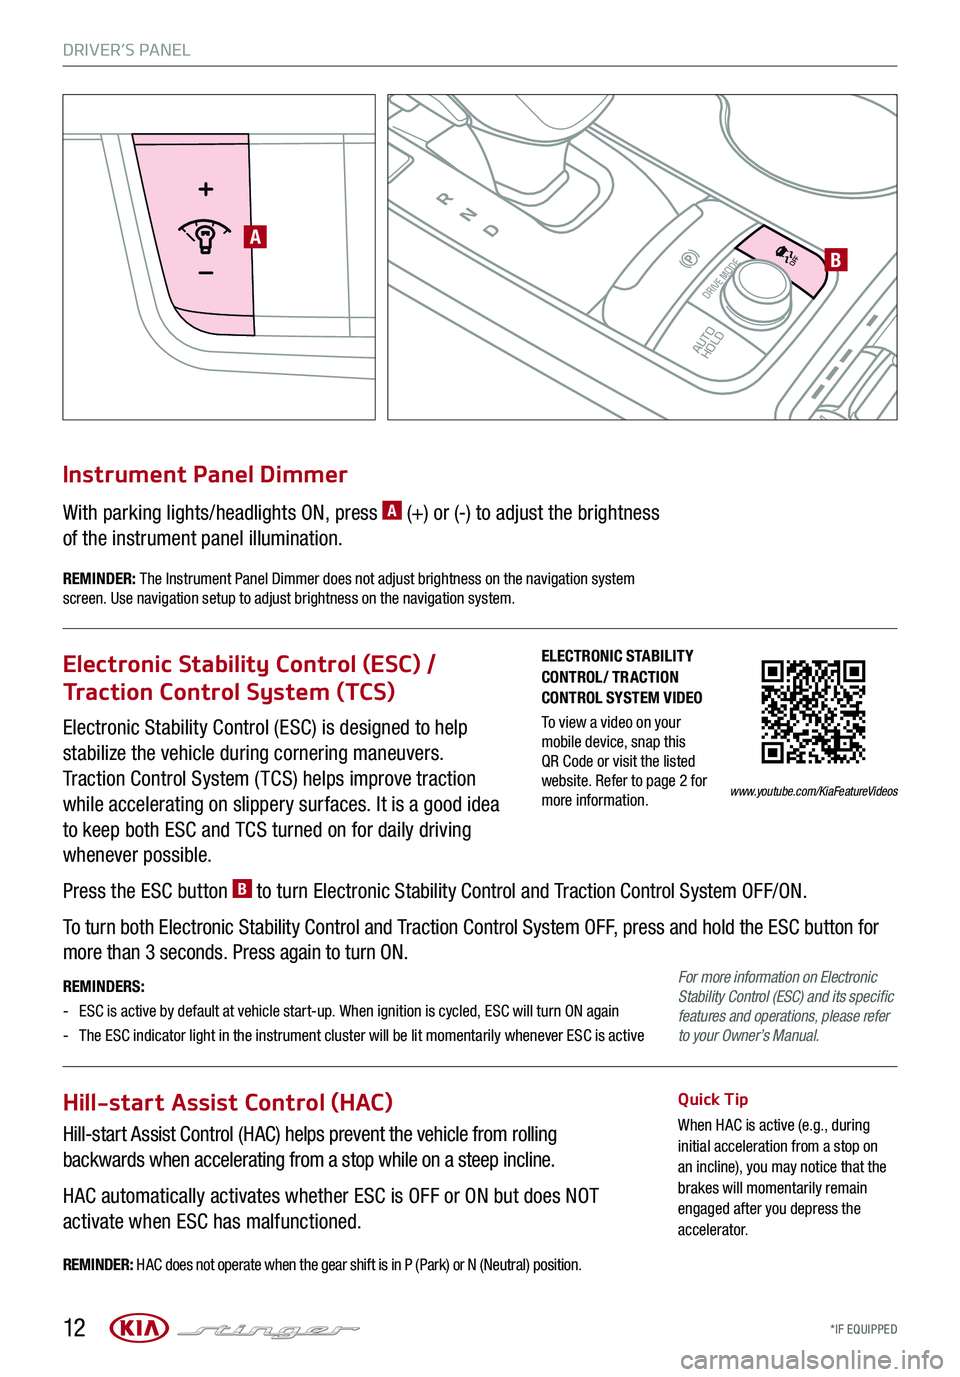
Press the ESC button B to turn Electronic Stability Control and Traction Control System OFF/ON.
To turn both Electronic Stability Control and Traction Control System OFF, press and hold the ESC button for
more than 3 seconds. Press again to turn ON.
REMINDERS:
-ESC is active by default at vehicle start-up. When ignition is cycled, ESC will turn ON again
- The ESC indicator light in the instrument cluster will be lit momentarily whenever ESC is active
Electronic Stability Control (ESC) /
Traction Control System (TCS)
Hill-start Assist Control (HAC)
Hill-start Assist Control (HAC) helps prevent the vehicle from rolling
backwards when accelerating from a stop while on a steep incline.
HAC automatically activates whether ESC is OFF or ON but does NOT
activate when ESC has malfunctioned.
Quick Tip
When HAC is active (e.g., during initial acceleration from a stop on an incline), you may notice that the brakes will momentarily remain engaged after you depress the accelerator.
REMINDER: HAC does not operate when the gear shift is in P (Park) or N (Neutral) position.
With parking lights/headlights ON, press A (+) or (-) to adjust the brightness
of the instrument panel illumination.
Instrument Panel Dimmer
REMINDER: The Instrument Panel Dimmer does not adjust brightness on the navigation system screen. Use navigation setup to adjust brightness on the navigation system.
ELECTRONIC STABILITY CONTROL/ TRACTION CONTROL SYSTEM VIDEO
To view a video on your mobile device, snap this QR Code or visit the listed website. Refer to page 2 for more information.www.youtube.com/KiaFeatureVideos
For more information on Electronic Stability Control (ESC) and its specific features and operations, please refer to your Owner’s Manual.
Page 18 of 58

*IF EQUIPPED
DRIVER’S PANEL
16
P
R
N
D
AUTO
HOLD
DRIVE MODE
OFFOFF
P
Parking Assist System
The Parking Assist System is a supplemental system that
assists the driver by chiming if an object is detected within the
sensing areas in the front or rear of the vehicle when parking or
backing up.
When the Engine Start /Stop button is ON and the shift lever
is in R (Reverse), the system is activated and the Parking
Assist button indicator is illuminated.
To turn off the Parking Assist System, press the button A.
REMINDERS:
-
If the vehicle is moving at speeds over 6 mph, the system may not activate
-
When more than two objects are sensed at the same time, the closest one will be recognized first
-
The Parking Assist System is not a substitute for proper and safe backing-up procedures. Always drive safely and use caution when backing up. The Parking Assist System may not detect every object behind or in front of the vehicle
Rear View Monitor*
The Rear View Monitor system is not a safety device. It is a
supplemental system that displays the view behind the vehicle
through the Navigation screen* while the vehicle is in Reverse.
The Rear View Monitor activates when the:
§ Engine Start /Stop button is in the ON position
§ Gear Shift Lever is in the R (Reverse) position
REMINDERS:
- The Rear View Monitor is not a substitute for proper and safe backing-up procedures.
- The Rear View Monitor may not display every object behind the vehicle.
- Always drive safely and use caution when backing up.
P
R
N
D
AUTO
HOLD
DRIVE MODEOFF
A
(Rear sensors shown)
Page 26 of 58
*IF EQUIPPED
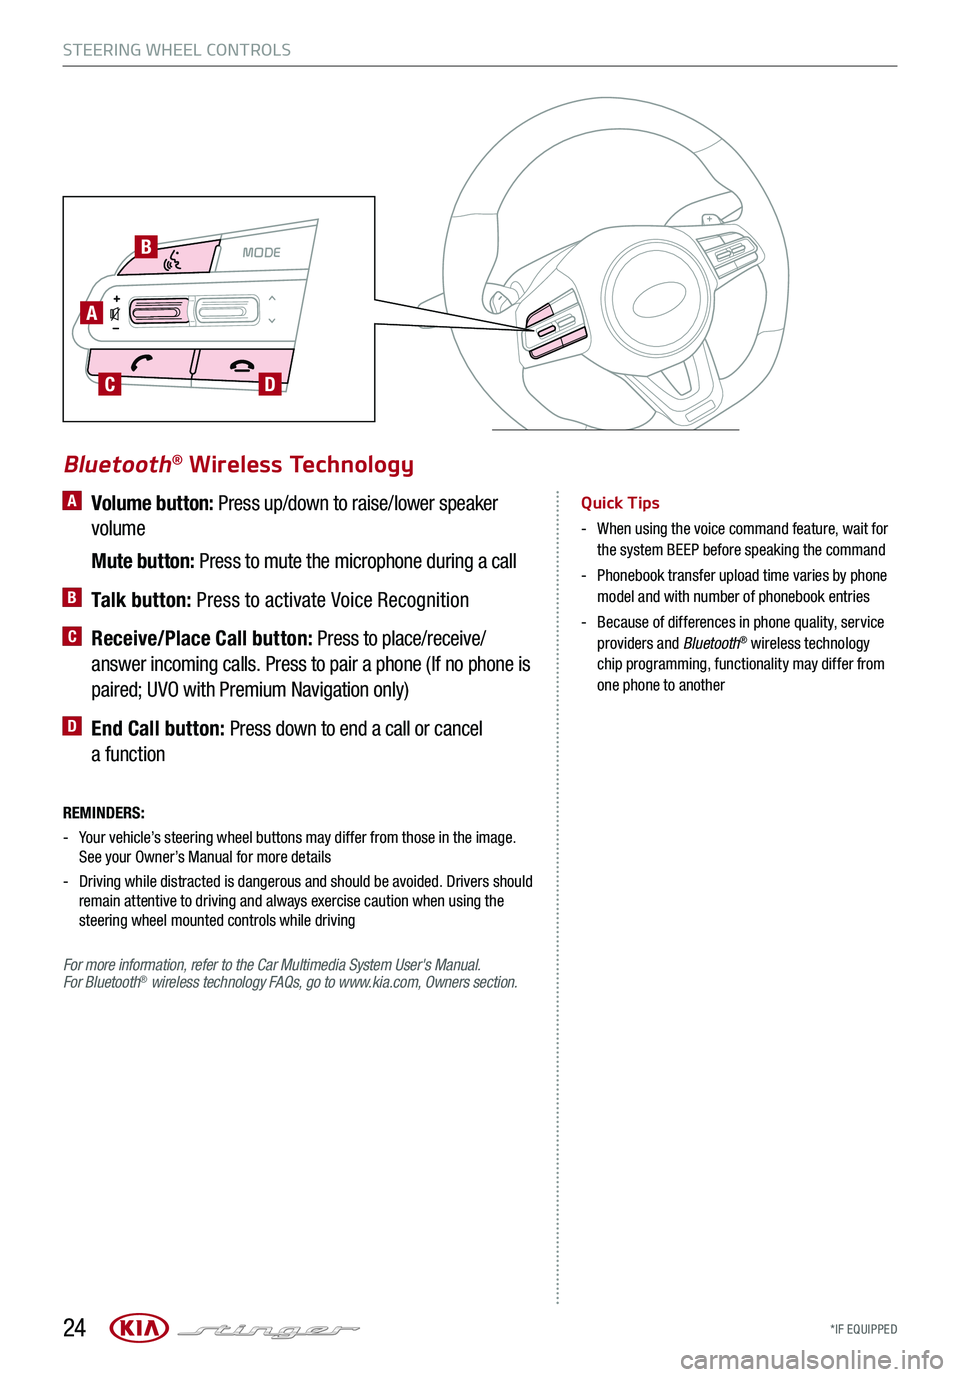
A Volume button: Press up/down to raise/lower speaker
volume
Mute button: Press to mute the microphone during a call
B Talk button: Press to activate Voice Recognition
C Receive/Place Call button: Press to place/receive/
answer incoming calls. Press to pair a phone (If no phone is
paired; UVO with Premium Navigation only)
D End Call button: Press down to end a call or cancel
a function
REMINDERS:
-
Your vehicle’s steering wheel buttons may differ from those in the image. See your Owner’s Manual for more details
- Driving while distracted is dangerous and should be avoided. Drivers should remain attentive to driving and always exercise caution when using the steering wheel mounted controls while driving
For more information, refer to the Car Multimedia System User's Manual. For Bluetooth® wireless technology FAQs, go to www.kia.com, Owners section.
Bluetooth® Wireless Technology
Quick Tips
- When using the voice command feature, wait for the system BEEP before speaking the command
- Phonebook transfer upload time varies by phone model and with number of phonebook entries
- Because of differences in phone quality, service providers and Bluetooth® wireless technology chip programming, functionality may differ from one phone to another
STEERING WHEEL CONTROLS
24
MODE MODE
A
B
CD
Page 30 of 58
*IF EQUIPPED 28
AUDIO SYSTEM
UVO VIDEO
To view a video on your mobile device, snap this QR Code or visit the listed website. Refer to page 2 for more information.
RADIO
MEDIA SEEK
PASSENGERPASSENGER
AIR BAGOFF
TRACK APPS/
PHONE SETUPUVO
UVO
FM/AM/SiriusXM®/Media (USB, iPod®, Aux, Bluetooth® Audio)
Your vehicle’s audio system may differ from that in the illustration. For further UVO operations, refer to the Car Multimedia System User's Manual. For other audio system information, refer to pages 26-29.
Sound Settings – To adjust the sound settings:
1.
Press the SETUP key on the audio control unit
2. Select the on-screen SOUND button
3. Select the menu item ( Volume Levels, Tone, Priority,
Advanced, Default, Beep)
4. Use the onscreen buttons to adjust settings
5. Press the return button to save settings
Radio Presets – You can listen to FM, AM and SiriusXM radio
and save frequently used stations.
How to Save a Preset - Press and hold the desired slot. This
saves the current station in the selected slot
SiriusXM Smart Favorites - For the first ten favorite SiriusXM
channels, you may play live or repeat from the beginning of a
song or a program segment. In Radio mode, choose SiriusXM,
then select any of the first six favorites. During song or
program play, tap the Skip Backward icon to start from the
beginning of the song or program. Tap the Play Live icon to
return to the live broadcast.
REMINDER: To help minimize driver distraction, some audio system functionalities have been modified while the vehicle is in Drive, Reverse or moved out of Park.
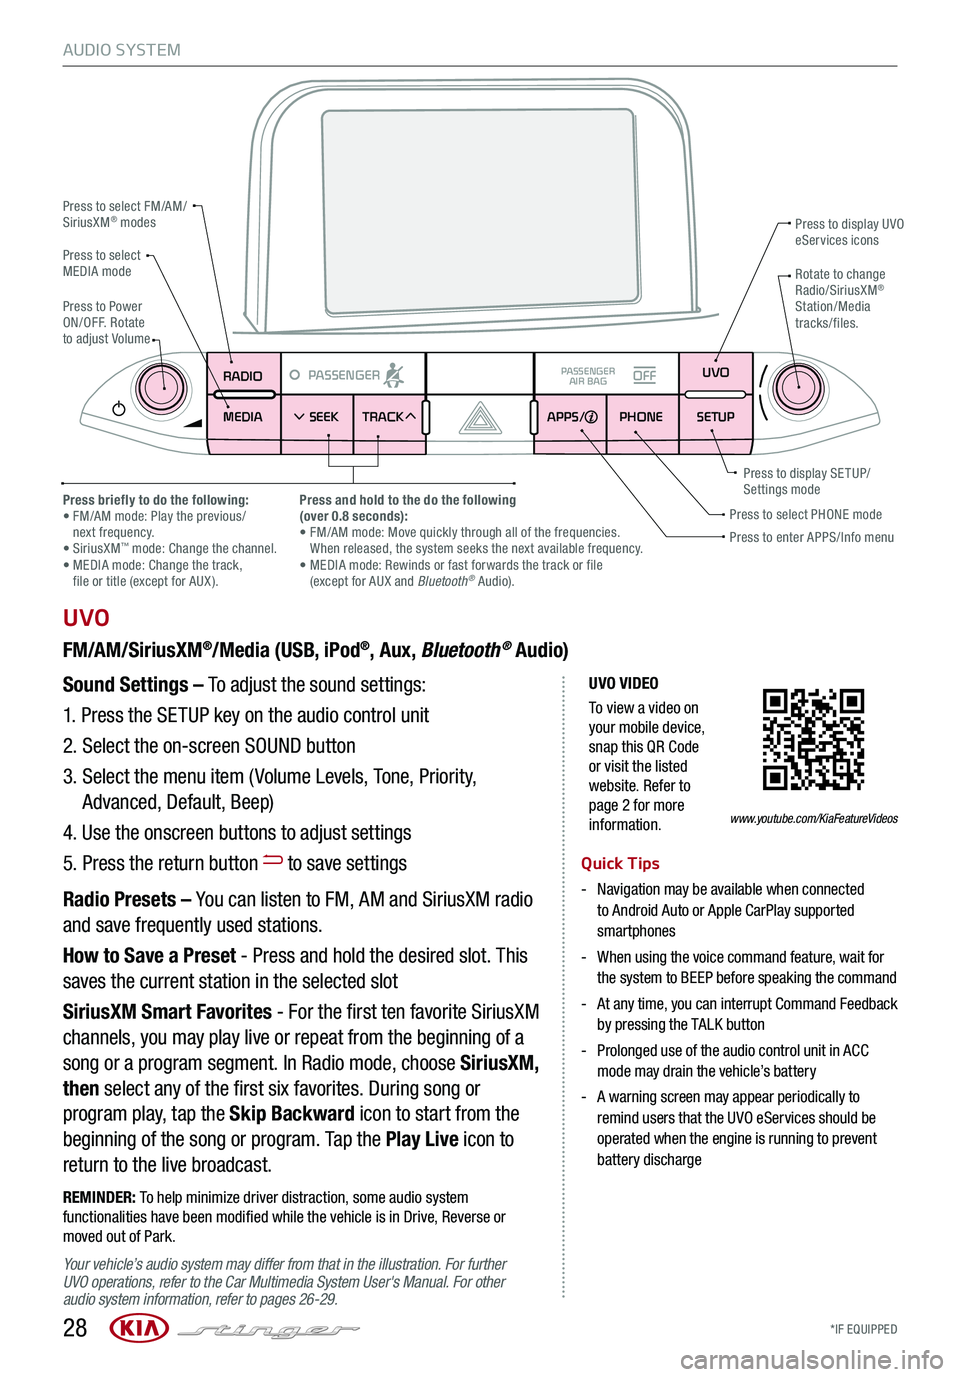
Press to select FM/AM/SiriusXM® modes
Press to PowerON/OFF. Rotate to adjust Volume
Press to display UVO eServices icons
Press to enter APPS/Info menuPress to select PHONE modePress briefly to do the following: • FM/AM mode: Play the previous/ next frequency.• SiriusXM™ mode: Change the channel. • MEDIA mode: Change the track, file or title (except for AUX ).
Press and hold to the do the following(over 0.8 seconds):• FM/AM mode: Move quickly through all of the frequencies. When released, the system seeks the next available frequency.• MEDIA mode: Rewinds or fast forwards the track or file (except for AUX and Bluetooth® Audio).
Press to display SE TUP/Settings mode
Press to select MEDIA modeRotate to change Radio/SiriusXM® Station/Media tracks/files.
Quick Tips
- Navigation may be available when connected to Android Auto or Apple CarPlay supported smartphones
- When using the voice command feature, wait for the system to BEEP before speaking the command
- At any time, you can interrupt Command Feedback by pressing the TALK button
- Prolonged use of the audio control unit in ACC mode may drain the vehicle’s battery
- A warning screen may appear periodically to remind users that the UVO eServices should be operated when the engine is running to prevent battery discharge
www.youtube.com/KiaFeatureVideos
Page 31 of 58
*IF EQUIPPED ALWAYS CHECK THE OWNER’S MANUAL FOR COMPLE TE OPER ATING INFORMATION AND SAFE T Y WARNINGS.29
CENTER PANEL
UVO with Premium Navigation
FM/AM/SiriusXM®/Media (USB, iPod®, Aux, Bluetooth® Audio)
Your vehicle’s audio system may differ from that in the illustration. For further UVO operations, refer to the Car Multimedia System User's Manual. For other audio system information, refer to pages 26-28.
Sound Settings – To adjust the sound settings:
1. Press the SETUP key on the audio control unit
2. Select the on-screen SOUND button
3. Select the menu item ( Volume Levels, Tone, Priority,
Navigation, Advanced, Default, Beep)
4. Use the onscreen buttons to adjust settings
Radio Presets – You can listen to FM, AM and SiriusXM radio
and save frequently used stations.
How to Save a Preset - Press and hold the desired slot. This
saves the current station in the selected slot
SiriusXM Smart Favorites - For the first ten favorite SiriusXM
channels, you may play live or repeat from the beginning of a
song or a program segment. In Radio mode, choose SiriusXM,
then select any of the first six favorites. During song or program
play, tap the Skip Backward icon to start from the beginning of
the song or program. Tap the Play Live icon to return to the live
broadcast.
Quick Tips
-
Prolonged use of the navigation system in ACC mode may drain the vehicle’s battery. A warning screen may appear periodically to remind users that the navigation system should be operated with the engine running to prevent battery discharge
-
When using the voice command feature, wait for the system BEEP before speaking the command
-Surround Sound can be turned on or off
RADIO
MEDIA SEEK
PASSENGERPASSENGER
AIR BAGOFF
TRACK MAP
N AVSETUP
MAP
SD card/slot
UVO WITH PREMIUM N AVIG ATION SYSTEM VIDEO
To view a video on your mobile device, snap this QR Code or visit the listed website. Refer to page 2 for more information.
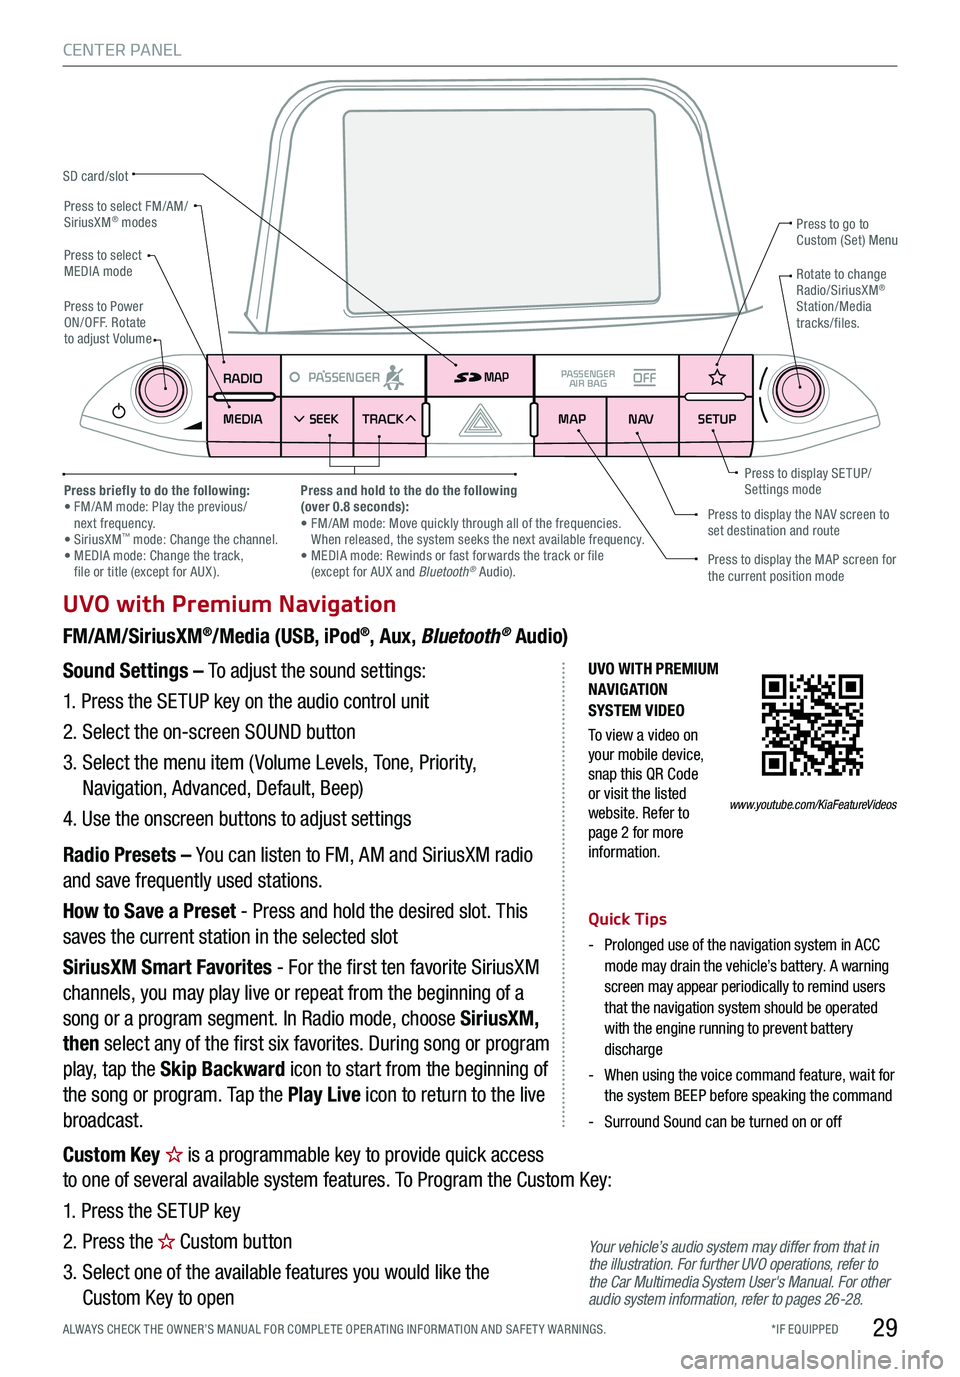
Press to select FM/AM/SiriusXM® modes
Press to PowerON/OFF. Rotate to adjust Volume
Press to go to Custom (Set) Menu
Press to display the MAP screen for the current position mode
Press to display the NAV screen to set destination and route
Press briefly to do the following: • FM/AM mode: Play the previous/ next frequency.• SiriusXM™ mode: Change the channel. • MEDIA mode: Change the track, file or title (except for AUX ).
Press and hold to the do the following(over 0.8 seconds):• FM/AM mode: Move quickly through all of the frequencies. When released, the system seeks the next available frequency.• MEDIA mode: Rewinds or fast forwards the track or file (except for AUX and Bluetooth® Audio).
Press to display SE TUP/Settings mode
Press to select MEDIA modeRotate to change Radio/SiriusXM® Station/Media tracks/files.
www.youtube.com/KiaFeatureVideos
Custom Key is a programmable key to provide quick access
to one of several available system features. To Program the Custom Key:
1. Press the SETUP key
2. Press the Custom button
3. Select one of the available features you would like the
Custom Key to open