Page 147 of 605

461
Features of your vehicle
Programming
Your vehicle may require the ignition
switch to be turned to the ACC posi-
tion for programming and/or opera-
tion of HomeLink. It is also recom-
mended that a new battery be
replaced in the hand-held transmitter
of the device being programmed to
HomeLink for quicker training and
accurate transmission of the radio-
frequency.
Follow these steps to train your
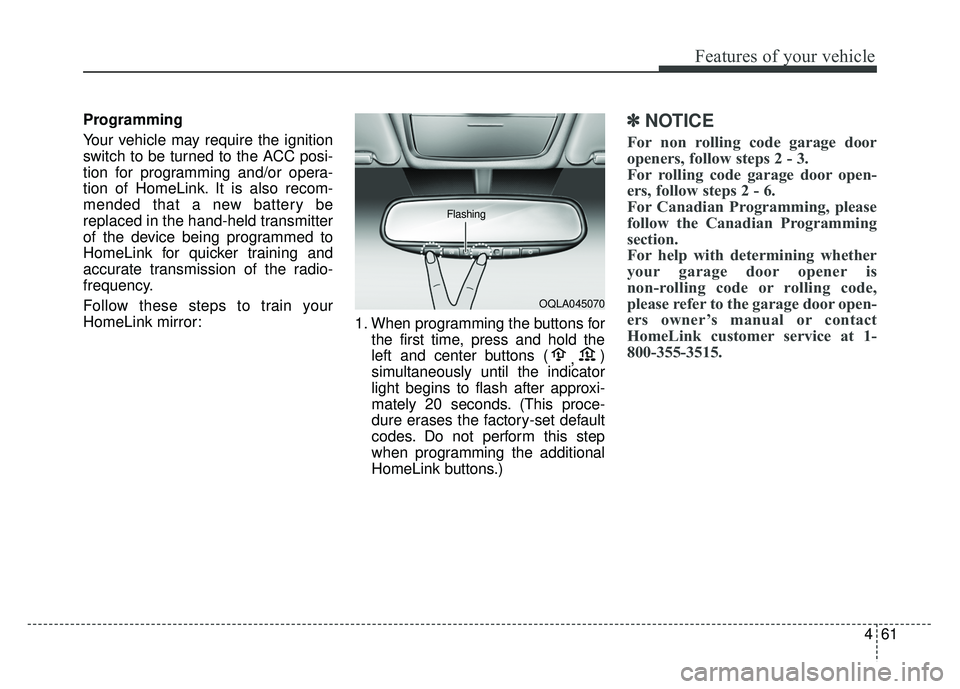
HomeLink mirror:1. When programming the buttons for
the first time, press and hold the
left and center buttons ( ,)
simultaneously until the indicator
light begins to flash after approxi-
mately 20 seconds. (This proce-
dure erases the factory-set default
codes. Do not perform this step
when programming the additional
HomeLink buttons.)✽ ✽ NOTICE
For non rolling code garage door
openers, follow steps 2 - 3.
For rolling code garage door open-
ers, follow steps 2 - 6.
For Canadian Programming, please
follow the Canadian Programming
section.
For help with determining whether
your garage door opener is
non-rolling code or rolling code,
please refer to the garage door open-
ers owner’s manual or contact
HomeLink customer service at 1-
800-355-3515.
OQLA045070
Flashing
Page 152 of 605

Features of your vehicle
66
4
Adjusting outside rearview mirror
(if equipped)
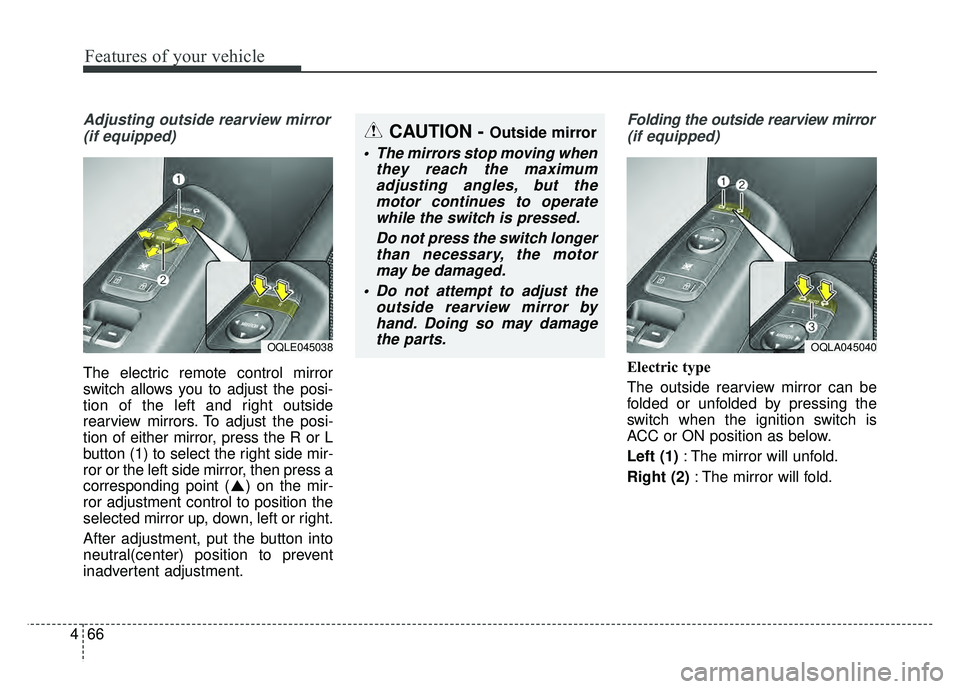
The electric remote control mirror
switch allows you to adjust the posi-
tion of the left and right outside
rearview mirrors. To adjust the posi-
tion of either mirror, press the R or L
button (1) to select the right side mir-
ror or the left side mirror, then press a
corresponding point ( ) on the mir-
ror adjustment control to position the
selected mirror up, down, left or right.
After adjustment, put the button into
neutral(center) position to prevent
inadvertent adjustment.
Folding the outside rearview mirror(if equipped)
Electric type
The outside rearview mirror can be
folded or unfolded by pressing the
switch when the ignition switch is
ACC or ON position as below.
Left (1) : The mirror will unfold.
Right (2) : The mirror will fold.
CAUTION - Outside mirror
The mirrors stop moving when
they reach the maximumadjusting angles, but themotor continues to operatewhile the switch is pressed.
Do not press the switch longerthan necessary, the motormay be damaged.
Do not attempt to adjust the outside rearview mirror byhand. Doing so may damagethe parts.
OQLE045038OQLA045040
Page 155 of 605
469
Features of your vehicle
Instrument Cluster Control
Adjusting Instrument ClusterIllumination
The brightness of the instrument
panel illumination is changed by
pressing the illumination control button
(“+” or “-”) when the ignition switch or
Engine Start/Stop button is ON, or the
taillights are turned on. If you hold the illumination control
button (“+” or “-”), the brightness
will be changed continuously.
If the brightness reaches to the maximum or minimum level, an
alarm will sound.
LCD Display Control
The LCD display modes can be
changed by using the control buttons
on the steering wheel.
(1) : MODE button for change the LCD MODES
(2) / : MOVE scroll switch for select the items
(3) OK : SET/RESET button for set the items or reset the items
❈ For the LCD modes, refer to “LCD
Display” in this chapter.OQL045041
OQLA045061
OQLE045233
Page 156 of 605
Features of your vehicle
70
4
Gauges
Speedometer
The speedometer indicates the
speed of the vehicle and is calibrated
in miles per hour (mph) and/or kilo-
meters per hour (km/h).
Tachometer
The tachometer indicates the
approximate number of engine revo-
lutions per minute (rpm).
Use the tachometer to select the cor-
rect shift points and to prevent lug-
ging and/or over-revving the engine.
Engine Coolant Temperature
Gauge
This gauge indicates the tempera-
ture of the engine coolant when the
ignition switch or Engine Start/Stop
button is ON.
If the gauge pointer moves beyond
the normal range area toward the "H"
position, it indicates overheating that
may damage the engine.
Do not continue driving with an over-
heated engine. If your vehicle over-
heats, refer to “If the Engine
Overheats” in chapter 7.
OQL045184
OQL045183
CAUTION - Red zone
Do not operate the engine with-in the tachometer's RED ZONE.This may cause severe enginedamage.
OQLE045230
Page 161 of 605
475
Features of your vehicle
Edit settings after engaging park-ing brake/Edit settings after shift-ing to P
This warning message illuminates if
you try to select an item from the
User Settings mode while driving.
For your safety, change the User
Settings after parking the vehicle,
applying the parking brake and mov-
ing the shift lever to P (Park).
Service Mode
Tire Pressure
This mode displays the pressure sta-
tus of each tire.
You can change the tire pressure unit
in "User settings" mode.
❈ For more information, refer to “Tire
Pressure Monitoring System
(TPMS)” in chapter 7.
Service Interval
Service interval
It calculates and displays when you
need a scheduled maintenance
service (mileage or days).
If the remaining mileage or time reach-
es 900 mi. (1,500 km) or 30 days,
“Service in” message is displayed for
several seconds each time you set
the ignition switch or Engine
Start/Stop Button to the ON position.
OQLA045116
OQLE045195
OQLE045117
Page 162 of 605
Features of your vehicle
76
4
Service required
If you do not have your vehicle serv-
iced according to the already inputted
service interval, the “Service
required” message will appear.
The “Service required” message is
displayed for several seconds each
time you set the ignition switch or
Engine Start/Stop Button to the ON
position.
To reset the service interval to the
mileage and days you inputted
before:
Press the OK button (reset) for more
than 1 second. Service in OFF
If the service interval is not set
“Service in OFF” message is dis-
played on the LCD display.
If you want to activate Service inter-
val function, set the service interval
in the User setting mode.
For more details, refer to “User set-
ting mode" in this chapter.
✽ ✽
NOTICE
If any of the following conditions
occurs, the mileage and days may be
incorrect.
- The battery cable is disconnected.
- The fuse switch is turned off.
- The battery is discharged.
OQLA045196OQLE045197
Page 165 of 605

479
Features of your vehicle
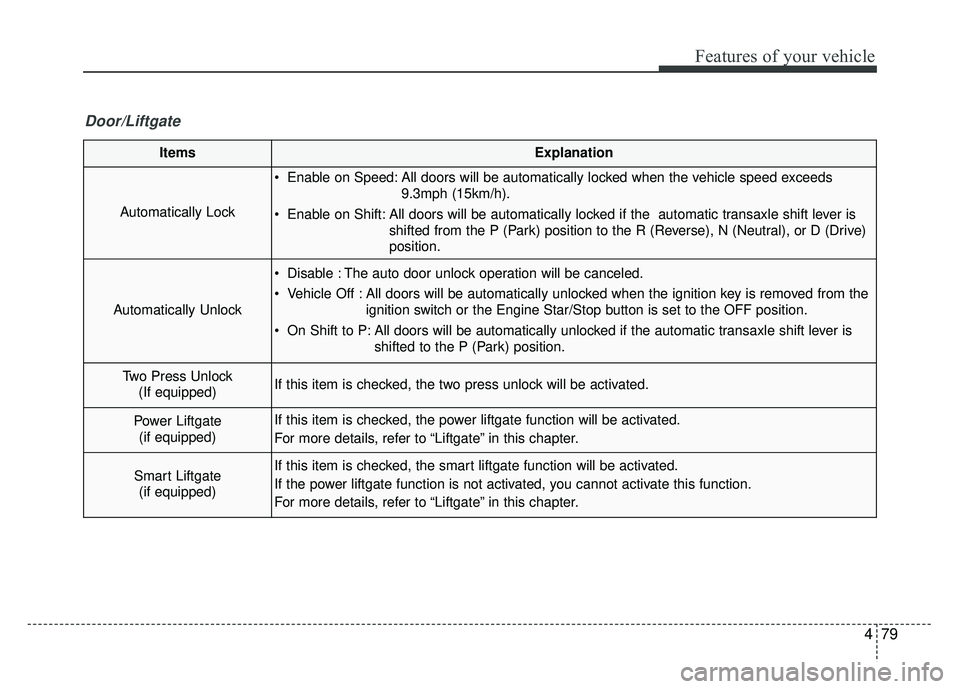
ItemsExplanation
Automatically Lock
Enable on Speed: All doors will be automatically locked when the vehicle speed exceeds9.3mph (15km/h).
Enable on Shift: All doors will be automatically locked if the automatic transaxle shift lever is shifted from the P (Park) position to the R (Reverse), N (Neutral), or D (Drive)
position.
Automatically Unlock
Disable : The auto door unlock operation will be canceled.
Vehicle Off : All doors will be automatically unlocked when the ignition key is removed from theignition switch or the Engine Star/Stop button is set to the OFF position.
On Shift to P: All doors will be automatically unlocked if the automatic transaxle shift lever is shifted to the P (Park) position.
Two Press Unlock(If equipped)If this item is checked, the two press unlock will be activated.
Power Liftgate (if equipped)If this item is checked, the power liftgate function will be activated.
For more details, refer to “Liftgate” in this chapter.
Smart Liftgate (if equipped)If this item is checked, the smart liftgate function will be activated.
If the power liftgate function is not activated, you cannot activate this function.
For more details, refer to “Liftgate” in this chapter.
Door/Liftgate
Page 168 of 605
Features of your vehicle
82
4
ItemsExplanation
Fuel Economy Auto ResetIf this item is checked, the average fuel economy will reset automatically when refueling or after
ignition.
Fuel Economy UnitChoose the fuel economy unit. (US gallon, UK gallon)
Temperature UnitChoose the temperature unit. (°C,°F)
Tire Pressure Unit
(if equipped)Choose the tire pressure unit. (psi, kPa, Bar)
Other features