2018 KIA SOUL oil
[x] Cancel search: oilPage 568 of 620

893
Maintenance
Always handle them carefully, andavoid scratches and abrasions. If
the bulbs are lit, avoid contact with
liquids. Never touch the glass with
bare hands. Residual oil may
cause the bulb to overheat and
burst when lit. A bulb should be
operated only when installed in a
headlamp.
If a bulb becomes damaged or cracked, replace it immediately
and carefully dispose of it.
Wear eye protection when chang- ing a bulb. Allow the bulb to cool
down before handling it.Front turn signal lamp bulb
replacement
1. Turn off the engine and open the hood. Disconnect the negative
battery cable. 2. Disconnect the power connector
front the back of the headlamp
assembly.
3. Loosen the retaining bolts.
OPS073051
OPS076028L
Page 582 of 620

8107
Maintenance
High-pressure washing
When using high-pressure wash-ers, make sure to maintain suffi-
cient distance from the vehicle.
Insufficient clearance or excessive
pressure can lead to component
damage or water penetration.
Do not spray the camera, sensors or its surrounding area directly with
a high pressure washer. Shock
applied from high pressure water
may cause the device to not oper-
ate normally.
Do not bring the nozzle tip close to boots (rubber or plastic covers) or
connectors as they may be dam-
aged if they come into contact with
high pressure water. Waxing
Wax the vehicle when water will no
longer bead on the paint.
Always wash and dry the vehicle
before waxing. Use a good quality
liquid or paste wax, and follow the
manufacturer’s instructions. Wax all
metal trim to protect it and to main-
tain its luster.
Removing oil, tar, and similar materi-
als with a spot remover will usually
strip the wax from the finish. Be sure
to re-wax these areas even if the rest
of the vehicle does not yet need wax-
ing.
✽ ✽
NOTICE
Do not apply wax on embossed
unpainted unit, as it may tarnish the
unit.
CAUTION- Wetting engine
Water washing in the engine
compartment including highpressure water washing maycause the failure of electricalcircuits located in the enginecompartment.
Never allow water or other liq- uids to come in contact withelectrical/electronic compo-nents inside the vehicle asthis may damage them.
OJB037800
Page 586 of 620
8111
Maintenance
When cleaning lower door panels,rocker panels and frame members,
be sure that drain holes are kept
open so that moisture can escape
and not be trapped inside to accel-
erate corrosion.
Keep your garage dry
Don't park your vehicle in a damp,
poorly ventilated garage. This cre-
ates a favorable environment for cor-
rosion. This is particularly true if you
wash your vehicle in the garage or
drive it into the garage when it is still
wet or covered with snow, ice or
mud. Even a heated garage can con-
tribute to corrosion unless it is well
ventilated so moisture is dispersed. Keep paint and trim in good con-
dition
Scratches or chips in the finish
should be covered with "touch-up"
paint as soon as possible to reduce
the possibility of corrosion. If bare
metal is showing through, the atten-
tion of a qualified body and paint
shop is recommended.
Bird droppings : Bird droppings are
highly corrosive and may damage
painted surfaces in just a few hours.
Always remove bird droppings as
soon as possible.
Don't neglect the interior
Moisture can collect under the floor
mats and carpeting and cause corro-
sion. Check under the mats periodi-
cally to be sure the carpeting is dry.
Use particular care if you carry fertil-
izers, cleaning materials or chemi-
cals in the vehicle.
These should be carried only in prop-
er containers and any spills or leaks
should be cleaned up, flushed with
clean water and thoroughly dried.Interior care
Interior general precautions
Prevent chemicals such as perfume,
cosmetic oil, sun cream, hand clean-
er, and air freshener from contacting
the interior parts because they may
cause damage or discoloration. If
they do contact the interior parts,
wipe them off immediately. If neces-
sary, use a vinyl cleaner, see product
instructions for correct usage.
Page 587 of 620
Maintenance
112
8
Cleaning the upholstery and inte-
rior trim
Vinyl
Remove dust and loose dirt from
vinyl with a whisk broom or vacuum
cleaner. Clean vinyl surfaces with a
vinyl cleaner.
Fabric
Remove dust and loose dirt from fab-
ric with a whisk broom or vacuum
cleaner. Clean with a mild soap solu-
tion recommended for upholstery or
carpets. Remove fresh spots imme-
diately with a fabric spot cleaner. If
fresh spots do not receive immediate
attention, the fabric can be stained
and its color can be affected. Also, its
fire-resistant properties can be
reduced if the material is not proper-
ly maintained.
Using anything but recommended
cleaners and procedures may affect
the fabric’s appearance and fire-
resistant properties.
Cleaning the lap/shoulder beltwebbing
Clean the belt webbing with any mild
soap solution recommended for
cleaning upholstery or carpet. Follow
the instructions provided with the
soap. Do not bleach or re-dye the
webbing because this may weaken
it.
Cleaning the interior window glass
If the interior glass surfaces of the
vehicle become fogged (that is, cov-
ered with an oily, greasy or waxy
film), they should be cleaned with a
glass cleaner. Follow the directions
on the glass cleaner container.
CAUTION- Electrical components
Never allow water or other liq-uids to come in contact withelectrical/electronic compo-nents inside the vehicle as thismay damage them.
CAUTION- Leather
When cleaning leather products(steering wheel, seats etc.), useneutral detergents or low alco-hol content solutions. If you usehigh alcohol content solutionsor acid/alkaline detergents, thecolor of the leather may fade orthe surface may get stripped off.
CAUTION- Rear window
Do not scrape or scratch theinside of the rear window. Thismay result in damage of the rearwindow defroster grid.
Page 588 of 620
8113
Maintenance
Taking care of leather seats
Vacuum the seat periodically toremove dust and sand on the seat.
It will prevent abrasion or damage of
the leather and maintain its quality.
Wipe the natural leather seat cover often with dry or soft cloth.
Sufficient use of a leather protec- tive may prevent abrasion of the
cover and helps maintain the color.
Be sure to read the instructions
and consult a specialist when
using leather coating or protective
agents.
Leather with bright colors(beige, cream beige) is easily contaminat-
ed and clear in appearance. Clean
the seats frequently.
Avoid wiping with wet cloth. It may cause the surface to crack.
Cleaning the leather seats
Remove all contaminations instant-ly. Refer to instructions below for
removal of each contaminant.
Cosmetic products(sunscreen, foundation, etc.)
- Apply cleansing cream on a clothand wipe the contaminated point.
Wipe off the cream with a wet
cloth and remove water with a dry
cloth.
Beverages(coffee, soft drink, etc.) - Apply a small amount of neutraldetergent and wipe until contami-
nations do not smear.
Oil - Remove oil instantly withabsorbable cloth and wipe with
stain remover for natural leather
only.
Chewing gum - Harden the gum with ice andremove gradually.
Fabric seat cover (If equipped)
Please clean the fabric seats regu-
larly with a vacuum cleaner in con-
sideration of fabric material charac-
teristics. If they are heavily soiled
with beverage stains, etc., use a suit-
able interior cleaner. To prevent dam-
age to seat covers, wipe off the seat
covers down to the seams with a
large wiping motion and moderate
pressure using a soft sponge or
microfiber cloth.
Velcro closures on clothing or sharp
objects may cause snagging or
scratches on the surface of the
seats. Make sure not to rub such
objects against the surface.
Page 599 of 620
97
Specifications, Consumer information, Reporting safety defects
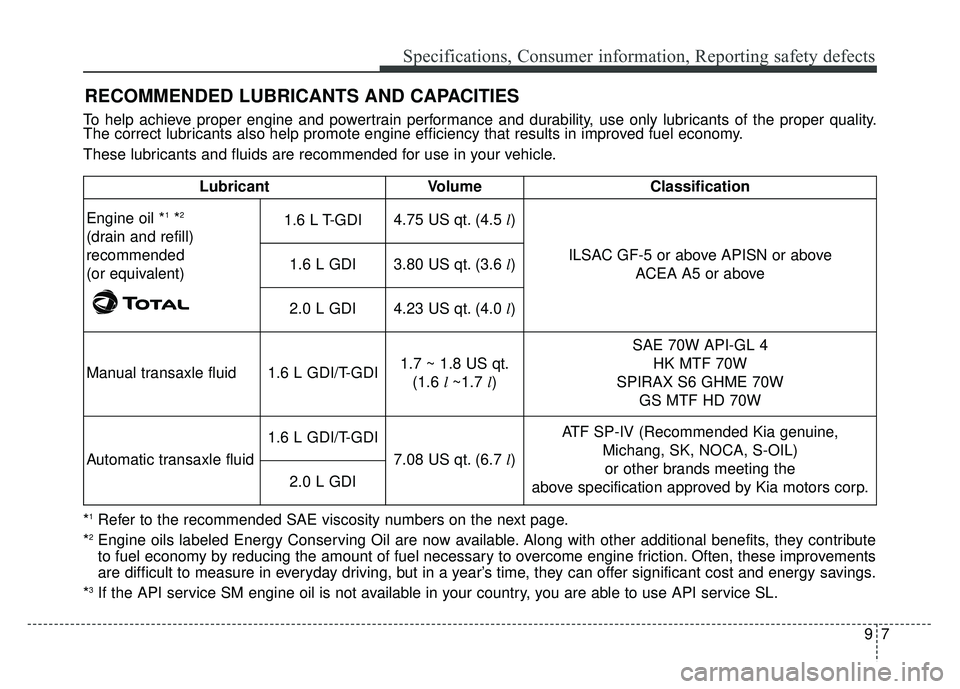
RECOMMENDED LUBRICANTS AND CAPACITIES
To help achieve proper engine and powertrain performance and durability, use only lubricants of the proper quality.
The correct lubricants also help promote engine efficiency that results in improved fuel economy.
These lubricants and fluids are recommended for use in your vehicle.
*
1Refer to the recommended SAE viscosity numbers on the next page.
*2Engine oils labeled Energy Conserving Oil are now available. Along with other additional benefits, they contribute
to fuel economy by reducing the amount of fuel necessary to overcome engine friction. Often, these improvements
are difficult to measure in everyday driving, but in a year’s time, they can offer significant cost and energy savings.
*
3If the API service SM engine oil is not available in your country, you are able to use API service SL. Lubricant Volume Classification
Engine oil *
1*2
(drain and refill)
recommended
(or equivalent) 1.6 L T-GDI
4.75 US qt. (4.5 l)
ILSAC GF-5 or above APISN or above ACEA A5 or above
1.6 L GDI
3.80 US qt. (3.6 l)
2.0 L GDI4.23 US qt. (4.0 l)
Manual transaxle fluid 1.6 L GDI/T-GDI 1.7 ~ 1.8 US qt.
(1.6 l ~1.7 l) SAE 70W API-GL 4
HK MTF 70W
SPIRAX S6 GHME 70W GS MTF HD 70W
Automatic transaxle fluid 1.6 L GDI/T-GDI
7.08 US qt. (6.7 l)ATF SP-IV (Recommended Kia genuine,
Michang, SK, NOCA, S-OIL)or other brands meeting the
above specification approved by Kia motors corp.
2.0 L GDI
Page 601 of 620
99
Specifications, Consumer information, Reporting safety defects
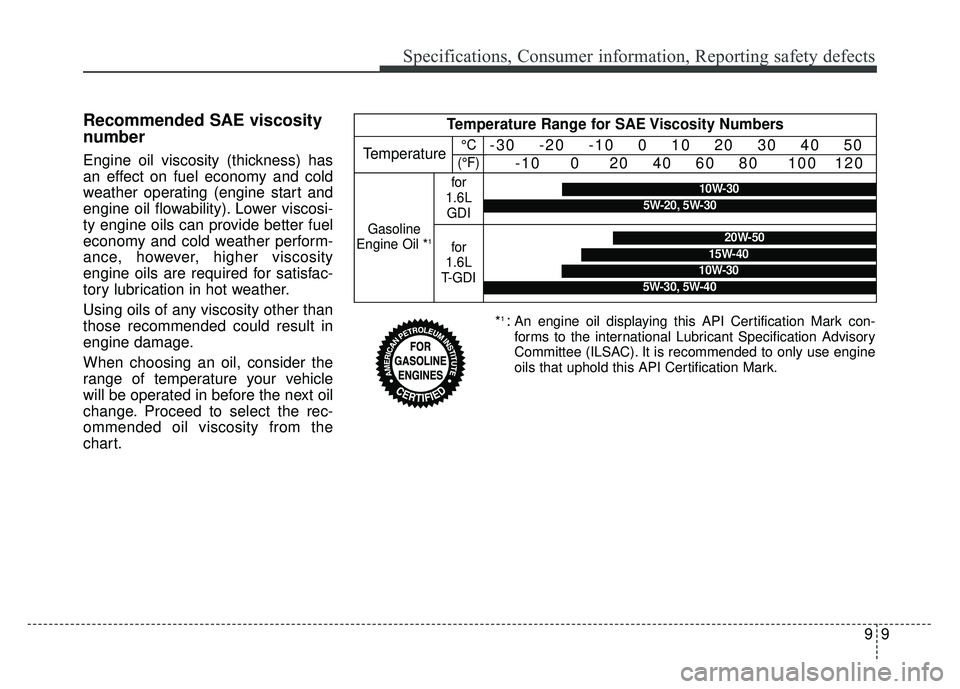
Recommended SAE viscosity
number
Engine oil viscosity (thickness) has
an effect on fuel economy and cold
weather operating (engine start and
engine oil flowability). Lower viscosi-
ty engine oils can provide better fuel
economy and cold weather perform-
ance, however, higher viscosity
engine oils are required for satisfac-
tory lubrication in hot weather.
Using oils of any viscosity other than
those recommended could result in
engine damage.
When choosing an oil, consider the
range of temperature your vehicle
will be operated in before the next oil
change. Proceed to select the rec-
ommended oil viscosity from the
chart.
*1 :An engine oil displaying this API Certification Mark con-
forms to the international Lubricant Specification Advisory
Committee (ILSAC). It is recommended to only use engine
oils that uphold this API Certification Mark.
Temperature Range for SAE Viscosity Numbers
Temperature-30 -20 -10 0 10 20 30 40 50
-10 0 20 40 60 80 100 120
Gasoline
Engine Oil *1
for
1.6L GDI
for
1.6L
T-GDI
10W-30
5W-20, 5W-30
20W-50
10W-30
15W-40
5W-30, 5W-40
°C
(°F)
Page 612 of 620
Index
4I
To temporarily accelerate with the cruise control on . . . . . . . . . . . . . . . . . . . . . . . . . . . . . . . . . . . . \
. . 6-64
To turn cruise control off, do one of the following . 6-66
Declaration of Conformity . . . . . . . . . . . . . . . . . . . . . . 5-84 FCC . . . . . . . . . . . . . . . . . . . . . . . . . . . . . . . . . . . . \
. 5-84
Defroster . . . . . . . . . . . . . . . . . . . . . . . . . . . . . . . . . . . 4-\
101 Rear window defroster . . . . . . . . . . . . . . . . . . . . . . 4-101
Dimensions . . . . . . . . . . . . . . . . . . . . . . . . . . . . . . . . . . . 9-\
2
Door locks. . . . . . . . . . . . . . . . . . . . . . . . . . . . . . . . . . . 4-\
17 Auto door lock/unlock feature . . . . . . . . . . . . . . . . . 4-20
Child-protector rear door lock . . . . . . . . . . . . . . . . . 4-21
Impact sensing door unlock system . . . . . . . . . . . . . 4-20
Operating door locks from inside the vehicle . . . . . 4-18
Operating door locks from outside the vehicle . . . . 4-17
Speed sensing door lock system . . . . . . . . . . . . . . . 4-20
Drive mode integrated control system . . . . . . . . . . . . . 6-84
Dual Clutch Transmission (DCT). . . . . . . . . . . . . . . . . 6-25 Dual clutch transmission operation . . . . . . . . . . . . . 6-25
Good driving practices . . . . . . . . . . . . . . . . . . . . . . . 6-33
Economical operation . . . . . . . . . . . . . . . . . . . . . . . . . 6-103
Electrical equipment (U.S. Only) . . . . . . . . . . . . . . . . . 9-15 Emergency starting . . . . . . . . . . . . . . . . . . . . . . . . . . . . . 7-5
Jump starting . . . . . . . . . . . . . . . . . . . . . . . . . . . . . . . 7-5
Push-starting . . . . . . . . . . . . . . . . . . . . . . . . . . . . . . . . 7-7
Emission control system . . . . . . . . . . . . . . . . . . . . . . . 8-114 Crankcase emission control system . . . . . . . . . . . . 8-114
Evaporative emission control (including ORVR:Onboard Refueling Vapor Recovery) system. . . . 8-114
Exhaust emission control system . . . . . . . . . . . . . . 8-115
Engine . . . . . . . . . . . . . . . . . . . . . . . . . . . . . . . . . . . . \
. . . 9-3
Engine compartment . . . . . . . . . . . . . . . . . . . . . . . . 2-6, 8-3
Engine coolant . . . . . . . . . . . . . . . . . . . . . . . . . . . . . . . 8-42 Changing the coolant . . . . . . . . . . . . . . . . . . . . . . . . 8-44
Checking the coolant level . . . . . . . . . . . . . . . . . . . . 8-42
Engine number . . . . . . . . . . . . . . . . . . . . . . . . . . . . . . . 9-11
Engine oil . . . . . . . . . . . . . . . . . . . . . . . . . . . . . . . . . . . 8-\
40 Changing the engine oil and filter . . . . . . . . . . . . . . 8-41
Checking the engine oil level . . . . . . . . . . . . . . . . . . 8-40
Engine start/stop button . . . . . . . . . . . . . . . . . . . . . . . . . 6-9 Engine start/stop button position . . . . . . . . . . . . . . . . 6-8
Illuminated engine start/stop button. . . . . . . . . . . . . . 6-9
Starting the engine with a smart key . . . . . . . . . . . . 6-11
Explanation of scheduled maintenance items . . . . . . . 8-34
Exterior features . . . . . . . . . . . . . . . . . . . . . . . . . . . . . 4-147 Mounting bracket for roof carrier . . . . . . . . . . . . . 4-148
Roof rack . . . . . . . . . . . . . . . . . . . . . . . . . . . . . . . . 4-147
Exterior overview . . . . . . . . . . . . . . . . . . . . . . . . . . . . . . 2-2
D
E