2018 KIA SOUL wiring
[x] Cancel search: wiringPage 76 of 620

Safety features of your vehicle
58
3
Advanced air bags are combined with
pre-tensioner seat belts to help pro-
vide enhanced occupant protection in
frontal crashes. Front air bags are not
intended to deploy in collisions in
which sufficient protection can be pro-
vided by the pre-tensioner seat belt.
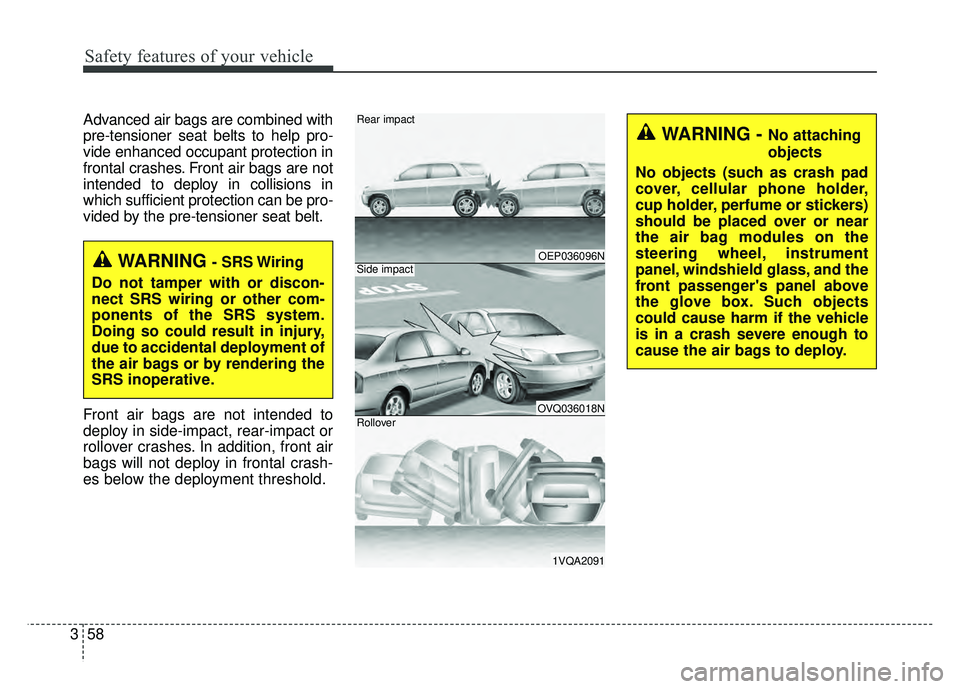
Front air bags are not intended to
deploy in side-impact, rear-impact or
rollover crashes. In addition, front air
bags will not deploy in frontal crash-
es below the deployment threshold.
OEP036096N
OVQ036018N
1VQA2091
Rear impact
Side impact
Rollover
WARNING- SRS Wiring
Do not tamper with or discon-
nect SRS wiring or other com-
ponents of the SRS system.
Doing so could result in injury,
due to accidental deployment of
the air bags or by rendering the
SRS inoperative.
WARNING - No attaching
objects
No objects (such as crash pad
cover, cellular phone holder,
cup holder, perfume or stickers)
should be placed over or near
the air bag modules on the
steering wheel, instrument
panel, windshield glass, and the
front passenger's panel above
the glove box. Such objects
could cause harm if the vehicle
is in a crash severe enough to
cause the air bags to deploy.
Page 86 of 620

Safety features of your vehicle
68
3
Adding equipment to or modi-
fying your air bag-equipped
vehicle
If you modify your vehicle by changing
your vehicle's frame, bumper system,
front end or side sheet metal or ride
height, this may affect the operation of
your vehicle's air bag system.
Air bag warning label
Air bag warning labels, some required
by the U.S. National Highway Traffic
Safety Administration (NHTSA), are
attached to the sunvisor to alert the
driver and passengers of potential
risks of the air bag system.
WARNING- Tampering
with SRS
Do not tamper with or discon-
nect SRS wiring, or other com-
ponents of the SRS system.
Doing so could result in the
accidental inflation of the air
bags or by rendering the SRS
inoperative.
WARNING- Towing Vehicle
Always have the ignition off
when your vehicle is being
towed. The side air bags may
inflate if the vehicle is tilted
such as when being towed
because of the rollover sensors
in the vehicle.OAM039041
Page 90 of 620

Features of your vehicle
44
Record your key number
The key code num-
ber is stamped on
the key code tag
attached to the key
set. Should you
lose your keys, this number will
enable an authorized Kia dealer to
duplicate the keys easily. Remove
the key code tag and store it in a safe
place. Also, record the key code
number and keep it in a safe and
handy place, but not in the vehicle.
Key operations
• Used to start the engine.
Used to lock and unlock the doors. To unfold the key, press the release
button (1) then the key will unfold
automatically. To fold the key, fold
the key manually while pressing
the release button (1).
KEY
CAUTION
Do not fold the key withoutpressing the release button.This may damage the key.
WARNING- Aftermarket
key
Use only Kia original parts for
the ignition key in your vehicle.
If an aftermarket key is used,
the ignition switch may not
return to ON after START. If this
happens, the starter will contin-
ue to operate causing damage
to the starter motor and possi-
ble fire due to excessive current
in the wiring.
OED036001A
OPS046493N
■Type A (if equipped)
■ Type B (if equipped)
Page 431 of 620

Driving your vehicle
112
6
Use high quality ethylene gly-
col coolant
Your vehicle is delivered with high qual-
ity ethylene glycol coolant in the cool-
ing system. It is the only type of coolant
that should be used because it helps
prevent corrosion in the cooling sys-
tem, lubricates the water pump and
prevents freezing. Be sure to replace
or replenish your coolant in accor-
dance with the maintenance schedule
in section 8. Before winter, have your
coolant tested to assure that its freez-
ing point is sufficient for the tempera-
tures anticipated during the winter.
Check battery and cables
Winter puts additional burdens on the
battery system. Visually inspect the
battery and cables as described in
section 8. The level of charge in your
battery can be checked by an author-
ized Kia dealer or a service station.
Change to "winter weight" oil
if necessary
In some climates it is recommended
that a lower viscosity "winter weight"
oil be used during cold weather. See
section 9 for recommendations. If you
aren't sure what weight oil you should
use, consult an authorized Kia dealer.
Check spark plugs and ignition
system
Inspect your spark plugs as
described in section 8 and replace
them if necessary. Also check all
ignition wiring and components to be
sure they are not cracked, worn or
damaged in any way.
To keep locks from freezing
To keep the locks from freezing,
squirt an approved de-icer fluid or
glycerine into the key opening. If a
lock is covered with ice, squirt it with
an approved de-icing fluid to remove
the ice. If the lock is frozen internally,
you may be able to thaw it out by
using a heated key. Handle the heat-
ed key with care to avoid injury.
Use approved window washer
anti-freeze in system
To keep the water in the window
washer system from freezing, add an
approved window washer anti-freeze
solution in accordance with instruc-
tions on the container. Window wash-
er anti-freeze is available from an
authorized Kia dealer and most auto
parts outlets. Do not use engine
coolant or other types of anti-freeze
as these may damage the paint finish.
CAUTION- Snow chains
Chains that are the wrong size
or improperly installed candamage your vehicle's brakelines, suspension, body andwheels.
Stop driving and retighten the chains any time you hear themhitting the vehicle.
Page 549 of 620

Maintenance
74
8
FUSES
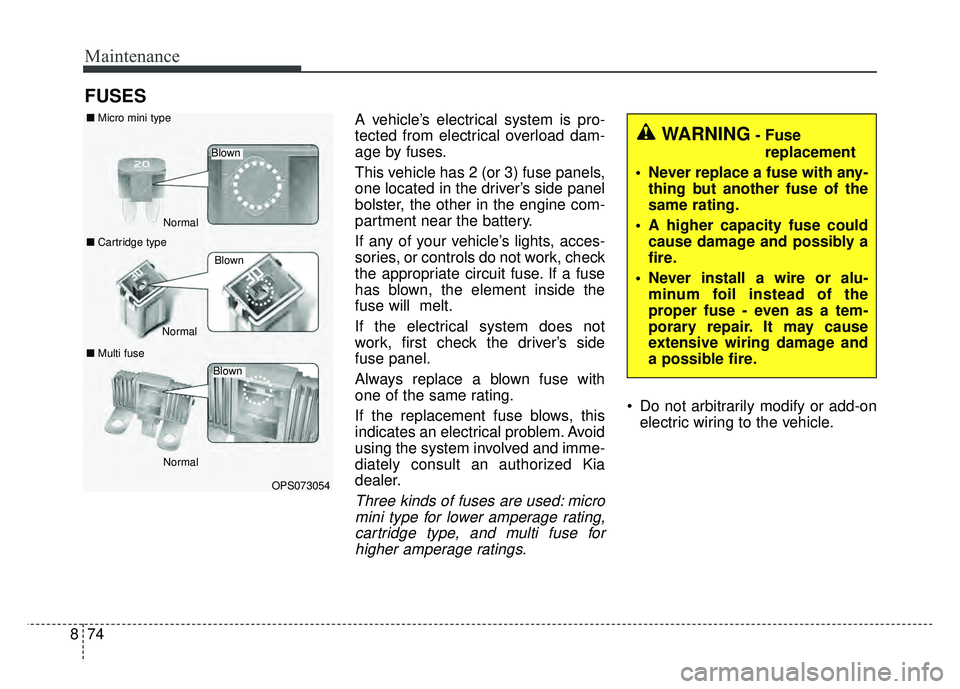
A vehicle’s electrical system is pro-
tected from electrical overload dam-
age by fuses.
This vehicle has 2 (or 3) fuse panels,
one located in the driver’s side panel
bolster, the other in the engine com-
partment near the battery.
If any of your vehicle’s lights, acces-
sories, or controls do not work, check
the appropriate circuit fuse. If a fuse
has blown, the element inside the
fuse will melt.
If the electrical system does not
work, first check the driver’s side
fuse panel.
Always replace a blown fuse with
one of the same rating.
If the replacement fuse blows, this
indicates an electrical problem. Avoid
using the system involved and imme-
diately consult an authorized Kia
dealer.
Three kinds of fuses are used: micro
mini type for lower amperage rating,cartridge type, and multi fuse forhigher amperage ratings.
Do not arbitrarily modify or add-on electric wiring to the vehicle.
WARNING- Fuse
replacement
Never replace a fuse with any- thing but another fuse of the
same rating.
A higher capacity fuse could cause damage and possibly a
fire.
Never install a wire or alu- minum foil instead of the
proper fuse - even as a tem-
porary repair. It may cause
extensive wiring damage and
a possible fire.
OPS073054
Normal
Normal
■
Micro mini type
■ Cartridge type
■ Multi fuse
Blown
Blown
Normal
Blown
Page 550 of 620

875
Maintenance
✽
✽NOTICE
• When replacing fuse, turn the
ignition “OFF” and turn off
switches of all electrical devices
then remove battery (-) terminal.
• The actual fuse/relay panel label may differ from equipped items.
CAUTION
Do not use a screwdriver or any
other metal object to removefuses because it may cause ashort circuit and damage thesystem.
CAUTION- Fuse fire
When replacing a blown fuse or relay, make sure the newfuse or relay fits tightly intothe clips. Failure to tightlyinstall the fuse or relay maycause damage to the wiringand electric systems.
Do not remove fuses, relays and terminals fastened withbolts or nuts. The fuses, relaysand terminals may not be fas-tened correctly which maycause vehicle damage.
CAUTION- Fuse
Replacement
Do not input any other objectsexcept fuses or relays intofuse/relay terminals such as adriver or wiring. It may causecontact failure and system mal-function.
WARNING- Electrical Fire
Always ensure replacements fuses and relays are securely
fastened when installed.
Failure to do so can result in a
vehicle fire.
We recommend that you do not remove fuses, relays and termi-
nals that are fastened with
bolts or nuts. If they are not
completely re-installed, such
looseness may cause electrical
arcing and a possible fire. If
fuses, relays and terminals fas-
tened with bolts or nuts need
replacement, consult with an
authorized Kia dealer.
Page 563 of 620

Maintenance
88
8
LIGHT BULBS
Bulb replacement precaution
Please keep extra bulbs on hand
with appropriate wattage ratings in
case of emergencies.
Refer to “Bulb Wattage” in chapter 9.
When changing lamps, first turn off
the engine at a safe place, firmly
apply the parking brake and detach
the battery’s negative (-) terminal.
Use only bulbs of the specified
wattage.✽ ✽ NOTICE
• If the light bulb or lamp connector
is removed while the lamp is still
on, the fuse box's electronic sys-
tem may log it as a malfunction.
Therefore, a lamp malfunction
incident may be recorded as a
Diagnostic Trouble Code (DTC) in
the fuse box.
• It is normal for an operating lamp to flicker momentarily. This is due
to a stabilization function of the
vehicle’s electronic control device.
If the lamp lights up normally
after momentarily blinking, then
it is functioning as normal.
However, if the lamp continues to
flicker several times or turns off
completely, there may be an error
in the vehicle’s electronic control
device. Please have the vehicle
checked by an authorized Kia
dealer immediately.
WARNING- Working on
the lights
Prior to working on the light,
firmly apply the parking brake,
ensure that the ignition switch
is turned to the LOCK position
and turn off the lights to avoid
sudden movement of the vehi-
cle and burning your fingers or
receiving an electric shock.
CAUTION -Light replace-
ment
Be sure to replace the burned- out bulb with one of the samewattage rating. Otherwise, itmay cause damage to the fuseor electric wiring system.
CAUTION -Headlamp
Lens
To prevent damage, do notclean the headlamp lens withchemical solvents or strongdetergents.
Page 564 of 620

889
Maintenance
If you don’t have the necessary tools,
the correct bulbs and the expertise,
consult an authorized Kia dealer. In
many cases, it is difficult to replace
vehicle light bulbs because other
parts of the vehicle must be removed
before you can get to the bulb. This is
especially true if you have to remove
the headlamp assembly to get to the
bulb(s).
Removing/installing the headlamp
assembly can result in damage to
the vehicle.
If non-genuine parts or substandard
bulbs are used, it may lead to blow-
ing a fuse or other wiring damages.
Do not install extra lamps or LEDs to
the vehicle. If additional lights are
installed, it may lead to lamp mal-
functions and flickering. Additionally,
the fuse box and other writing may
be damaged.Light bulb position (Front)(1) Front turn signal lamp
(2) Headlamp (Low/High)
(3) Side marker
(4) Headlamp (High)
(5) Headlamp (Low)
(6) Position lamp (LED Type)
(7) Position lamp/Daytime runninglamp (LED Type)
(8) Front fog lamp
■Type B
■Type A
OPS076021N
OPS076020N■Type C
OPS076134N