Page 332 of 620

613
Driving your vehicle
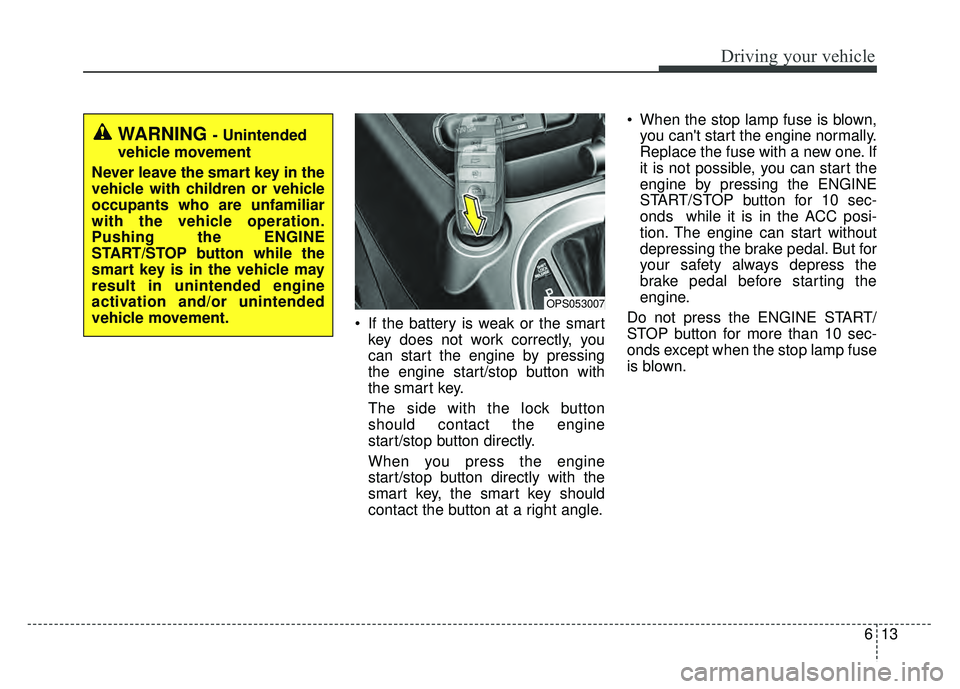
If the battery is weak or the smartkey does not work correctly, you
can start the engine by pressing
the engine start/stop button with
the smart key.
The side with the lock button
should contact the engine
start/stop button directly.
When you press the engine
start/stop button directly with the
smart key, the smart key should
contact the button at a right angle. When the stop lamp fuse is blown,
you can't start the engine normally.
Replace the fuse with a new one. If
it is not possible, you can start the
engine by pressing the ENGINE
START/STOP button for 10 sec-
onds while it is in the ACC posi-
tion. The engine can start without
depressing the brake pedal. But for
your safety always depress the
brake pedal before starting the
engine.
Do not press the ENGINE START/
STOP button for more than 10 sec-
onds except when the stop lamp fuse
is blown.
OPS053007
WARNING - Unintended
vehicle movement
Never leave the smart key in the
vehicle with children or vehicle
occupants who are unfamiliar
with the vehicle operation.
Pushing the ENGINE
START/STOP button while the
smart key is in the vehicle may
result in unintended engine
activation and/or unintended
vehicle movement.
Page 477 of 620

. . . . . . . . . . . . . . . . . . . . . . . . . . . 8-57
. . . . . . . . . . . . . . . . . . . . . . . . . . . . . . . . . . 8-58\
Tires and wheels . . . . . . . . . . . . . . . . . . . . . . . . . . . 8-59
. . . . . . . . . . . . . . . . . . . . . . . . . . . . . . . . . . . . \
8-59
. . . . . . . 8-59
. . . . . . . . . . . . . . . . . . . . . . . . . . . . . . . . 8-61
. . . . . . . . . . . . . . . 8-62
. . . . . . . . . . . . . . . . . . . . . . . . . . . . . 8-63
. . . . . . . . . . . . . . . . . . . . . . . . . . . 8-64
. . . . . . . . . . . . . . . . . . . . . . . . . . . . . . . . . 8-64
. . . . . . . . . . . . . . . . . . . . . . . . . . . . 8-64
. . . . . . . . . . . . . . . . . . . . . . . . . 8-64
. . . . . . . . . . . . . . . . . . . . . . . . . . . . . . 8-71
. . . . . . . . . . . . . . . . . . . . . . . . . . . . . . . . . . . 8-\
71
. . . . . . . . . . . . . . . . . . . . . . . . . . . . . . . . . . 8-71\
. . . . . . . . . . . . . . . . . . . . . . . . . . . . . . 8-72
. . . . . . . . . . . . . . . . . . . . . . . . . . 8-73
Fuses . . . . . . . . . . . . . . . . . . . . . . . . . . . . . . . . . . . . \
8-74
. . . . . . . . . . . . . . . . . . . 8-76
Light bulbs . . . . . . . . . . . . . . . . . . . . . . . . . . . . . . . 8-88
. . . . . . . . . . . . . . . . . . 8-88
. . . . . . . . . . . . . . . . . . . . . 8-90
. . . . . . . . . 8-90 . . . . 8-91
. . . . . . . . . 8-93
. .
8-96
. . . . . . . . . . . . . . . 8-96
. . 8-97
. . . . . . . . . 8-98
. . . . . . . . . . . . 8-99
. . . . . . . . . . . . . . . 8-100
. . 8-101
. . . . . 8-101
replacement . . . . . . . . . . . . . . . . . . . . . . . . . . . . . . . 8-102
. . . . . . . . . . . 8-102
. . . . . . . . . . . . . . . . . . 8-102
. . . . . . . . . . . . . . . . . 8-103
. . . . . . . . . . . . . . 8-104
. . . . . . . . . . . . . . . 8-104
. . . . . . . . . . 8-105
Appearance care . . . . . . . . . . . . . . . . . . . . . . . . . . 8-106
. . . . . . . . . . . . . . . . . . . . . . . . . . . . . . . 8-106
. . . . . . . . . . . . . . . . . . . . . . . . . . . . . . . . 8-111
Emission control system . . . . . . . . . . . . . . . . . . . 8-114
. . . . . . . . . . . . . 8-114
Onboard Refueling Vapor Recovery) system . . . . 8-114
. . . . . . . . . . . . . . . 8-115
California perchlorate notice . . . . . . . . . . . . . . . 8-117
8
Page 478 of 620
83
Maintenance
ENGINE COMPARTMENT
OPS076113/OPS076133
■
■Gamma 1.6L GDI
❈ The actual engine compartment in the vehicle may differ from the illustration.
■
■Gamma 1.6L T-GDI 1. Engine oil filler cap
2. Windshield washer fluid reservoir
3. Engine oil dipstick
4. Engine coolant reservoir
5. Radiator cap
6. Brake/clutch fluid reservoir
7. Positive battery terminal
8. Negative battery terminal
9. Fuse box
10. Air cleaner
Page 479 of 620
Maintenance
48
OPS076002N
* The actual engine room in the vehicle may differ from the illustration.1. Engine oil filler cap
2. Windshield washer fluid reservoir
3. Engine oil dipstick
4. Engine coolant reservoir
5. Radiator cap
6. Brake/clutch fluid reservoir
7. Positive battery terminal
8. Negative battery terminal
9. Fuse box
10. Air cleaner
■ ■Nu 2.0L GDI
Page 549 of 620

Maintenance
74
8
FUSES
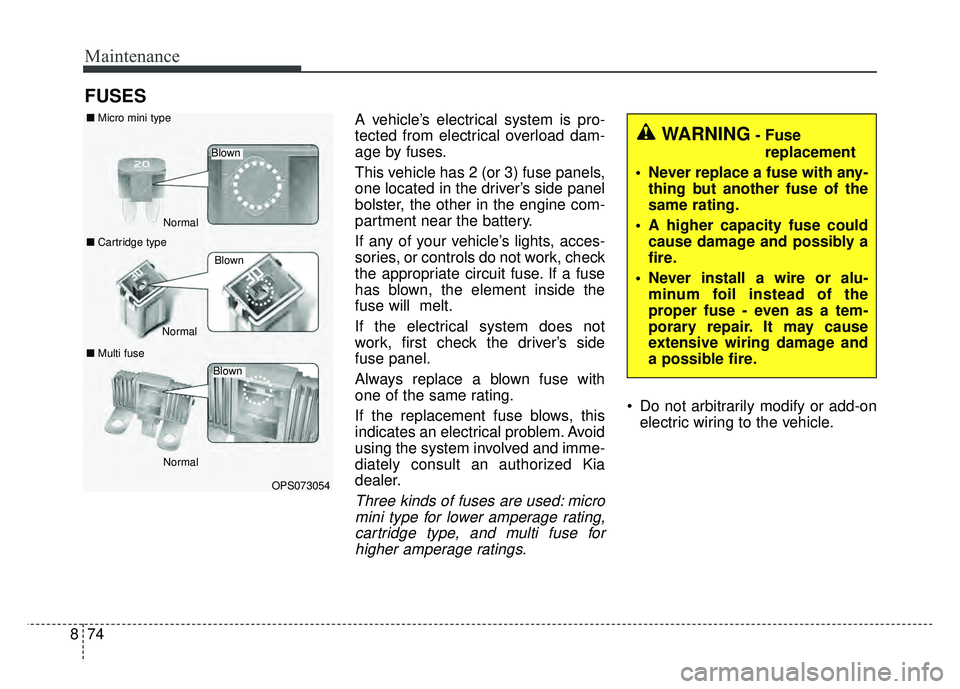
A vehicle’s electrical system is pro-
tected from electrical overload dam-
age by fuses.
This vehicle has 2 (or 3) fuse panels,
one located in the driver’s side panel
bolster, the other in the engine com-
partment near the battery.
If any of your vehicle’s lights, acces-
sories, or controls do not work, check
the appropriate circuit fuse. If a fuse
has blown, the element inside the
fuse will melt.
If the electrical system does not
work, first check the driver’s side
fuse panel.
Always replace a blown fuse with
one of the same rating.
If the replacement fuse blows, this
indicates an electrical problem. Avoid
using the system involved and imme-
diately consult an authorized Kia
dealer.
Three kinds of fuses are used: micro
mini type for lower amperage rating,cartridge type, and multi fuse forhigher amperage ratings.
Do not arbitrarily modify or add-on electric wiring to the vehicle.
WARNING- Fuse
replacement
Never replace a fuse with any- thing but another fuse of the
same rating.
A higher capacity fuse could cause damage and possibly a
fire.
Never install a wire or alu- minum foil instead of the
proper fuse - even as a tem-
porary repair. It may cause
extensive wiring damage and
a possible fire.
OPS073054
Normal
Normal
■
Micro mini type
■ Cartridge type
■ Multi fuse
Blown
Blown
Normal
Blown
Page 550 of 620

875
Maintenance
✽
✽NOTICE
• When replacing fuse, turn the
ignition “OFF” and turn off
switches of all electrical devices
then remove battery (-) terminal.
• The actual fuse/relay panel label may differ from equipped items.
CAUTION
Do not use a screwdriver or any
other metal object to removefuses because it may cause ashort circuit and damage thesystem.
CAUTION- Fuse fire
When replacing a blown fuse or relay, make sure the newfuse or relay fits tightly intothe clips. Failure to tightlyinstall the fuse or relay maycause damage to the wiringand electric systems.
Do not remove fuses, relays and terminals fastened withbolts or nuts. The fuses, relaysand terminals may not be fas-tened correctly which maycause vehicle damage.
CAUTION- Fuse
Replacement
Do not input any other objectsexcept fuses or relays intofuse/relay terminals such as adriver or wiring. It may causecontact failure and system mal-function.
WARNING- Electrical Fire
Always ensure replacements fuses and relays are securely
fastened when installed.
Failure to do so can result in a
vehicle fire.
We recommend that you do not remove fuses, relays and termi-
nals that are fastened with
bolts or nuts. If they are not
completely re-installed, such
looseness may cause electrical
arcing and a possible fire. If
fuses, relays and terminals fas-
tened with bolts or nuts need
replacement, consult with an
authorized Kia dealer.
Page 551 of 620
Maintenance
76
8
Inner panel fuse replacement
1. Turn the ignition switch and all
other switches off.
2. Open the fuse panel cover. 3. Pull the suspected fuse straight
out. Use the fuse puller provided
on the engine compartment fuse
panel cover.
4. Check the removed fuse; replace it if it is blown.
Spare fuses are provided in theengine compartment fuse panel.
5. Push in a new fuse of the same rating, and make sure it fits tightly
in the clips.
If it fits loosely, consult an authorized
Kia dealer.
If you do not have a spare, use a fuse of the same rating from a circuityou may not need for operating thevehicle, such as the power outletfuse.
If the headlights or other electrical
components do not work and the
fuses are OK, check the fuse panel
in the engine compartment. If a fuse
is blown, it must be replaced.
OPS073017
OPS073014
Page 552 of 620
877
Maintenance
Fuse switch
Always, put the fuse switch at the ON
position.
If you move the switch to the OFF
position, some items such as audio
and digital clock must be reset and
transmitter (or smart key) may not
work properly.
✽ ✽NOTICE
If you need to park your vehicle for
prolonged periods more than 1
month, move the transportation fuse
switch to the OFF position to pre-
vent the battery being discharged.
Engine compartment fuse
replacement
1. Turn the ignition switch and all
other switches off.
2. Remove the fuse panel cover by pressing the tab and pulling the
cover up. When the blade type
fuse is disconnected, remove it by
using the clip designed for chang-
ing fuses located in the engine
room fuse box. Upon removal,
securely insert reserve fuse of
equal quantity.
OPS073016
OPS073015