2018 KIA SOUL buttons
[x] Cancel search: buttonsPage 22 of 50
SOUL FEATURES & FUNCTIONS GUIDE20*IF EQUIPPED
STEERING WHEEL CONTROLS
B
C
GA
B
Smart Cruise Controlcanceled
E
D
H
Smart Cruise Control Video
To view a video on your mobile device, snap this QR Code or visit the listed website
Refer to page 2 for more information
www youtube com/KiaFeatureVideos
QR CODE
17 2 f t13 0 f t
82ft
10 6 f t
( Vehicle-to-vehicle distance settings; may vary per vehicle)
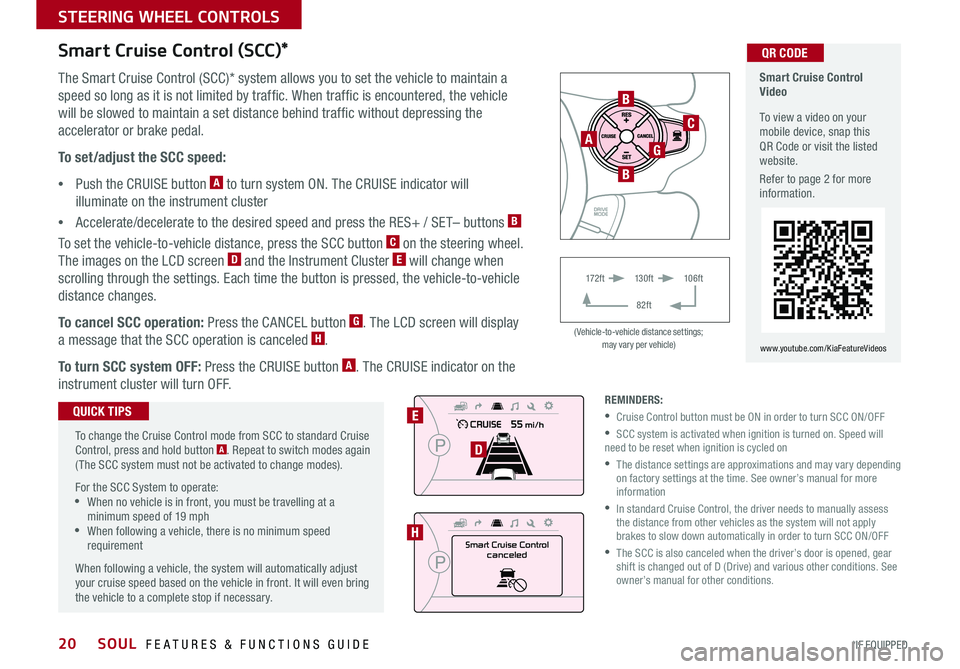
Smart Cruise Control (SCC)*
The Smart Cruise Control (SCC)* system allows you to set the vehicle to maintain a
speed so long as it is not limited by traffic When traffic is encountered, the vehicle
will be slowed to maintain a set distance behind traffic without depressing the
accelerator or brake pedal
To set/adjust the SCC speed:
•Push the CRUISE button A to turn system ON The CRUISE indicator will
illuminate on the instrument cluster
•Accelerate/decelerate to the desired speed and press the RES+ / SET– buttons B
To set the vehicle-to-vehicle distance, press the SCC button C on the steering wheel
The images on the LCD screen D and the Instrument Cluster E will change when
scrolling through the settings Each time the button is pressed, the vehicle-to-vehicle
distance changes
To cancel SCC operation: Press the CANCEL button G The LCD screen will display
a message that the SCC operation is canceled H
To turn SCC system OFF: Press the CRUISE button A The CRUISE indicator on the
instrument cluster will turn OFF
To change the Cruise Control mode from SCC to standard Cruise Control, press and hold button A Repeat to switch modes again ( The SCC system must not be activated to change modes)
For the SCC System to operate: •When no vehicle is in front, you must be travelling at a minimum speed of 19 mph •When following a vehicle, there is no minimum speed requirement
When following a vehicle, the system will automatically adjust your cruise speed based on the vehicle in front It will even bring the vehicle to a complete stop if necessary
QUICK TIPSREMINDERS:
•Cruise Control button must be ON in order to turn SCC ON/OFF
•SCC system is activated when ignition is turned on Speed will need to be reset when ignition is cycled on
•
The distance settings are approximations and may vary depending on factory settings at the time See owner’s manual for more information
•
In standard Cruise Control, the driver needs to manually assess the distance from other vehicles as the system will not apply brakes to slow down automatically in order to turn SCC ON/OFF
•
The SCC is also canceled when the driver’s door is opened, gear shift is changed out of D (Drive) and various other conditions See owner’s manual for other conditions
Page 23 of 50
21ALWAYS CHECK THE OWNER’S MANUAL FOR COMPLETE OPER ATING INFORMATION AND SAFET Y WARNINGS *IF EQUIPPED
AUDIO SYSTEMS
SETUPCLOCK
Standard Audio System Video To view a video on your mobile device, snap this QR Code or visit the listed website
Refer to page 2 for more information
www.youtube.com/KiaFeatureVideos
QR CODE
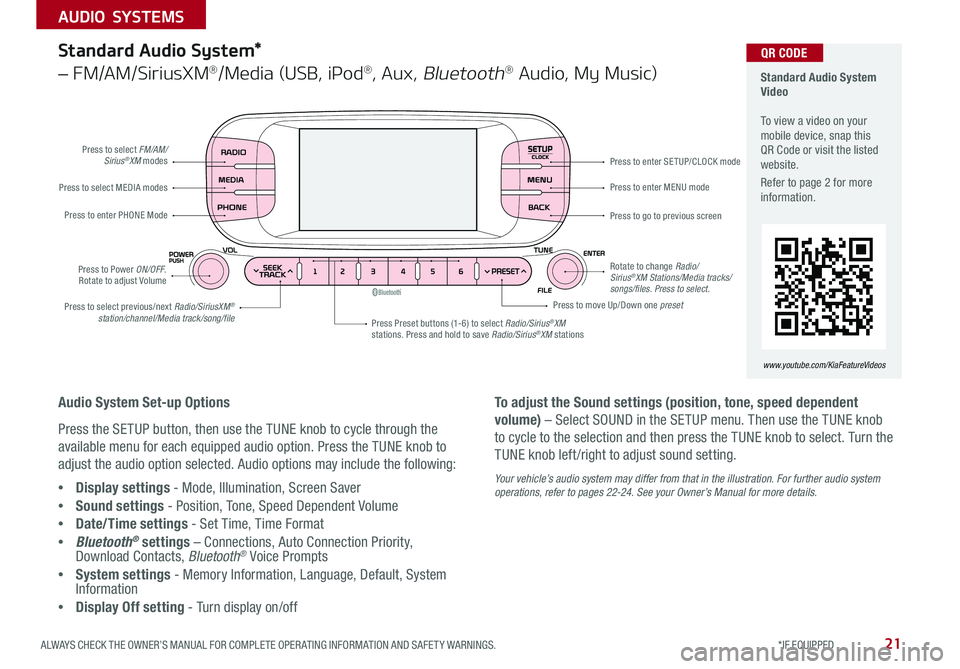
Press to select FM/AM/Sirius®XM modes
Press to Power ON/OFF Rotate to adjust Volume
Press Preset buttons (1-6) to select Radio/Sirius®XM stations Press and hold to save Radio/Sirius®XM stations
Press to select MEDIA modes
Press to enter PHONE Mode
Press to select previous/next Radio/SiriusXM® station/channel/Media track/song/file
Press to enter MENU mode
Press to go to previous screen
Rotate to change Radio/Sirius®XM Stations/Media tracks/songs/files. Press to select.
Press to move Up/Down one preset
Press to enter SE TUP/CLOCK mode
Standard Audio System*
– FM/AM/SiriusXM®/Media (USB, iPod®, Aux, Bluetooth® Audio, My Music)
Audio System Set-up Options
Press the SETUP button, then use the TUNE knob to cycle through the
available menu for each equipped audio option Press the TUNE knob to
adjust the audio option selected Audio options may include the following:
•Display settings - Mode, Illumination, Screen Saver
•Sound settings - Position, Tone, Speed Dependent Volume
•Date/Time settings - Set Time, Time Format
•Bluetooth® settings – Connections, Auto Connection Priority, Download Contacts, Bluetooth® Voice Prompts
•System settings - Memory Information, Language, Default, System Information
•Display Off setting - Turn display on/off
To adjust the Sound settings (position, tone, speed dependent
volume) – Select SOUND in the SETUP menu Then use the TUNE knob
to cycle to the selection and then press the TUNE knob to select Turn the
TUNE knob left /right to adjust sound setting
Your vehicle’s audio system may differ from that in the illustration. For further audio system operations, refer to pages 22-24. See your Owner’s Manual for more details.
Page 25 of 50
23ALWAYS CHECK THE OWNER’S MANUAL FOR COMPLETE OPER ATING INFORMATION AND SAFET Y WARNINGS *IF EQUIPPED
AUDIO SYSTEMS
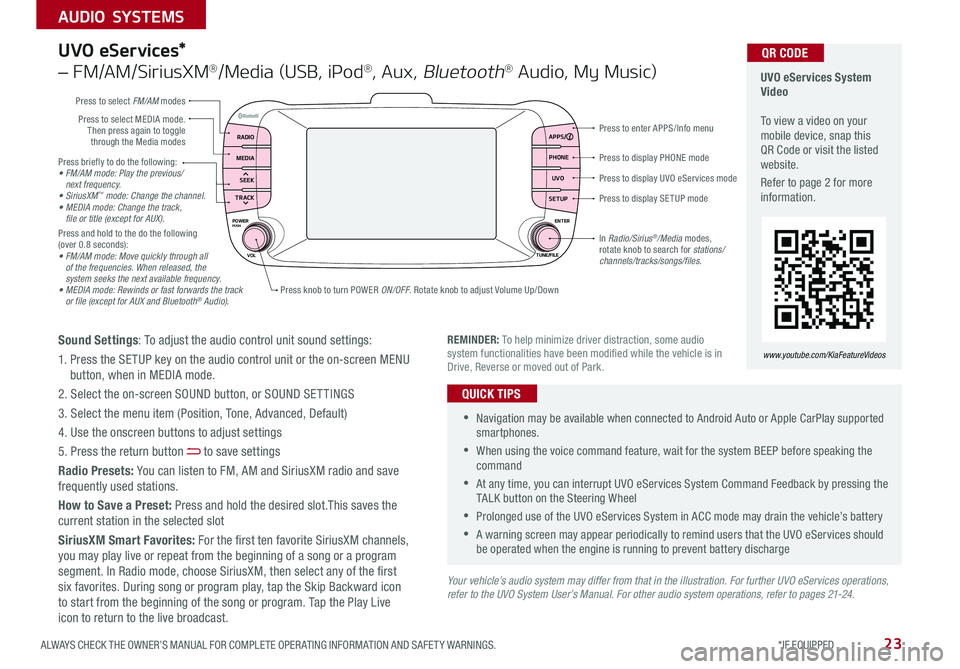
Press briefly to do the following:• FM/AM mode: Play the previous/ next frequency.• SiriusXM™ mode: Change the channel.• MEDIA mode: Change the track, file or title (except for AUX).Press and hold to the do the following (over 0 8 seconds):• FM/AM mode: Move quickly through all of the frequencies. When released, the system seeks the next available frequency.• MEDIA mode: Rewinds or fast forwards the track or file (except for AUX and Bluetooth® Audio).
Press to display PHONE mode
Press to enter APPS/Info menu
Press to display SE TUP mode
Press to display UVO eServices mode
Press knob to turn POWER ON/OFF Rotate knob to adjust Volume Up/Down
Press to select MEDIA mode Then press again to toggle through the Media modes
Press to select FM/AM modes
In Radio/Sirius®/Media modes, rotate knob to search for stations/ channels/tracks/songs/files.
UVO eServices System Video To view a video on your mobile device, snap this QR Code or visit the listed website
Refer to page 2 for more information
QR CODE
www.youtube.com/KiaFeatureVideosREMINDER: To help minimize driver distraction, some audio system functionalities have been modified while the vehicle is in Drive, Reverse or moved out of Park
RADIO APPS/
PHONE
UVO
SETUP
MEDIA
SEEK
TRACK
POWER ENTER
TUNE/FILE
VOLPUSH
UVO eServices*
– FM/AM/SiriusXM®/Media (USB, iPod®, Aux, Bluetooth® Audio, My Music)
Sound Settings: To adjust the audio control unit sound settings:
1 Press the SETUP key on the audio control unit or the on-screen MENU button, when in MEDIA mode
2 Select the on-screen SOUND button, or SOUND SET TINGS
3 Select the menu item (Position, Tone, Advanced, Default)
4 Use the onscreen buttons to adjust settings
5 Press the return button to save settings
Radio Presets: You can listen to FM, AM and SiriusXM radio and save frequently used stations
How to Save a Preset: Press and hold the desired slot This saves the current station in the selected slot
SiriusXM Smart Favorites: For the first ten favorite SiriusXM channels, you may play live or repeat from the beginning of a song or a program segment In Radio mode, choose SiriusXM, then select any of the first six favorites During song or program play, tap the Skip Backward icon to start from the beginning of the song or program Tap the Play Live icon to return to the live broadcast
•Navigation may be available when connected to Android Auto or Apple CarPlay supported smartphones
•When using the voice command feature, wait for the system BEEP before speaking the command
•At any time, you can interrupt UVO eServices System Command Feedback by pressing the TALK button on the Steering Wheel
•Prolonged use of the UVO eServices System in ACC mode may drain the vehicle’s battery
•A warning screen may appear periodically to remind users that the UVO eServices should be operated when the engine is running to prevent battery discharge
QUICK TIPS
Your vehicle’s audio system may differ from that in the illustration. For further UVO eServices operations, refer to the UVO System User’s Manual. For other audio system operations, refer to pages 21-24.
Page 26 of 50
SOUL FEATURES & FUNCTIONS GUIDE24*IF EQUIPPED
AUDIO SYSTEMS
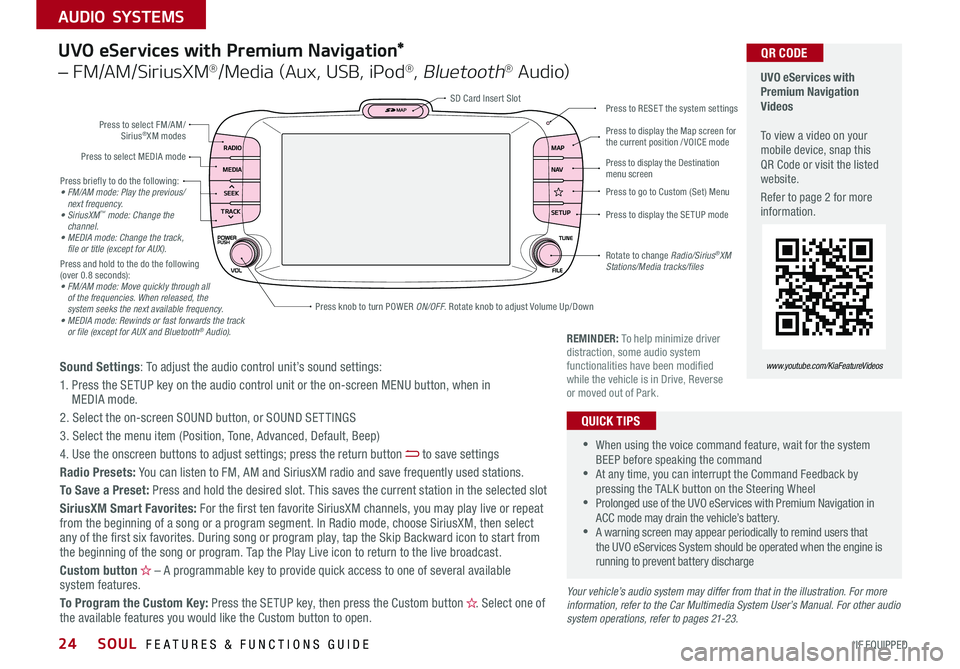
Press briefly to do the following:• FM/AM mode: Play the previous/ next frequency.• SiriusXM™ mode: Change the channel.• MEDIA mode: Change the track, file or title (except for AUX).Press and hold to the do the following (over 0 8 seconds):• FM/AM mode: Move quickly through all of the frequencies. When released, the system seeks the next available frequency.• MEDIA mode: Rewinds or fast forwards the track or file (except for AUX and Bluetooth® Audio).
RADIO
SETUP N AV MAP
MEDIA
SEEK
TRACK
Press to select FM/AM/ Sirius®XM modes
Press to select MEDIA mode
Rotate to change Radio/Sirius®XM Stations/Media tracks/files
Press to display the Map screen for the current position / VOICE mode
Press to RESE T the system settingsSD Card Insert Slot
Press to display the Destination menu screen
Press to display the SE TUP mode
UVO eServices with Premium Navigation Videos To view a video on your mobile device, snap this QR Code or visit the listed website
Refer to page 2 for more information
QR CODE
www.youtube.com/KiaFeatureVideosSound Settings: To adjust the audio control unit’s sound settings:
1 Press the SETUP key on the audio control unit or the on-screen MENU button, when in MEDIA mode
2 Select the on-screen SOUND button, or SOUND SET TINGS
3 Select the menu item (Position, Tone, Advanced, Default, Beep)
4 Use the onscreen buttons to adjust settings; press the return button to save settings
Radio Presets: You can listen to FM, AM and SiriusXM radio and save frequently used stations
To Save a Preset: Press and hold the desired slot This saves the current station in the selected slot
SiriusXM Smart Favorites: For the first ten favorite SiriusXM channels, you may play live or repeat from the beginning of a song or a program segment In Radio mode, choose SiriusXM, then select any of the first six favorites During song or program play, tap the Skip Backward icon to start from the beginning of the song or program Tap the Play Live icon to return to the live broadcast
Custom button – A programmable key to provide quick access to one of several available system features
To Program the Custom Key: Press the SETUP key, then press the Custom button Select one of the available features you would like the Custom button to open
UVO eServices with Premium Navigation*
– FM/AM/SiriusXM®/Media (Aux, USB, iPod®, Bluetooth® Au d io)
•
•When using the voice command feature, wait for the system BEEP before speaking the command •At any time, you can interrupt the Command Feedback by pressing the TALK button on the Steering Wheel •Prolonged use of the UVO eServices with Premium Navigation in ACC mode may drain the vehicle’s battery •A warning screen may appear periodically to remind users that the UVO eServices System should be operated when the engine is running to prevent battery discharge
QUICK TIPS
Your vehicle’s audio system may differ from that in the illustration. For more information, refer to the Car Multimedia System User’s Manual. For other audio system operations, refer to pages 21-23.
Press knob to turn POWER ON/OFF Rotate knob to adjust Volume Up/Down
REMINDER: To help minimize driver distraction, some audio system functionalities have been modified while the vehicle is in Drive, Reverse or moved out of Park
Press to go to Custom (Set) Menu
Page 27 of 50
25ALWAYS CHECK THE OWNER’S MANUAL FOR COMPLETE OPER ATING INFORMATION AND SAFET Y WARNINGS *IF EQUIPPED
CENTER PANEL
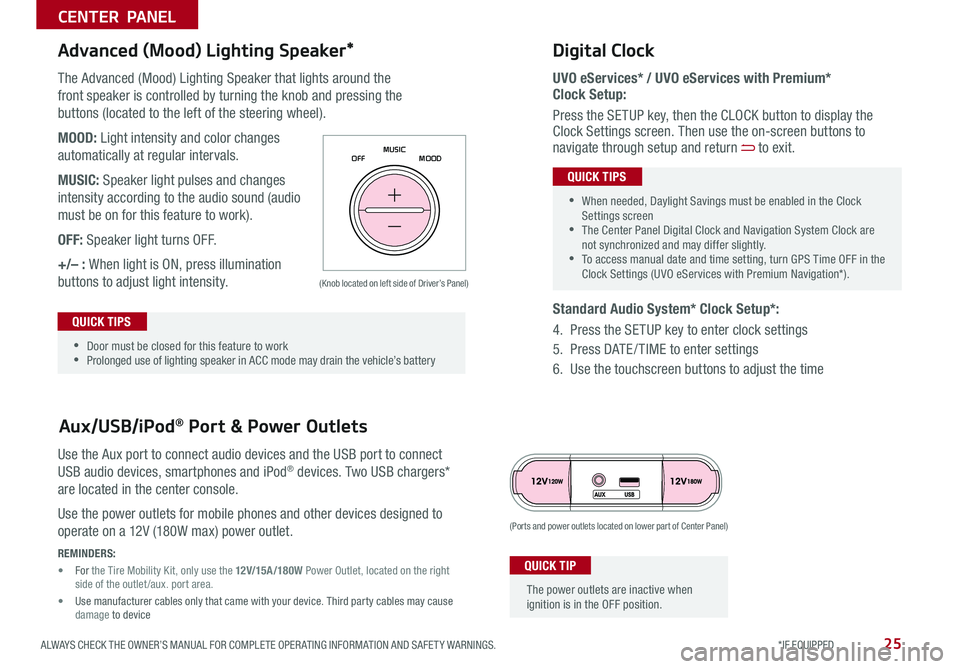
The Advanced (Mood) Lighting Speaker that lights around the
front speaker is controlled by turning the knob and pressing the
buttons (located to the left of the steering wheel)
MOOD: Light intensity and color changes
automatically at regular intervals
MUSIC: Speaker light pulses and changes
intensity according to the audio sound (audio
must be on for this feature to work)
OFF: Speaker light turns OFF
+/– : When light is ON, press illumination
buttons to adjust light intensity
Use the Aux port to connect audio devices and the USB port to connect
USB audio devices, smartphones and iPod® devices Two USB chargers*
are located in the center console
Use the power outlets for mobile phones and other devices designed to
operate on a 12V (180W max) power outlet
Aux/USB/iPod® Port & Power Outlets
Digital Clock
UVO eServices* / UVO eServices with Premium* Clock Setup:
Press the SETUP key, then the CLOCK button to display the Clock Settings screen Then use the on-screen buttons to navigate through setup and return to exit
Standard Audio System* Clock Setup*:
4 Press the SETUP key to enter clock settings
5 Press DATE / TIME to enter settings
6 Use the touchscreen buttons to adjust the time
Advanced (Mood) Lighting Speaker*
OFF MOOD
MUSIC
REMINDERS:
• For the Tire Mobility Kit, only use the 12V/15A/180W Power Outlet, located on the right side of the outlet /aux
port area
• Use manufacturer cables only that came with your device Third party cables may cause damage to device
(Ports and power outlets located on lower part of Center Panel)
(Knob located on left side of Driver’s Panel)
The power outlets are inactive when ignition is in the OFF position
QUICK TIP
•
•Door must be closed for this feature to work •Prolonged use of lighting speaker in ACC mode may drain the vehicle’s battery
QUICK TIPS
•
•When needed, Daylight Savings must be enabled in the Clock Settings screen •The Center Panel Digital Clock and Navigation System Clock are not synchronized and may differ slightly •To access manual date and time setting, turn GPS Time OFF in the Clock Settings (UVO eServices with Premium Navigation*)
QUICK TIPS
Page 28 of 50
SOUL FEATURES & FUNCTIONS GUIDE26*IF EQUIPPED
Automatic Climate Control*
(Type B)
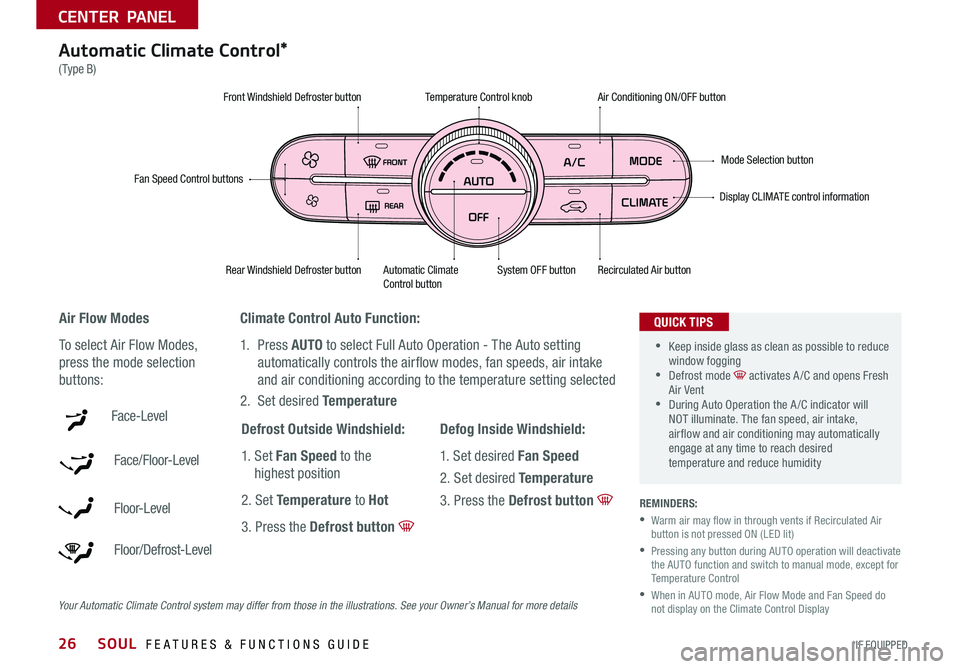
Climate Control Auto Function:
1 Press AUTO to select Full Auto Operation - The Auto setting
automatically controls the airflow modes, fan speeds, air intake
and air conditioning according to the temperature setting selected
2 Set desired Temperature
REMINDERS:
•
Warm air may flow in through vents if Recirculated Air button is not pressed ON (LED lit)
•
Pressing any button during AUTO operation will deactivate the AUTO function and switch to manual mode, except for Temperature Control
•
When in AUTO mode, Air Flow Mode and Fan Speed do not display on the Climate Control Display
Air Flow Modes
To select Air Flow Modes,
press the mode selection
buttons:
Face-Level
Face/Floor-Level
F lo o r- L evel
Floor/Defrost-Level
Fan Speed Control buttons
Mode Selection button
Display CLIMATE control information
Rear Windshield Defroster buttonAutomatic Climate Control button Recirculated Air button
Front Windshield Defroster buttonAir Conditioning ON/OFF button
Temperature Control knob
System OFF button
•
•Keep inside glass as clean as possible to reduce window fogging •Defrost mode activates A /C and opens Fresh Air Vent •During Auto Operation the A /C indicator will NOT illuminate The fan speed, air intake, air flow and air conditioning may automatically engage at any time to reach desired temperature and reduce humidity
QUICK TIPS
Defrost Outside Windshield:
1 Set Fan Speed to the
highest position
2 Set Temperature to Hot
3 Press the Defrost button
Defog Inside Windshield:
1 Set desired Fan Speed
2 Set desired Temperature
3 Press the Defrost button
Your Automatic Climate Control system may differ from those in the illustrations. See your Owner’s Manual for more details
CENTER PANEL
Page 29 of 50
27ALWAYS CHECK THE OWNER’S MANUAL FOR COMPLETE OPER ATING INFORMATION AND SAFET Y WARNINGS *IF EQUIPPED
CENTER PANEL
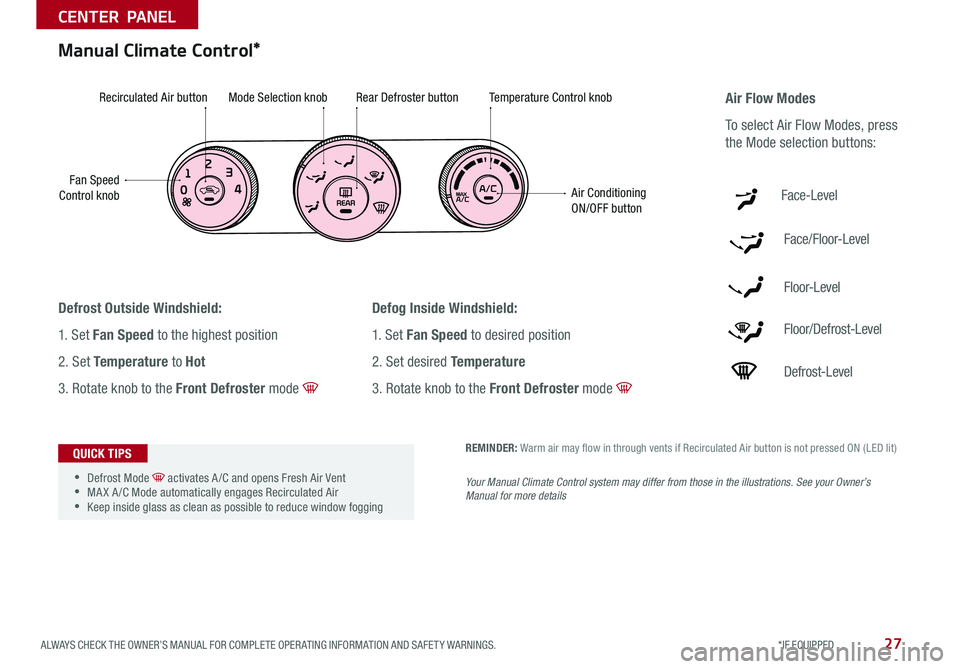
Manual Climate Control*
Defrost Outside Windshield:
1 Set Fan Speed to the highest position
2 Set Temperature to Hot
3 Rotate knob to the Front Defroster mode
Defog Inside Windshield:
1 Set Fan Speed to desired position
2 Set desired Temperature
3 Rotate knob to the Front Defroster mode
Fan Speed Control knob
Recirculated Air buttonMode Selection knobRear Defroster buttonTemperature Control knob
Air Conditioning ON/OFF button
REMINDER: Warm air may flow in through vents if Recirculated Air button is not pressed ON (LED lit)
Your Manual Climate Control system may differ from those in the illustrations. See your Owner’s Manual for more details
Air Flow Modes
To select Air Flow Modes, press
the Mode selection buttons:
Face-Level
Face/Floor-Level
F lo o r- L evel
Floor/Defrost-Level
Defrost-Level
•
•Defrost Mode activates A /C and opens Fresh Air Vent •MA X A /C Mode automatically engages Recirculated Air •Keep inside glass as clean as possible to reduce window fogging
QUICK TIPS