2018 KIA SOUL EV lights
[x] Cancel search: lightsPage 5 of 496
2
1
Table of contents
3
4
5
6
7
8I
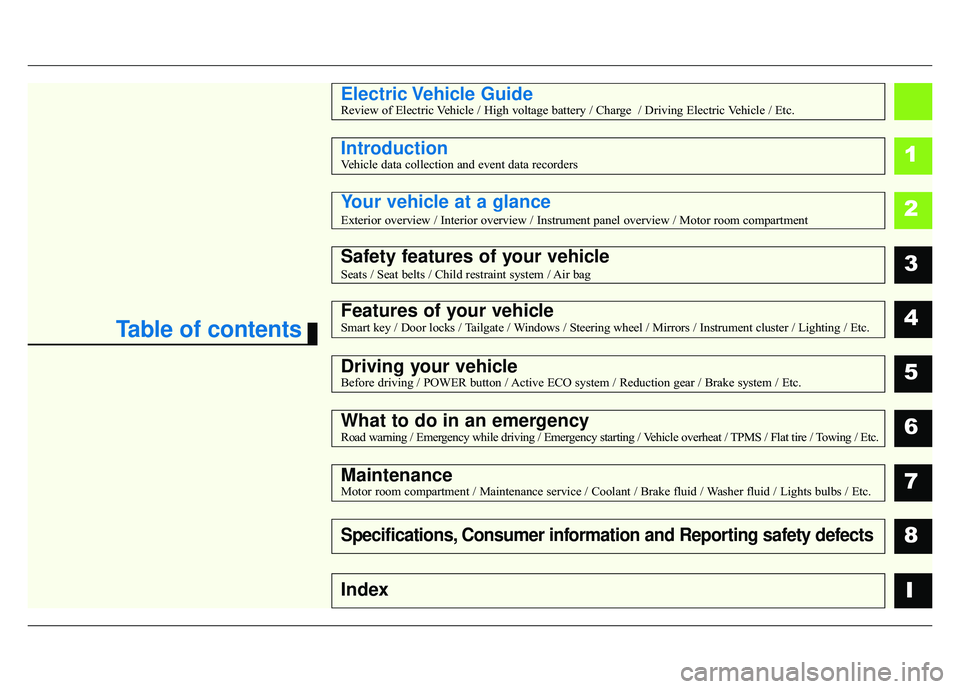
IntroductionVehicle data collection and event data recorders
Electric Vehicle GuideReview of Electric Vehicle / High voltage battery / Charge / Driving Electric Vehicle / Etc.
Your vehicle at a glance
Exterior overview / Interior overview / Instrument panel overview / Moto\
r room compartment
Safety features of your vehicle
Seats / Seat belts / Child restraint system / Air bag
Features of your vehicleSmart key / Door locks / Tailgate / Windows / Steering wheel / Mirrors / Instrument cluster / Lighting / Etc.
Driving your vehicleBefore driving / POWER button / Active ECO system / Reduction gear / Brake system / Etc.
What to do in an emergencyRoad warning / Emergency while driving / Emergency starting / Vehicle overheat / TPMS / Flat tire / Towing / Etc.
MaintenanceMotor room compartment / Maintenance service / Coolant / Brake fluid / Washer fluid / Lights bulbs / Etc.
Specifications, Consumer information and Reporting safety defects
Index
Page 9 of 496
4
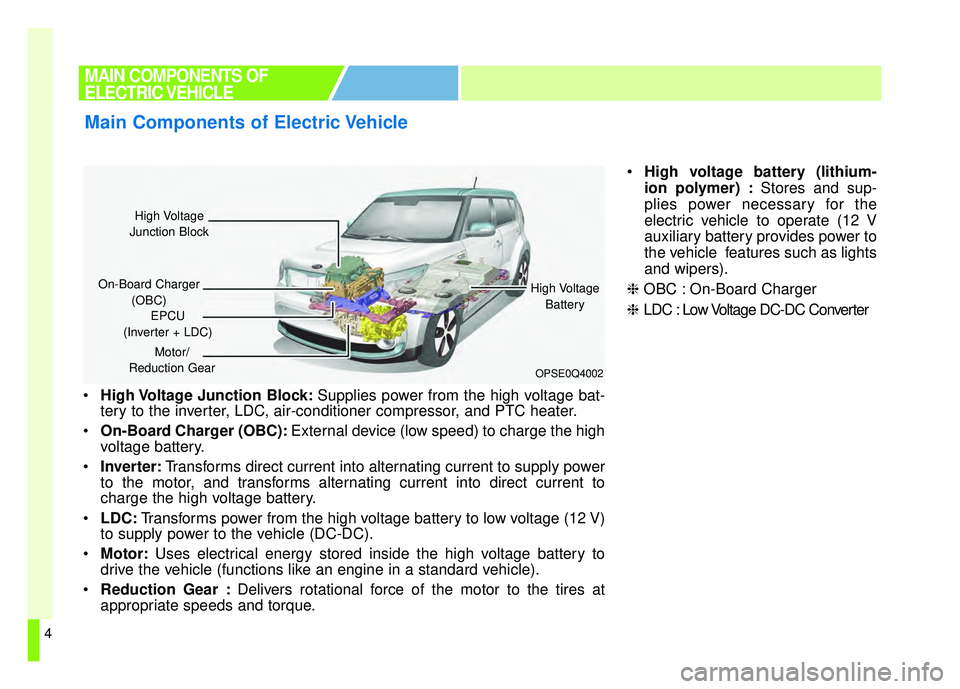
High Voltage Junction Block: Supplies power from the high voltage bat-
tery to the inverter, LDC, air-conditioner compressor, and PTC heater.
On-Board Charger (OBC): External device (low speed) to charge the high
voltage battery.
Inverter: Transforms direct current into alternating current to supply power
to the motor, and transforms alternating current into direct current to
charge the high voltage battery.
LDC: Transforms power from the high voltage battery to low voltage (12 V)
to supply power to the vehicle (DC-DC).
Motor: Uses electrical energy stored inside the high voltage battery to
drive the vehicle (functions like an engine in a standard vehicle).
Reduction Gear : Delivers rotational force of the motor to the tires at
appropriate speeds and torque.
High voltage battery (lithium-
ion polymer) : Stores and sup-
plies power necessary for the
electric vehicle to operate (12 V
auxiliary battery provides power to
the vehicle features such as lights
and wipers).
❈ OBC : On-Board Charger
❈ LDC : Low Voltage DC-DC Converter
MAIN COMPONENTS OF
ELECTRIC VEHICLE
Main Components of Electric Vehicle
OPSE0Q4002
High Voltage
Junction Block
On-Board Charger (OBC) High Voltage
Battery
EPCU
(Inverter + LDC)
Motor/
Reduction Gear
Page 71 of 496
Your vehicle at a glance
42
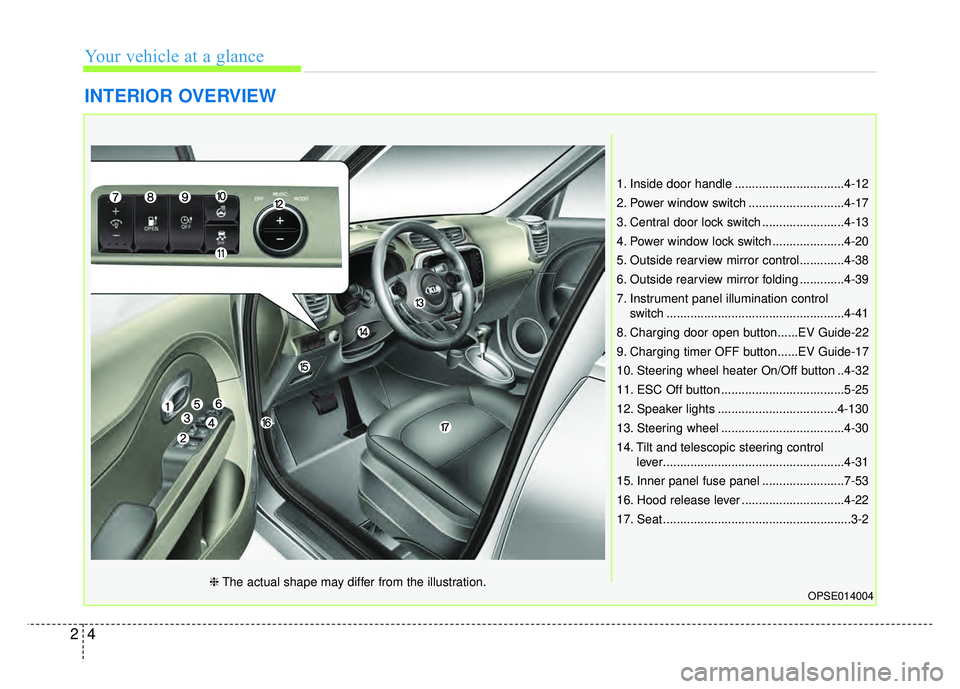
INTERIOR OVERVIEW
1. Inside door handle ................................4-12
2. Power window switch ............................4-17
3. Central door lock switch ........................4-13
4. Power window lock switch .....................4-20
5. Outside rearview mirror control.............4-38
6. Outside rearview mirror folding .............4-39
7. Instrument panel illumination controlswitch ....................................................4-41
8. Charging door open button......EV Guide-22
9. Charging timer OFF button......EV Guide-17
10. Steering wheel heater On/Off button ..4-32
11. ESC Off button ....................................5-25
12. Speaker lights ...................................4-130
13. Steering wheel ....................................4-30
14. Tilt and telescopic steering control lever.....................................................4-31
15. Inner panel fuse panel ........................7-53
16. Hood release lever ..............................4-22
17. Seat .......................................................3-2
OPSE014004❈ The actual shape may differ from the illustration.
Page 133 of 496
. . . . . . . . . . . . . . . . . . . . . . . . . . . . . . . . . . . 4-\
48
. . . . . . . . . . . . . . . . . . . . . . . . . . . . . . . . 4-48
. . . . . . . . . . . . . . . . . . . . . . . . . . . 4-49
. . . . . . . . . . . . . . . . . . . . . . . . . . . . 4-52
Trip computer . . . . . . . . . . . . . . . . . . . . . . . . . . . . . 4-61
. . . . . . . . . . . . . . . . . . . . . . . . . . 4-61
. . . . . . . . . . . . . . . . . . . . . . . . . . . . . . . . . . . . \
4-62
. . . . . . . . . . . . . . . . . . . . . . . . . . . . . . . . . . . . \
. . 4-64
Warning and indicator lights . . . . . . . . . . . . . . . . 4-65
. . . . . . . . . . . . . . . . . . . . . . . . . . . . . . . 4-65
. . . . . . . . . . . . . . . . . . . . . . . . . . . . . . 4-72
Parking assist system . . . . . . . . . . . . . . . . . . . . . . . 4-76
. . . . . . . . . . . 4-76
. . 4-78
. . . . . . . . . . . . . . . . . . . . . . . . . . . . . . . . 4-79
Rear camera display . . . . . . . . . . . . . . . . . . . . . . . 4-80
Lighting . . . . . . . . . . . . . . . . . . . . . . . . . . . . . . . . . . 4-81\
. . . . . . . . . . . . . . . . . . . . . . . . . . . . . 4-81
. . . . . . . . . . . . . . . . . . . . . . . . . 4-81
. . . . . . . . . . . . . . . . . . . . . 4-82
electric control system . . . . . . . . . . . . . . . . . . . . . . . 4-82 . . . . . . . . . . . . . . . . . . . . . . . . . . . . . . 4-82
. . . . . . . . . . . . . . . . . . . . . . . . . 4-84
. . . . . . . . . . . . 4-85
. . . . . . . . . . . . . . . . . . . . . . . . . . . . . . . 4-86
Wipers and washers . . . . . . . . . . . . . . . . . . . . . . . . 4-87
. . . . . . . . . . . . . . . . . . . . . . 4-87
. . . . . . . . . . . . . . . . . . . . 4-87
. . . . . . . . . . . . . . . . . . . . . . . . . . . . 4-87
. . . . . . . . . . 4-89
Interior light . . . . . . . . . . . . . . . . . . . . . . . . . . . . . . 4-90
. . . . . . . . . . . . . . . . . . . . . . . 4-90
. . . . . . . . . . . . . . . . . . . . . . . . . . . . . . . . . . 4-90\
. . . . . . . . . . . . . . . . . . . . . . . . . . . . . . . . . . 4-91\
. . . . . . . . . . . . . . . . . . . . . . . . . . 4-92
. . . . . . . . . . . . . . . . . . . . . . . . . . . . . . 4-92
. . . . . . . . . . . . . . . . . . . . . . . . . . . 4-92
Defroster . . . . . . . . . . . . . . . . . . . . . . . . . . . . . . . . . 4-93
. . . . . . . . . . . . . . . . . . . . . . . . 4-93
Automatic climate control system. . . . . . . . . . . . . 4-94
. . . . . . . . . . 4-95
. . . . . . . . . . . . 4-96
. . . . . . . . . . . . . . . . . . . . . . . . 4-106
. . . . . . . . . . . . . . . . . . . . . . . . . . . . 4-107
. . . . . . . . . . . . . . . . . . . . . . 4-109
4
Page 136 of 496
45
Features of your vehicle
Door Lock
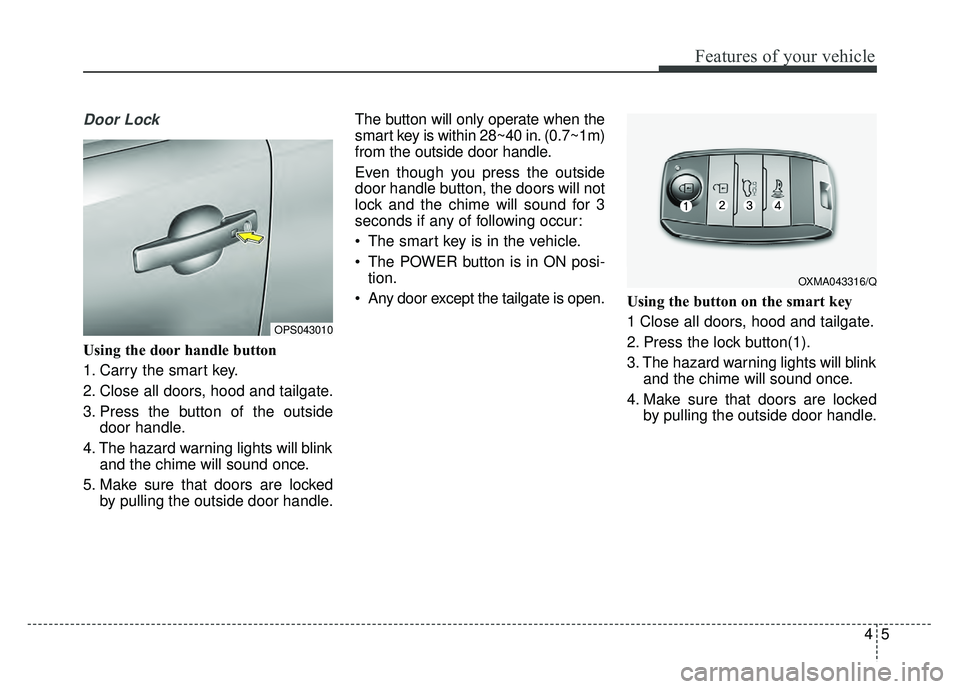
Using the door handle button
1. Carry the smart key.
2. Close all doors, hood and tailgate.
3. Press the button of the outsidedoor handle.
4. The hazard warning lights will blink and the chime will sound once.
5. Make sure that doors are locked by pulling the outside door handle. The button will only operate when the
smart key is within 28~40 in. (0.7~1m)
from the outside door handle.
Even though you press the outside
door handle button, the doors will not
lock and the chime will sound for 3
seconds if any of following occur:
• The smart key is in the vehicle.
The POWER button is in ON posi-
tion.
Any door except the tailgate is open. Using the button on the smart key
1 Close all doors, hood and tailgate.
2. Press the lock button(1).
3. The hazard warning lights will blink
and the chime will sound once.
4. Make sure that doors are locked by pulling the outside door handle.
OXMA043316/Q
OPS043010
Page 137 of 496
Features of your vehicle
64
Unlocking
Using the door handle button
1. Carry the smart key.
2. Press the button of the driver'soutside door handle.
3. The driver’s door will unlock. The hazard warning lights will blink and
the chime will sound two times.
4. Press the button twice within 4 seconds and all doors and the tail-
gate will unlock and the hazard
warning lights will blink and the
chime will sound two times.
The button will only operate when the smart key is within 28~40 in.
(0.7~1m) from the outside door
handle.
When the smart key is recognized in the area of 28~40 in. (0.7~1m)
from the front outside door handle,
other people can also open the
doors.
After unlocking the driver’s door or all doors, the door(s) will lock auto-
matically unless the door is
opened. Using the button on the smart key
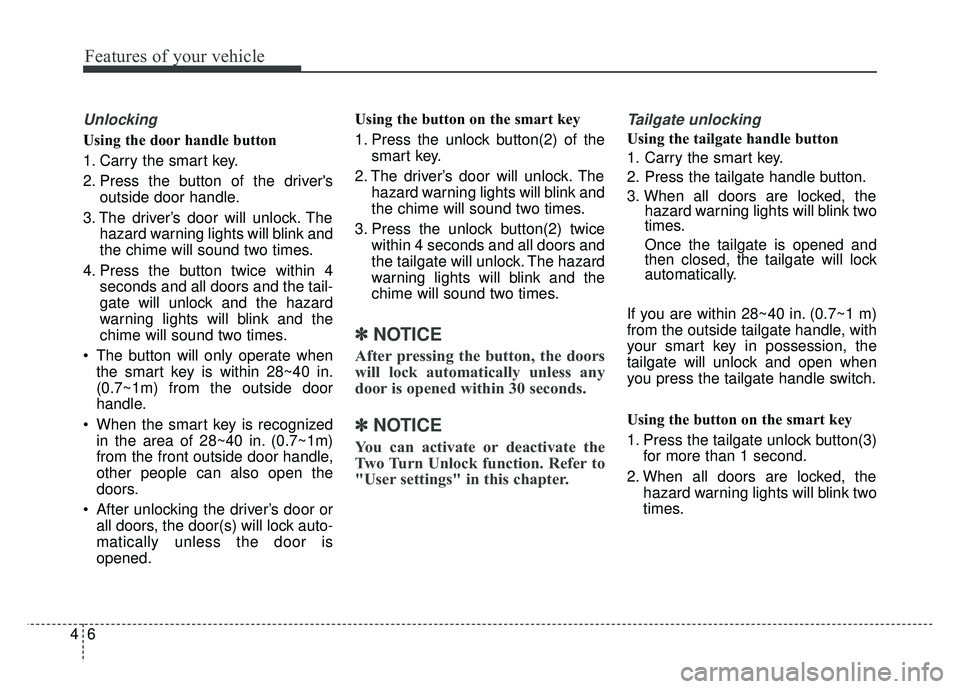
1. Press the unlock button(2) of the
smart key.
2. The driver’s door will unlock. The hazard warning lights will blink and
the chime will sound two times.
3. Press the unlock button(2) twice within 4 seconds and all doors and
the tailgate will unlock. The hazard
warning lights will blink and the
chime will sound two times.
✽ ✽NOTICE
After pressing the button, the doors
will lock automatically unless any
door is opened within 30 seconds.
✽ ✽NOTICE
You can activate or deactivate the
Two Turn Unlock function. Refer to
"User settings" in this chapter.
Tailgate unlocking
Using the tailgate handle button
1. Carry the smart key.
2. Press the tailgate handle button.
3. When all doors are locked, the
hazard warning lights will blink two
times.
Once the tailgate is opened and
then closed, the tailgate will lock
automatically.
If you are within 28~40 in. (0.7~1 m)
from the outside tailgate handle, with
your smart key in possession, the
tailgate will unlock and open when
you press the tailgate handle switch.
Using the button on the smart key
1. Press the tailgate unlock button(3) for more than 1 second.
2. When all doors are locked, the hazard warning lights will blink two
times.
Page 162 of 496
431
Features of your vehicle
(Continued)
• When you operate the steeringwheel in low temperature, abnor-
mal noise may occur. If tempera-
ture rises, the noise will likely dis-
appear. This is a normal condition.
• When the charging system warn- ing light comes on due to the low
voltage (When the alternator or
battery) does not operate normal-
ly or it malfunctions), the steering
wheel may require increased
steering effort.Tilt and telescopic steering
Tilt and telescopic steering allows
you to adjust the steering wheel
before you drive. You can also raise it
to give your legs more room when
you exit and enter the vehicle.
The steering wheel should be posi-
tioned so that it is comfortable for
you to drive, while permitting you to
see the instrument panel warning
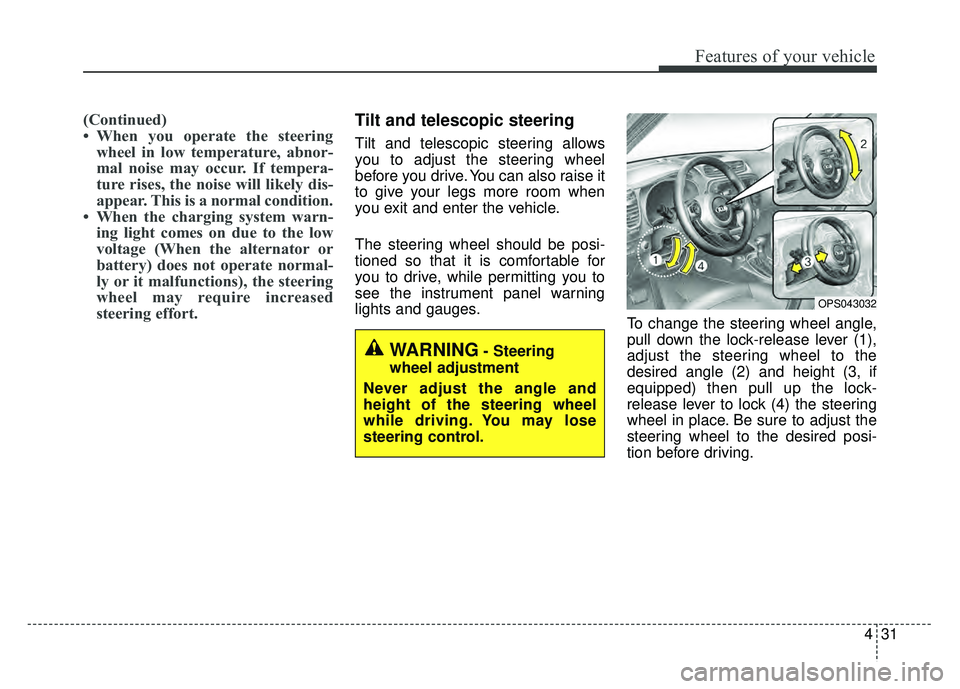
lights and gauges. To change the steering wheel angle,
pull down the lock-release lever (1),
adjust the steering wheel to the
desired angle (2) and height (3, if
equipped) then pull up the lock-
release lever to lock (4) the steering
wheel in place. Be sure to adjust the
steering wheel to the desired posi-
tion before driving.
OPS043032
WARNING- Steering
wheel adjustment
Never adjust the angle and
height of the steering wheel
while driving. You may lose
steering control.
Page 166 of 496
435
Features of your vehicle
MIRRORS
Inside rearview mirror
Adjust the rearview mirror so that the
center view through the rear window
is seen. Make this adjustment before
you start driving.
Do not place objects in the rear seat or
cargo area which would interfere with
your vision through the rear window.
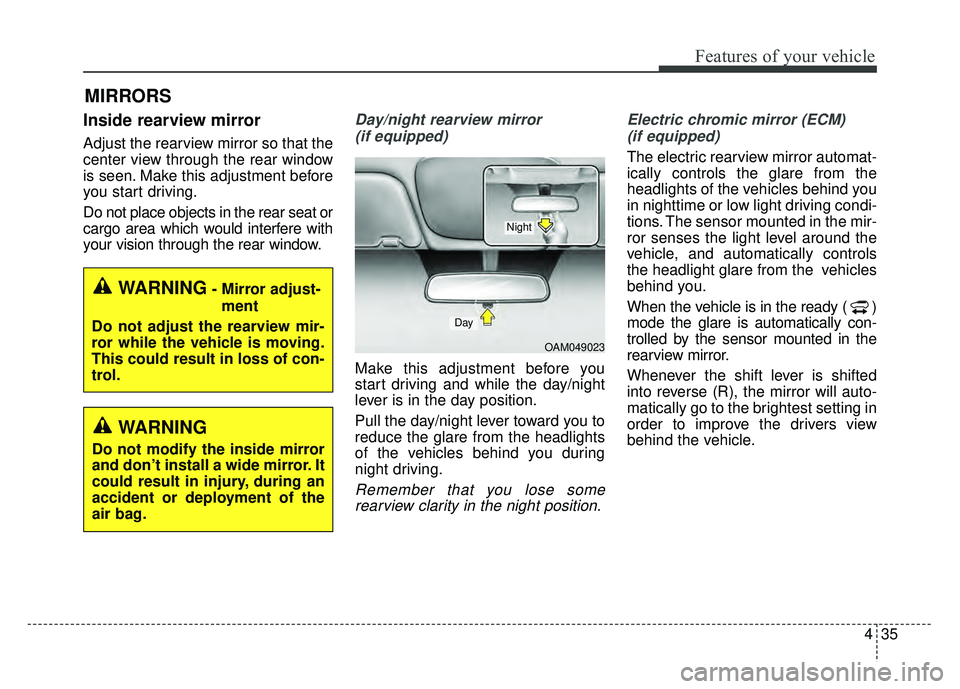
Day/night rearview mirror (if equipped)
Make this adjustment before you
start driving and while the day/night
lever is in the day position.
Pull the day/night lever toward you to
reduce the glare from the headlights
of the vehicles behind you during
night driving.
Remember that you lose somerearview clarity in the night position. Electric chromic mirror (ECM)
(if equipped)
The electric rearview mirror automat-
ically controls the glare from the
headlights of the vehicles behind you
in nighttime or low light driving condi-
tions. The sensor mounted in the mir-
ror senses the light level around the
vehicle, and automatically controls
the headlight glare from the vehicles
behind you.
When the vehicle is in the ready ( )
mode the glare is automatically con-
trolled by the sensor mounted in the
rearview mirror.
Whenever the shift lever is shifted
into reverse (R), the mirror will auto-
matically go to the brightest setting in
order to improve the drivers view
behind the vehicle.
OAM049023
Day
Night
WARNING- Mirror adjust- ment
Do not adjust the rearview mir-
ror while the vehicle is moving.
This could result in loss of con-
trol.
WARNING
Do not modify the inside mirror
and don’t install a wide mirror. It
could result in injury, during an
accident or deployment of the
air bag.