2018 KIA SOUL EV change key battery
[x] Cancel search: change key batteryPage 140 of 496

49
Features of your vehicle
This device complies with Part 15
of the FCC rules.
Operation is subject to the following
two conditions:
1. This device may not cause harm-ful interference, and
2. This device must accept any inter- ference received, including inter-
ference that may cause undesired
operation.
✽ ✽NOTICE
Changes or modifications not
expressly approved by the party
responsible for compliance could void
the user’s authority to operate the
equipment. If the keyless entry sys-
tem is inoperative due to changes or
modifications not expressly approved
by the party responsible for compli-
ance, it will not be covered by your
manufacturer’s vehicle warranty.
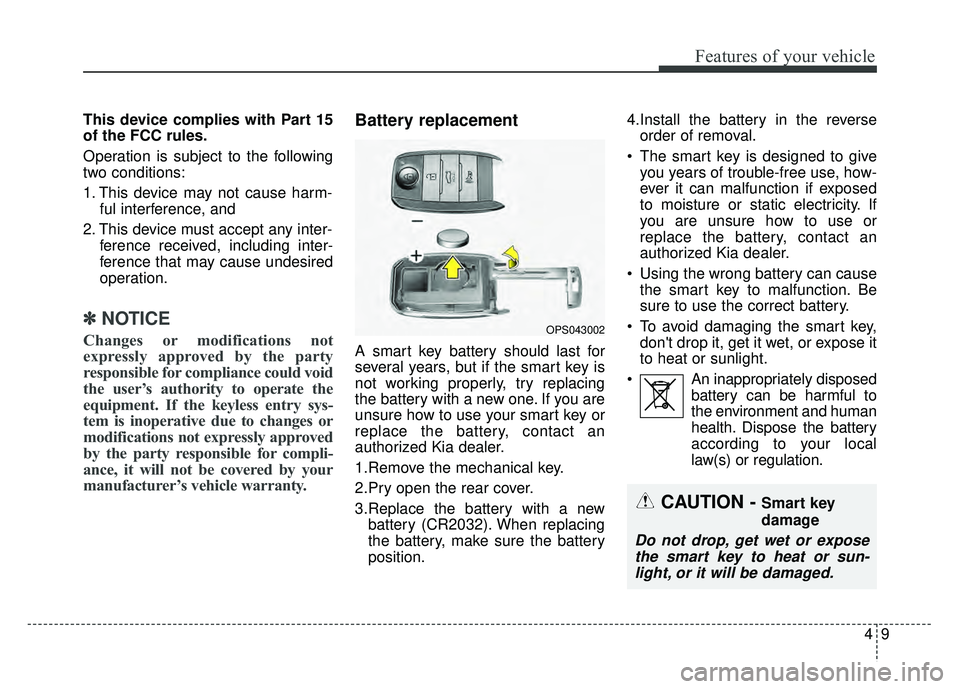
Battery replacement
A smart key battery should last for
several years, but if the smart key is
not working properly, try replacing
the battery with a new one. If you are
unsure how to use your smart key or
replace the battery, contact an
authorized Kia dealer.
1.Remove the mechanical key.
2.Pry open the rear cover.
3.Replace the battery with a new
battery (CR2032). When replacing
the battery, make sure the battery
position. 4.Install the battery in the reverse
order of removal.
The smart key is designed to give you years of trouble-free use, how-
ever it can malfunction if exposed
to moisture or static electricity. If
you are unsure how to use or
replace the battery, contact an
authorized Kia dealer.
Using the wrong battery can cause the smart key to malfunction. Be
sure to use the correct battery.
To avoid damaging the smart key, don't drop it, get it wet, or expose it
to heat or sunlight.
An inappropriately disposed battery can be harmful to
the environment and human
health. Dispose the battery
according to your local
law(s) or regulation.
OPS043002
CAUTION - Smart key
damage
Do not drop, get wet or exposethe smart key to heat or sun-light, or it will be damaged.
Page 188 of 496

457
Features of your vehicle
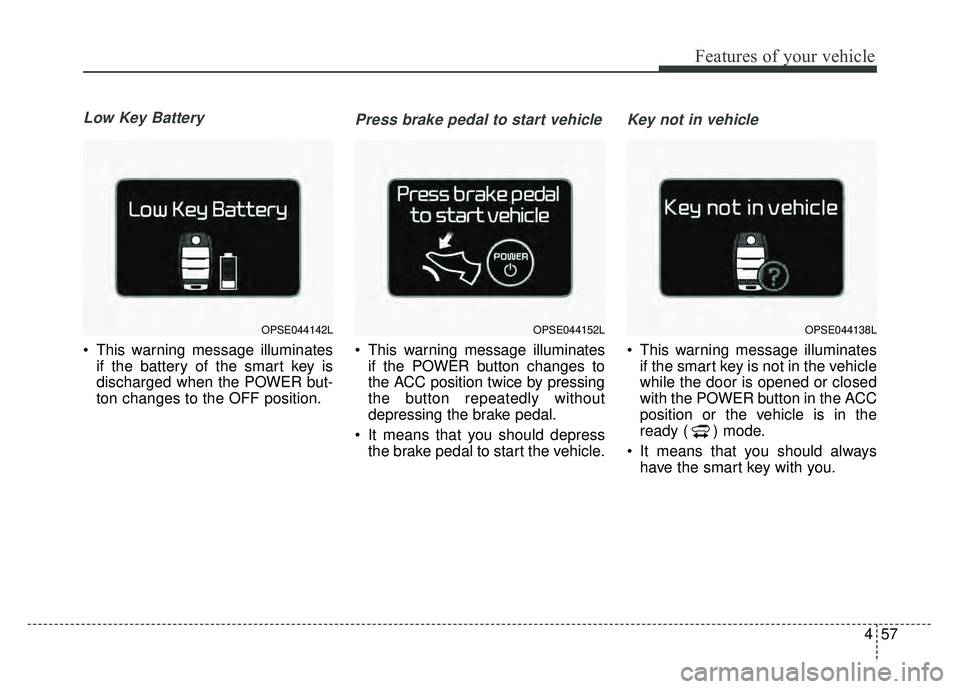
Low Key Battery
This warning message illuminatesif the battery of the smart key is
discharged when the POWER but-
ton changes to the OFF position.
Press brake pedal to start vehicle
This warning message illuminatesif the POWER button changes to
the ACC position twice by pressing
the button repeatedly without
depressing the brake pedal.
It means that you should depress the brake pedal to start the vehicle.
Key not in vehicle
This warning message illuminatesif the smart key is not in the vehicle
while the door is opened or closed
with the POWER button in the ACC
position or the vehicle is in the
ready ( ) mode.
It means that you should always have the smart key with you.
OPSE044142LOPSE044152LOPSE044138L
Page 317 of 496

55
Driving your vehicle
Illuminated POWER button
Whenever the front door is opened,
the POWER button will illuminate for
your convenience. The light will go off
after about 30 seconds when the
door is closed.
When all entrances are closed, if you
lock the vehicle by using the smart
key, the light will go off immediately.
POWER button position
OFF
To turn off the vehicle, press the
POWER button with the shift lever in
the P (Park) position. When you
press the POWER button without the
shift lever in the P (Park) position, the
POWER button will not change to the
OFF position but to the ACC posi-
tion.
In an emergency situation while the
vehicle is in motion, you are able to
turn the vehicle off and to the ACC
position by pressing the POWER
button for more than 2 seconds or 3
times successively within 3 seconds.
If the vehicle is still moving, you can
restart the vehicle without depress-
ing the brake pedal by pressing the
POWER button with the shift lever in
the N (Neutral) position.
ACC (Accessory)
Press the POWER button while it is
in the OFF position without depress-
ing the brake pedal.
If the POWER button is in the ACC
position for more than 1 hour, the
POWER button is turned off auto-
matically to prevent battery dis-
charge.
POWER BUTTON
OPSE054001
Not illuminatedAmber
Page 490 of 496

Index
6I
Interior features. . . . . . . . . . . . . . . . . . . . . . . . . . . . . . 4-118Cargo area cover. . . . . . . . . . . . . . . . . . . . . . . . . . . 4-126
Clothes hanger . . . . . . . . . . . . . . . . . . . . . . . . . . . . 4-124
Cup holder . . . . . . . . . . . . . . . . . . . . . . . . . . . . . . . 4-118
Floor mat anchor(s) . . . . . . . . . . . . . . . . . . . . . . . . 4-124
Luggage net (holder) . . . . . . . . . . . . . . . . . . . . . . . 4-125
Power outlet . . . . . . . . . . . . . . . . . . . . . . . . . . . . . . 4-123
Rear seat warmer . . . . . . . . . . . . . . . . . . . . . . . . . . 4-122
Seat air ventilation . . . . . . . . . . . . . . . . . . . . . . . . . 4-121
Seat warmer . . . . . . . . . . . . . . . . . . . . . . . . . . . . . . 4-119
Sunvisor . . . . . . . . . . . . . . . . . . . . . . . . . . . . . . . . . 4-119
Interior lamp auto cut . . . . . . . . . . . . . . . . . . . . . . . . . . 4-90
Interior light . . . . . . . . . . . . . . . . . . . . . . . . . . . . . . . . . 4-90 Glove box lamp . . . . . . . . . . . . . . . . . . . . . . . . . . . . 4-92
Interior lamp auto cut . . . . . . . . . . . . . . . . . . . . . . . . 4-90
Luggage room lamp . . . . . . . . . . . . . . . . . . . . . . . . . 4-92
Map lamp . . . . . . . . . . . . . . . . . . . . . . . . . . . . . . . . . 4-90
Room lamp . . . . . . . . . . . . . . . . . . . . . . . . . . . . . . . . 4-91
Vanity mirror lamp . . . . . . . . . . . . . . . . . . . . . . . . . . 4-92
Interior overview. . . . . . . . . . . . . . . . . . . . . . . . . . . . . . . 2-4
Jump starting. . . . . . . . . . . . . . . . . . . . . . . . . . . . . . . . . . 6-5 Label
Air bag warning label. . . . . . . . . . . . . . . . . . . . . . . . 3-57
Air conditioner compressor label . . . . . . . . . . . . . . . . 8-8
Tire sidewall labeling . . . . . . . . . . . . . . . . . . . . . . . . 7-41
Tire specification and pressure label . . . . . . . . . . . . . 8-8
Lane change signals . . . . . . . . . . . . . . . . . . . . . . . . . . . 4-85
Lap/shoulder belt . . . . . . . . . . . . . . . . . . . . . . . . . . . . . 3-15
LCD Display . . . . . . . . . . . . . . . . . . . . . . . . . . . . . . . . . 4-46
LCD Modes . . . . . . . . . . . . . . . . . . . . . . . . . . . . . . . . . 4-46
Light bulbs . . . . . . . . . . . . . . . . . . . . . . . . . . . . . . . . . . 7-63\
Lighting. . . . . . . . . . . . . . . . . . . . . . . . . . . . . . . . . . . . \
. 4-81 Abnormal lamp operation . . . . . . . . . . . . . . . . . . . . 4-82
Battery saver function . . . . . . . . . . . . . . . . . . . . . . . 4-81
Daytime running light . . . . . . . . . . . . . . . . . . . . . . . 4-81
Front fog light . . . . . . . . . . . . . . . . . . . . . . . . . . . . . 4-86
Headlamp escort . . . . . . . . . . . . . . . . . . . . . . . . . . . 4-81
High - beam operation . . . . . . . . . . . . . . . . . . . . . . . 4-84
Lane change signals . . . . . . . . . . . . . . . . . . . . . . . . . 4-85
Lighting control . . . . . . . . . . . . . . . . . . . . . . . . . . . . 4-82
Turn signals . . . . . . . . . . . . . . . . . . . . . . . . . . . . . . . 4-85
Lighting control . . . . . . . . . . . . . . . . . . . . . . . . . . . . . . 4-82 Auto light position . . . . . . . . . . . . . . . . . . . . . . . . . . 4-83
Headlight position . . . . . . . . . . . . . . . . . . . . . . . . . . 4-83
Parking light position . . . . . . . . . . . . . . . . . . . . . . . . 4-83
Loss of the smart key . . . . . . . . . . . . . . . . . . . . . . . . . . . 4-7
Lower anchor system . . . . . . . . . . . . . . . . . . . . . . . . . . 3-32L
J