Page 353 of 496
541
Driving your vehicle
If at all possible, avoid sharp turns or
abrupt maneuvers, do not load your
roof rack with heavy cargo, and
never modify your vehicle in any way.Rocking the vehicle
If it is necessary to rock the vehicle
to free it from snow, sand, or mud,
first turn the steering wheel right and
left to clear the area around your
front wheels. Then, shift back and
forth between R (Reverse) and any
forward gear. Do not race the vehicle,
and spin the wheels as little as pos-
sible. If you are still stuck after a few
tries, have the vehicle pulled out by a
tow vehicle to avoid overheating and
possible damage to the gear.The ESC system should be turned
OFF prior to rocking the vehicle.CAUTION- Vehicle rocking
Prolonged rocking may causeoverheating, gear damage orfailure, and tire damage.
WARNING- Replacement
tires
Always use the size and type of
tires recommended in the tire
section of the manual.
Installation of variant tires can
affect the safety and perform-
ance of your vehicle.
WARNING
- Sudden vehicle movement
Do not attempt to rock the vehi-
cle if people or objects are near-
by. The vehicle may suddenly
move forward or backwards as
it becomes unstuck.
CAUTION- Spinning tires
Do not spin the wheels, espe- cially at speeds more than 35mph (56 km/h). Spinning thewheels at high speeds when thevehicle is stationary couldcause a tire to overheat whichcould result in tire damage thatmay injure bystanders.
Page 360 of 496
Driving your vehicle
48
5
Don't let ice and snow accu-
mulate underneath
Under some conditions, snow and
ice can build up under the fenders
and interfere with the steering. When
driving in severe winter conditions
where this may happen, you should
periodically check underneath the
vehicle to be sure the movement of
the front wheels and the steering
components are not obstructed.
Carry emergency equipment
Depending on the severity of the
weather, you should carry appropri-
ate emergency equipment. Some of
the items you may want to carry
include tow straps or chains, flash-
light, emergency flares, sand, shov-
el, jumper cables, window scraper,
gloves, ground cloth, coveralls, blan-
ket, etc. We do not recommend using this
vehicle for trailer towing.
TRAILER TOWING
Page 381 of 496
615
What to do in an emergency
It is possible that some tires, espe-
cially with larger punctures or dam-
age to the sidewall, cannot be sealed
completely.
Air pressure loss in the tire may
adversely affect tire performance.
For this reason, you should avoid
abrupt steering or other driving
maneuvers, especially if the vehicle
is heavily loaded or if a trailer is in
use.
The Tire Mobility Kit is not designed
or intended as a permanent tire
repair method and is to be used for
one tire only.
This instruction shows you step by
step how to temporarily seal the
puncture simply and reliably.
Read the section "Notes on the safe
use of the Tire Mobility Kit".Notes on the suggested use of
the Tire Mobility Kit
Park your car at the side of the roadso that you can work with the Tire
Mobility Kit away from moving traf-
fic.
To be sure your vehicle will not move, even when you're on fairly
level ground, always set your park-
ing brake.
Only use the Tire Mobility Kit for sealing/inflation passenger car tires.
Only punctured areas located with-
in the tread region of the tire can be
sealed using the tire mobility kit.
Do not use on motorcycles, bicycles or any other type of tires.
When the tire and wheel are dam- aged, do not use Tire Mobility Kit for
your safety.
Use of the Tire Mobility Kit may not be effective for tire damage larger
than approximately 0.24 in (6 mm).
Please contact the nearest Kia
dealership if the tire cannot be
made roadworthy with the Tire
Mobility Kit. Do not use the Tire Mobility Kit if a
tire is severely damaged by driving
run flat or with insufficient air pres-
sure.
Do not remove any foreign objects such as nails or screws that have
penetrated the tire.
Provided the car is outdoors, leave the vehicle running. Otherwise
operating the compressor may
eventually drain the car battery.
Never leave the Tire Mobility Kit unattended while it is being used.
Do not leave the compressor run- ning for more than 10 min. at a time
or it may overheat.
Do not use the Tire Mobility Kit if the ambient temperature is below -
22°F (-30°C).
Before using the TMK, read the precautionary advice printed on
the sealant bottle!
Page 383 of 496
617
What to do in an emergency
Using the Tire Mobility Kit
1. Detach the speed restriction label(0) from the sealant bottle (1), and
place it in a highly visible place
inside the vehicle such as on the
steering wheel to remind the driv-
er not to drive too fast.
2. Screw connection hose (9) onto the connector of the sealant bottle.
3. Ensure that screw cap (8) is closed.
4. Unscrew the valve cap from the valve of the defective wheel and
screw filling hose (2) of the
sealant bottle onto the valve.
5. Insert the sealant bottle into the housing (4) of the compressor so
that the bottle is upright.
✽ ✽NOTICE
If a foreign object is seen that has
punctured the tire, do not remove it
before using Tire Mobility Kit.
6. Ensure that the compressor is
switched off, position 0. 7. Plug the compressor power cord
into the front passenger side
power outlet (180W) of the vehicle.
Only use the front passenger side
power outlet when connecting the
power cord.
OPSE064002OPS063016
Page 388 of 496
What to do in an emergency
22
6
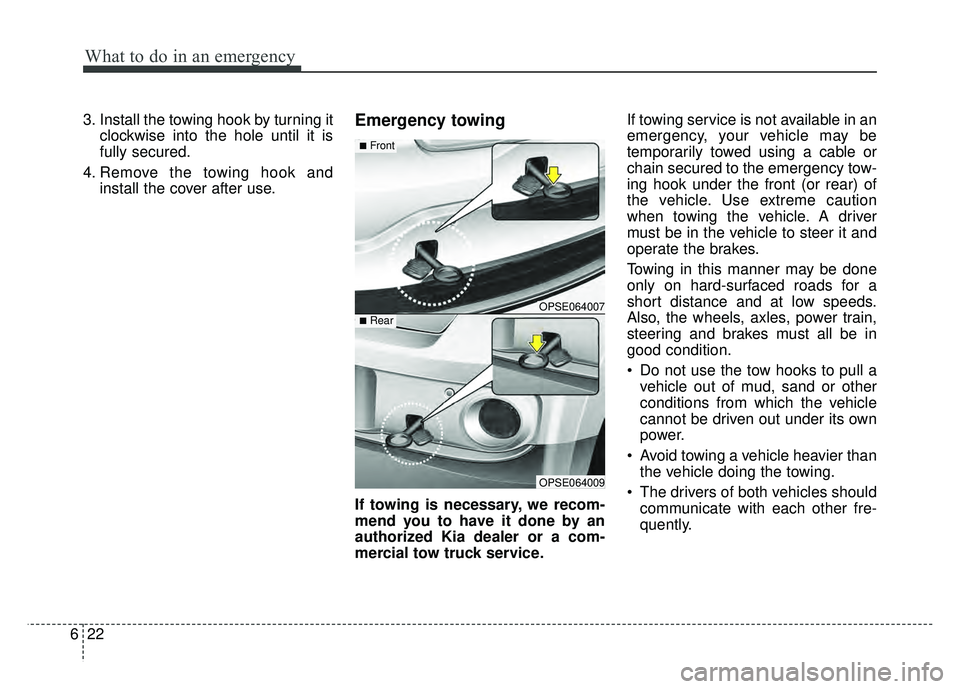
3. Install the towing hook by turning it
clockwise into the hole until it is
fully secured.
4. Remove the towing hook and install the cover after use.Emergency towing
If towing is necessary, we recom-
mend you to have it done by an
authorized Kia dealer or a com-
mercial tow truck service. If towing service is not available in an
emergency, your vehicle may be
temporarily towed using a cable or
chain secured to the emergency tow-
ing hook under the front (or rear) of
the vehicle. Use extreme caution
when towing the vehicle. A driver
must be in the vehicle to steer it and
operate the brakes.
Towing in this manner may be done
only on hard-surfaced roads for a
short distance and at low speeds.
Also, the wheels, axles, power train,
steering and brakes must all be in
good condition.
Do not use the tow hooks to pull a
vehicle out of mud, sand or other
conditions from which the vehicle
cannot be driven out under its own
power.
Avoid towing a vehicle heavier than the vehicle doing the towing.
The drivers of both vehicles should communicate with each other fre-
quently.
OPSE064007
OPSE064009
■Front
■Rear
Page 389 of 496
623
What to do in an emergency
Attach a towing strap to the towhook.
Using a portion of the vehicle other than the tow hooks for towing may
damage the body of your vehicle.
Only use a cable or chain specifi- cally intended for use in towing
vehicles. Securely fasten the cable
or chain to the towing hook provid-
ed.
Before emergency towing, check that the hook is not broken or dam-
aged.
Fasten the towing cable or chain securely to the hook.
Do not jerk the hook. Apply it steadily and with even force.
To avoid damaging the hook, do not pull from the side or at a verti-
cal angle. Always pull straight
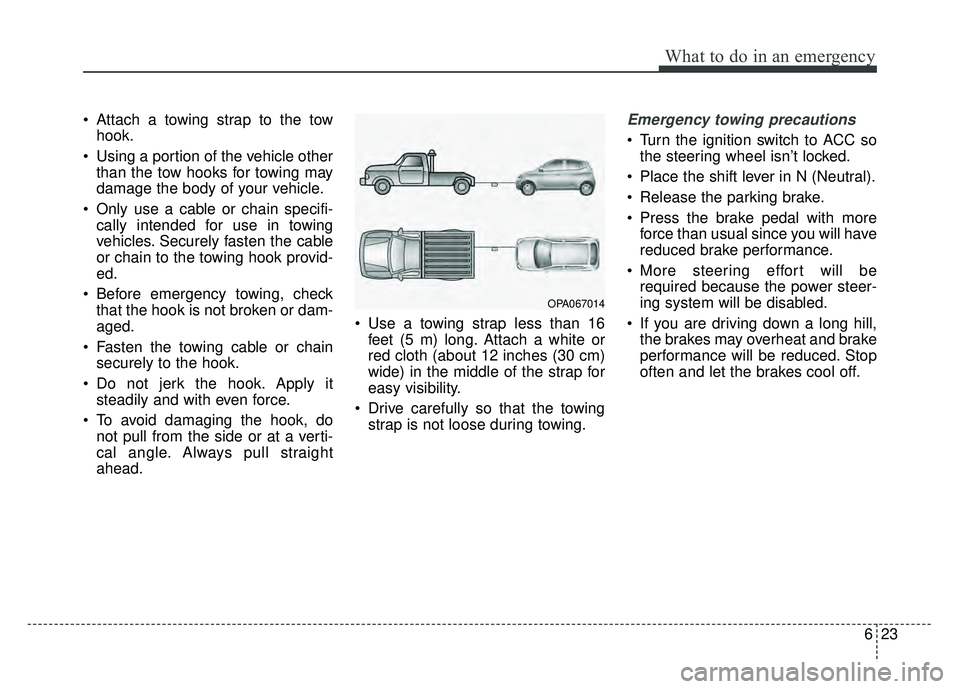
ahead. Use a towing strap less than 16
feet (5 m) long. Attach a white or
red cloth (about 12 inches (30 cm)
wide) in the middle of the strap for
easy visibility.
Drive carefully so that the towing strap is not loose during towing.Emergency towing precautions
Turn the ignition switch to ACC sothe steering wheel isn’t locked.
Place the shift lever in N (Neutral).
Release the parking brake.
Press the brake pedal with more force than usual since you will have
reduced brake performance.
More steering effort will be required because the power steer-
ing system will be disabled.
If you are driving down a long hill, the brakes may overheat and brake
performance will be reduced. Stop
often and let the brakes cool off.
OPA067014
Page 395 of 496
75
Maintenance
OWNER MAINTENANCE
The following lists are vehicle checks
and inspections that should be per-
formed by the owner or an author-
ized Kia dealer at the frequencies
indicated to help ensure safe,
dependable operation of your vehi-
cle.
Any adverse conditions should be
brought to the attention of your deal-
er as soon as possible.
These Owner Maintenance Checks
are generally not covered by war-
ranties and you may be charged for
labor, parts and lubricants used.Owner maintenance schedule
When you stop for fuel:
Check the coolant level in thecoolant reservoir.
Check the windshield washer fluid level.
Look for low or under-inflated tires. Check if the front of the radiator
and condenser are clean and not
blocked with leaves, dirt or insects
etc. If any of the above parts are
extremely dirty or you are not sure
of their condition, take your vehicle
to an authorized Kia dealer.
While operating your vehicle:
Check for vibrations in the steeringwheel. Notice any increased steer-
ing effort or looseness in the steer-
ing wheel, or change in its straight-
ahead position.
Notice if your vehicle constantly turns slightly or “pulls” to one side
when traveling on smooth, level
road.
When stopping, listen and check for unusual sounds, pulling to one
side, increased brake pedal travel
or “hard-to-push” brake pedal.
If any slipping or changes in the operation of your transaxle occurs,
check the transaxle fluid level.
Check the reduction gear P (Park) function.
Check the parking brake.
Check for fluid leaks under your vehicle (water dripping from the air
conditioning system during or after
use is normal).
Page 410 of 496
Maintenance
20
7
Brake fluid
Check the brake fluid level in the
brake fluid reservoir. The level should
be between “MIN” and “MAX” marks
on the side of the reservoir. Use only
hydraulic brake fluid conforming to
DOT 3 or DOT 4 specification.
Brake discs, pads, calipers
and rotors
Check the pads for excessive wear,
discs for run out and wear, and
calipers for fluid leakage.
Suspension mounting bolts
Check the suspension connections
for looseness or damage. Retighten
to the specified torque.
Steering gear box, linkage &
boots/lower arm ball joint
With the vehicle stopped and off,
check for excessive free-play in the
steering wheel.
Check the linkage for bends or dam-
age. Check the dust boots and ball
joints for deterioration, cracks, or
damage. Replace any damaged
parts.
Drive shafts and boots
Check the drive shafts, boots and
clamps for cracks, deterioration, or
damage. Replace any damaged
parts and, if necessary, repack the
grease.
Air conditioning refrigerant
Check the air conditioning lines and
connections for leakage and dam-
age.