Page 36 of 496

31
❈During cold weather, quick charg-
ing may not be available to prevent
high voltage battery degradation.
You can start charging when the Power button is in the OFF posi-
tion and the shift lever is in P
(Park).
After charging has started, you
can use electrical components
such as the radio by pressing the
Power button to ACC or ON posi-
tion.
If you move the shift lever from P (Park) to R (Reverse), N (Neutral),
D (Drive), charging stops immedi-
ately. If you want to start charging
again, place the shift lever to P
(Park) and press the Power button
to the OFF position. Unplug and
reconnect the charging cable to
start charging again.
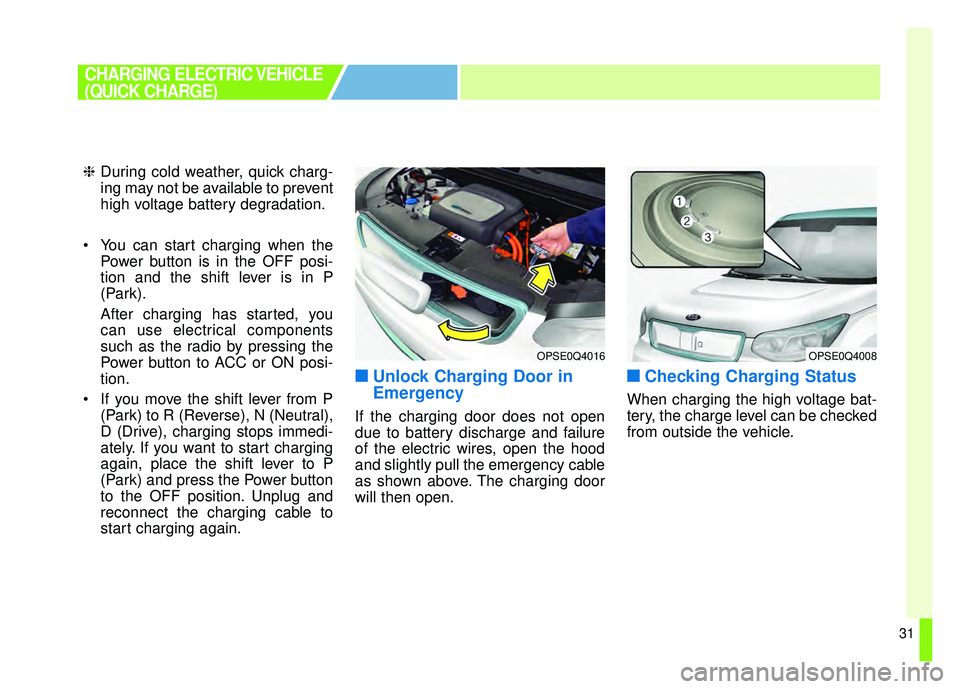
■ ■Unlock Charging Door in
Emergency
If the charging door does not open
due to battery discharge and failure
of the electric wires, open the hood
and slightly pull the emergency cable
as shown above. The charging door
will then open.
■ ■Checking Charging Status
When charging the high voltage bat-
tery, the charge level can be checked
from outside the vehicle.
OPSE0Q4016OPSE0Q4008
CHARGING ELECTRIC VEHICLE
(QUICK CHARGE)
Page 40 of 496
35
3. While the brake pedal is pressed,engage the parking brake.
4. Turn OFF all switches, place the shift lever in P (Park), and turn
OFF the vehicle. 5. Press the charging door open
switch [ ] to open the charging
door. Charging door open switch
can be operated only when vehi-
cle is turned off.
6. If you cannot open the charging door due to freezing weather :
1) Remove any ice near the charg-ing door.
2) Pull the emergency cable to open the charging door.
(When the charging door does not
open, refer to “How to Unlock
Charging Door in Emergencies.”) 7. Open the charging door and press
the normal charging inlet release
tab (1) to open the normal charg-
ing inlet cover.
8. Before connecting the charging connector, make sure the door
lock is released.
When the door is locked, the
charging connector lock system
will be triggered. And the charging
connector will not be connected.
CHARGING ELECTRIC VEHICLE
(TRICKLE CHARGE)
OPSE0Q4011
OPSE0Q4012
Page 43 of 496
38
Depending on the condition and
durability of the high voltage battery,
charger specifications, and ambient
temperature, the time required for
charging the battery may vary.14.You may prevent possible charg-
ing cable theft by taking the fol-
lowing steps. Lock the door after
the charging cable is connected,
by pressing the lock button on the
smart key or on the central door
lock switch.
When the door is locked, the
charging connector will become
locked and this will prevent possi-
ble theft.
So, after charging is complete,
you must release the door lock in
order to disconnect the charging
connector.
■ ■Unlock Charging Door in
Emergency
If the charging door does not open
due to battery discharge and failure
of the electric wires, open the hood
and slightly pull the emergency cable
as shown above. The charging door
will then open.
CHARGING ELECTRIC VEHICLE
(TRICKLE CHARGE)
OPSE0Q4016
Page 44 of 496

39
■
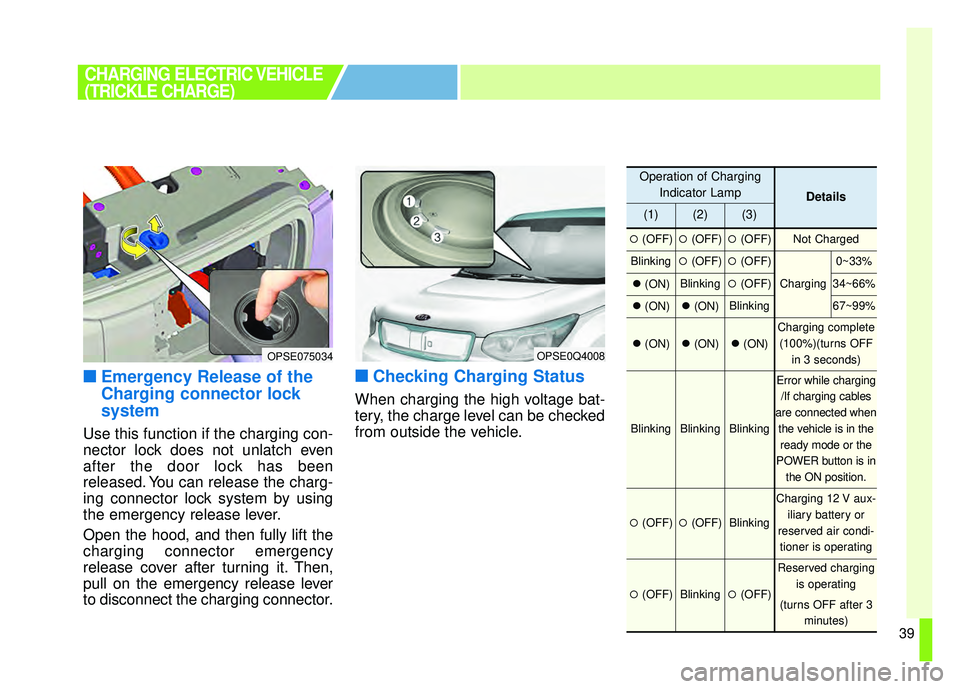
■Emergency Release of the
Charging connector lock
system
Use this function if the charging con-
nector lock does not unlatch even
after the door lock has been
released. You can release the charg-
ing connector lock system by using
the emergency release lever.
Open the hood, and then fully lift the
charging connector emergency
release cover after turning it. Then,
pull on the emergency release lever
to disconnect the charging connector.
■ ■Checking Charging Status
When charging the high voltage bat-
tery, the charge level can be checked
from outside the vehicle.
CHARGING ELECTRIC VEHICLE
(TRICKLE CHARGE)
OPSE0Q4008
Operation of Charging
Indicator Lamp
Details
(1)(2)(3)
�(OFF)�(OFF)�(OFF)Not Charged
Blinking�(OFF)�(OFF)
Charging
0~33%
�(ON)Blinking�(OFF)34~66%
�(ON)�(ON)Blinking67~99%
�(ON)�(ON)�(ON)
Charging complete
(100%)(turns OFF in 3 seconds)
BlinkingBlinkingBlinking
Error while charging/If charging cables
are connected when the vehicle is in theready mode or the
POWER button is in the ON position.
�(OFF)�(OFF)Blinking
Charging 12 V aux- iliary battery or
reserved air condi- tioner is operating
�(OFF)Blinking�(OFF)
Reserved charging is operating
(turns OFF after 3 minutes)
OPSE075034
Page 46 of 496
41
■
■How to Disconnect Portable
Charging Cable
(ICCB: In-Cable Control Box)
1. Before disconnecting the charging
connector, make sure the door
lock is released.
When the door is locked, the charg-
ing connector lock system will be
triggered. And the charging con-
nector will not be disconnected. 2. Hold the charging connector han-
dle and pull it while pressing the
release button (1).
CHARGING ELECTRIC VEHICLE
(TRICKLE CHARGE)
OPSE0Q4034
CAUTION- Disconnecting
charging plug
When disconnecting the charg-ing connector, do not try to dis-connect it by force while notpressing the release button. Thismay damage the charging con-nector and vehicle charging inlet.
CAUTION
In order to disconnect thecharging connector, release thedoor lock to unlatch the charg-ing connector lock system.
If not, the charging connectorand the vehicle's charging inletmay be damaged.
Page 70 of 496
23
Your vehicle at a glance
10. Door locks ...........................................4-11
11. Rear combination lamp.......................7-68
12. High mounted stop lamp ....................7-70
13. Rear window wiper blade ..........4-87, 7-31
14. Tailgate................................................4-15
15. Rear camera display ...........................4-80
16. Antenna ............................................4-128
17. Parking assist system .........................4-76
OPSE014002
■Rear view
❈The actual shape may differ from the illustration.
Page 71 of 496

Your vehicle at a glance
42
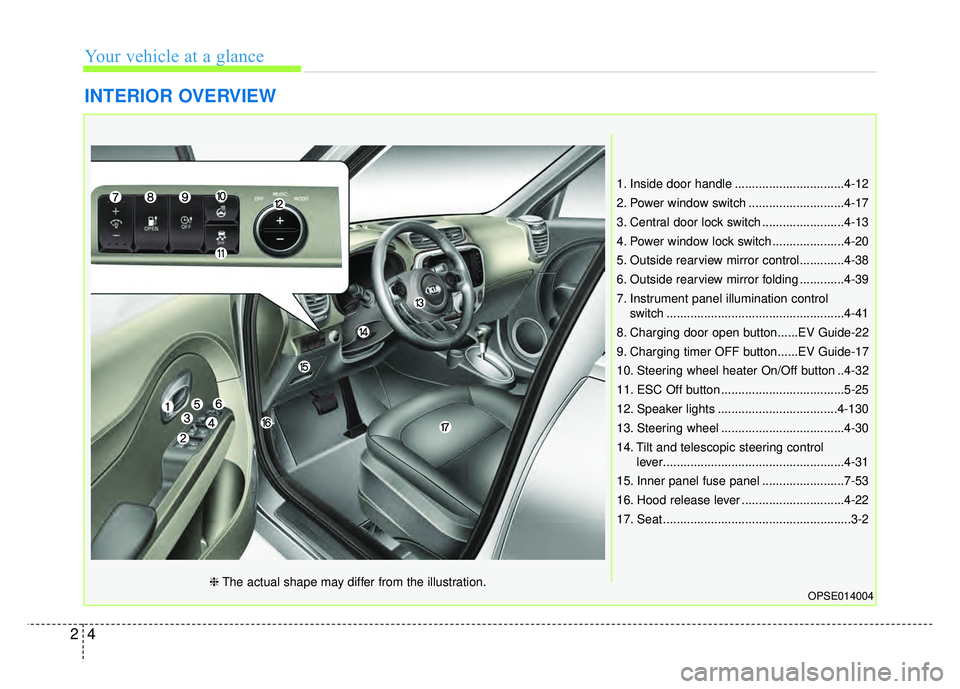
INTERIOR OVERVIEW
1. Inside door handle ................................4-12
2. Power window switch ............................4-17
3. Central door lock switch ........................4-13
4. Power window lock switch .....................4-20
5. Outside rearview mirror control.............4-38
6. Outside rearview mirror folding .............4-39
7. Instrument panel illumination controlswitch ....................................................4-41
8. Charging door open button......EV Guide-22
9. Charging timer OFF button......EV Guide-17
10. Steering wheel heater On/Off button ..4-32
11. ESC Off button ....................................5-25
12. Speaker lights ...................................4-130
13. Steering wheel ....................................4-30
14. Tilt and telescopic steering control lever.....................................................4-31
15. Inner panel fuse panel ........................7-53
16. Hood release lever ..............................4-22
17. Seat .......................................................3-2
OPSE014004❈ The actual shape may differ from the illustration.
Page 89 of 496

Safety features of your vehicle
16
3
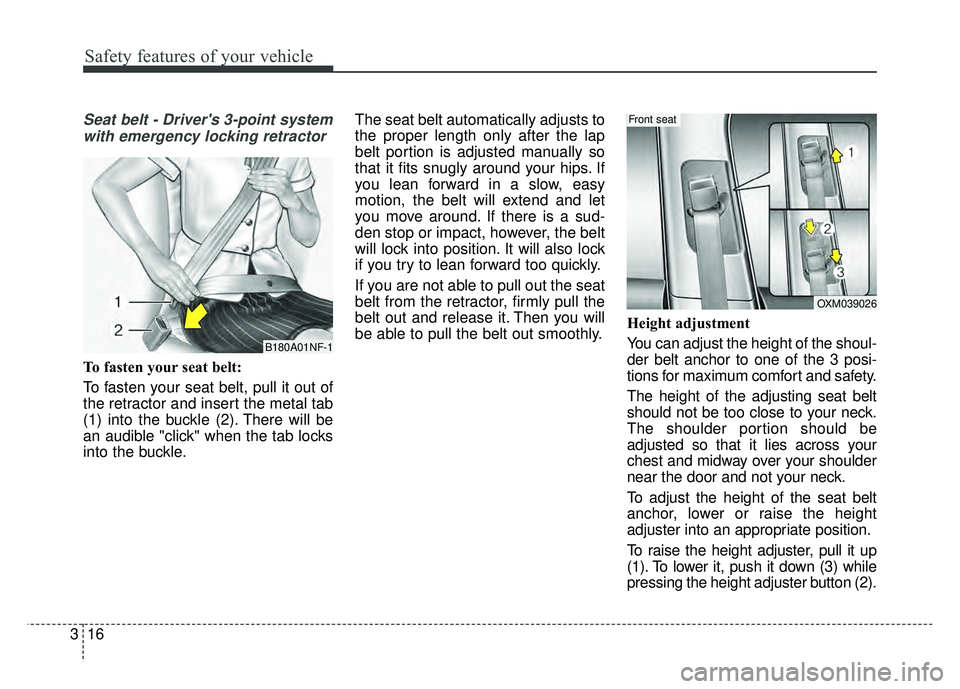
Seat belt - Driver's 3-point system
with emergency locking retractor
To fasten your seat belt:
To fasten your seat belt, pull it out of
the retractor and insert the metal tab
(1) into the buckle (2). There will be
an audible "click" when the tab locks
into the buckle. The seat belt automatically adjusts to
the proper length only after the lap
belt portion is adjusted manually so
that it fits snugly around your hips. If
you lean forward in a slow, easy
motion, the belt will extend and let
you move around. If there is a sud-
den stop or impact, however, the belt
will lock into position. It will also lock
if you try to lean forward too quickly.
If you are not able to pull out the seat
belt from the retractor, firmly pull the
belt out and release it. Then you will
be able to pull the belt out smoothly.
Height adjustment
You can adjust the height of the shoul-
der belt anchor to one of the 3 posi-
tions for maximum comfort and safety.
The height of the adjusting seat belt
should not be too close to your neck.
The shoulder portion should be
adjusted so that it lies across your
chest and midway over your shoulder
near the door and not your neck.
To adjust the height of the seat belt
anchor, lower or raise the height
adjuster into an appropriate position.
To raise the height adjuster, pull it up
(1). To lower it, push it down (3) while
pressing the height adjuster button (2).
B180A01NF-1
OXM039026
Front seat