Page 158 of 496
427
Features of your vehicle
Do not extend the face, neck, arms
or body outside the sunroof while
driving.Sunshade
To open the sunshade
Pull the sunroof control lever back-
ward to the 1st detent position.
OPSE046031L
CAUTION- Sunroof motordamage
If you try to open the sunroofwhen the temperature is belowfreezing or when the sunroof iscovered with snow or ice, theglass or the motor could bedamaged.
CAUTION
To prevent damage to the sun-roof, periodically remove anydirt that may accumulate on theguide rail.
WARNING- Sunroof
Operation
When closing the sunroof, make
sure there are no body parts in
the movement range of the slid-
ing roof. Parts of the body could
become trapped or crushed.
Page 161 of 496
Features of your vehicle
30
4
Electric power steering (EPS)
The power steering uses a motor to
assist you in steering the vehicle. If the
vehicle is in not the ready ( ) mode
or if the power steering system
becomes inoperative, the vehicle may
still be steered, but it will require
increased steering effort.
The motor driven power steering is
controlled by a power steering con-
trol unit which senses the steering
wheel torque and vehicle speed to
command the motor.
The steering becomes heavier as
the vehicle’s speed increases and
becomes lighter as the vehicle’s
speed decreases for optimum steer-
ing control.
Should you notice any change in the
effort required to steer during normal
vehicle operation, have the power
steering checked by an authorized
Kia dealer. If the Electric Power Steering
System does not operate normally,
the warning light will illuminate on
the instrument cluster. The steering
wheel may require increased
steering effort. Take your vehicle to
an authorized Kia dealer and have
the vehicle checked as soon as
possible.
When you operate the steering wheel in low temperature, noise
may occur. If temperature rises, the
noise will likely disappear. This is a
normal condition.
When the vehicle is stationary, when the steering wheel is turned
all the way to the left or right con-
tinuously, the steering wheel
becomes harder to turn. The power
assist is limited to protect the
motor from overheating.
As time passes, the steering wheel
return to its normal condition.
✽ ✽ NOTICE
The following symptoms may occur
during normal vehicle operation:
• The EPS warning light does not
illuminate.
• The steering gets heavy immedi- ately after turning the POWER
button on. This happens as the
system performs the EPS system
diagnostics. When the diagnostics
are completed, the steering wheel
will return to its normal condition.
• A click noise may be heard from the EPS relay after the POWER
button is turned to the ON or OFF
position.
• A motor noise may be heard when the vehicle is at a stop or at a low
driving speed.
• If the Electric Power Steering System does not operate normally,
the warning light will illuminate on
the instrument cluster. The steer-
ing wheel may become difficult to
control or operate abnormally.
Take your vehicle to an authorized
Kia dealer and have the vehicle
checked as soon as possible. (Continued)
STEERING WHEEL
Page 162 of 496
431
Features of your vehicle
(Continued)
• When you operate the steeringwheel in low temperature, abnor-
mal noise may occur. If tempera-
ture rises, the noise will likely dis-
appear. This is a normal condition.
• When the charging system warn- ing light comes on due to the low
voltage (When the alternator or
battery) does not operate normal-
ly or it malfunctions), the steering
wheel may require increased
steering effort.Tilt and telescopic steering
Tilt and telescopic steering allows
you to adjust the steering wheel
before you drive. You can also raise it
to give your legs more room when
you exit and enter the vehicle.
The steering wheel should be posi-
tioned so that it is comfortable for
you to drive, while permitting you to
see the instrument panel warning
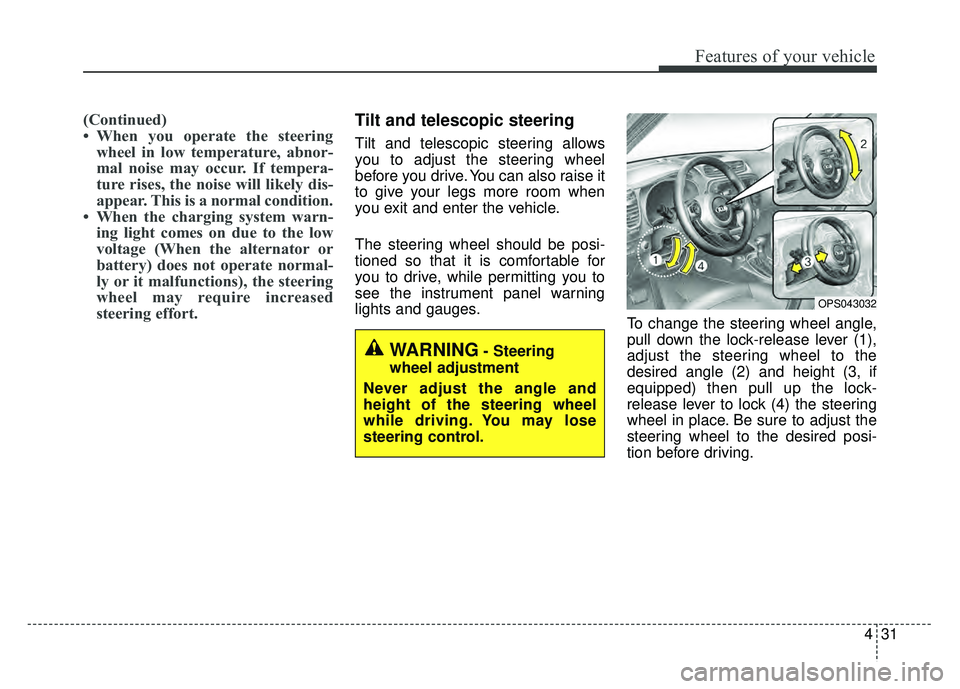
lights and gauges. To change the steering wheel angle,
pull down the lock-release lever (1),
adjust the steering wheel to the
desired angle (2) and height (3, if
equipped) then pull up the lock-
release lever to lock (4) the steering
wheel in place. Be sure to adjust the
steering wheel to the desired posi-
tion before driving.
OPS043032
WARNING- Steering
wheel adjustment
Never adjust the angle and
height of the steering wheel
while driving. You may lose
steering control.
Page 166 of 496
435
Features of your vehicle
MIRRORS
Inside rearview mirror
Adjust the rearview mirror so that the
center view through the rear window
is seen. Make this adjustment before
you start driving.
Do not place objects in the rear seat or
cargo area which would interfere with
your vision through the rear window.
Day/night rearview mirror (if equipped)
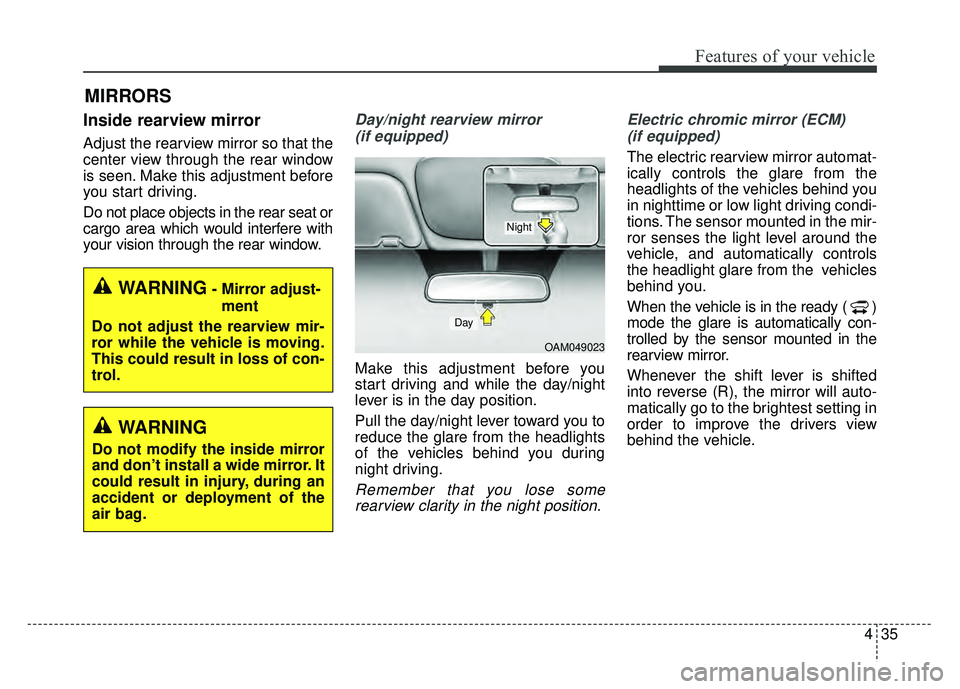
Make this adjustment before you
start driving and while the day/night
lever is in the day position.
Pull the day/night lever toward you to
reduce the glare from the headlights
of the vehicles behind you during
night driving.
Remember that you lose somerearview clarity in the night position. Electric chromic mirror (ECM)
(if equipped)
The electric rearview mirror automat-
ically controls the glare from the
headlights of the vehicles behind you
in nighttime or low light driving condi-
tions. The sensor mounted in the mir-
ror senses the light level around the
vehicle, and automatically controls
the headlight glare from the vehicles
behind you.
When the vehicle is in the ready ( )
mode the glare is automatically con-
trolled by the sensor mounted in the
rearview mirror.
Whenever the shift lever is shifted
into reverse (R), the mirror will auto-
matically go to the brightest setting in
order to improve the drivers view
behind the vehicle.
OAM049023
Day
Night
WARNING- Mirror adjust- ment
Do not adjust the rearview mir-
ror while the vehicle is moving.
This could result in loss of con-
trol.
WARNING
Do not modify the inside mirror
and don’t install a wide mirror. It
could result in injury, during an
accident or deployment of the
air bag.
Page 168 of 496
437
Features of your vehicle
button
In case of an emergency, requests
for help to the UVO center.
The call is connected to the UVO
emergency rescue center.
Repressing the button will end the
call.
For more details, refer to the
Navigation Manual.Outside rearview mirror
Be sure to adjust the mirror angles
before driving.
Your vehicle is equipped with both
left-hand and right-hand outside
rearview mirrors. The mirrors can be
adjusted remotely with the remote
switch. The mirror heads can be fold-
ed back to prevent damage during an
automatic vehicle wash or when
passing through a narrow street.
The right outside rearview mirror is
convex. Objects seen in the mirror
are closer than they appear.
Use your interior rearview mirror or
direct observation to determine the
actual distance of following vehicles
when changing lanes.If the mirror is jammed with ice, do
not adjust the mirror by force. Use an
approved spray de-icer (not radiator
antifreeze) to release the frozen
mechanism or move the vehicle to a
warm place and allow the ice to melt.CAUTION- Rearview
mirror
Do not scrape ice off the mirrorface; this may damage the sur-face of the glass. If ice shouldrestrict the movement of the mir-ror, do not force the mirror foradjustment. To remove ice, use adeicer spray, or a sponge or softcloth with very warm water.
WARNING- Mirror
adjustment
Do not adjust or fold the outside
rearview mirrors while the vehi-
cle is moving. This could result
in loss of control.
Page 171 of 496
Features of your vehicle
40
4
INSTRUMENT CLUSTER
1. Motor operation gauge
2. Speedometer
3. Range meter
4. Warning and indicator lights
5. State of charge gauge
6. LCD display
OPSE046300N
❈ The actual cluster in the vehicle may differ
from the illustration.
For more details, refer to the "Gauges" in
this chapter.
Page 174 of 496
443
Features of your vehicle
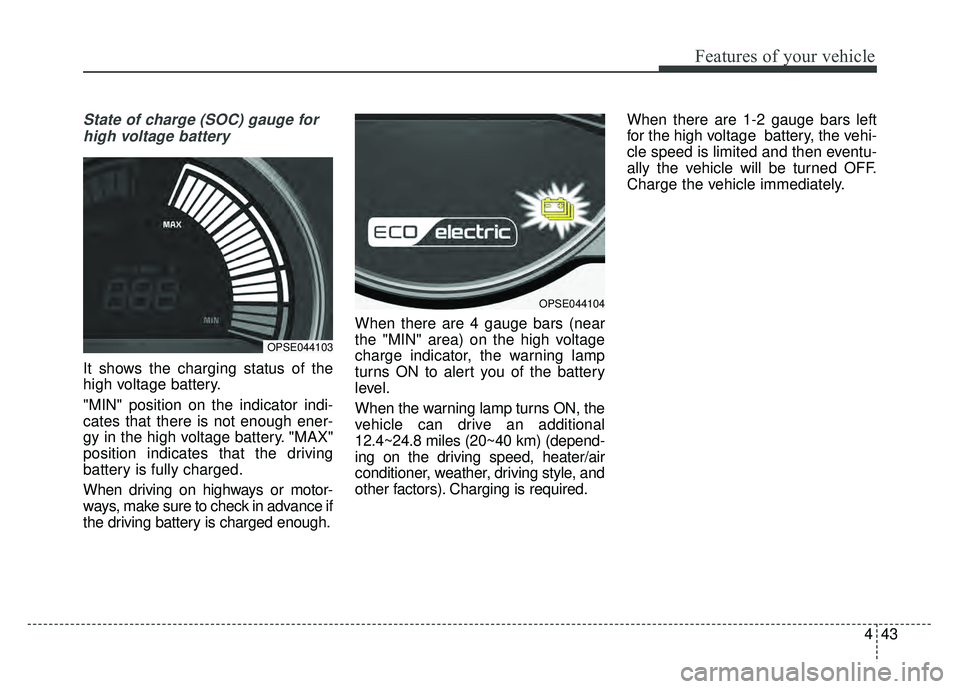
State of charge (SOC) gauge forhigh voltage battery
It shows the charging status of the
high voltage battery.
"MIN" position on the indicator indi-
cates that there is not enough ener-
gy in the high voltage battery. "MAX"
position indicates that the driving
battery is fully charged.
When driving on highways or motor-
ways, make sure to check in advance if
the driving battery is charged enough. When there are 4 gauge bars (near
the "MIN" area) on the high voltage
charge indicator, the warning lamp
turns ON to alert you of the battery
level.
When the warning lamp turns ON, the
vehicle can drive an additional
12.4~24.8 miles (20~40 km) (depend-
ing on the driving speed, heater/air
conditioner, weather, driving style, and
other factors). Charging is required.When there are 1-2 gauge bars left
for the high voltage battery, the vehi-
cle speed is limited and then eventu-
ally the vehicle will be turned OFF.
Charge the vehicle immediately.
OPSE044103
OPSE044104
Page 177 of 496
Features of your vehicle
46
4
LCD Modes
LCD DISPLAY
Modes SymbolExplanation
EV informationThis mode displays EV system energy flow and ECO level.
For more details, refer to “EV information mode" in this chapter.
Trip Computer
This mode displays driving information like the tripmeter,
energy consumption, and so on.
For more details, refer to “Trip Computer” in this chapter.
A/VThis mode displays the state of the A/V system.
ServiceThis mode informs of service interval (mileage or days) and warning messages
related to TPMS and so on.
Master warning
User SettingsOn this mode, you can change settings of the doors, lamps, and so on.
❈ For controlling the LCD modes, refer to "LCD Display Control" in this chapter.