Page 28 of 536

311
Safety features of your vehicle
Easy access function (if equipped)
The system will move the driver's
seat automatically as follows:
Without smart key system
- It will move the driver’s seat rear-ward when the ignition key is
removed.
- It will move the driver’s seat for- ward when the ignition key is
inserted.
With smart key system - It will move the driver’s seat rear-ward when the engine start/stop
button is changed to the OFF
position.
- It will move the driver’s seat for- ward when the engine start/stop
button is changed to the ACC or
START position.
You can activate or deactivate this fea-
ture. Refer to "User settings" in chap-
ter 4.
Headrest (for front seat)
The driver's and front passenger's
seats are equipped with a headrest
for the occupant's safety and comfort.
The headrest not only provides com-
fort for the driver and front passenger,
but also helps protect the head and
neck in the event of a rear collision.
For maximum effectiveness in case
of an accident, the headrest should
be adjusted so the middle of the
headrest is at the same height of the
center of gravity of an occupant's
head. Generally, the center of gravity
of most people's head is similar with
the height of the top of their eyes. Also, adjust the headrest as close to
your head as possible. For this rea-
son, the use of a cushion that holds
the body away from the seatback is
not recommended.
WARNING- Headrest
removal/adjustment
Do not operate the vehicle with the headrests removed.
Headrests can provide critical
neck and head support in a
crash.
Do not adjust the headrest height while the vehicle is in
motion. Driver may lose con-
trol of the vehicle.
OHM038048N
Page 30 of 536
313
Safety features of your vehicle
Removal and reinstallation
To remove the headrest:
1. Recline the seatback (2) with therecline lever or switch (1).
2. Raise headrest as far as it can go. 3. Press the headrest release button
(3) or press the release button with
slim tool (3) (for Type C and Type
D) while pulling the headrest up
(4).
OUM034012
OUM034013
■
Type B
■Type A
OUM034013L
OUMA036012
■
Type D
■Type C
WARNING
NEVER allow anyone to ride in a
seat with the headrest removed.
Page 41 of 536
Safety features of your vehicle
24
3
To remove the headrest :
1. Raise it as far as it can go then
press the release button (1) while
pulling the headrest up (2).
To reinstall the headrest :
1. Put the headrest poles (3) into the holes while pressing the release
button (1).
2. Adjust it to the appropriate height.3rd row headrest (if equipped)
The headrest will fold down automat-
ically when folding the seatback. To fold the headrest manually :
Pull the strap.
To unfold the headrest : Raise the headrest manually.
Always be sure the headrest has
locked into position after you return
the seatback.
WARNING
Make sure the headrest locks in position after adjusting it to
properly protect the occu-
pants.
After installing the headrest, make sure that it is installed
in the right direction.
A headrest installed reversely
could increase whiplash injury
during rear impact.
OUMA034091
OXM039061N
Page 43 of 536

Safety features of your vehicle
26
3
No modifications or additions
should be made by the user which
will either prevent the seat belt
adjusting devices from operating to
remove slack, or prevent the seat
belt assembly from being adjusted
to remove slack.
When you fasten the seat belt, be careful not to latch the seat belt in
buckles of other seat. It's very dan-
gerous and you may not be pro-
tected by the seat belt properly.
Do not unfasten the seat belt and do not fasten and unfasten the seat
belt repeatedly while driving. This
could result in loss of control, and
an accident causing death, serious
injury, or property damage.
When fastening the seat belt, make sure that the seat belt does
not pass over objects that are hard
or can break easily.Seat belt warning (for driver’s seat)
The driver's seat belt warning light
and chime will activate according to
the following table when the ignition
switch is in "ON" position.
1GQA2083
WARNING- Seat belt
buckle
Do not allow foreign material
(gum, crumbs, coins, etc.) to
obstruct the seat belt buckle.
This may prevent the seat belt
from fastening securely.
Page 47 of 536
Safety features of your vehicle
30
3
Stowing the rear seat belt
The rear seat belt buckles can be
stowed in the pocket between the
rear seatback and cushion when not
in use.
Routing the seat belt webbing
through the rear seat belt guides will
help keep the belts from being
trapped behind or under the seats.
After inserting the seat belt, tighten
the belt webbing by pulling it up.
CAUTION - Seatbelt Guide
Remove the seat belt from the
guides before using. If you pullon the seat belt when it is storedin the guides, it may damage theguides and/or belt webbing.
OUM034036
OUM034037
■2nd row seat
■ 3rd row seat OUM034022
OUM034035
■2nd row seat
■ 3rd row seat
Page 56 of 536
339
Safety features of your vehicle
If the vehicle headrest prevents prop-
er installation of a child seat (as
described in the child seat system
manual), the headrest of the respec-
tive seating position shall be read-
justed or entirely removed.3. Pull the shoulder portion of theseat belt all the way out. When the
shoulder portion of the seat belt is
fully extended, it will shift the
retractor to the “Auto Lock” (child
restraint) mode. 4. Slowly allow the shoulder portion
of the seat belt to retract and listen
for an audible “clicking” or “ratchet-
ing” sound. This indicates that the
retractor is in the “Auto Lock”
mode. If no distinct sound is
heard, repeat steps 3 and 4.
OEN036103OEN036102
Page 57 of 536

Safety features of your vehicle
40
3
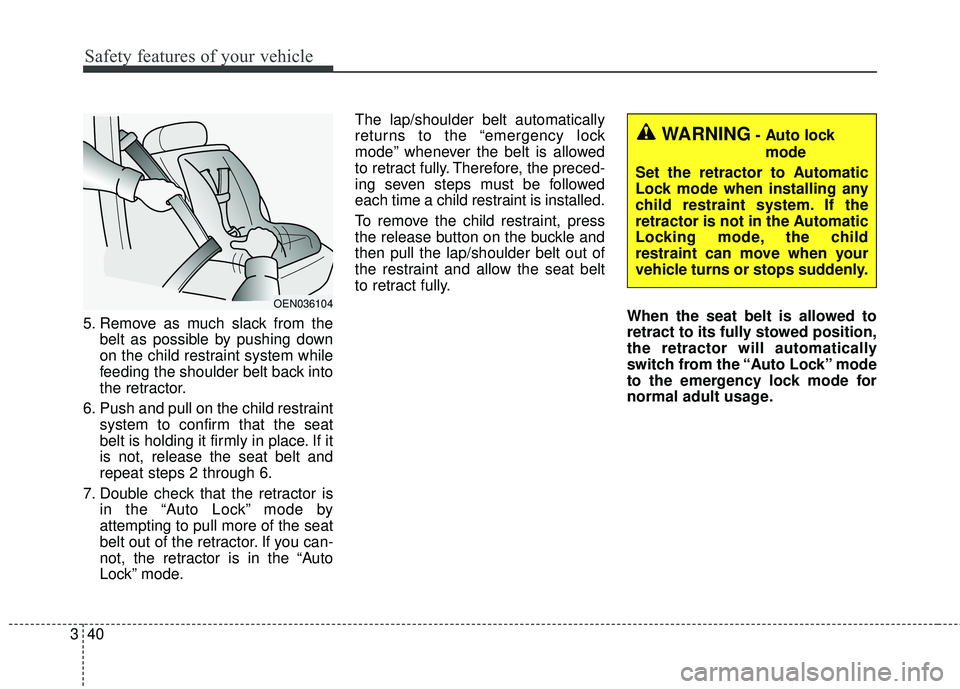
5. Remove as much slack from the
belt as possible by pushing down
on the child restraint system while
feeding the shoulder belt back into
the retractor.
6. Push and pull on the child restraint system to confirm that the seat
belt is holding it firmly in place. If it
is not, release the seat belt and
repeat steps 2 through 6.
7. Double check that the retractor is in the “Auto Lock” mode by
attempting to pull more of the seat
belt out of the retractor. If you can-
not, the retractor is in the “Auto
Lock” mode. The lap/shoulder belt automatically
returns to the “emergency lock
mode” whenever the belt is allowed
to retract fully. Therefore, the preced-
ing seven steps must be followed
each time a child restraint is installed.
To remove the child restraint, press
the release button on the buckle and
then pull the lap/shoulder belt out of
the restraint and allow the seat belt
to retract fully.
When the seat belt is allowed to
retract to its fully stowed position,
the retractor will automatically
switch from the “Auto Lock” mode
to the emergency lock mode for
normal adult usage.
OEN036104
WARNING- Auto lockmode
Set the retractor to Automatic
Lock mode when installing any
child restraint system. If the
retractor is not in the Automatic
Locking mode, the child
restraint can move when your
vehicle turns or stops suddenly.
Page 58 of 536

341
Safety features of your vehicle
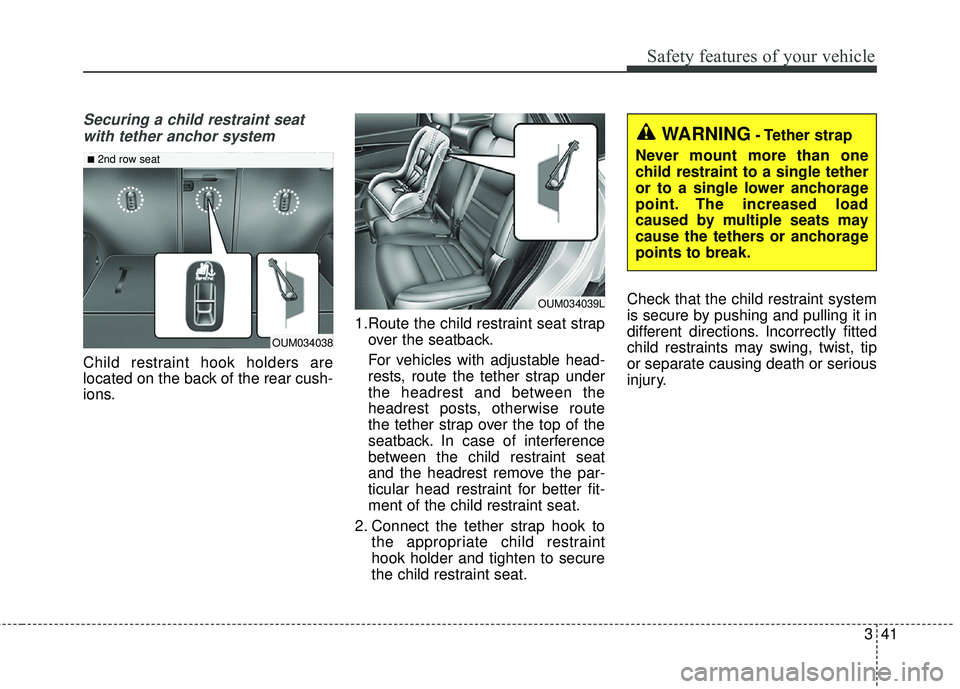
Securing a child restraint seatwith tether anchor system
Child restraint hook holders are
located on the back of the rear cush-
ions. 1.Route the child restraint seat strap
over the seatback.
For vehicles with adjustable head-
rests, route the tether strap under
the headrest and between the
headrest posts, otherwise route
the tether strap over the top of the
seatback. In case of interference
between the child restraint seat
and the headrest remove the par-
ticular head restraint for better fit-
ment of the child restraint seat.
2. Connect the tether strap hook to the appropriate child restraint
hook holder and tighten to secure
the child restraint seat. Check that the child restraint system
is secure by pushing and pulling it in
different directions. Incorrectly fitted
child restraints may swing, twist, tip
or separate causing death or serious
injury.
WARNING- Tether strap
Never mount more than one
child restraint to a single tether
or to a single lower anchorage
point. The increased load
caused by multiple seats may
cause the tethers or anchorage
points to break.
OUM034039L
OUM034038
■2nd row seat