2018 KIA RIO Eco turn off
[x] Cancel search: Eco turn offPage 384 of 490
827
Maintenance
ENGINE OIL
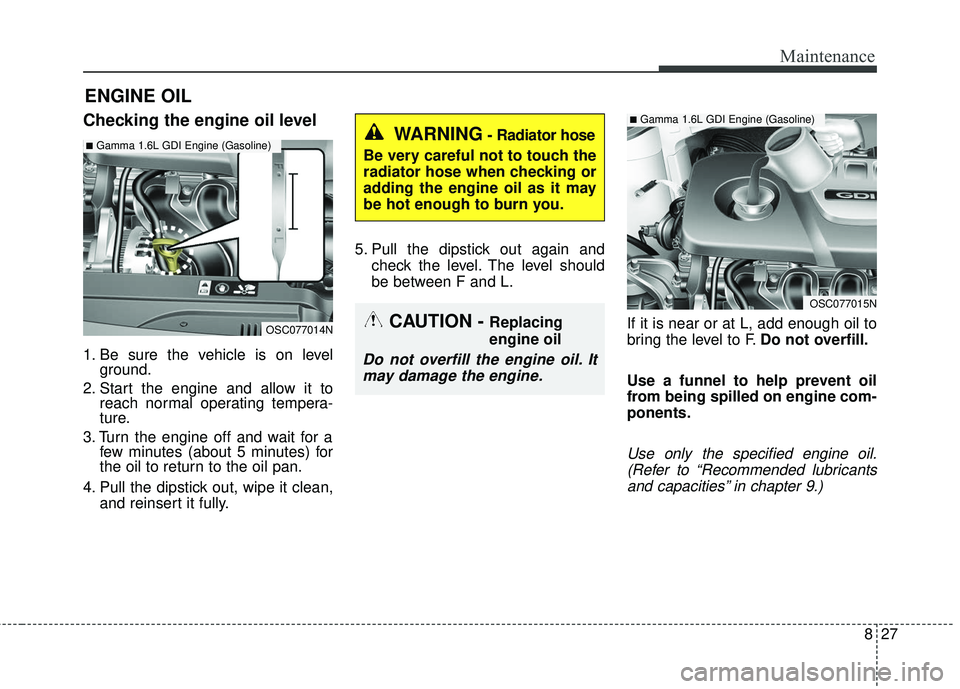
Checking the engine oil level
1. Be sure the vehicle is on levelground.
2. Start the engine and allow it to reach normal operating tempera-
ture.
3. Turn the engine off and wait for a few minutes (about 5 minutes) for
the oil to return to the oil pan.
4. Pull the dipstick out, wipe it clean, and reinsert it fully. 5. Pull the dipstick out again and
check the level. The level should
be between F and L.
If it is near or at L, add enough oil to
bring the level to F.Do not overfill.
Use a funnel to help prevent oil
from being spilled on engine com-
ponents.
Use only the specified engine oil. (Refer to “Recommended lubricantsand capacities” in chapter 9.)
CAUTION - Replacing
engine oil
Do not overfill the engine oil. Itmay damage the engine.
WARNING- Radiator hose
Be very careful not to touch the
radiator hose when checking or
adding the engine oil as it may
be hot enough to burn you.
OSC077014N
■Gamma 1.6L GDI Engine (Gasoline)
OSC077015N
■Gamma 1.6L GDI Engine (Gasoline)
Page 400 of 490
843
Maintenance
✽ ✽NOTICE
If you connect unauthorized elec-
tronic devices to the battery, the bat-
tery may be discharged. Never use
unauthorized devices.
Recharging the battery
Your vehicle has a maintenance-free,
calcium-based battery.
If the battery becomes discharged
in a short time (because, for exam-
ple, the headlamps or interior
lamps were left on while the vehi-
cle was not in use), recharge it by
slow charging (trickle) for 10 hours.
If the battery gradually discharges because of high electric load while
the vehicle is being used, recharge
it at 20-30A for two hours. When recharging the battery,
observe the following precautions:
The battery must be removed from
the vehicle and placed in an area
with good ventilation.
Do not allow cigarettes, sparks, or flame near the battery.
Watch the battery during charging, and stop or reduce the charging
rate if the battery cells begin
gassing (boiling) violently or if the
temperature of the electrolyte of
any cell exceeds 49°C (120°F).
Wear eye protection when check- ing the battery during charging.
Disconnect the battery charger in the following order.
1. Turn off the battery charger main switch.
2. Unhook the negative clamp from the negative battery terminal.
3. Unhook the positive clamp from the positive battery terminal.WARNING- Risk of elec-
trocution
Never touch the electrical igni-
tion system while the vehicle is
running. This system works
with high voltage which can
shock you.
WARNING- Recharging Battery
Never attempt to recharge the
battery when the battery cables
are connected.
Page 418 of 490
861
Maintenance
✽ ✽NOTICE
• When replacing fuse, turn the
ignition “OFF” and turn off
switches of all electrical devices
then remove battery (-) terminal.
• The actual fuse/relay panel label may differ from equipped items.
WARNING- Electrical Fire
Always ensure replacements
fuses and relays are securely
fastened when installed. Failure
to do so can result in a vehicle
fire.
CAUTION
When replacing a blown fuse or relay, make sure the newfuse or relay fits tightly intothe clips. Failure to tightlyinstall the fuse or relay maycause damage to the wiringand electric systems.
Do not remove fuses, relays and terminals fastened withbolts or nuts. The fuses, relaysand terminals may not be fas-tened correctly which maycause vehicle damage.
CAUTION
Do not input any other objects except fuses or relays intofuse/relay terminals such as adriver or wiring. It may causecontact failure and systemmalfunction.
Do not plug in screwdrivers or aftermarket wiring into the ter-minal originally designed forfuse and relays only. The elec-trical system and wiring of thevehicle interior may be dam-aged or burned due to contactfailure.
If you directly connect the wire on the taillight or replacethe bulb which is over the reg-ulated capacity to install trail-ers etc., the inner junctionblock can get burned.
Page 432 of 490
875
Maintenance
LIGHT BULBS
Bulb replacement precaution
Please keep extra bulbs on hand
with appropriate wattage ratings in
case of emergencies.
Refer to “Bulb Wattage” in chapter 9.
When changing lamps, first turn off
the engine at a safe place, firmly
apply the parking brake and detach
the battery’s negative (-) terminal.
Use only bulbs of the specifiedwattage. net-work failure
The headlamp, taillight, and fog light
may light up when the head lamp
switch is turned ON, and not light up
when the taillight or for light switch is
turned ON. This may be cause by
network failure or vehicle electrical
control system malfunction. If there is
a problem, we recommend the sys-
tem be serviced by an authorized Kia
dealer.
trical control system stabilization
A normally functioning lamp may
flicker momentarily. This momentary
occurrence is due to stabilization
function of the vehicle's electrical on
control system. If the lamp soon
returns to normal, the vehicle does
not require service.
However, if the lamp goes out after
the momentary flickering, or the flick-
ering continues, we recommend the
system be serviced by an authorized
Kia dealer.
WARNING- Working on the lights
Prior to working on the light,
firmly apply the parking brake,
ensure that the ignition switch
is turned to the LOCK position
and turn off the lights to avoid
sudden movement of the vehi-
cle and burning your fingers or
receiving an electric shock.
CAUTION -Light replace-
ment
Be sure to replace the burned- out bulb with one of the samewattage rating. Otherwise, itmay cause damage to the fuseor electric wiring system.
CAUTION -Headlamp
Lens
To prevent damage, do notclean the headlamp lens withchemical solvents or strongdetergents.
Page 433 of 490
Maintenance
76
8
✽ ✽
NOTICE
• If the light bulb or lamp connector
is removed while the lamp is still
on, the fuse box's electronic sys-
tem may log it as a malfunction.
Therefore, a lamp malfunction
incident may be recorded as a
Diagnostic Trouble Code (DTC) in
the fuse box.
• It is normal for an operating lamp to flicker momentarily. This is due
to a stabilization function of the
vehicle’s electronic control device.
If the lamp lights up normally
after momentarily blinking, then
it is functioning as normal.
However, if the lamp continues to
flicker several times or turns off
completely, there may be an error
in the vehicle’s electronic control
device. Please have the vehicle
checked by an authorized Kia
dealer immediately.
✽ ✽ NOTICE
We recommend that the headlight
aiming be adjusted after an accident
or after the headlight assembly is rein-
stalled at an authorized Kia dealer.
✽ ✽NOTICE
After driving in heavy rain or wash-
ing, headlamp and taillamp lenses
could appear frosty. This condition is
caused by the temperature differ-
ence between the lamp inside and
outside. This is similar to the con-
densation on your windows inside
your vehicle during the rain and
doesn’t indicate a problem with your
vehicle. If the water leaks into the
lamp bulb circuitry, we recommend
that you have the vehicle checked by
an authorized Kia dealer.
If you don’t have the necessary tools,
the correct bulbs and the expertise,
consult an authorized Kia dealer. In
many cases, it is difficult to replace
vehicle light bulbs because other
parts of the vehicle must be removed
before you can get to the bulb. This is
especially true if you have to remove
the headlamp assembly to get to the
bulb(s).
Removing/installing the headlamp
assembly can result in damage to
the vehicle.
If non-genuine parts or substandard
bulbs are used, it may lead to blow-
ing a fuse or other wiring damages.
Do not install extra lamps or LEDs to
the vehicle. If additional lights are
installed, it may lead to lamp mal-
functions and flickering. Additionally,
the fuse box and other writing may
be damaged.
Page 466 of 490
8109
Maintenance
EMISSION CONTROL SYSTEM
The emission control system of your
vehicle is covered by a written limited
warranty. Please see the warranty
information contained in the
Warranty & Consumer Information
manual in your vehicle.
Your vehicle is equipped with an
emission control system to meet all
applicable emission regulations.
There are three emission control
systems, as follows.
(1) Crankcase emission control sys-tem
(2) Evaporative emission control sys- tem
(3) Exhaust emission control system
In order to assure the proper function
of the emission control systems, it is
recommended that you have your
vehicle inspected and maintained by
an authorized Kia dealer in accor-
dance with the maintenance sched-
ule in this manual. Caution for the Inspection and
Maintenance Test (With Electronic
Stability Control (ESC) system)
To prevent the vehicle from mis-
firing during dynamometer test-
ing, turn the Electronic Stability
Control (ESC) system off by
pressing the ESC switch.
After dynamometer testing is completed, turn the ESC system
back on by pressing the ESC
switch again.1. Crankcase emission control system
The positive crankcase ventilation
system is employed to prevent air
pollution caused by blow-by gases
being emitted from the crankcase.
This system supplies fresh filtered air
to the crankcase through the air
intake hose. Inside the crankcase,
the fresh air mixes with blow-by
gases, which then pass through the
PCV valve into the induction system.
2. Evaporative emission con-trol (including ORVR:
Onboard Refueling Vapor
Recovery)
system
The Evaporative Emission Control
System is designed to prevent fuel
vapors from escaping into the atmos-
phere.
(The ORVR system is designed to
allow the vapors from the fuel tank to
be loaded into a canister while refu-
eling at the gas station, preventing
the escape of fuel vapors into the
atmosphere.)
Page 483 of 490
I3
Index
Good braking practices ..............................................6-35
Hill-start assist control (HAC) ....................................6-33
Parking brake ..............................................................6-25
Power brakes ..............................................................5-23
Vehicle stability management (VSM) ........................6-34
Brake/clutch fluid ..........................................................8-32 Checking the brake/clutch fluid level ........................8-32
Bulb wattage ....................................................................9-3
Checking fluid levels ....................................................8-26
Child restraint system ....................................................3-23 Using a child restraint system ....................................3-24
Climate control air filter ................................................8-37 Filter inspection ..........................................................8-37
Cruise control system ....................................................6-48 Cruise control switch ..................................................6-48
To cancel cruise control, do one of the following ......6-51
To decrease the cruising speed ..................................6-50
To increase cruise control set speed ..........................6-50
To resume cruising speed at more than approximately 30 km/h (20 mph) ....................................................6-51
To set cruise control speed..........................................6-49
To temporarily accelerate with the cruise control on 6-50
To turn cruise control off, do one of the following ....6-52 Declaration of conformity ............................................5-39
Be sure the exhaust system does not leak ....................6-3
IC ........................................................................\
........5-39
Defroster ......................................................................4-\
103 Rear window defroster ..............................................4-103
Dimensions ......................................................................9-\
2
Door locks......................................................................4-\
18 Auto door lock/unlock feature ....................................4-20
Child-protector rear door lock ....................................4-21
Impact sensing door unlock system ............................4-20
Operating door locks from inside the vehicle ............4-19
Operating door locks from outside the vehicle ..........4-18
Speed sensing door lock system ................................4-21
Economical operation ....................................................6-55
Emergency starting ..........................................................7-5 Jump starting ................................................................7-5
Emission control system ..............................................8-109 Crankcase emission control system ..........................8-109
Evaporative emission control (including ORVR: Onboard Refueling Vapor Recovery) system ........8-109
Exhaust emission control system ..............................8-110
Engine ........................................................................\
......9-2
Engine compartment ................................................2-7, 8-4
C
D
E
Page 485 of 490
I5
Index
In case of an emergency while driving............................7-3If engine stalls while driving ........................................7-3
If the engine stalls at a crossroad or crossing ..............7-3
If you have a flat tire while driving ..............................7-3
Instrument cluster ..........................................................4-53 Gauges ........................................................................\
4-55
Instrument cluster control ..........................................4-54
LCD window control ..................................................4-54
Transaxle shift indicator ............................................4-58
Instrument panel overview ..............................................2-6
Interior features............................................................4-131 Clothes hanger ..........................................................4-135
Covering shelf (5 door) ............................................4-137
Cup holder ................................................................4-131
Floor mat anchor(s) ..................................................4-136
Power outlet ..............................................................4-133
Seat warmer ..............................................................4-132
Shopping bag holder ................................................4-136
Sunvisor ....................................................................4-13\
1
USB charger ..............................................................4-134
Interior light ..................................................................4-98 Automatic turn off function ........................................4-98
Glove box lamp ........................................................4-101
Luggage room lamp ..................................................4-101
Map lamp ....................................................................4-98\
Room lamp ..................................................................4-99
Vanity mirror lamp ....................................................4-102
Interior overview ............................................................2-5 Key positions ..................................................................6-6
Ignition switch position ................................................6-6
Keys ........................................................................\
........4-4 Key operations ..............................................................4-4
Record your key number ..............................................4-4
LCD windows ................................................................4-60 LCD modes (for Type B cluster) ................................4-65
Over view ....................................................................4-60\
Service mode ..............................................................4-66
User settings mode (for Type B cluster) ....................4-66
Light bulbs ....................................................................8-75\
Back-up lamp bulb replacement (4 door) ..................8-94
Back-up lamp bulb replacement (5 door) ..................8-89
Bulb replacement precaution ......................................8-75
DRL (Bulb type) bulb replacement ............................8-85
Front fog lamp bulb replacement................................8-84
Front turn signal lamp bulb replacement (Headlamp Type A) ..................................................8-81
Front turn signal lamp bulb replacement (Headlamp Type B) ..................................................8-83
Glove box lamp bulb replacement ..............................8-99
Headlamp (Low/High beam) bulb replacement (Headlamp Type B) ..................................................8-82K
L