Page 383 of 490
Maintenance
26
8
CHECKING FLUID LEVELS
When checking engine oil, engine
coolant, brake fluid, and washer fluid,
always be sure to clean the area
around any filler plug, drain plug, or
dipstick before checking or draining
any lubricant or fluid. This is espe-
cially important in dusty or sandy
areas and when the vehicle is used
on unpaved roads. Cleaning the plug
and dipstick areas will prevent dirt
and grit from entering the engine and
other mechanisms that could be
damaged.
Page 389 of 490

Maintenance
32
8
BRAKE/CLUTCH FLUID (IF EQUIPPED)
Checking the brake/clutch
fluid level
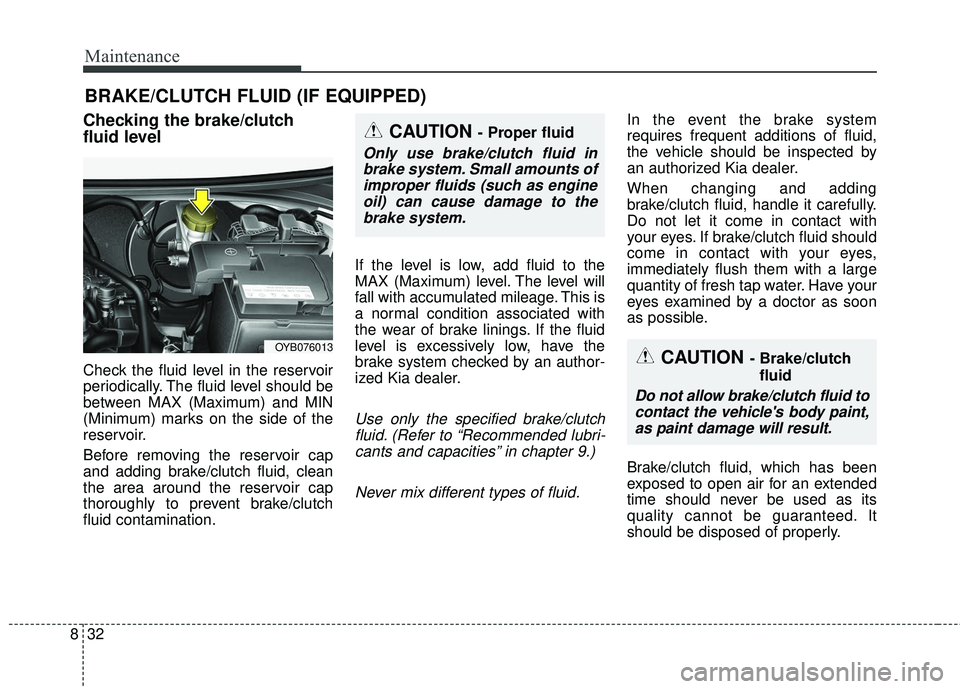
Check the fluid level in the reservoir
periodically. The fluid level should be
between MAX (Maximum) and MIN
(Minimum) marks on the side of the
reservoir.
Before removing the reservoir cap
and adding brake/clutch fluid, clean
the area around the reservoir cap
thoroughly to prevent brake/clutch
fluid contamination. If the level is low, add fluid to the
MAX (Maximum) level. The level will
fall with accumulated mileage. This is
a normal condition associated with
the wear of brake linings. If the fluid
level is excessively low, have the
brake system checked by an author-
ized Kia dealer.
Use only the specified brake/clutch
fluid. (Refer to “Recommended lubri-cants and capacities” in chapter 9.)
Never mix different types of fluid.
In the event the brake system
requires frequent additions of fluid,
the vehicle should be inspected by
an authorized Kia dealer.
When changing and adding
brake/clutch fluid, handle it carefully.
Do not let it come in contact with
your eyes. If brake/clutch fluid should
come in contact with your eyes,
immediately flush them with a large
quantity of fresh tap water. Have your
eyes examined by a doctor as soon
as possible.
Brake/clutch fluid, which has been
exposed to open air for an extended
time should never be used as its
quality cannot be guaranteed. It
should be disposed of properly.
OYB076013CAUTION - Brake/clutch fluid
Do not allow brake/clutch fluid tocontact the vehicle's body paint,as paint damage will result.
CAUTION - Proper fluid
Only use brake/clutch fluid inbrake system. Small amounts ofimproper fluids (such as engineoil) can cause damage to thebrake system.
Page 391 of 490
Maintenance
34
8
Checking the parking brake
Check the stroke of the parking
brake by counting the number of
“clicks’’ heard while fully applying it
from the released position. Also, the
parking brake alone should securely
hold the vehicle on a fairly steep
grade. If the stroke is more or less
than specified, have the parking
brake adjusted by an authorized Kia
dealer.
Stroke : 5~7 “clicks’’ at a force of 20
kg (44 lbs, 196 N).
PARKING BRAKE
OYB076016
Page 405 of 490

Maintenance
48
8
Disc brake pads should be inspected
for wear whenever tires are rotated.
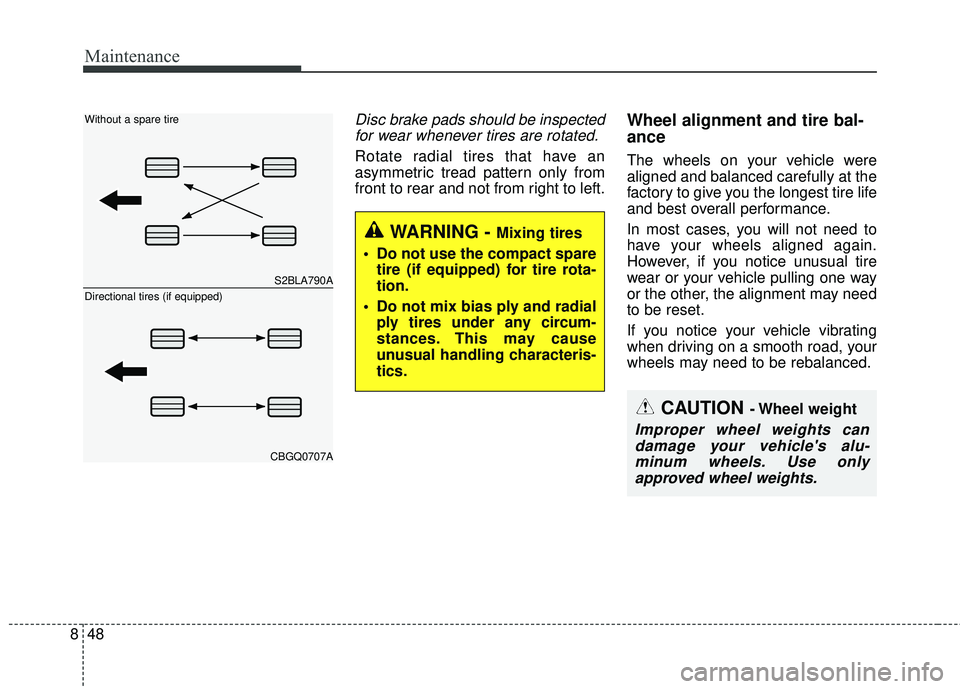
Rotate radial tires that have an
asymmetric tread pattern only from
front to rear and not from right to left.
Wheel alignment and tire bal-
ance
The wheels on your vehicle were
aligned and balanced carefully at the
factory to give you the longest tire life
and best overall performance.
In most cases, you will not need to
have your wheels aligned again.
However, if you notice unusual tire
wear or your vehicle pulling one way
or the other, the alignment may need
to be reset.
If you notice your vehicle vibrating
when driving on a smooth road, your
wheels may need to be rebalanced.
WARNING - Mixing tires
Do not use the compact spare tire (if equipped) for tire rota-
tion.
Do not mix bias ply and radial ply tires under any circum-
stances. This may cause
unusual handling characteris-
tics.
CAUTION - Wheel weight
Improper wheel weights candamage your vehicle's alu-minum wheels. Use onlyapproved wheel weights.
S2BLA790A
CBGQ0707A
Without a spare tire
Directional tires (if equipped)
Page 406 of 490

849
Maintenance
Tire replacement
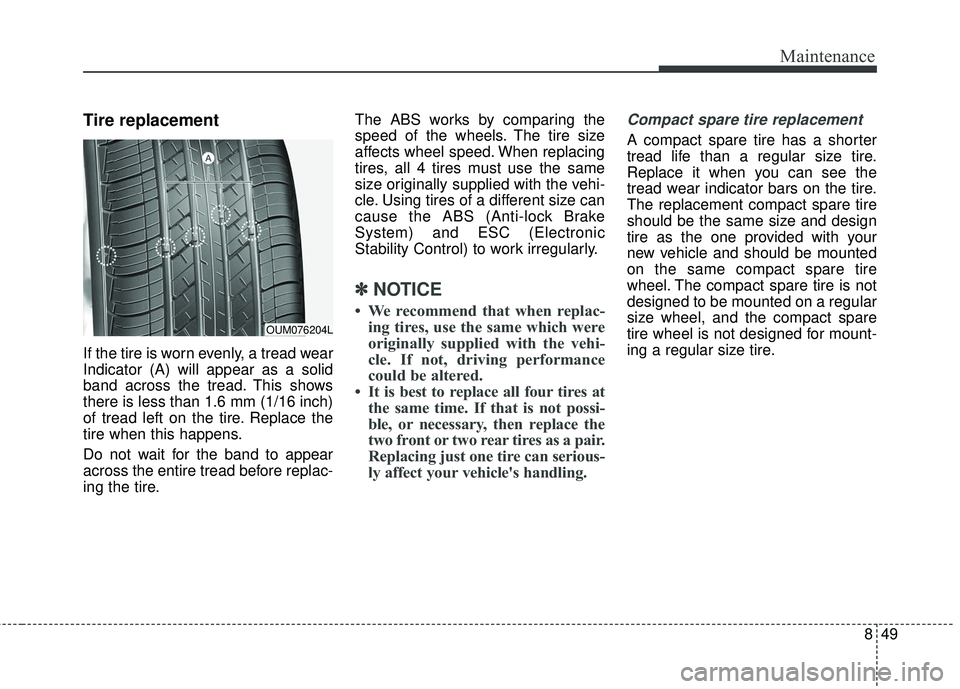
If the tire is worn evenly, a tread wear
Indicator (A) will appear as a solid
band across the tread. This shows
there is less than 1.6 mm (1/16 inch)
of tread left on the tire. Replace the
tire when this happens.
Do not wait for the band to appear
across the entire tread before replac-
ing the tire.The ABS works by comparing the
speed of the wheels. The tire size
affects wheel speed. When replacing
tires, all 4 tires must use the same
size originally supplied with the vehi-
cle. Using tires of a different size can
cause the ABS (Anti-lock Brake
System) and ESC (Electronic
Stability Control) to work irregularly.
✽ ✽
NOTICE
• We recommend that when replac-
ing tires, use the same which were
originally supplied with the vehi-
cle. If not, driving performance
could be altered.
• It is best to replace all four tires at the same time. If that is not possi-
ble, or necessary, then replace the
two front or two rear tires as a pair.
Replacing just one tire can serious-
ly affect your vehicle's handling.
Compact spare tire replacement
A compact spare tire has a shorter
tread life than a regular size tire.
Replace it when you can see the
tread wear indicator bars on the tire.
The replacement compact spare tire
should be the same size and design
tire as the one provided with your
new vehicle and should be mounted
on the same compact spare tire
wheel. The compact spare tire is not
designed to be mounted on a regular
size wheel, and the compact spare
tire wheel is not designed for mount-
ing a regular size tire.
OUM076204L
Page 413 of 490

Maintenance
56
8
Production options weight: The
combined weight of installed regular
production options weighing over 2.3
kg (5 lb.) in excess of the standard
items which they replace, not previ-
ously considered in curb weight or
accessory weight, including heavy
duty brakes, ride levelers, roof rack,
heavy duty battery, and special trim.
Recommended Inflation Pressure:
Vehicle manufacturer's recommend-
ed tire inflation pressure and shown
on the tire placard.
Radial Ply Tire: A pneumatic tire in
which the ply cords that extend to the
beads are laid at 90 degrees to the
centerline of the tread.
Rim: A metal support for a tire and
upon which the tire beads are seat-
ed.
Sidewall: The portion of a tire
between the tread and the bead. Speed Rating:
An alphanumeric
code assigned to a tire indicating the
maximum speed at which a tire can
operate.
Traction: The friction between the
tire and the road surface. The
amount of grip provided.
Tread: The portion of a tire that
comes into contact with the road.
Treadwear Indicators: Narrow
bands, sometimes called "wear
bars," that show across the tread of a
tire when only 1/16 inch of tread
remains.
UTQGS: Uniform Tire Quality
Grading Standards, a tire information
system that provides consumers with
ratings for a tire's traction, tempera-
ture and treadwear. Ratings are
determined by tire manufacturers
using government testing proce-
dures. The ratings are molded into
the sidewall of the tire.
Vehicle Capacity Weight: The num-
ber of designated seating positions
multiplied by 68kg (150 lbs.) plus the
rated cargo and luggage load. Vehicle Maximum Load on the
Tire:
Load on an individual tire due
to curb and accessory weight plus
maximum occupant and cargo
weight.
Vehicle Normal Load on the Tire:
Load on an individual tire that is
determined by distributing to each
axle its share of the curb weight,
accessory weight, and normal occu-
pant weight and driving by 2.
Vehicle Placard: A label permanent-
ly attached to a vehicle showing the
original equipment tire size and rec-
ommended inflation pressure.
Page 425 of 490

Maintenance
68
8
Fuse NameFuse ratingCircuit Protected
TCU15AEngine Room Junction Block(Back-Up Lamp Switch), Auto Transmission Shift Lever, Transaxle Range
Switch, Stop Lamp Switch
P/WINDOW LH25APower Window Main Switch
SPARE125ASpare
FOG LAMP REAR10A-
HEATED STEERING15AClock Spring
TAIL LAMP LH7.5AHead Lamp Left Handle side, License Lamp Left Handle side, Rear Combination Lamp (OUT) Left
Handle side, Rear Combination Lamp (IN) Left Handle side, Glove Box Lamp
MODULE37.5AFront Seat Warmer Control Module, Audio, Electro Chromic Mirror, Air Conditioner Control Module,
Audio/Video & Navigation Head Unit, Clock Spring, Auto Transmission Shift Lever Indicator
ABS7.5AEngine Room Junction Block(Multipurpose Check Connector), ESC (Electronic Stability Control) Module
BRAKE SWITCH10ASmart Key Control Module, Stop Lamp Switch
SPARE415ASpare
FOG LAMP FRONT15AFront Fog Lamp Relay
A/CON17.5AEngine Room Junction Block(Blower Relay), Air Conditioner Control Module
MODULE510AEngine Room Junction Block(Head Lamp Relay, Head Lamp Hi Relay), Rain Sensor, Sunroof Motor,
Front Seat Warmer Control Module, Driver Safety Power Window Module
MODULE710ATPMS (Tire Pressure Monitoring System) Unit
ECU10AECM (Engine Control Module)/PCM (Power train Control Module), Immobilizer Module, Smart Key
Control Module
Page 430 of 490
873
Maintenance
Fuse NameFuse ratingCircuit Protected
B/UP LAMP10ABack-Up Lamp Switch
B+140AInstrument Panel Junction Block (Fuse - DRL2, FOGLAMP FRONT, STOP LAMP, MODULE6, Power
Connector (AUDIO, ROOM LAMP))
B+250AInstrument Panel Junction Block (Fuse - IMMO, SMART KEY, BRAKE SWITCH, SAFETY P/WINDOW,
S/HEATER, SUNROOF, Power Window Relay)
IG240AIgnition Switch, IG2 Relay, Start Relay
COOLING FAN40ACooling Fan1/2 Relay
ECU130AFuse - ECU3, ECU4, Main Relay
HEAD LAMP20AHead Lamp Relay
H/LAMP HI20AWith CANADA DRL : SLM(Seat Belt & Lighting Module) or BCM(Body Control Module)
Without CANADA DRL : Head Lamp HI Relay
FUEL PUMP20AFuel Pump Relay
HORN15AHorn Relay/ Burglar Alarm Horn Relay
A/CON10AAir Conditioner Relay
AMS10ABattery Sensor
B+340AInstrument Panel Junction Block (Fuse - T/SIGNAL LAMP, DOOR LOCK, Tail Lamp Relay)
IG140AIgnition Switch, IG1 Relay, ACC Relay
POWER OUTLET40AInstrument Panel Junction Block (Power Outlet Relay)