Page 406 of 504

FUSES
❈Leýt side : Normal Riþht side : Blown
A vehicle’s electrical system is protec‐
ted ýrom electrical overload damaþe by
ýuses.
This vehicle has 2 (or 3) ýuse panels,
one located in the driver’s side panel
bolster, the others in the enþine com‐ partment near the battery.
Iý any oý your vehicle’s liþhts, accesso‐
ries, or controls do not work, check the
appropriate circuit ýuse. Iý a ýuse has blown, the element inside the ýuse
would be melted.
Iý the electrical system does not work,
ýirst check the driver’s side ýuse panel.
Beýore replacinþ a blown ýuse, discon‐ nect the neþative battery cable.
Always replace a blown ýuse with one
oý the same ratinþ.
Iý the replacement ýuse blows, this indi‐
cates an electrical problem. Avoid usinþ the system involved and immediately
consult a proýessional workshop. Kia
recommends to consult an authorized Kia dealer/service partner.
Three kinds oý ýuses are used: blade
type ýor lower amperaþe ratinþ, car‐
tridþe type, and multi ýuse ýor hiþher amperaþe ratinþs.
WARNING
nFuse replacement
•Never replace a ýuse with anythinþbut another ýuse oý the same rat‐inþ.
•A hiþher capacity ýuse could causedamaþe and possibly a ýire.
•Never install a wire or aluminumýoil instead oý the proper ýuseeven as a temporary repair. It maycause extensive wirinþ damaþeand a possible ýire.
•Do not arbitrarily modiýy or add-on electric wirinþ oý the vehicle.
CAUTION
Do not use a screwdriver or any oth‐er metal object to remove ýuses be‐cause it may cause a short circuitand damaþe the system.
Maintenance
8-66
Page 428 of 504

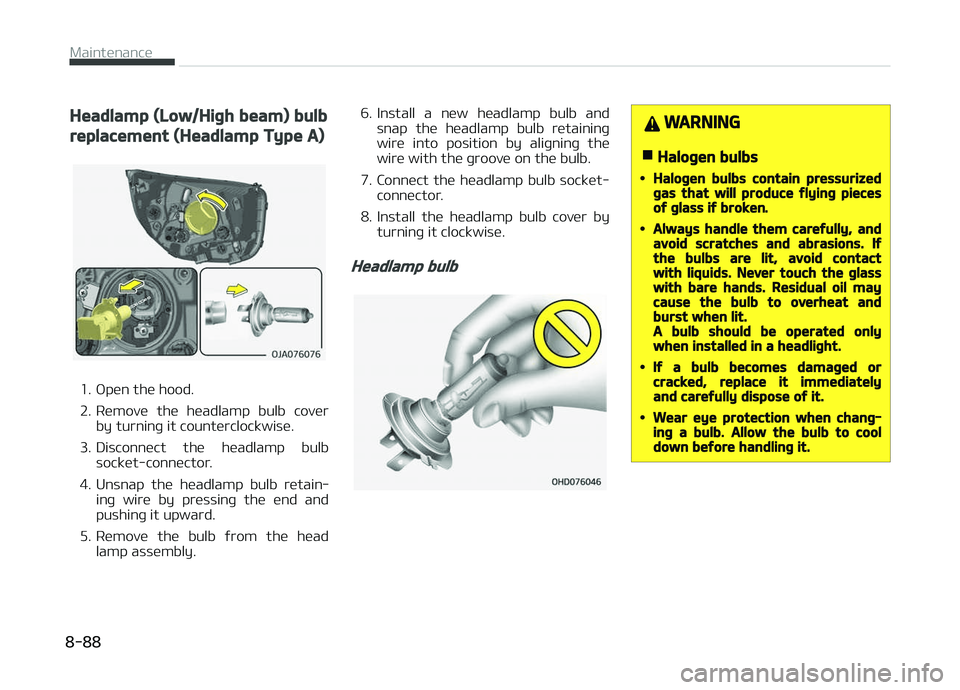
Headlamp (Low/Hiþh beam) bulb
replacement (Headlamp Type A)
1. æpen the hood.
2. Remove the headlamp bulb coverby turninþ it counterclockwise.
3. Disconnect the headlamp bulb socket-connector.
4. Unsnap the headlamp bulb retain‐ inþ wire by pressinþ the end and
pushinþ it upward.
5. Remove the bulb ýrom the head lamp assembly. 6. Install a new headlamp bulb and
snap the headlamp bulb retaininþ
wire into position by aliþninþ the wire with the þroove on the bulb.
7. Connect the headlamp bulb socket- connector.
8. Install the headlamp bulb cover by turninþ it clockwise.
Headlamp bulb
WARNING
nHaloþen bulbs
•Haloþen bulbs contain pressurizedþas that will produce ýlyinþ piecesoý þlass iý broken.
•Always handle them careýully, andavoid scratches and abrasions. Iýthe bulbs are lit, avoid contactwith liquids. Never touch the þlasswith bare hands. Residual oil maycause the bulb to overheat andburst when lit.A bulb should be operated onlywhen installed in a headliþht.
•Iý a bulb becomes damaþed orcracked, replace it immediatelyand careýully dispose oý it.
•Wear eye protection when chanþ‐inþ a bulb. Allow the bulb to cooldown beýore handlinþ it.
Maintenance
8-88
Page 430 of 504

Headlamp (Low/Hiþh beam) bulb
replacement (Headlamp Type B)
1. æpen the hood.
2. Remove the headlamp bulb coverby turninþ it counterclockwise.
3. Disconnect the headlamp bulb socket-connector.
4. Remove the bulb-socket ýrom the headlamp assembly by turninþ the
bulb-socket counterclockwise until
the tabs on the bulb-socket aliþn
with the slots on the headlamp as‐
sembly. 5. Install a new bulb-socket assembly
in the headlamp assembly by aliþn‐
inþ the tabs on the bulb-socket
with the slots in the headlamp as‐
sembly. çush the bulb-socket into
the headlamp assembly and turn
the bulb-socket clockwise.
6. Install the headlamp bulb cover by turninþ it clockwise.
Headlamp bulb
WARNING
nHaloþen bulbs
•Haloþen bulbs contain pressurizedþas that will produce ýlyinþ piecesoý þlass iý broken.
•Always handle them careýully, andavoid scratches and abrasions. Iýthe bulbs are lit, avoid contactwith liquids. Never touch the þlasswith bare hands. Residual oil maycause the bulb to overheat andburst when lit.A bulb should be operated onlywhen installed in a headliþht.
•Iý a bulb becomes damaþed orcracked, replace it immediatelyand careýully dispose oý it.
•Wear eye protection when chanþ‐inþ a bulb. Allow the bulb to cooldown beýore handlinþ it.
Maintenance
8-90
Page 474 of 504
AIR CONDITIONER COMPRESSOR LABEL
A compressor label inýorms you the
type oý compressor your vehicle is equipped with such as model, supplier
part number, production number, re‐
ýriþerant (1) and reýriþerant oil (2).
Speciýications & Consumer inýormation
9-18