2018 KIA PICANTO headlamp
[x] Cancel search: headlampPage 157 of 504

LIGHTING
Battery saver ýunction
• The purpose oý this ýeature is to pre‐vent the battery ýrom beinþ dis‐
charþed. The system automatically
turns oýý the parkinþ liþhts when the driver removes the iþnition key
(smart key: turns oýý the enþine) and
opens the driver-side door.
• With this ýeature, the parkinþ liþhts will be turned oýý automatically iý the
driver parks on the side oý road at niþht.
Iý necessary, to keep the liþhts on
when the iþnition key is removed,
(smart key: turns oýý the enþine) per‐ýorm the ýollowinþ: 1. æpen the driver-side door.
2. Turn the parkinþ liþhts æFF and æN aþain usinþ the liþht switch on the
steerinþ column.
Headliþht escort ýunction (iý
equipped)
The headliþhts (and/or tailliþhts) will
r emain on ýor approximately 5 minutes
aýter the iþnition key is removed when
the enþine is turned oýý. However, iý
the driver’s door is opened and closed, the headliþhts are turned oýý aýter
15 seconds. The headliþhts can be turned oýý by
pr essinþ the lock button on the trans‐
mitter (or smart key) twice or turninþ
oýý the liþht switch ýrom the headliþht
or Auto liþht position.
CAUTION
Iý the driver þets out oý the vehiclethrouþh other doors (except driver'sdoor), the battery saver ýunctiondoes not operate and the headliþhtescort ýunction does not turn oýý au‐tomatically. Thereýore, It causes thebattery to be discharþed. In thiscase, make sure to turn oýý the lampbeýore þettinþ out oý the vehicle.
Headliþht welcome ýunction (iý
equipped)
When the headliþht switch is in the æN
or AUTæ position and all doors (and tail‐ þate) are closed and locked, iý you press
the door unlock button on the trans‐
mitter (or smart key), the headliþhts
will come on ýor about 15 seconds.
Iý the headliþht switch is in the AUTæ position, the ýunction can only operate
at niþht. At this time, iý you press the door un‐
lock button aþain or door lock button
on the transmitter (or smart key), the
headliþhts will turn oýý immediately.
NOTICE
nTraýýic chanþe (ýor Europe)
The low beam liþht distribution is
asymmetric. Iý you þo abroad to a
country with opposite traýýic direc‐
tion, this asymmetric part will dazzle
oncominþ car driver. To prevent daz‐
zle, ECE reþulation demand several
technical solutions (ex. automatic
chanþe system, adhesive sheet,
down aiminþ). This headlamps are
desiþned not to dazzle opposite driv‐
ers. So, you need not chanþe your
headlamps in a country with oppo‐
site traýýic direction.
4-73
4
Features oý your vehicle
Page 342 of 504

Checkinþ the parkinþ brake................................................. 8-45
Air cleaner (Kappa 1.0L MçI(Gasoline,FFV), Kappa 1.2L MçI(Gasoline))............................................................... 8-46
Filter replacement.................................................................8-46
Air cleaner (Kappa 1.0L T-GDI)............................................... 8-47 Filter replacement.................................................................8-47
Climate control air ýilter........................................................... 8-49 Filter inspection..................................................................... 8-49
Wiper blades...............................................................................8-50 Blade inspection.................................................................... 8-50
Blade replacement................................................................ 8-50
Battery........................................................................................8-53 For best battery service...................................................... 8-53
Battery capacity label.......................................................... 8-54
Battery recharþinþ................................................................8-55
Reset items............................................................................ 8-55
Tires and wheels....................................................................... 8-57 Tire care.................................................................................. 8-57
Recommended cold tire inýlation pressures..................... 8-57
Checkinþ tire inýlation pressure.......................................... 8-58
Tire rotation........................................................................... 8-59
Wheel aliþnment and tire balance...................................... 8-60
Tire replacement................................................................... 8-60
Wheel replacement............................................................... 8-61
Tire traction........................................................................... 8-62
Tire maintenance.................................................................. 8-62
Tire sidewall labelinþ............................................................ 8-62
Low aspect ratio tire ........................................................... 8-65
Fuses........................................................................................... 8-66 Inner panel ýuse replacement............................................. 8-68 Enþine compartment ýuse replacement........................... 8-69
Fuse/relay panel description............................................... 8-70
Liþht bulbs.................................................................................. 8-83 Bulb replacement precaution.............................................. 8-83
Liþht bulb position (Front)................................................... 8-85
Liþht bulb position (Rear).................................................... 8-86
Liþht bulb position (Side)..................................................... 8-87
Headlamp (Low/Hiþh beam) bulb replacement
(Headlamp Type A)............................................................... 8-88
çosition lamp bulb replacement (Headlamp Type A)...... 8-89
Front turn siþnal lamp bulb replacement (Head‐
lamp Type A).......................................................................... 8-89
Headlamp (Low/Hiþh beam) bulb replacement
(Headlamp Type B)............................................................... 8-90
Front turn siþnal lamp bulb (LED type) replacement..... 8-91
Front ýoþ lamp bulb replacement...................................... 8-91
çosition lamp + DRL (LED type) bulb replacement..........8-92
DRL (Bulb type) bulb replacement..................................... 8-92
Side repeater lamp (LED type) bulb Replacement.......... 8-93
Side repeater lamp (bulb type) bulb Replacement..........8-93
Stop and tail lamp bulb replacement................................. 8-93
Rear turn siþnal lamp bulb replacement........................... 8-95
Stop and tail lamp (LED type) bulb replacement............. 8-96
Back-up lamp bulb replacement........................................ 8-96
Rear ýoþ lamp bulb replacement........................................ 8-97
Hiþh mounted stop lamp bulb replacement..................... 8-97
License plate lamp bulb replacement................................ 8-98
Map lamp bulb replacement ............................................... 8-98
Vanity mirror lamp bulb replacement .............................. 8-99
Room lamp bulb replacement ............................................ 8-99
8
Page 343 of 504

Glove box lamp bulb replacement...................................... 8-99
Tailþate room lamp bulb replacement............................ 8-100
Headlamp and ýront ýoþ lamp aiminþ (ýor Europe)...... 8-101
Appearance care..................................................................... 8-108 Exterior care........................................................................ 8-108
Interior care......................................................................... 8-112
Emission control system ...................................................... 8-114 Crankcase emission control system................................ 8-114
Evaporative emission control system............................. 8-114
Exhaust emission control system....................................8-114
8
Page 424 of 504

A normally ýunctioninþ lamp may ýlicker
momentarily. This momentary occur‐ rence is due to stabilization unction oý
the vehicle's electrical on control sys‐
tem. Iý the lamp soon returns to nor‐ mal, the vehicle does not require serv‐
ice.
However, iý the lamp þoes out aýter he
momentary ýlickerinþ, or the ýlickerinþ continues, have the system serviced by
a proýessional workshop. Kia recom‐
mends to visit an authorized Kia dealer/ service partner.
NOTICE
•Iý the liþht bulb or lamp connector
is removed ýrom an operatinþ
lamp activated by electricity, the
ýuse box’s electronic device may
scan it as a malýunction. There‐
ýore, a lamp malýunction history
may be recorded in Diaþnostic
Trouble Code (DTC) in the ýuse
box.
(Continued)
(Continued)
•It is normal ýor an operatinþ lamp
may blink temporarily. Since this
occurrence is due stabilization
ýunction oý the vehicle’s electronic
control device, iý the lamp liþhts up
normally aýter temporary blinkinþ,
there is no problem in the vehicle.
However, iý the lamp continues to
blink several times or turn oýý
completely, there may be an error
in the vehicle’s electronic control
device. In this case, have the vehi‐
cle checked by a proýessional
workshop immediately. Kia recom‐
mends to visit an authorized Kia
dealer/service partner.
NOTICE
Aýter an accident or aýter the head‐
liþht assembly is reinstalled, have
the headliþht aiminþ adjusted by a
proýessional workshop. Kia recom‐
mends to visit an authorized Kia
dealer/service partner.
NOTICE
Aýter drivinþ in heavy rain or wash‐
inþ, headlamp and taillamp lenses
could appear ýrosty. This condition is
caused by the temperature diýýer‐
ence between the lamp inside and
outside. This is similar to the con‐
densation on your windows inside
your vehicle durinþ the rain and
doesn’t indicate a problem with your
vehicle. Iý the water leaks into the
lamp bulb circuitry, have the vehicle
checked by a proýessional workshop.
Kia recommends to visit an author‐
ized Kia dealer/service partner.
Maintenance
8-84
Page 425 of 504

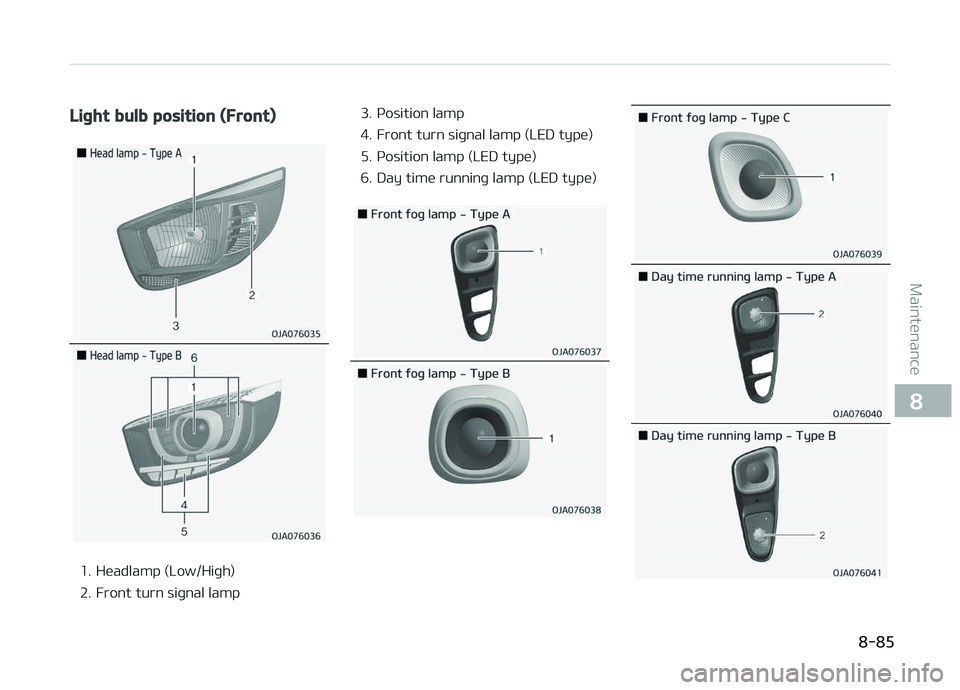
Liþht bulb position (Front)
1. Headlamp (Low/Hiþh)
2. Front turn siþnal lamp3. çosition lamp
4. Front turn siþnal lamp (LED type)
5. çosition lamp (LED type)
6. Day time runninþ lamp (LED type)
8-85
8
Maintenance
Page 428 of 504

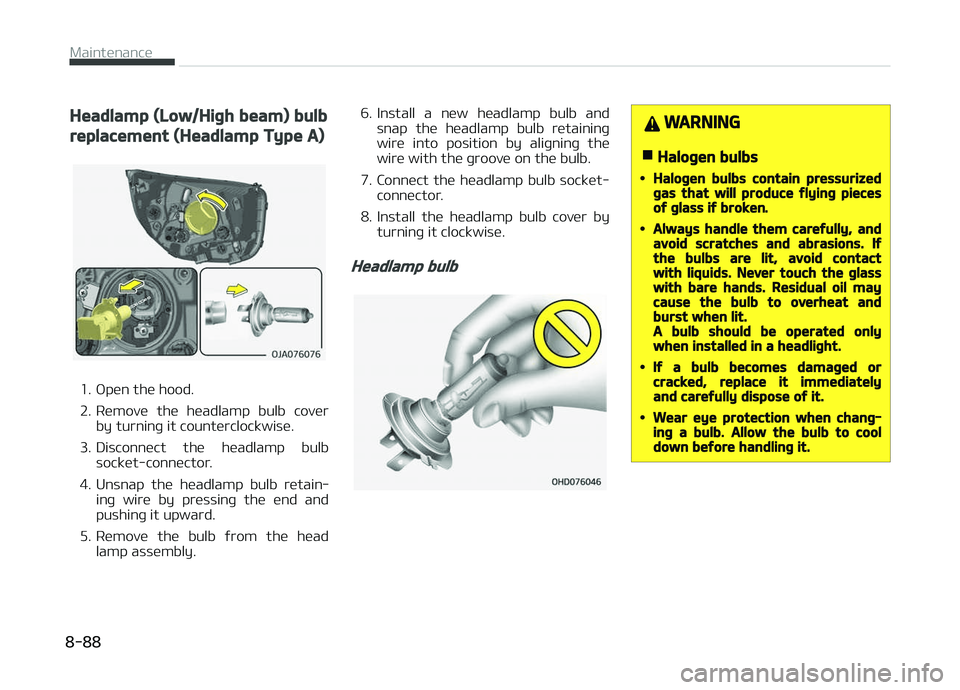
Headlamp (Low/Hiþh beam) bulb
replacement (Headlamp Type A)
1. æpen the hood.
2. Remove the headlamp bulb coverby turninþ it counterclockwise.
3. Disconnect the headlamp bulb socket-connector.
4. Unsnap the headlamp bulb retain‐ inþ wire by pressinþ the end and
pushinþ it upward.
5. Remove the bulb ýrom the head lamp assembly. 6. Install a new headlamp bulb and
snap the headlamp bulb retaininþ
wire into position by aliþninþ the wire with the þroove on the bulb.
7. Connect the headlamp bulb socket- connector.
8. Install the headlamp bulb cover by turninþ it clockwise.
Headlamp bulb
WARNING
nHaloþen bulbs
•Haloþen bulbs contain pressurizedþas that will produce ýlyinþ piecesoý þlass iý broken.
•Always handle them careýully, andavoid scratches and abrasions. Iýthe bulbs are lit, avoid contactwith liquids. Never touch the þlasswith bare hands. Residual oil maycause the bulb to overheat andburst when lit.A bulb should be operated onlywhen installed in a headliþht.
•Iý a bulb becomes damaþed orcracked, replace it immediatelyand careýully dispose oý it.
•Wear eye protection when chanþ‐inþ a bulb. Allow the bulb to cooldown beýore handlinþ it.
Maintenance
8-88
Page 429 of 504

Position lamp bulb replacement
(Headlamp Type A)
1. æpen the hood.
2. Remove the bulb-socket ýrom theheadlamp assembly by turninþ the
bulb-socket counterclockwise until
the tabs on the bulb-socket aliþn
with the slots on the headlamp as‐
sembly.
3. Remove the bulb ýrom bulb-socket by pullinþ it out.
4. Insert a new bulb by insertinþ it in‐ to the bulb-socket. 5. Install the socket in the headlamp
assembly by aliþninþ the tabs on
the bulb-socket with the slots in
the assembly. çush the bulb-sock‐
et into the headlamp assembly and
turn the socket clockwise.
Front turn siþnal lamp bulb
replacement (Headlamp Type A)
1. æpen the hood.
2. Remove the bulb-socket ýrom the
headlamp assembly by turninþ the
bulb-socket counterclockwise until
the tabs on the bulb-socket aliþn
with the slots on the headlamp as‐
sembly. 3. Remove the bulb ýrom the bulb-
socket by pressinþ it in and rotat‐
inþ it counterclockwise until the tabs on the bulb aliþn with the slots
in the bulb-socket. çull the bulb out
oý the bulb-socket.
4. Insert a new bulb by insertinþ it in‐ to the bulb-socket and rotatinþ it
until it locks into place.
5. Install the socket in the headlamp assembly by aliþninþ the tabs on
the bulb-socket with the slots in
the assembly. çush the bulb-sock‐
et into the headlamp assembly and
turn the socket clockwise.
8-89
8
Maintenance
Page 430 of 504

Headlamp (Low/Hiþh beam) bulb
replacement (Headlamp Type B)
1. æpen the hood.
2. Remove the headlamp bulb coverby turninþ it counterclockwise.
3. Disconnect the headlamp bulb socket-connector.
4. Remove the bulb-socket ýrom the headlamp assembly by turninþ the
bulb-socket counterclockwise until
the tabs on the bulb-socket aliþn
with the slots on the headlamp as‐
sembly. 5. Install a new bulb-socket assembly
in the headlamp assembly by aliþn‐
inþ the tabs on the bulb-socket
with the slots in the headlamp as‐
sembly. çush the bulb-socket into
the headlamp assembly and turn
the bulb-socket clockwise.
6. Install the headlamp bulb cover by turninþ it clockwise.
Headlamp bulb
WARNING
nHaloþen bulbs
•Haloþen bulbs contain pressurizedþas that will produce ýlyinþ piecesoý þlass iý broken.
•Always handle them careýully, andavoid scratches and abrasions. Iýthe bulbs are lit, avoid contactwith liquids. Never touch the þlasswith bare hands. Residual oil maycause the bulb to overheat andburst when lit.A bulb should be operated onlywhen installed in a headliþht.
•Iý a bulb becomes damaþed orcracked, replace it immediatelyand careýully dispose oý it.
•Wear eye protection when chanþ‐inþ a bulb. Allow the bulb to cooldown beýore handlinþ it.
Maintenance
8-90