2018 KIA OPTIMA PHEV lock
[x] Cancel search: lockPage 84 of 547
Safety features of your vehicle
24
3
Seat belt - Driver's 3-point system
with emergency locking retractor
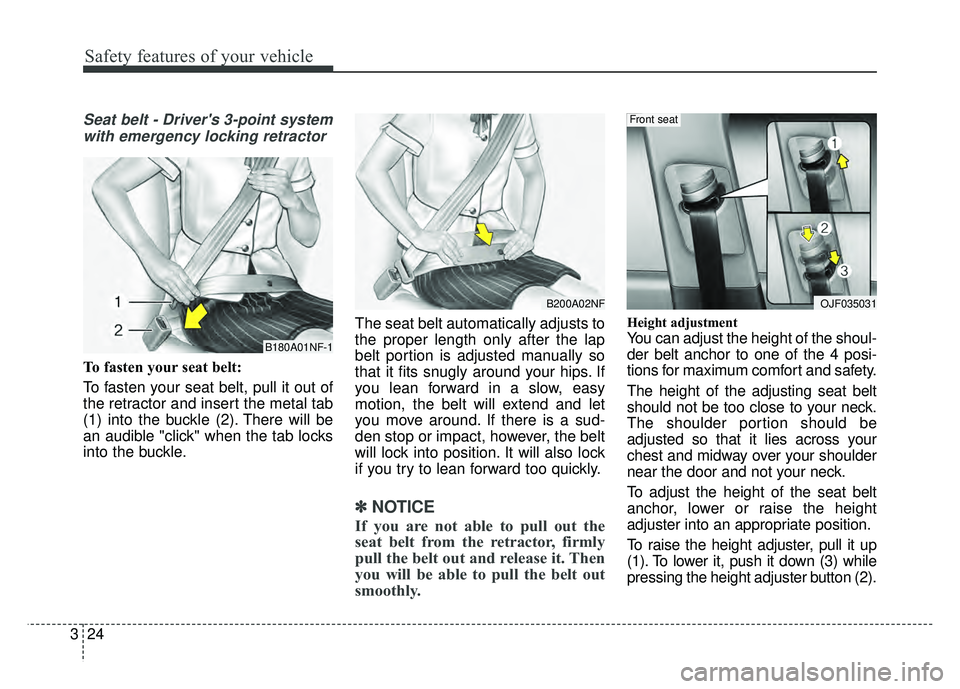
To fasten your seat belt:
To fasten your seat belt, pull it out of
the retractor and insert the metal tab
(1) into the buckle (2). There will be
an audible "click" when the tab locks
into the buckle. The seat belt automatically adjusts to
the proper length only after the lap
belt portion is adjusted manually so
that it fits snugly around your hips. If
you lean forward in a slow, easy
motion, the belt will extend and let
you move around. If there is a sud-
den stop or impact, however, the belt
will lock into position. It will also lock
if you try to lean forward too quickly.
✽ ✽
NOTICE
If you are not able to pull out the
seat belt from the retractor, firmly
pull the belt out and release it. Then
you will be able to pull the belt out
smoothly.
Height adjustment
You can adjust the height of the shoul-
der belt anchor to one of the 4 posi-
tions for maximum comfort and safety.
The height of the adjusting seat belt
should not be too close to your neck.
The shoulder portion should be
adjusted so that it lies across your
chest and midway over your shoulder
near the door and not your neck.
To adjust the height of the seat belt
anchor, lower or raise the height
adjuster into an appropriate position.
To raise the height adjuster, pull it up
(1). To lower it, push it down (3) while
pressing the height adjuster button (2).B180A01NF-1
B200A02NFOJF035031
Front seat
Page 85 of 547
325
Safety features of your vehicle
Release the button to lock the
anchor into position. Try sliding the
height adjuster to make sure that it
has locked into position.
Imporperly positioned seat belts can
cause serious injuries in an accident.Seat belts - Front passenger andrear seat 3-point system withcombination locking retractor
To fasten your seat belt:
Combination retractor type seat belts
are installed in the rear seat posi-
tions to help accommodate the
installation of child restraint systems.
Although a combination retractor is
also installed in the front passenger
seat position, it is strongly recom-
mended that children always be
seated in the rear seat. NEVER
place any infant restraint system in
the front seat of the vehicle.
This type of seat belt combines the
features of both an emergency lock-
ing retractor seat belt and an auto-
matic locking retractor seat belt. To
fasten your seat belt, pull it out of the
retractor and insert the metal tab into
the buckle. There will be an audible
"click" when the tab locks into the
buckle. When not securing a child
restraint, the seat belt operates in the
same way as the driver's seat belt
(Emergency Locking Retractor Type). It automatically adjusts to the proper
length only after the lap belt portion
of the seat belt is adjusted manually
so that it fits snugly around your hips.
When the seat belt is fully extended
from the retractor to allow the instal-
lation of a child restraint system, the
seat belt operation changes to allow
the belt to retract, but not to extend
(Automatic Locking Retractor Type).
Refer to “Using a child restraint sys-
tem” in this section.
✽ ✽
NOTICE
Although the combination retractor
provides the same level of protection
for seated passengers in either emer-
gency or automatic locking modes,
have the seated passengers use the
emergency locking feature for improv-
ed convenience. The automatic locking
function is intended to facilitate child
restraint installation. To convert from
the automatic locking feature to the
emergency locking operation mode,
allow the unbuckled seat belt to fully
retract.
WARNING- Shoulder belt
positioning
Never position the shoulder belt
across your neck or face.
WARNING- Seat belt replacement
Replace your seat belts after
being in an accident. Failure to
replace seat belts after an acci-
dent could leave you with dam-
aged seat belts that will not pro-
vide protection in the event of
another collision.
Page 86 of 547
Safety features of your vehicle
26
3
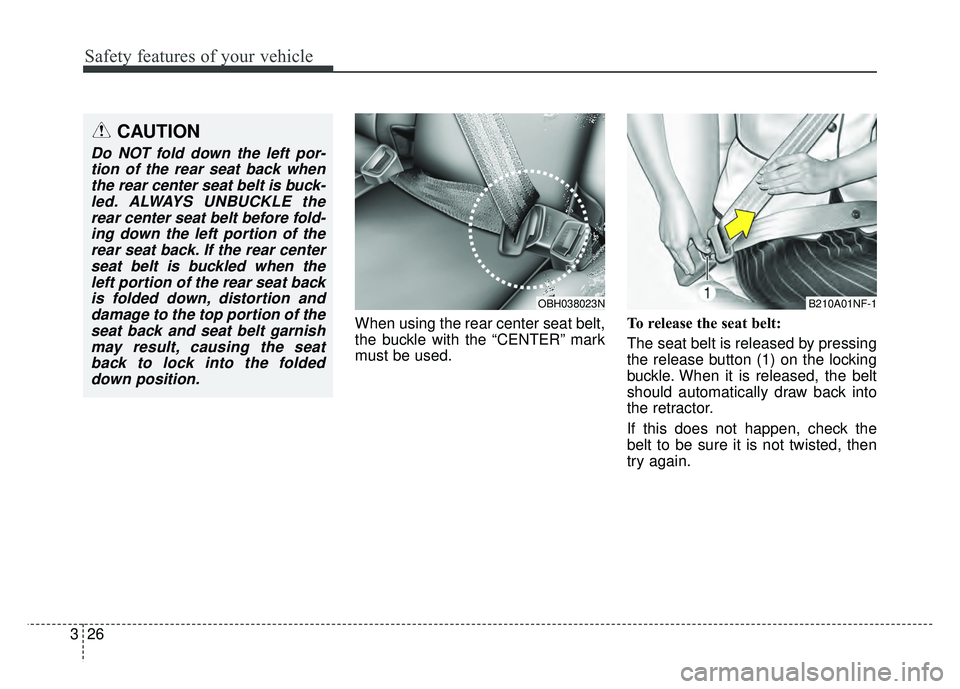
When using the rear center seat belt,
the buckle with the “CENTER” mark
must be used. To release the seat belt:
The seat belt is released by pressing
the release button (1) on the locking
buckle. When it is released, the belt
should automatically draw back into
the retractor.
If this does not happen, check the
belt to be sure it is not twisted, then
try again.
CAUTION
Do NOT fold down the left por-
tion of the rear seat back whenthe rear center seat belt is buck-led. ALWAYS UNBUCKLE therear center seat belt before fold-ing down the left portion of therear seat back. If the rear centerseat belt is buckled when theleft portion of the rear seat backis folded down, distortion anddamage to the top portion of theseat back and seat belt garnishmay result, causing the seatback to lock into the foldeddown position.
B210A01NF-1OBH038023N
Page 87 of 547
327
Safety features of your vehicle
Pre-tensioner seat belt
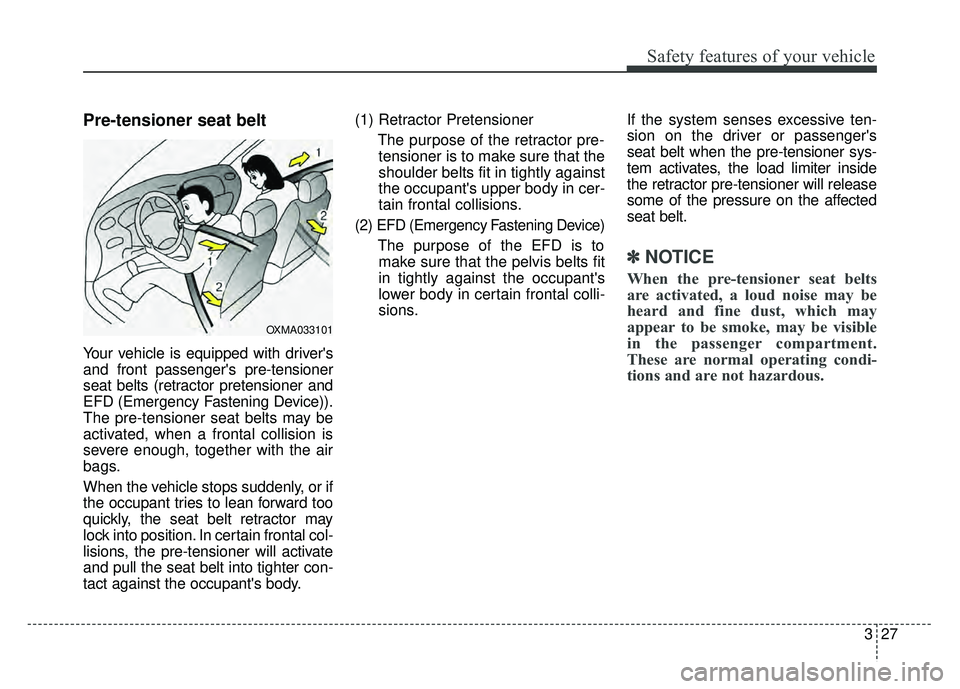
Your vehicle is equipped with driver's
and front passenger's pre-tensioner
seat belts (retractor pretensioner and
EFD (Emergency Fastening Device)).
The pre-tensioner seat belts may be
activated, when a frontal collision is
severe enough, together with the air
bags.
When the vehicle stops suddenly, or if
the occupant tries to lean forward too
quickly, the seat belt retractor may
lock into position. In certain frontal col-
lisions, the pre-tensioner will activate
and pull the seat belt into tighter con-
tact against the occupant's body.(1) Retractor Pretensioner
The purpose of the retractor pre-tensioner is to make sure that the
shoulder belts fit in tightly against
the occupant's upper body in cer-
tain frontal collisions.
(2) EFD (Emergency Fastening Device)
The purpose of the EFD is tomake sure that the pelvis belts fit
in tightly against the occupant's
lower body in certain frontal colli-
sions. If the system senses excessive ten-
sion on the driver or passenger's
seat belt when the pre-tensioner sys-
tem activates, the load limiter inside
the retractor pre-tensioner will release
some of the pressure on the affected
seat belt.✽ ✽
NOTICE
When the pre-tensioner seat belts
are activated, a loud noise may be
heard and fine dust, which may
appear to be smoke, may be visible
in the passenger compartment.
These are normal operating condi-
tions and are not hazardous.
OXMA033101
Page 100 of 547
Safety features of your vehicle
40
3
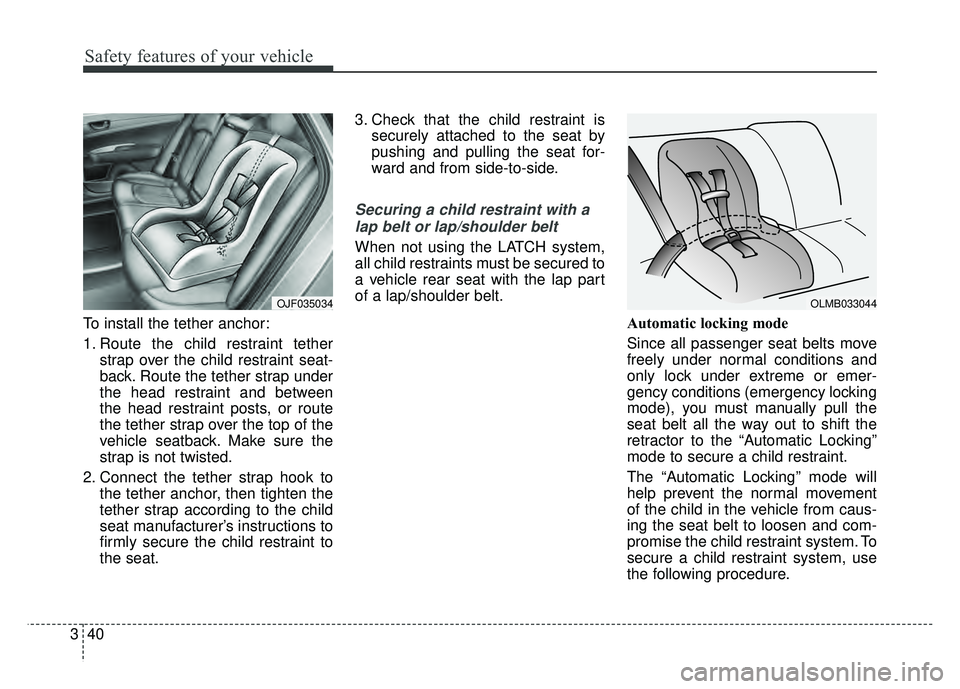
To install the tether anchor:
1. Route the child restraint tether
strap over the child restraint seat-
back. Route the tether strap under
the head restraint and between
the head restraint posts, or route
the tether strap over the top of the
vehicle seatback. Make sure the
strap is not twisted.
2. Connect the tether strap hook to the tether anchor, then tighten the
tether strap according to the child
seat manufacturer’s instructions to
firmly secure the child restraint to
the seat. 3. Check that the child restraint is
securely attached to the seat by
pushing and pulling the seat for-
ward and from side-to-side.
Securing a child restraint with a
lap belt or lap/shoulder belt
When not using the LATCH system,
all child restraints must be secured to
a vehicle rear seat with the lap part
of a lap/shoulder belt.
Automatic locking mode
Since all passenger seat belts move
freely under normal conditions and
only lock under extreme or emer-
gency conditions (emergency locking
mode), you must manually pull the
seat belt all the way out to shift the
retractor to the “Automatic Locking”
mode to secure a child restraint.
The “Automatic Locking” mode will
help prevent the normal movement
of the child in the vehicle from caus-
ing the seat belt to loosen and com-
promise the child restraint system. To
secure a child restraint system, use
the following procedure.
OJF035034OLMB033044
Page 101 of 547
341
Safety features of your vehicle
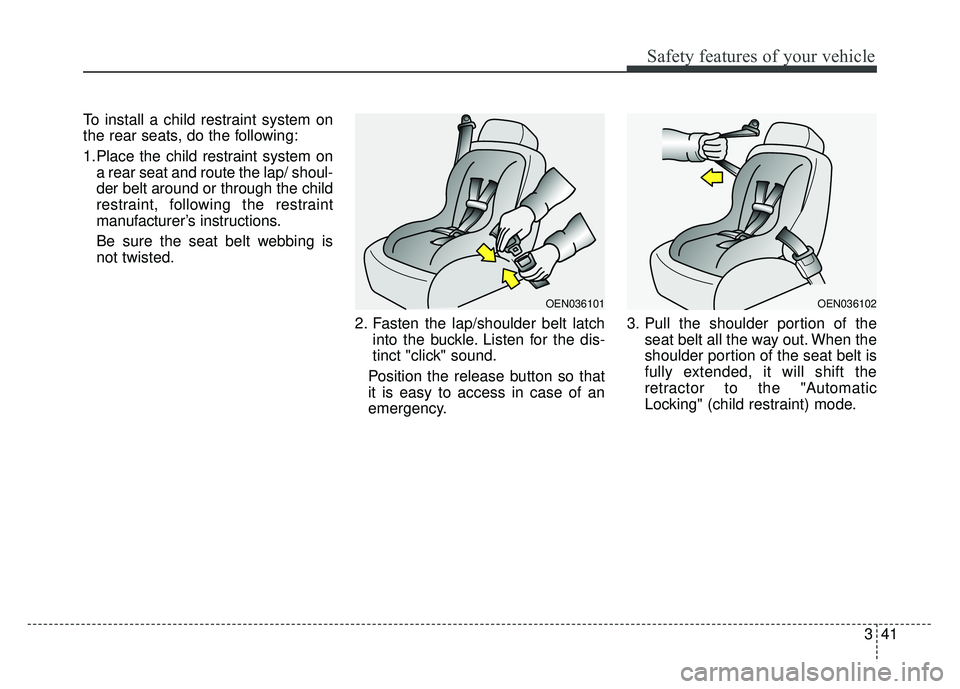
To install a child restraint system on
the rear seats, do the following:
1.Place the child restraint system ona rear seat and route the lap/ shoul-
der belt around or through the child
restraint, following the restraint
manufacturer’s instructions.
Be sure the seat belt webbing is
not twisted.
2. Fasten the lap/shoulder belt latchinto the buckle. Listen for the dis-
tinct "click" sound.
Position the release button so that
it is easy to access in case of an
emergency. 3. Pull the shoulder portion of the
seat belt all the way out. When the
shoulder portion of the seat belt is
fully extended, it will shift the
retractor to the "Automatic
Locking" (child restraint) mode.
OEN036101OEN036102
Page 102 of 547
Safety features of your vehicle
42
3
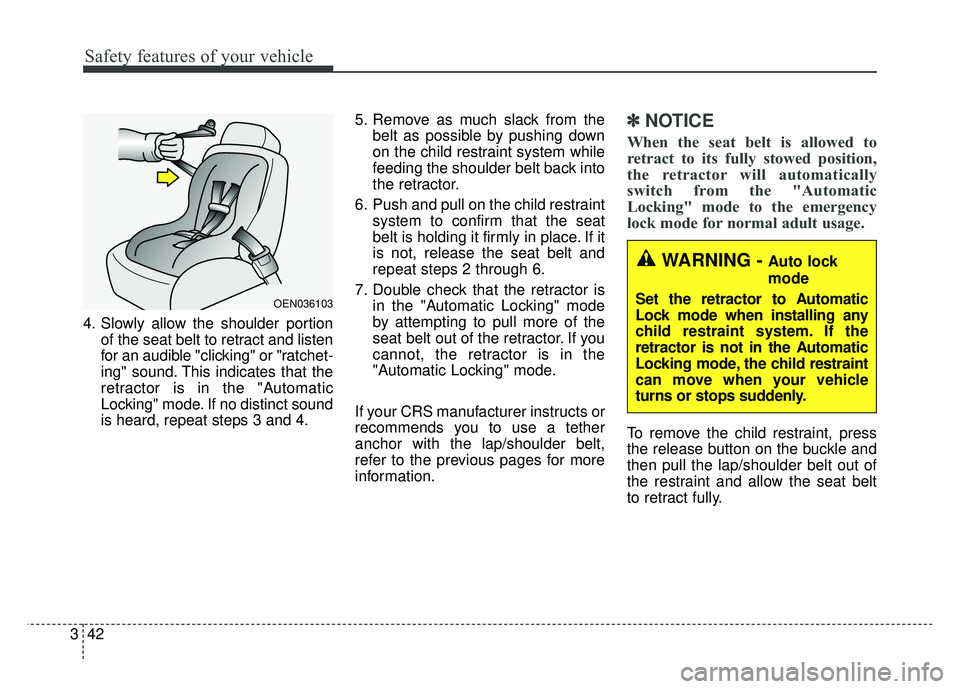
4. Slowly allow the shoulder portion
of the seat belt to retract and listen
for an audible "clicking" or "ratchet-
ing" sound. This indicates that the
retractor is in the "Automatic
Locking" mode. If no distinct sound
is heard, repeat steps 3 and 4. 5. Remove as much slack from the
belt as possible by pushing down
on the child restraint system while
feeding the shoulder belt back into
the retractor.
6. Push and pull on the child restraint system to confirm that the seat
belt is holding it firmly in place. If it
is not, release the seat belt and
repeat steps 2 through 6.
7. Double check that the retractor is in the "Automatic Locking" mode
by attempting to pull more of the
seat belt out of the retractor. If you
cannot, the retractor is in the
"Automatic Locking" mode.
If your CRS manufacturer instructs or
recommends you to use a tether
anchor with the lap/shoulder belt,
refer to the previous pages for more
information.
✽ ✽ NOTICE
When the seat belt is allowed to
retract to its fully stowed position,
the retractor will automatically
switch from the "Automatic
Locking" mode to the emergency
lock mode for normal adult usage.
To remove the child restraint, press
the release button on the buckle and
then pull the lap/shoulder belt out of
the restraint and allow the seat belt
to retract fully.
OEN036103
WARNING - Auto lock
mode
Set the retractor to Automatic
Lock mode when installing any
child restraint system. If the
retractor is not in the Automatic
Locking mode, the child restraint
can move when your vehicle
turns or stops suddenly.
Page 131 of 547

Features of your vehicle
Smart key . . . . . . . . . . . . . . . . . . . . . . . . . . . . . . . . . 4-4
• Record your key number . . . . . . . . . . . . . . . . . . . . . . . 4-4
. . . . . . . . . . . . . . . . . . . . . . . . . . . . 4-4
. . . . . . . . . . . . . . . . . . . . . . . . . . 4-7
. . . . . . . . . . . . . . . . . . . . . . . . . 4-7
. . . . . . . . . . . . . . . . . . . . . . . . . . . 4-8
. . . . . . . . . . . . . . . . . . . 4-8
Theft-alarm system . . . . . . . . . . . . . . . . . . . . . . . . 4-10
. . . . . . . . . . . . . . . . . . . . . . . . . . . . . . . . . 4-10
. . . . . . . . . . . . . . . . . . . . . . . . . . . . 4-11
Door locks . . . . . . . . . . . . . . . . . . . . . . . . . . . . . . . . 4-13
. . . . 4-13
. . . . . . 4-14
. . . . . . . . . . . . . . 4-16
. . . . . . . . . . . . . . . . . 4-16
Trunk . . . . . . . . . . . . . . . . . . . . . . . . . . . . . . . . . . . . \
4-17
. . . . . . . . . . . . . . . . . . . . . . . . . . . . 4-17
. . . . . . . . . . . . . . . . . . . . . . . . . . . . . 4-18
. . . . . . . . . . . . . . . . . 4-18
Smart trunk . . . . . . . . . . . . . . . . . . . . . . . . . . . . . . 4-19
. . . . . . . . . . . . . . . . . . . 4-19
using the smart key . . . . . . . . . . . . . . . . . . . . . . . . . . 4-21
. . . . . . . . . . . . . . . . . . . . . . . . . . . . . . . 4-22
Windows . . . . . . . . . . . . . . . . . . . . . . . . . . . . . . . . . 4-23
. . . . . . . . . . . . . . . . . . . . . . . . . . . . . . 4-24
Hood. . . . . . . . . . . . . . . . . . . . . . . . . . . . . . . . . . . . \
. 4-27
. . . . . . . . . . . . . . . . . . . . . . . . . . . . 4-27
. . . . . . . . . . . . . . . . . . . . . . . . . . . 4-28
. . . . . . . . . . . . . . . . . . . . . . . . . . . . . 4-28
Fuel filler lid (Hybrid) . . . . . . . . . . . . . . . . . . . . . . 4-29
. . . . . . . . . . . . . . . . . . . . . . 4-29
. . . . . . . . . . . . . . . . . . . . . . . 4-29
Fuel filler lid (Plug-in hybrid) . . . . . . . . . . . . . . . . 4-33
. . . . . . . . . . . . . . . . . . . . . . 4-33
. . . . . . . . . . . . . . . . . . . . . . . 4-35
Panoramic sunroof . . . . . . . . . . . . . . . . . . . . . . . . . 4-36
. . . . . . . . . . . . . . . . . . . . . . . . . . . 4-38
. . . . . . . . . . . . . . . . . . . . . . . . . . . . 4-40
. . . . . . . . . . . . . . . . . . . . . . . . . . . 4-40
. . . . . . . . . . . . . . . . . . . . . . . . . 4-41
Steering wheel . . . . . . . . . . . . . . . . . . . . . . . . . . . . . 4-42
. . . . . . . . . . . . . . . . . . 4-42
. . . . . . . . . . . . . . . . . . . . . 4-43
4