Page 9 of 54

7*IF EQUIPPED ALWAYS CHECK THE OWNER’S MANUAL FOR COMPLETE OPER ATING INFORMATION AND SAFET Y WARNINGS .
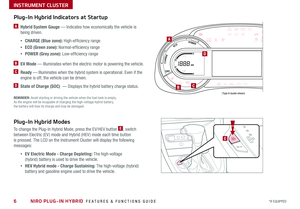
Trip Modes / Trip Computer
The Trip Computer is a driver information system that displays information
related to driving . It appears on the display when the Engine Start /Stop
button is in the ON position .
To cycle through the Trip modes, press the Mode button A .
When in the Trip Computer mode , press the Select /Reset (OK ) button
B to cycle through the screens . When displaying ACCUMUL ATED INFO or
DRIVE INFO screens, press and hold the OK button B to reset to zero .
LCD Instrument Cluster Modes*
Press Mode button A to scroll through different LCD Instrument Cluster
Modes .
Trip Computer Mode: Displays driving information for tripmeter,
fuel economy, MPH, energy flow, etc .
Turn-by-Turn Mode*: Displays the state of the navigation
LKA/DAA/SCC* Mode: Displays the state of the Smart Cruise
Control, Lane Keeping Assist and Driver Attention Alert
Audio Mode*: Displays the state of the A / V System
Service/Master Warning/Door Open Modes: Informs on
upcoming service intervals, tire pressure status, warning
messages related to TPMS, BSD malfunction and when any door
is not securely closed .
User Settings Mode: Change settings of the Driving Assist,
Doors, Lights, Sound, Convenience and Service Interval
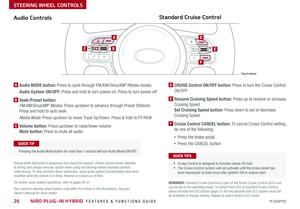
Your vehicle’s steering wheel buttons may differ from those in the illustrations.
REMINDERS:
•
Appearance of Trip Computer display may differ as equipped
•
All stored driving information (except Odometer and Range) is reset if the battery is disconnected
INSTRUMENT CLUSTER
ACCUMULATED INFO• Trip Information• Average MPG• Elapsed Time
DRIVE INFO• Trip Information• Average MPG• Elapsed Time
DIGITAL SPEEDOMETER
DRIVING STYLE
ENERGY FLOW
ENGINE TEMPERATURE
Accumulated Info
T rip
Average
Ti mer 247.5
15.7
17:42mi
MPG
h
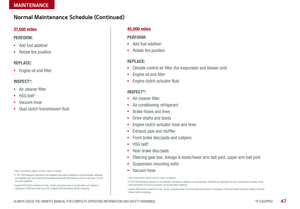
(Buttons located on Steering Wheel – Type A shown)
MODE
RES
CRUISE
CAN CELOKSET
MODE
RES
CRUISE
CAN CELOKSET
MODE
A
B
Page 10 of 54

NIRO PLUG-IN HYBRID FEATURES & FUNCTIONS GUIDE8*IF EQUIPPED
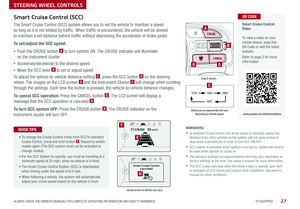
Fuel Economy Video To view a video on your mobile device, snap this QR Code or visit the listed website .
Refer to page 2 for more information .
QR CODE
www.youtube.com/KiaFeatureVideos
Fuel Economy
There are several factors that contribute to your vehicle’s fuel
economy, including maintenance of your vehicle, driving style,
environmental conditions, vehicle weight and vehicle aerodynamics .
Below are tips on how to help improve fuel economy:
•Keep your vehicle in good condition with regular maintenance
•Don’t let the engine idle longer than necessary
•Drive at a moderate speed, accelerating smoothly and at a
moderate rate
•Keep tires inflated to the recommended pressure
•Travel lightly, without carrying unnecessary weight in your vehicles
•Avoid placing large or heavy items on roof racks
•Avoid hilly, winding or poorly maintained roads
REMINDER: Driving range can vary depending on your vehicle’s fuel tank size, e .g ., 12-gal . vs . 24-gal ., even though the MPG may be the same
For more information on Fuel Economy, you can snap the QR Code above to view a video or refer to the Owner's Manual.
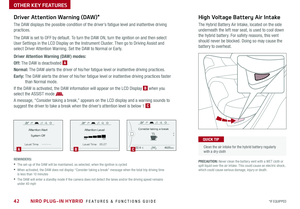
(Actual vehicle's LCD screen may vary)
INSTRUMENT CLUSTER
When the Instrument Cluster LCD screen is in
the Trip Computer mode, the screen displays fuel
economy information related to the driving range
and average fuel economy .
To change modes, go to User Settings in the LCD
Instrument Cluster modes .
Average Fuel Consumption - Calculates
average* fuel consumption from the distance
driven and amount of fuel injected into the
engine / total fuel used .
FUEL ECONOMY
• Trip Information /
Trip Computer
• Average MPG
• Instant MPG
TRIP A/B
• Tripmeter
• Average MPH
• Elapsed Time (E/T)
DIGITAL SPEEDOMETER
DRIVING STYLE ENERGY FLOW
Page 11 of 54

9*IF EQUIPPED ALWAYS CHECK THE OWNER’S MANUAL FOR COMPLETE OPER ATING INFORMATION AND SAFET Y WARNINGS .
Service Mode
To enter Service mode, press the Mode button A,
scroll to Service Mode and press OK button B .
System will display number of miles remaining until
next service is due, as well as type of service .
When service is required, the
following will be displayed:
Service Required
To reset the Service mode
system, press and hold the
OK button B for more than
1 second .
To turn Service In OFF,
go to User Settings .
Service Interval Setting
To set the service interval
when in User Settings mode:
•Press the OK button B
up/down and scroll to Service Interval .
Press the OK button B to enter
•Press the OK button B up/down and toggle to
ON, then press the OK button B again . Then
press the OK button B to scroll and select the
desired miles or months for your next service
•Press the OK button B again to enter
User Settings
To enter the User Settings mode in the LCD Instrument Cluster Modes,
press the Mode button A when the vehicle is at a standstill and the
Engine Start /Stop button and select User Settings .
You can navigate the selections on the display by pressing the OK
button B up/down, and then selecting the item by pressing the
OK button B again .
Driving Assist*:
•Lane Keeping Assist System*
•Driver Attention Alert (DA A)*
•Smart Cruise Control
•Forward Collision-Avoidance Assist (FCA) /
AEB (Autonomous Emergency Braking)*
•FCW (Forward Collision Warning)*
•BSD (Blind Spot Detection) with RCTA*
•Coasting Guide*
Door:
•Automatically Lock
•Automatically Unlock
•Two Press Unlock
Service Interval:
•Service Interval ON/OFF
•Set Mileage/Month
Reset
•Choosing reset will restore defaults
for all User Settings menus
Lights:
•One-Touch Turn Signal
•Headlamp Delay
•Welcome Light
Convenience:
•Seat Easy Access*
•Wireless Charging System*
•Wiper/Light Display*
•Gear Pop-Up*
Sound:
•Park Assist System Volume*
Other features:
•Fuel Economy Auto Reset
•Fuel Economy Unit
•Temperature Unit
•Tire Pressure Unit
•Instrument Cluster Layout
•Aux . Battery Saver+
To view a video on your mobile device, snap these QR Codes or visit the listed website .
Refer to page 2 for more information .
LCD Display Video
LCD Display: Maintenance Video
QR CODES
www.youtube.com/KiaFeatureVideos
www.youtube.com/KiaFeatureVideos
(Buttons located on Steering Wheel – Type B)
MODE
RES
CRUISE
CAN CELOKSET
MODE
RES
CRUISE
CAN CELOKSET
MODE
A
BService in
Off
Service Required
0000mi.
0000mi.
INSTRUMENT CLUSTER
Page 12 of 54
 - ECO Mode
(S) - Sport Mode -")
NIRO PLUG-IN HYBRID FEATURES & FUNCTIONS GUIDE10*IF EQUIPPED
Sport/ECO Modes
The mode can be change A by moving the shift lever from
D to the left gate and back:
(D) - ECO Mode
(S) - Sport Mode - When shift lever is moved into the
left gate from (D) . If shift lever is not moved through the
gears, then the vehicle will shift automatically . Sport
Mode changes the Niro’s shift points and steering feel,
and makes it more fun to drive vs . other hybrid vehicles
The LCD screen B on the instrument cluster will display the
mode the vehicle is in .
(Located in Instrument Cluster)
B
ECO Mode (Active ECO)
Active ECO helps improve fuel economy by controlling
several vehicle components . When in ECO Mode, it
optimizes drivetrain operations such as engine power and
transmission to help improve fuel economy .
To help improve your fuel economy: •Drive at a moderate speed, accelerating smoothly and at a moderate rate •Keep tires inflated to the recommended pressure •Be sure the wheels are properly aligned
QUICK TIPS
For more information on Active ECO, refer to your Owner’s Manual or contact your local dealership.
A
ECOSPORT
A
ECOSport
REMINDER: Steering effort may be slightly increased in Sport mode .
INSTRUMENT CLUSTER
Page 13 of 54

11*IF EQUIPPED ALWAYS CHECK THE OWNER’S MANUAL FOR COMPLETE OPER ATING INFORMATION AND SAFET Y WARNINGS .
UVO eco and UVO eco with Navigation* Display
When equipped, UVO eco with Navigation screen also provides information on economical operation and hybrid system modes . To enter the Plug-In Hybrid
display mode, press the PHEV button . Then select one of the menus A - ECO Driving, Energy Information, Charging Settings, Charging Stations, Gas Stations
and EV Range* (UVO eco with Navigation only) .
Energy Flow - Displays the current flow of power between the
NIRO's main powertrain components .
ECO Level - The more economically and environmentally-friendly
you drive, the more the ECO Level increases .
Plug-In Hybrid System Home Screen -
Fuel Economy, ECO Driving and Energy FlowA
Fuel Economy - Displays the average fuel economy
over the duration of a trip .
Energy Information
Feb.
3
9:31AM
ECO Driving
EV Range Charging
Settings Charging
Stations Gas Stations
Feb. 3
12:26AM
Feb. 3
12:31AM
Feb. 3
9:31AM
Idle Mode
Electric
Motor Battery
l Average
MPG15Now
102030 min.
30 45--.- MPG
Reset
l Hybrid Fuel
Economy
l Electric
Motor Use
ECO DrivingPlug-In Hybrid
ECO Level 4
Fuel Economy History
ECO Level
kW 5Now
102030 min.
10 15Engine
Energy FlowECO Driving
Fuel Economy History
ECO Level Battery InformationEnergy Flow
EV
Energy Information
Feb.
3
9:31AM
ECO Driving
EV Range Charging
Settings Charging
Stations Gas Stations
Feb. 3
12:26AM
Feb. 3
12:31AM
Feb. 3
9:31AM
Idle Mode
Electric
Motor Battery
l Average
MPG15Now
102030 min.
30 45--.- MPG
Reset
l Hybrid Fuel
Economy
l Electric
Motor Use
ECO Driving
Plug-In Hybrid
ECO Level
4
Fuel EconomyHistory
ECO Level
kW 5Now
102030 min.
10
15Engine
Energy FlowECO Driving
Fuel Economy History
ECO LevelBattery Information Energy Flow
EV
Energy Information
Feb.
3
9:31AM
ECO Driving
EV Range Charging
Settings Charging
Stations Gas Stations
Feb. 3
12:26AM
Feb. 3
12:31AM
Feb. 3
9:31AM
Idle Mode
Electric
Motor Battery
l Average
MPG15Now
102030 min.
30
45--.- MPG
Reset
l Hybrid Fuel
Economy
l Electric
Motor Use
ECO DrivingPlug-In Hybrid
ECO Level 4
Fuel Economy History
ECO Level
kW 5Now
102030 min.
10
15Engine
Energy FlowECO Driving
Fuel Economy History
ECO Level Battery InformationEnergy Flow
EV
The images shown are for illustration purposes only. Not all available displays are shown. Screens may vary.
PLUG-IN HYBRID SYSTEM
Page 14 of 54
NIRO PLUG-IN HYBRID FEATURES & FUNCTIONS GUIDE12*IF EQUIPPED
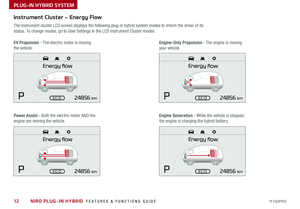
Instrument Cluster - Energy Flow
The instrument cluster LCD screen displays the following plug-in hybrid system modes to inform the driver of its
status . To change modes, go to User Settings in the LCD Instrument Cluster modes .
EV Propulsion - The electric motor is moving
the vehicle .
Engine-Only Propulsion - The engine is moving
your vehicle .
Power Assist - Both the electric motor AND the
engine are moving the vehicle .
Engine Generation - While the vehicle is stopped,
the engine is charging the hybrid battery .
PLUG-IN HYBRID SYSTEM
Page 15 of 54
13*IF EQUIPPED ALWAYS CHECK THE OWNER’S MANUAL FOR COMPLETE OPER ATING INFORMATION AND SAFET Y WARNINGS .
Instrument Cluster - Energy Flow
The instrument cluster LCD screen displays the following plug-in hybrid system modes to inform the driver of its
status . To change modes, go to User Settings in the LCD Instrument Cluster modes .
Vehicle Stop - The vehicle’s hybrid system is
standing by .
Engine Generation/Regeneration - The engine
and the regenerative braking system are both
recharging the hybrid battery .
PLUG-IN HYBRID SYSTEM
Power Reserve - While the engine powers the
vehicle, it is also recharging the hybrid battery .
Engine Brake/Regeneration - The regenerative
braking system is recharging the hybrid battery .
Page 16 of 54

NIRO PLUG-IN HYBRID FEATURES & FUNCTIONS GUIDE14*IF EQUIPPED
PLUG-IN HYBRID SYSTEM
B
A
C
D
E
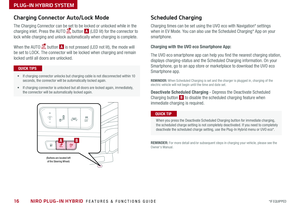
Charging the Plug-In Hybrid Vehicle
Level 1 Charging – “Trickle” Charge
A Level 1 or “trickle” charger is the most common type of charging system for a Plug-In Hybrid . This type of
charger uses 110 volts of household electricity and takes up to 9 hours for a full charge .
Trickle Charger Indicators:
A ICCB – In-Cable Control Box
B Power – Indicates that the charger is plugged in
and functioning .
C Charge – Indicates that the vehicle is charging .
D Fault – Indicates charge failure .
E Charge Level – Indicates the level of charge -
L (8A), M (10A), or H (12A)
REMINDER: Do not use an extension cord . Plug Trickle charger directly into wall socket . Do not charge to a receptacle that is old, damaged, corroded or cracked .
Level 2 Charging – “Normal” Charge
A Level 2 or “normal” 240-volt charger is the recommended charging system for your Optima Plug-In Hybrid .
This type of charger uses 240 volts of electricity and takes approximately 2 .5-3 hours for a full charge
(Based on Kia Motors Corporation testing with SAE J1772 charger performed at 3 .3kW ) . This charger
can be installed at your home or found at a public charging station .
REMINDER: Shape of charger and how to use the charger may be different for each manufacturer . Please see Owner’s Manual for more information .
A Level 2 or “normal” 240-volt charger is recommended for regular charging of the vehicle .
QUICK TIP
REMINDER: For more detail and/or subsequent steps in charging your vehicle, please see the Owner's Manual .
POWER
CHARGE
FA U LT!
LEVELLMH