2018 KIA NIRO Start
[x] Cancel search: StartPage 235 of 616

Features of your vehicle
102
4
Indicator Lights
Electronic Stability
Control (ESC) IndicatorLight
This indicator light illuminates:
Once you set the Engine Start/Stop Button to the ON posi-
tion.
- It illuminates for approximately 3seconds and then goes off.
When there is a malfunction with the ESC system.
In this case, have your vehicle
inspected by an authorized Kia
dealer.
This indicator light blinks:
While the ESC is operating.
❈ For more details, refer to
“Electronic Stability Control (ESC)”
in chapter 6.
Electronic Stability
Control (ESC) OFFIndicator Light
This indicator light illuminates:
Once you set the Engine Start/Stop Button to the ON posi-
tion.
- It illuminates for approximately 3seconds and then goes off.
When you deactivate the ESC sys- tem by pressing the ESC OFF but-
ton.
❈ For more details, refer to
“Electronic Stability Control (ESC)”
in chapter 6.
Charging Cable
Connection Indicator (Plug-in hybrid)
This indicator illuminates in red when
the charging cable is connected.
Immobilizer IndicatorLight (Without Smart Key)
This indicator light illuminates:
When the vehicle detects the immobilizer in your key properly
while the Engine Start/Stop button
is ON.
- At this time, you can start theengine.
- The indicator light goes off after starting the engine.
This indicator light blinks:
When there is a malfunction with the immobilizer system.
In this case, have your vehicle
inspected by an authorized Kia
dealer.
Page 236 of 616

4103
Features of your vehicle
Immobilizer IndicatorLight (With Smart Key)
This indicator light illuminates for up
to 30 seconds:
When the vehicle detects the smart key in the vehicle properly
while the Engine Start/Stop Button
is ACC or ON.
- At this time, you can start theengine.
- The indicator light goes off after starting the engine.
This indicator light blinks for a few
seconds:
When the smart key is not in the vehicle.
- At this time, you can not start theengine. This indicator light illuminates for 2
seconds and goes off:
When the vehicle can not detect
the smart key which is in the vehi-
cle while the Engine Start/Stop
Button is ON.
In this case, have your vehicle
inspected by an authorized Kia
dealer.
This indicator light blinks:
When the battery of the smart key is weak.
- At this time, you can not start theengine. However, you can start the
engine if you press the Engine
Start/Stop Button with the smart
key. (For more details, refer to
“Starting the Engine” in chapter 6).
When there is a malfunction with the immobilizer system.
In this case, have your vehicle
inspected by an authorized Kia
dealer.
Turn Signal Indicator
Light
This indicator light blinks:
When you turn the turn signal light on.
If any of the following occurs, there
may be a malfunction with the turn
signal system. In this case, have your
vehicle inspected by an authorized
Kia dealer. - The indicator light does not blinkbut illuminates.
- The indicator light blinks more rapidly.
- The indicator light does not illumi- nate at all.
Page 266 of 616

4133
Features of your vehicle
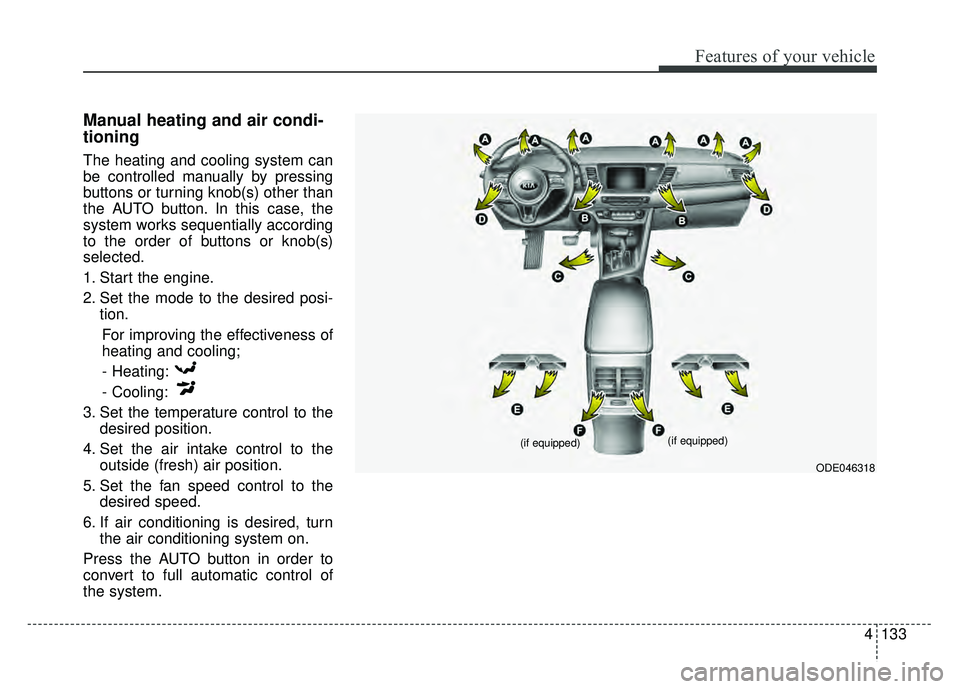
Manual heating and air condi-
tioning
The heating and cooling system can
be controlled manually by pressing
buttons or turning knob(s) other than
the AUTO button. In this case, the
system works sequentially according
to the order of buttons or knob(s)
selected.
1. Start the engine.
2. Set the mode to the desired posi-tion.
For improving the effectiveness of
heating and cooling;- Heating:
- Cooling:
3. Set the temperature control to the desired position.
4. Set the air intake control to the outside (fresh) air position.
5. Set the fan speed control to the desired speed.
6. If air conditioning is desired, turn the air conditioning system on.
Press the AUTO button in order to
convert to full automatic control of
the system.
ODE046318
(if equipped)
(if equipped)
Page 274 of 616

4141
Features of your vehicle
Air conditioning (if equipped)
All Kia Air Conditioning Systems are
filled with R-1234yf refrigerant.
1.Start the engine. Press the air con-ditioning button.
2.Set the mode to the position.
3.Set the air intake control to the out- side air or recirculated air position.
4.Adjust the fan speed control and temperature control to maintain
maximum comfort.
When maximum cooling is desired, set the temperature control to the
extreme left position, set the mode
control to the MAX A/C position,
then set the fan speed control to
the highest speed. Air conditioning system operation tips
If the vehicle has been parked in
direct sunlight during hot weather,
open the windows for a short time
to let the hot air inside the vehicle
escape.
To help reduce moisture inside of the windows on rainy or humid
days, decrease the humidity inside
the vehicle by operating the air
conditioning system.
During air conditioning system operation, you may occasionally
notice a slight change in engine
speed as the air conditioning com-
pressor cycles. This is a normal
system operation characteristic.
Use the air conditioning system every month only for a few minutes
to ensure maximum system per-
formance.CAUTION - Excessive A/C
Use
When using the air conditioningsystem, monitor the tempera-ture gauge closely while drivingup hills or in heavy traffic whenoutside temperatures are high.Air conditioning system opera-tion may cause engine over-heating. Continue to use theblower fan but turn the air con-ditioning system off if the tem-perature gauge indicates engineoverheating.
CAUTION
When opening the windows inhumid weather, air conditioningmay create water dropletsinside the vehicle. Since exces-sive water droplets may causedamage to electrical equipment,air conditioning should only beused with the windows closed.
Page 286 of 616

4153
Features of your vehicle
During mild weather or under condi-
tions where the operation of the seat
warmer is not needed, keep the
switches in the “OFF” position.Temperature control (Manual)
Each time you press the switch, the temperature setting of the seat
will change as follows :
■ Front seat
■ Rear seat
The seat warmer defaults to the OFF position whenever the ignition
switch is turned on. Temperature control(Automatic)
The seat warmer starts to automati-
cally control the seat temperature in
order to prevent low-temperature
burns after being manually turned
ON.
■ Front seat
■ Rear seat
You may manually press the button
to increase the seat temperature.
However, it soon returns to the auto-
matic mode again.
When pressing the switch for more than 1.5 seconds with the seat
warmer operating, the seat warmer
will turn OFF.
The seat warmer defaults to the OFF position whenever the Engine
Start/Stop button is in the ON posi-
tion.✽ ✽ NOTICE
With the seat warmer switch in the
ON position, the heating system in
the seat turns off or on automatical-
ly depending on the seat tempera-
ture.▼
▼
OFF→
HIGH( )→ MIDDLE( )→LOW( )
→
OFF→HIGH( )→ LOW( )
→
OFF→HIGH( )→ MIDDLE( )→LOW( )
→→30min
60min
OFF→HIGH( )→ LOW( )
→30min
Page 289 of 616

Features of your vehicle
156
4
Only use 12V electric accessories
which are less than 10A in electric
capacity.
Adjust the air-conditioner or heater to the lowest operating level when
using the power outlet.
Close the cover when not in use.
Some electronic devices can cause electronic interference when
plugged into a vehicle’s power out-
let. These devices may cause
excessive audio static and malfunc-
tions in other electronic systems or
devices used in your vehicle.
Push the plug in as far as it will go. If good contact is not made, the
plug may overheat and the fuse
may open.
Plug in battery equipped electronic devices with reverse current pro-
tection. The current from the bat-
tery may flow into the vehicle’s
electri cal/electronic system and
cause system malfunction.USB charger (if equipped)
The USB charger is designed to
recharge batteries of small size elec-
trical devices using a USB cable. The
electrical devices can be recharged
when the Engine Start/Stop button is
in ACC/ON/START position.
The battery charging state may be
monitored on the electrical device.
Disconnect the USB cable from the
USB port after use.
WARNING - Electric shock
Do not put a finger or a foreign
element (pen, etc.) into a power
outlet and do not touch with a
wet hand. You may receive an
electric shock.
ODE046434
Page 291 of 616

Features of your vehicle
158
4
To prevent the battery from being dis-
charged, do not use the AC inverter
while the engine is not running.
After using an electric accessory or equipment, pull the plug out. Leaving
the accessory or equipment plugged
in for a long time may cause battery
discharge.
Do not use an electric accessory or equipment the power consumption of
which is greater than 150W (115V).
When the AC inverter input voltage is less than 11.3V, automatically turn off
the power.
AC inverter will operate as normal
when the voltage is increased.
When the AC inverter input voltage is less than 10.7V, power will turn
off. The AC inverter will operate as
normal when the voltage is
increased. While the power consumption of
some electrical devices/appliances
may be within the AC inverter’s
electric power range, it may mal-
function in below cases.
- If the device/appliance requireshigh electric power for initial start
up
- If the device/appliance processes precise/very accurate data
- If the device/appliance requires very stable supply of electricityWireless smart phone charg-
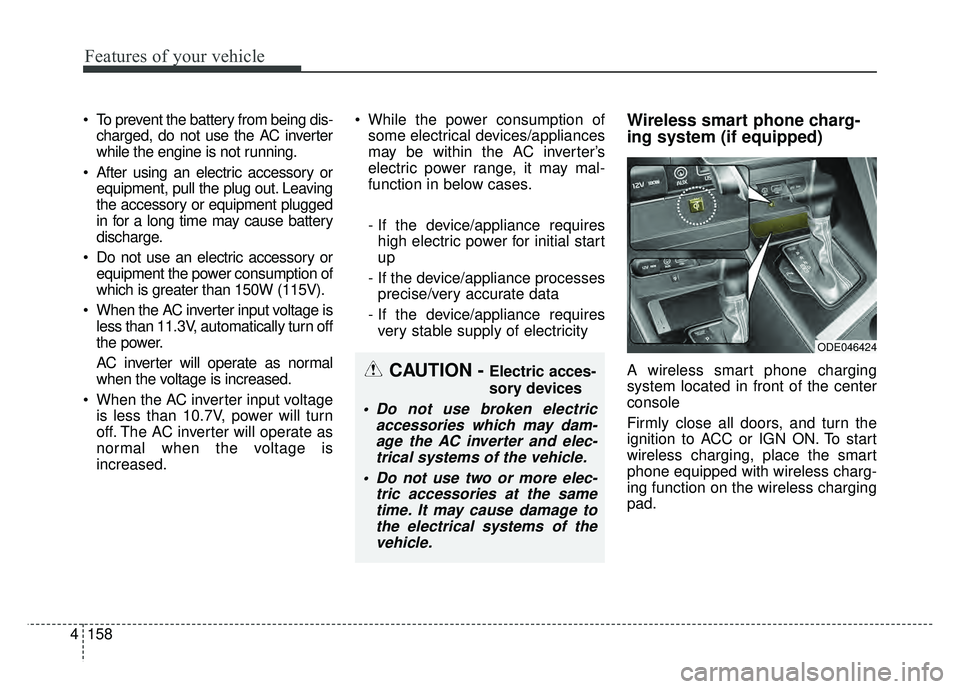
ing system (if equipped)
A wireless smart phone charging
system located in front of the center
console
Firmly close all doors, and turn the
ignition to ACC or IGN ON. To start
wireless charging, place the smart
phone equipped with wireless charg-
ing function on the wireless charging
pad.CAUTION - Electric acces-
sory devices
Do not use broken electric accessories which may dam-age the AC inverter and elec-trical systems of the vehicle.
Do not use two or more elec- tric accessories at the sametime. It may cause damage tothe electrical systems of thevehicle.
ODE046424
Page 299 of 616

Features of your vehicle
166
4
The following specification is the
maximum weight that can be loaded
onto the roof rack. Distribute the
load as evenly as possible across
the crossbars (if equipped) and roof
rack and secure the load firmly.
Loading cargo or luggage in excess
of the specified weight limit on the
roof rack may damage your vehicle.
The vehicle center of gravity will be higher when items are loaded onto
the roof rack. Avoid sudden starts,
braking, sharp turns, abrupt maneu-
vers or high speeds that may result
in loss of vehicle control or rollover
resulting in an accident. Always drive slowly and turn corners
carefully when carrying items on the
roof rack. Severe wind updrafts,
caused by passing vehicles or natu-
ral causes, can cause sudden
upward pressure on items loaded on
the roof rack. This is especially true
when carrying large, flat items such
as wood panels or mattresses. This
could cause the items to fall off the
roof rack and cause damage to your
vehicle or others around you.
To prevent damage or loss of cargo while driving, check frequently
before or while driving to make sure
the items on the roof rack are
securely fastened.
ROOF 100 kg (220 lbs.)
RACK EVENLY DISTRIBUTED
WARNING -Driving with
roof load
Always drive slow and turn cor-
ners carefully when carrying
items on the roof rack. The vehi-
cle center of gravity will be
higher when items are loaded
onto the roof rack.