2018 KIA NIRO Ground
[x] Cancel search: GroundPage 55 of 616

Introduction
21
Your new vehicle is designed to use
only unleaded fuel having a pump
octane number ((R+M)/2) of 87
(Research Octane Number 91) or
higher. (Do not use methanol blend-
ed fuels.)
Your new vehicle is designed to
obtain maximum performance with
UNLEADED FUEL, as well as mini-
mize exhaust emissions and spark
plug fouling.
Never add any fuel system cleaning
agents to the fuel tank other than
what has been specified. (Consult an
authorized Kia dealer for details.)
• Tighten the cap until it clicks onetime, otherwise the Check Engine light will illuminate.
Gasoline containing alcohol and
methanol
Gasohol, a mixture of gasoline and
ethanol (also known as grain alco-
hol), and gasoline or gasohol con-
taining methanol (also known as
wood alcohol) are being marketed
along with or instead of leaded or
unleaded gasoline. Pursuant to EPA regulations, ethanol
may be used in your vehicle.
Do not use gasohol containing more
than 15% ethanol, and do not use
gasoline or gasohol containing any
methanol. Ethanol provides less
energy than gasoline and it attracts
water, and it is thus likely to reduce
your fuel efficiency and could lower
your MPG results.
Methanol may cause drivability prob-
lems and damage to the fuel system,
engine control system and emission
control system.
Discontinue using gasohol of any
kind if drivability problems occur.
Vehicle damage or drivability prob-
lems may not be covered by the
manufacturer’s warranty if they result
from the use of:
1. Gasoline or gasohol containing
methanol.
2. Leaded fuel or leaded gasohol.
3. Gasohol containing more than 15% ethanol.
WARNING - Refueling
• Do not “top off” after the noz- zle automatically shuts off.
Attempts to force more fuel
into the tank can cause fuel
overflow onto you and the
ground causing a risk of fire.
Always check that the fuel cap is installed securely to pre-
vent fuel spillage, especially
in the event of an accident.
FUEL REQUIREMENTS
Page 131 of 616

365
Safety features of your vehicle
They may inflate in other types of
collisions where a side force is
detected by the sensors. Side air bag
and/or curtain air bags may also
inflate where rollover sensors indi-
cate the possibility of a rollover
occurring (even if none actually
occurs) or in other situations, includ-
ing when the vehicle is tilted while
being towed.
Even where side and/or curtain air
bags would not provide impact pro-
tection in a rollover, however, they
will deploy to prevent ejection of
occupants, especially those who are
restrained with seat belts.
If the vehicle chassis is impacted by
bumps or objects on unimproved
roads, the air bags may deploy. Drive
carefully on unimproved roads or on
surfaces not designed for vehicle
traffic to prevent unintended air bag
deployment.Air bag non-inflation conditions
In certain low-speed collisions theair bags may not deploy. The air
bags are designed not to deploy in
such cases because they may not
provide benefits beyond the pro-
tection of the seat belts in such col-
lisions.
Air bags are not designed to inflate in rear collisions, because occu-
pants are moved backward by the
force of the impact. In this case,
inflated air bags would not be able
to provide any additional benefit.
Front air bags may not inflate in side impact collisions, because
occupants move to the direction of
the collision, and thus in side
impacts, frontal air bag deployment
would not provide additional occu-
pant protection.
In an angled collision, the force of impact may direct the occupants in
a direction where the air bags would
not be able to provide any addition-
al benefit, and thus the sensors may
not deploy any air bags. Just before impact, drivers often
brake heavily. Such heavy braking
lowers the front portion of the vehi-
cle causing it to “ride” under a vehi-
cle with a higher ground clearance.
Air bags may not inflate in this
"under-ride" situation because
deceleration forces that are detect-
ed by sensors may be significantly
reduced by such “under-ride” colli-
sions.
Front air bags may not inflate in all rollover accidents where the
SRSCM indicates that the front air
bag deployment would not provide
additional occupant protection.
Air bags may not inflate if the vehi- cle collides with objects such as util-
ity poles or trees, where the point of
impact is concentrated to one area
and the full force of the impact is not
delivered to the sensors.
Page 167 of 616

Features of your vehicle
34
4
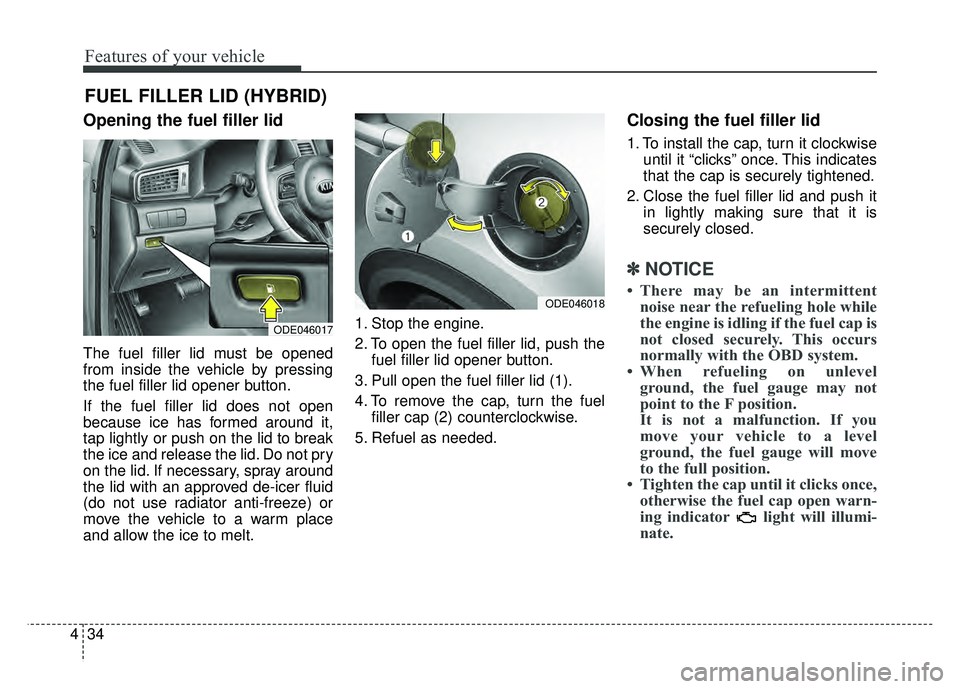
Opening the fuel filler lid
The fuel filler lid must be opened
from inside the vehicle by pressing
the fuel filler lid opener button.
If the fuel filler lid does not open
because ice has formed around it,
tap lightly or push on the lid to break
the ice and release the lid. Do not pry
on the lid. If necessary, spray around
the lid with an approved de-icer fluid
(do not use radiator anti-freeze) or
move the vehicle to a warm place
and allow the ice to melt. 1. Stop the engine.
2. To open the fuel filler lid, push the
fuel filler lid opener button.
3. Pull open the fuel filler lid (1).
4. To remove the cap, turn the fuel filler cap (2) counterclockwise.
5. Refuel as needed.
Closing the fuel filler lid
1. To install the cap, turn it clockwise until it “clicks” once. This indicates
that the cap is securely tightened.
2. Close the fuel filler lid and push it in lightly making sure that it is
securely closed.
✽ ✽NOTICE
• There may be an intermittent
noise near the refueling hole while
the engine is idling if the fuel cap is
not closed securely. This occurs
normally with the OBD system.
• When refueling on unlevel ground, the fuel gauge may not
point to the F position.
It is not a malfunction. If you
move your vehicle to a level
ground, the fuel gauge will move
to the full position.
• Tighten the cap until it clicks once, otherwise the fuel cap open warn-
ing indicator light will illumi-
nate.
FUEL FILLER LID (HYBRID)
ODE046017
ODE046018
Page 169 of 616

Features of your vehicle
36
4
1. Stop the engine.
2. To open the fuel filler lid, push the
fuel filler lid opener button.
3. Pull open the fuel filler lid (1).
4. To remove the cap, turn the fuel filler cap (2) counterclockwise.
5. Refuel as needed.
✽ ✽ NOTICE
• Add fuel into the fuel tank within
20 minutes after opening the fuel
filler lid. After 20 minutes, the fuel
tank may shut off, causing fuel to
overflow. In this case, re-press the
fuel filler lid opening button.
• Do not leave the fuel filler door opened for an extended period of
time. It may discharge the battery.
• Close the fuel filler lid after fuel- ing the vehicle. If you start the
vehicle with the fuel filler lid
opened, the message, “Check fuel
door”, illuminates on the LCD dis-
play.
Closing the fuel filler lid
1. To install the cap, turn it clockwise
until it “clicks”. This indicates that
the cap is securely tightened.
2. Close the fuel filler lid and push it lightly and make sure that it is
securely closed.
Always check that the fuel cap is
installed securely to prevent fuel
spillage in the event of an accident.
✽ ✽ NOTICE
• There may be an intermittent
noise near the refueling hole while
the engine is idling if the fuel cap is
not closed securely. This occurs
normally with the OBD system.
• When refueling on unlevel ground, the fuel gauge may not
point to the F position.
It is not a malfunction. If you
move your vehicle to a level
ground, the fuel gauge will move
to the full position.
• Tighten the cap until it clicks once, otherwise the fuel cap open warn-
ing indicator light will illumi-
nate.
WARNING - For Plug-in
Hybrid
Avoid refueling the vehicle
while charging the (high-volt-
age) hybrid battery. It may
cause a fire or an explosion due
to static electricity.
ODEP047474N
Page 171 of 616

Features of your vehicle
38
4
Make sure to refuel your vehicle
according to the “Fuel requirements”
suggested in chapter 1.
If the fuel filler cap requires replace-
ment, use only a genuine Kia cap or
the equivalent specified for your vehi-
cle. An incorrect fuel filler cap can
result in a serious malfunction of the
fuel system or emission control sys-
tem.
WARNING- Cell phone
fires
Do not use cellular phones
while refueling. Electric current
and/or electronic interference
from cellular phones can poten-
tially ignite fuel vapors causing
a fire.
WARNING- Smoking
DO NOT use matches or a
lighter and DO NOT SMOKE or
leave a lit cigarette in your vehi-
cle while at a gas station espe-
cially during refueling.
Automotive fuel is highly flam-
mable and can, when ignited,
result in fire.
WARNING- Refueling & Vehicle fires
When refueling, always shut the
engine off. Sparks produced by
electrical components related
to the engine can ignite fuel
vapors causing a fire. Once
refueling is complete, check to
make sure the filler cap and
filler door are securely closed,
before starting the engine.
CAUTION- Exterior paint
Do not spill fuel on the exterior surfaces of the vehicle. Anytype of fuel spilled on paintedsurfaces may damage the paint.
WARNING- Portable fuel
container
When using an approved
portable fuel container, be sure
to place the container on the
ground prior to refueling. Static
electricity discharge from the
container can ignite fuel vapors
causing a fire. Once refueling
has begun, contact with the
vehicle should be maintained
until the filling is complete. Use
only approved portable plastic
fuel containers designed to
carry and store gasoline.
Page 194 of 616

461
Features of your vehicle
Distance To Empty (1)
The distance to empty is the esti-mated distance the vehicle can be
driven with the remaining fuel.
- Distance range : 1 ~ 9,999 mi. or1 ~ 9,999 km
If the estimated distance is below 1 mi.(1 km), the trip computer will
display “----” as distance to empty.
If the level of the remaining fuel is more than three-quarters, more
than 3 liters of fuel must be refilled
for the fuel gauge to change. In
other cases, more than 6 liters of
fuel must be refilled for the vehicle
to change the fuel gauge. - For plug-in hybrid
Electric range (1)
The distance to empty is the estimat-
ed distance the vehicle can be driven
with the remaining high voltage bat-
tery.
Gasoline range (2)
The distance to empty is the esti-
mated distance the vehicle can be
driven with the remaining fuel.
Total range (3)
Electric distance to empty(1) +
Gasoline distance to empty(2) ✽ ✽
NOTICE
• If the vehicle is not on level ground
or the battery power has been
interrupted, the distance to empty
function may not operate correct-
ly.
• The distance to empty may differ from the actual driving distance as
it is an estimate of the available
driving distance.
• The fuel economy and distance to empty may vary significantly
based on driving conditions, driv-
ing habits, and condition of the
vehicle.
Page 275 of 616

Features of your vehicle
142
4
When using the air conditioning
system, you may notice clear water
dripping (or even puddling) on the
ground under the passenger side
of the vehicle. This is a normal sys-
tem operation characteristic.
Operating the air conditioning sys- tem in the recirculated air position
provides maximum cooling, how-
ever, continual operation in this
mode may cause the air inside the
vehicle to become stale.
During cooling operation, you may occasionally notice a misty air flow
because of rapid cooling and
humid air intake. This is a normal
system operation characteristic.Climate control air filter
(if equipped)
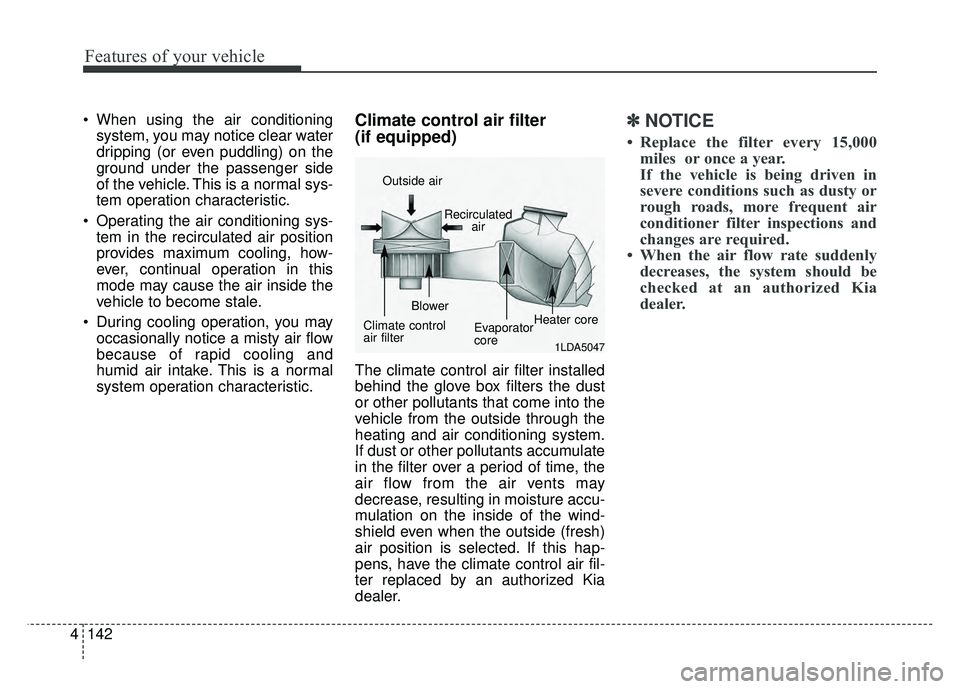
The climate control air filter installed
behind the glove box filters the dust
or other pollutants that come into the
vehicle from the outside through the
heating and air conditioning system.
If dust or other pollutants accumulate
in the filter over a period of time, the
air flow from the air vents may
decrease, resulting in moisture accu-
mulation on the inside of the wind-
shield even when the outside (fresh)
air position is selected. If this hap-
pens, have the climate control air fil-
ter replaced by an authorized Kia
dealer.
✽ ✽ NOTICE
• Replace the filter every 15,000
miles or once a year.
If the vehicle is being driven in
severe conditions such as dusty or
rough roads, more frequent air
conditioner filter inspections and
changes are required.
• When the air flow rate suddenly decreases, the system should be
checked at an authorized Kia
dealer.
1LDA5047
Outside air
Recirculatedair
Climate control
air filter Blower
Evaporator
coreHeater core
Page 352 of 616

Driving your vehicle
18
6
N (Neutral)
The wheels and transmission are not
engaged. - Parking in N (Neutral) gear
Follow below steps when parking
and you want the vehicle to move
when pushed.
1.After parking your vehicle, step on
the brake pedal and move the shift
lever to P with the ignition button in
ON or while the engine is running.
2.If the parking brake is applied unlock the parking brake.
3.While pressing the brake pedal, turn the ignition button OFF.
- For smart key equipped vehicles,the ignition switch can be moved
to OFF only when the shift lever
is in P.
4.Change the gear shift lever to N (Neutral) while pressing the brake
pedal and pushing [SHIFT LOCK
RELEASE] button or inserting,
pressing down a tool (e.g. flathead
screw-driver) into the [SHIFT
LOCK RELEASE] access hole at
the same time. Then, the vehicle
will move when external force is
applied.
WARNING
Do not shift into gear unless
your foot is firmly on the brake
pedal. Shifting into gear when
the engine is running at high
speed can cause the vehicle to
move very rapidly. You could
lose control of the vehicle and
hit people or objects.
WARNING
Do not drive with the shift lever
in N (Neutral).
The engine brake will not work
and lead to an accident.
WARNING - Parking In
Neutral
With the exception of parking in neutral gear, always park
the vehicle in [P] (Park) for
safety and apply the parking
brake.
Before parking in [N] (Neutral) gear, make sure the parking
ground is level and flat. Do not
park in [N] gear on any slopes
or gradients. If parked and left
in [N], the vehicle may move
and cause serious damage or
injury.