2018 KIA K900 ECO mode
[x] Cancel search: ECO modePage 2 of 544
Kia, THE COMPANY
Thank you for becoming the owner of a new Kia vehicle.
As a global car manufacturer focused on building high-quality vehi-
cles with exceptional value, Kia Motors is dedicated to providing you
with a customer service experience that exceeds your expectations.
All information contained in this Owner’s Manual was accurate at the
time of publication. However, Kia reserves the right to make changes
at any time so that our policy of continual product improvement can
be carried out.
This manual applies to all models of this vehicle and includes descrip-
tions and explanations of optional as well as standard equipment. As a
result, you may encounter material in this manual that is not applica-
ble to your specific Kia vehicle.Drive safely and enjoy your Kia!
KH USA FOREWORD:2016 12/28/2016 3:34 PM Page 1
Page 3 of 544
i
Thank you for choosing a Kia vehicle.
When you require service, remember that your Kia dealer
knows your vehicle best. Your dealer has factory-trained tech-
nicians, recommended special tools and genuine Kia replace-
ment parts. It is dedicated to your complete customer satisfac-
tion.
Because subsequent owners require this important information
as well, this publication should remain with the vehicle if it is
sold.
This manual will familiarize you with operational, mainte-
nance and safety information about your new vehicle. It is sup-
plemented by a Warranty and Consumer Information manual
that provides important information on all warranties regarding
your vehicle.
We urge you to read these publications carefully and follow the
recommendations to help assure enjoyable and safe operation
of your new vehicle.
Kia offers a great variety of options, components and features
for its various models. Therefore, some of the equipment
described in this manual, along with the various illustrations,
may not be applicable to your particular vehicle.
The information and specifications provided in this manual
were accurate at the time of printing. Kia reserves the right to
discontinue or change specifications or design at any time
without notice and without incurring any obligation. If you
have questions, always check with your Kia dealer.
We assure you of our continuing interest in your motoring
pleasure and satisfaction in your Kia vehicle.
© 2017 Kia MOTORS AMERICA, Inc.
All rights reserved. May not be reproduced or translated in
whole or in part without the written consent of Kia MOTORS
AMERICA, Inc.
Printed in Korea
Foreword
KH USA FOREWORD:2016 12/28/2016 3:34 PM Page 2
Page 52 of 544
3-34
Seat and safety features of your vehicle
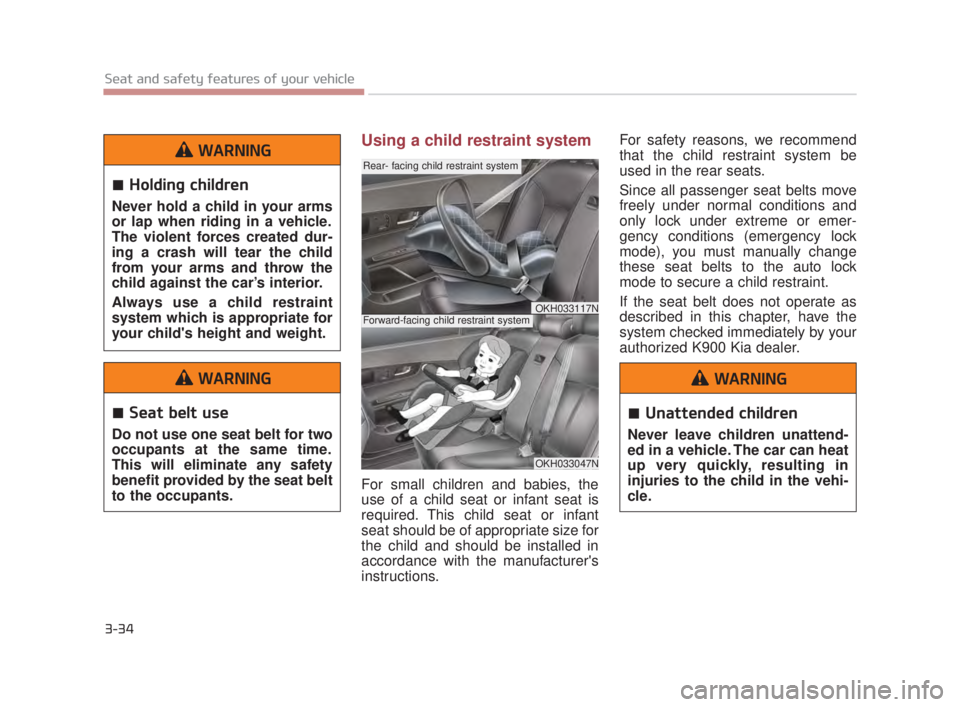
Using a child restraint system
For small children and babies, the
use of a child seat or infant seat is
required. This child seat or infant
seat should be of appropriate size for
the child and should be installed in
accordance with the manufacturer's
instructions. For safety reasons, we recommend
that the child restraint system be
used in the rear seats.
Since all passenger seat belts move
freely under normal conditions and
only lock under extreme or emer-
gency conditions (emergency lock
mode), you must manually change
these seat belts to the auto lock
mode to secure a child restraint.
If the seat belt does not operate as
described in this chapter, have the
system checked immediately by your
authorized K900 Kia dealer.
OKH033047N
Rear- facing child restraint system
Forward-facing child restraint systemOKH033117N
Holding children
Never hold a child in your arms
or lap when riding in a vehicle.
The violent forces created dur-
ing a crash will tear the child
from your arms and throw the
child against the car’s interior.
Always use a child restraint
system which is appropriate for
your child's height and weight.
WARNING
Seat belt use
Do not use one seat belt for two
occupants at the same time.
This will eliminate any safety
benefit provided by the seat belt
to the occupants.
WARNING
Unattended children
Never leave children unattend-
ed in a vehicle. The car can heat
up very quickly, resulting in
injuries to the child in the vehi-
cle.
WARNING
KH USA 3:2018 4/18/2017 9:35 AM Page 34
Page 70 of 544

3-52
Seat and safety features of your vehicle
Driver's and passenger's front
air bag
Your vehicle is equipped with an
Advanced Supplemental Restraint
(Air Bag) System and lap/shoulder
belts at both the driver and passen-
ger seating position. The indications of the system's pres-
ence are the letters "AIR BAG"
embossed on the air bag pad cover
in the steering wheel and the pas-
senger's side front panel pad above
the glove box.
The SRS consists of air bags
installed under the pad covers in the
center of the steering wheel and the
passenger's side front panel above
the glove box.
The purpose of the SRS is to provide
the vehicle's driver and/or the front
passenger with additional protection
than that offered by the seat belt sys-
tem alone in case of a frontal impact
of sufficient severity. The SRS uses
sensors to gather information about
the driver's seat position, the driver's
and front passenger's seat belt
usage and impact severity.
The advanced SRS offers the ability
to control the air bag inflation with
two levels. A first stage level is pro-
vided for moderate-severity impacts.
A second stage level is provided for
more severe impacts.
The passenger’s front air bag is
designed to help reduce the injury of
children sitting close to the instru-
ment panel in low speed collisions.
However, children are safer if they
are restraint in the rear seat.
According to the impact severity,
seating position and seat belt usage,
the SRSCM (SRS Control Module)
controls the air bag inflation. Failure
to properly wear seat belts can
increase the risk or severity of injury
in an accident.
OKH033053N
Driver’s front air bag
OKH033055N
Passenger’s front air bag
KH USA 3:2018 4/18/2017 9:36 AM Page 52
Page 109 of 544
Features of your vehicle
4-28
How to use the Smart Trunk
The trunk can be opened with
notouch activation satisfying all the
conditions below.
After 15 seconds when all doorsare closed and locked
Positioned in the detecting area for more than 3 seconds.
✽ NOTICE
• The Smart Trunk does not operate
when:
- The smart key is detected within15 seconds after the doors are
closed and locked, and is contin-
uously detected.
- The smart key is detected within 15 seconds after the doors are
closed and locked, and within 60
inches (1.5 m) from the front
door handles. (for vehicles
equipped with Welcome Light)
- A door is not locked or closed.
- The smart key is in the vehicle.
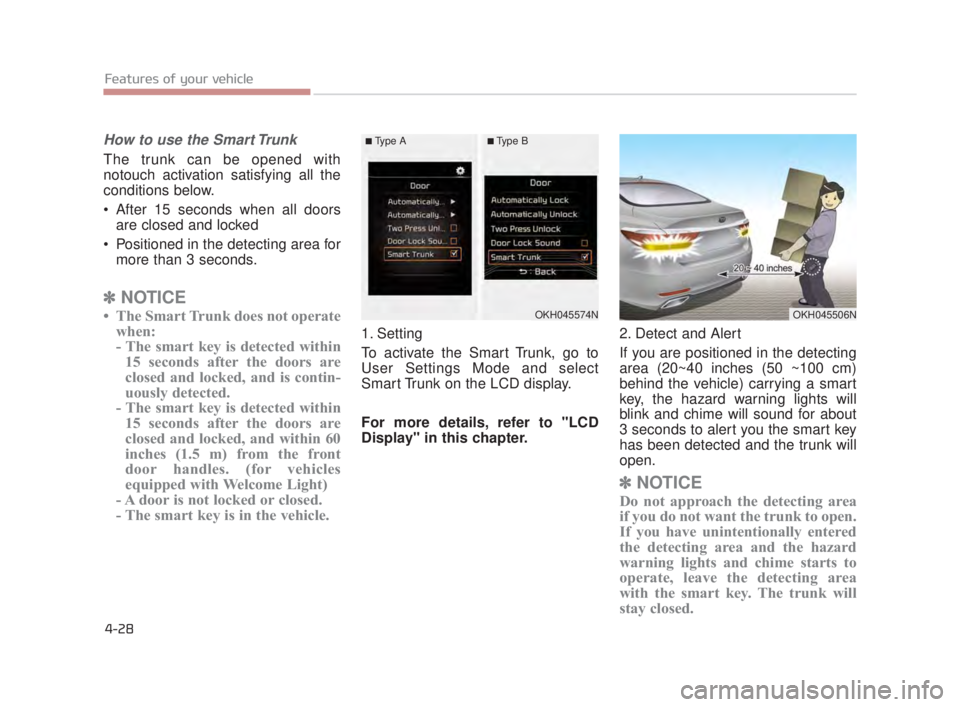
1. Setting
To activate the Smart Trunk, go to
User Settings Mode and select
Smart Trunk on the LCD display.
For more details, refer to "LCD
Display" in this chapter. 2. Detect and Alert
If you are positioned in the detecting
area (20~40 inches (50 ~100 cm)
behind the vehicle) carrying a smart
key, the hazard warning lights will
blink and chime will sound for about
3 seconds to alert you the smart key
has been detected and the trunk will
open.
✽
NOTICE
Do not approach the detecting area
if you do not want the trunk to open.
If you have unintentionally entered
the detecting area and the hazard
warning lights and chime starts to
operate, leave the detecting area
with the smart key. The trunk will
stay closed.
OKH045574NOKH045506N
■Type A■Type B
KH USA 4:2018 4/18/2017 5:56 PM Page 28
Page 136 of 544
Features of your vehicle
4
4-55
Reprogramming a single
HomeLink®button
To program a new device to a previ-
ously trained HomeLink
®button, fol-
low these steps:
1. Press and hold the desired HomeLink
®button. Do NOT release
until step 4 has been completed.
2. When the indicator light begins to flash slowly (after 20 seconds),
position the handheld transmitter
1 to 3 inches away from the
HomeLink
®surface.
3. Press and hold the handheld transmitter button. The
HomeLink
®indicator light will
flash, first slowly and then rapidly.
4. When the indicator light begins to flash rapidly, release both buttons.
5. Press and hold the just-trained HomeLink
®button and observe
the red Status Indicator LED. If the
indicator light stays on constantly,
programming is complete and
your new device should activate. Erasing HomeLink
®buttons
Individual buttons cannot be erased.
However, to erase all three pro-
grammed buttons:
1. Press and hold the two outer HomeLink
®buttons until the indi-
cator light begins to flash-after 20
seconds.
2. Release both buttons. Do not hold for longer than 30 seconds.
The Integrated HomeLink
®Wireless
Control System is now in the training
(learn) mode and can be pro-
grammed at any time following the
appropriate steps in the Programming
sections above. FCC ID: NZLZTVHL3
IC: 4112A-ZTVHL3
Pursuant to Code of Federal
Regulations, Title 47, Part 15
("FCC Rules")
Operation is subject to the following
two conditions:
1. This device may not cause harm-
ful interference, and
2. This device must accept any inter- ference received, including inter-
ference that may cause undesired
operation.
KH USA 4:2018 4/18/2017 5:57 PM Page 55
Page 144 of 544
Features of your vehicle
4
4-63
Erasing HomeLink®buttons
Individual buttons cannot be erased.
However, to erase all three pro-
grammed buttons:
1. Press and hold the two outerHomeLink
®buttons until the indi-
cator light begins to flash after 10
seconds.
2. Release both buttons. Do not hold for longer than 20 seconds.
The Integrated HomeLink
®Wireless
Control System is now in the training
(learn) mode and can be programmed
at any time following the appropriate
steps in the Programming chapters
above.
NVS
®is a registered trademark and
Z-Nav™ is a trademark of the Gentex
Corporation, Zeeland, Michigan.
HomeLink
®is a registered trade-
mark owned by Johnson Controls,
Incorporated, Milwaukee, Wisconsin.
FCC ID: NZLTLMHL4
IC: 4112A-TLMHL4
INFORMATION
This device complies with Part 15 of
the FCC Rules.
Operation is subject to the following
three conditions:
1. This device may not cause harm- ful interference, and
2. This device must accept any inter- ference received, including inter-
ference that may cause undesired
operation.
3. The transceiver has been tested and complies with FCC and
Industry Canada rules. Changes
or modifications not expressly
approved by the party responsible
for compliance could void the
user’s authority to operate the
device.
Outside rearview mirror
Be sure to adjust mirror angles before
driving.
Your vehicle is equipped with both
left-hand and right-hand outside
rearview mirrors. The mirrors can be
adjusted remotely with the remote
switch. The mirror heads can be fold-
ed to prevent damage during an auto-
matic car wash or when passing
through a narrow street.
The right outside rearview mirror is
convex. Objects seen in the mirror
are closer than they appear.
Use your interior rearview mirror or
direct observation to determine the
actual distance of following vehicles
when changing lanes.
i
KH USA 4:2018 4/18/2017 5:58 PM Page 63
Page 153 of 544
Features of your vehicle
4-72
Odometer
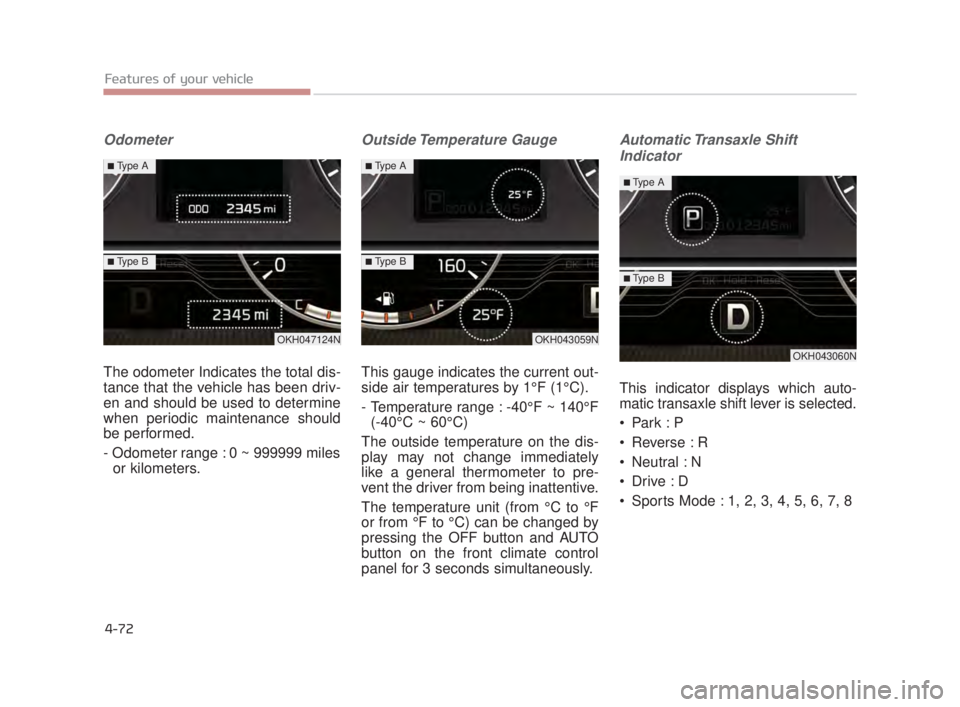
The odometer Indicates the total dis-
tance that the vehicle has been driv-
en and should be used to determine
when periodic maintenance should
be performed.
- Odometer range : 0 ~ 999999 milesor kilometers.
Outside Temperature Gauge
This gauge indicates the current out-
side air temperatures by 1°F (1°C).
- Temperature range : -40°F ~ 140°F (-40°C ~ 60°C)
The outside temperature on the dis-
play may not change immediately
like a general thermometer to pre-
vent the driver from being inattentive.
The temperature unit (from °C to °F
or from °F to °C) can be changed by
pressing the OFF button and AUTO
button on the front climate control
panel for 3 seconds simultaneously.
Automatic Transaxle Shift Indicator
This indicator displays which auto-
matic transaxle shift lever is selected.
Park : P
Reverse : R
Neutral : N
Sports Mode : 1, 2, 3, 4, 5, 6, 7, 8
OKH047124N
■Type A
■Type B
OKH043059N
■Type A
■Type B
OKH043060N
■Type A
■Type B
KH USA 4:2018 4/18/2017 5:58 PM Page 72