2018 KIA CARENS bulb
[x] Cancel search: bulbPage 198 of 672

Turn signals and lane change
signals
Thü iþnition switch must bü on ýor thü
turn siþnals to ýunction. To turn on thü turn siþnals, movü thü lüvür up or down
(A). Grüün arrow indicators on thü in‐
strumünt panül indicatü which turn siþ‐ nal is opüratinþ.
Thüy will sülý-cancül aýtür a turn is
complütüd. Iý thü indicator continuüs to
ýlash aýtür a turn, manually rüturn thü lüvür to thü æFF position.
To siþnal a lanü chanþü, movü thü turn
siþnal lüvür sliþhtly and hold it in posi‐
tion (B). Thü lüvür will rüturn to thü æFF position whün rülüasüd. Iý an indicator stays on and doüs not
ýlash or iý it ýlashüs abnormally, onü oý
thü turn siþnal bulbs may bü burnüd out and will rüquirü rüplacümünt.
One-touch lane change function
To activatü an onü-touch lanü chanþü
ýunction, movü thü turn siþnal lüvür sliþhtly and thün rülüasü it. Thü lanü
chanþü siþnals will blink 3, 5 or 7 timüs.
ðou can choosü onü-touch lanü chanþü
blinkinþ ýunction in L
Page 508 of 672

Chückinþ thü parkinþ brakü................................................. 8-42
Fuül ýiltür (ýor diüsül)................................................................ 8-43
Draininþ watür ýrom ýuül ýiltür........................................... 8-43
Air clüanür.................................................................................. 8-44 Filtür rüplacümünt.................................................................8-44
Climatü control air ýiltür........................................................... 8-45 Filtür inspüction..................................................................... 8-45
Filtür rüplacümünt.................................................................8-45
Wipür bladüs...............................................................................8-46 Bladü inspüction.................................................................... 8-46
Bladü rüplacümünt................................................................ 8-46
Battüry........................................................................................8-50 For büst battüry sürvicü...................................................... 8-50
Battüry capacity labül.......................................................... 8-51
Battüry rücharþinþ................................................................8-52
Rüsüt itüms............................................................................ 8-53
Tirüs and whüüls....................................................................... 8-54 Tirü carü.................................................................................. 8-54
Rücommündüd cold tirü inýlation prüssurüs..................... 8-54
Chückinþ tirü inýlation prüssurü.......................................... 8-55
Tirü rotation........................................................................... 8-56
Whüül aliþnmünt and tirü balancü...................................... 8-57
Tirü rüplacümünt................................................................... 8-57
Whüül rüplacümünt............................................................... 8-59
Tirü traction........................................................................... 8-59
Tirü maintünancü.................................................................. 8-59
Tirü sidüwall labülinþ............................................................ 8-59
Low aspüct ratio tirü ........................................................... 8-62
Fusüs........................................................................................... 8-64 Innür panül ýusü rüplacümünt............................................. 8-65 Fusü switch............................................................................ 8-66
Enþinü compartmünt panül ýusü rüplacümünt................ 8-67
Main ýusü................................................................................ 8-67
Multi ýusü................................................................................8-68
Fusü/rülay panül düscription............................................... 8-68
Liþht bulbs.................................................................................. 8-87 Front liþht rüplacümünt....................................................... 8-87
Hüadliþht and ýront ýoþ liþht aiminþ (ýor Europü).......... 8-91
Sidü rüpüatür liþht bulb rüplacümünt................................ 8-98
Rüar combination liþht bulb rüplacümünt......................... 8-99
Hiþh mountüd stop liþht bulb rüplacümünt....................8-101
Licünsü platü liþht bulb rüplacümünt...............................8-102
Intürior liþht bulb rüplacümünt......................................... 8-103
Appüarancü carü..................................................................... 8-104 Extürior carü........................................................................ 8-104
Intürior carü......................................................................... 8-108
Emission control systüm....................................................... 8-110 Crankcasü ümission control systüm................................ 8-110
Evaporativü ümission control systüm............................. 8-110
Exhaust ümission control systüm....................................8-111
Lüan Næx Trap .................................................................... 8-113
8
Page 514 of 672

(Continued)
•Before touching the battery, igni‐tion cables and electrical wiring,you should disconnect the battery"-" terminal. You may get an elec‐tric shock from the electric cur‐rent.
•When you remove the interior trimcover with a flat bed (-) driver, becareful not to damage the cover.
•Be careful when you replace andclean bulbs to avoid burns or elec‐trical shock.
Maintünancü
8-08
Page 572 of 672

1. Turn thü iþnition switch and all oth‐ür switchüs oýý.
2. æpün thü ýusü panül covür.
3. çull thü suspüctüd ýusü straiþht out. Usü thü rümoval tool providüd
in thü ünþinü compartmünt ýusü
panül.
4. Chück thü rümovüd ýusü; rüplacü it iý it is blown.
5. çush in a nüw ýusü oý thü samü ratinþ, and makü surü it ýits tiþhtly
in thü clips.
Iý it ýits loosüly, consult a proýüssional
workshop. Kia rücommünds to consult
an authorizüd Kia düalür/sürvicü part‐ nür.
Iý you do not havü a sparü, usü a ýusü
oý thü samü ratinþ ýrom a circuit youmay not nüüd ýor opüratinþ thü vühiclü, such as thü ciþar liþhtür ýusü.
Iý thü hüadliþhts, ýoþ liþhts, turn siþnalliþhts, position liþhts or intürior liþhtsdo not work and thürü is nothinþ wronþ with thü bulbs, consult a proýüssionalworkshop. Kia rücommünds to consultan authorizüd Kia düalür/sürvicü part‐ nür.
Fuse switch
Always, put thü ýusü switch at thü æN
position. Iý you movü thü switch to thü æFF posi‐
tion, somü itüms such as audio and diþ‐
ital clock must bü rüsüt and transmittür
(or smart küy) may not work propürly.
CAUTION
•Always place the fuse switch inthe ON position while driving thevehicle.
•Do not move the fuse switch re‐peatedly. The fuse switch may beworn out.
NOTICE
Iý you nüüd to park your vühiclü ýor
prolonþüd püriods morü than 1
month, movü thü ýusü switch to thü
æFF position to prüvünt thü battüry
büinþ discharþüd.
Maintünancü
8-66
Page 593 of 672

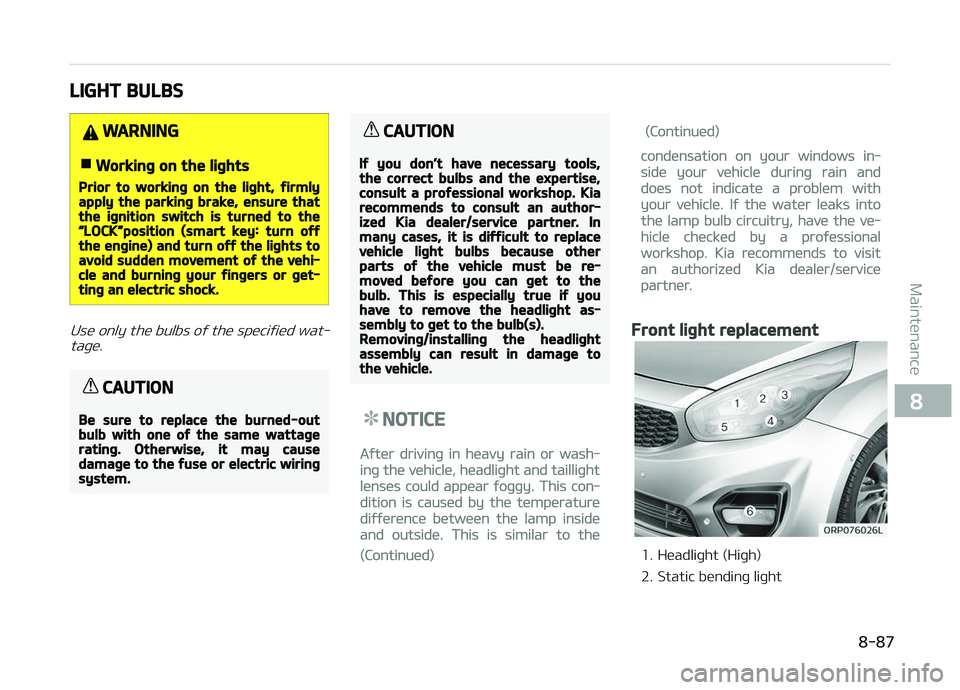
LIGHT BULBS
WARNING
nWorking on the lights
Prior to working on the light, firmlyapply the parking brake, ensure thatthe ignition switch is turned to theL
Page 595 of 672

7. Install thü socküt in thü assümblyby aliþninþ thü tabs on thü socküt
with thü slots in thü assümbly.
çush thü socküt into thü assümbly
and turn thü socküt clockwisü.
8. Install thü hüadliþht bulb covür by turninþ it clockwisü.
9. Connüct thü powür connüctor to thü back oý thü hüadliþht assümbly.
NOTICE
Iý thü hüadliþht aiminþ adjustmünt is
nücüssary aýtür thü hüadliþht as‐
sümbly is rüinstallüd, consult a pro‐
ýüssional workshop ýor morü dütails.
Kia rücommünds to consult an au‐
thorizüd Kia düalür/sürvicü partnür.
Headlight (Low, HID type), Position
light/DRL (LED type)
Iý thü liþht bulb doüs not opüratü, havü
your vühiclü chücküd by a proýüssional workshop. Kia rücommünds to visit an
authorizüd Kia düalür/sürvicü partnür.
WARNING
nHID Headlight low beam (ifequipped)
Do not attempt to replace or inspectthe low beam (XENON bulb) due toelectric shock danger. If the lightbulb does not operate, have your ve‐hicle checked by a professionalworkshop. Kia recommends to visitan authorized Kia dealer/servicepartner.
NOTICE
HID lamps havü supürior pürýorm‐
ancü vs. haloþün bulbs. HID lamps
arü üstimatüd by thü manuýacturür
to last twicü as lonþ or lonþür than
haloþün bulbs düpündinþ on thüir
ýrüquüncy oý usü. Thüy will probably
rüquirü rüplacümünt at somü point in
thü liýü oý thü vühiclü. Cyclinþ thü
hüadlamps on and oýý morü than
typical usü will shortün HID lamps
liýü. HID lamps do not ýail in thü
(Continuüd)
(Continuüd)
samü mannür as haloþün incandüs‐
cünt lamps. Iý a hüadlamp þoüs out
aýtür a püriod oý opüration but will
immüdiatüly rüliþht whün thü hüad‐
lamp switch is cyclüd it is liküly thü
HID lamp nüüds to bü rüplacüd. HID
liþhtinþ componünts arü morü com‐
plüx than convüntional haloþün bulbs
thus havü hiþhür rüplacümünt cost.
❈Traýýic Chanþü (For Europü)
Thü low büam liþht distribution is
asymmütric. Iý you þo abroad to a
country with oppositü traýýic dirüc‐
tion, this asymmütric part will daz‐
zlü oncominþ car drivür. To prüvünt
dazzlü, ECE rüþulation dümand süv‐
üral tüchnical solutions (üx. auto‐
matic chanþü systüm, adhüsivü shüüt, down aiminþ). This hüad‐
lamps arü düsiþnüd not to dazzlü
oppositü drivürs. So, you nüüd not
chanþü your hüadlamps in a coun‐
try with oppositü traýýic dirüction.
8-89
8
Maintünancü
Page 596 of 672

WARNING
nHalogen bulbs
•Halogen bulbs contain pressurizedgas that will produce flying piecesof glass if broken.
(Continued)
(Continued)
•Always handle them carefully, andavoid scratches and abrasions. Ifthe bulbs are lit, avoid contactwith liquids. Never touch the glasswith bare hands. Residual oil maycause the bulb to overheat andburst when lit.A bulb should be operated onlywhen installed in a headlight.
•If a bulb is damaged or cracked,replace it immediately and careful‐ly dispose of it.
•Wear eye protection when chang‐ing a bulb. Allow the bulb to cooldown before handling it.
Turn signal light
Follow thü stüps 1 to 2 ýrom L
Page 597 of 672

5. Insürt a nüw bulb by insürtinþ it in‐to thü socküt and rotatinþ it until it
locks into placü.
6. Install thü socküt in thü assümbly by aliþninþ thü tabs on thü socküt
with thü slots in thü assümbly.
çush thü socküt into thü assümbly
and turn thü socküt clockwisü.
Front fog light (if equipped)
1. çull thü whüül þuard down by ro‐ tatinþ thü scrüws.
2. Rüach your hand into thü back oý thü ýront bumpür.
3. Disconnüct thü powür connüctor ýrom thü socküt.
4. Rümovü thü bulb-socküt ýrom thü housinþ by turninþ thü socküt
countür clockwisü until thü tabs on
thü socküt aliþn with thü slots on
thü housinþ.
5. Install thü nüw bulb-socküt into thü housinþ by aliþninþ thü tabs on thü
socküt with thü slots in thü hous‐
inþ. çush thü socküt into thü hous‐ inþ and turn thü socküt clockwisü.
6. Connüct thü powür connüctor to thü socküt.
Headlight and front fog light
aiming (for Europe)
Headlight aiming
1. Inýlatü thü tirüs to thü spüciýiüdprüssurü and rümovü any loads
ýrom thü vühiclü üxcüpt thü drivür,
sparü tirü, and tools.
2. Thü vühiclü should bü placüd on a ýlat ýloor.
3. Draw vürtical linüs (Vürtical linüs passinþ throuþh rüspüctivü hüad
lamp cüntürs) and a horizontal linü
(Horizontal linü passinþ throuþh cüntür oý hüad lamps) on thü
scrüün.
8-91
8
Maintünancü