2018 KIA CADENZA ECU
[x] Cancel search: ECUPage 49 of 502
333
Safety features of your vehicle
Lower Anchors and Tether forChildren (LATCH) System
The LATCH system holds a child
restraint during driving and in an
accident. This system is designed to
make installation of the child restraint
easier and reduce the possibility of
improperly installing your child
restraint. The LATCH system uses
anchors in the vehicle and attach-
ments on the child restraint. The
LATCH system eliminates the need
to use seat belts to secure the child
restraint to the rear seats.
Lower anchors are metal bars built
into the vehicle. There are two lower
anchors for each LATCH seating
position that will accommodate a
child restraint with lower attachments.
To use the LATCH system in your
vehicle, you must have a child
restraint with LATCH attachments.
The child seat manufacturer will pro-
vide you with instructions on how to
use the child seat with its attach-
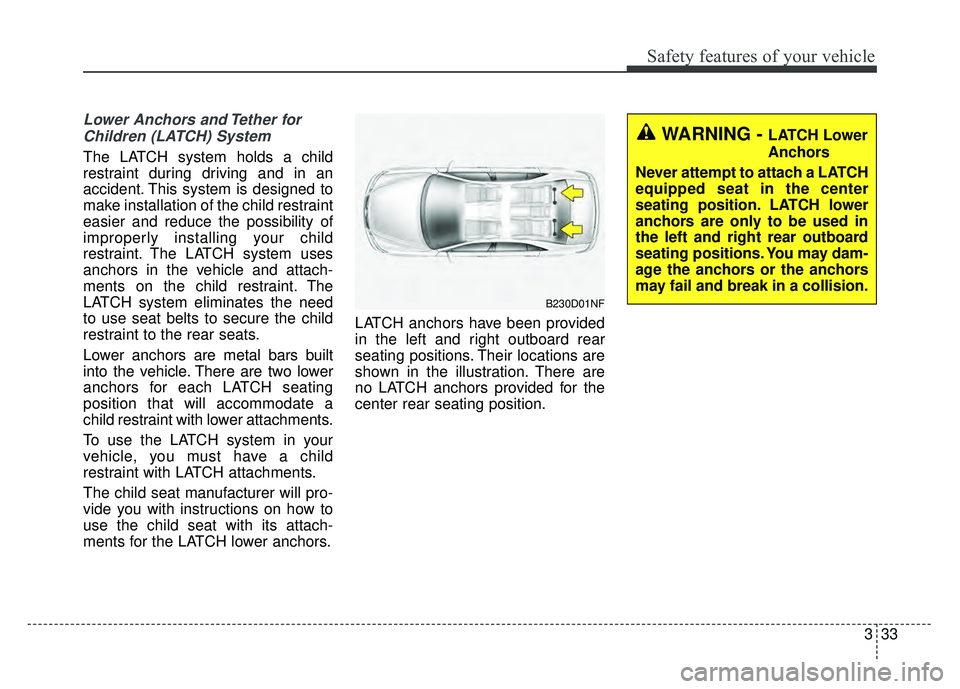
ments for the LATCH lower anchors. LATCH anchors have been provided
in the left and right outboard rear
seating positions. Their locations are
shown in the illustration. There are
no LATCH anchors provided for the
center rear seating position.
B230D01NF
WARNING - LATCH Lower
Anchors
Never attempt to attach a LATCH
equipped seat in the center
seating position. LATCH lower
anchors are only to be used in
the left and right rear outboard
seating positions. You may dam-
age the anchors or the anchors
may fail and break in a collision.
Page 50 of 502
Safety features of your vehicle
34
3
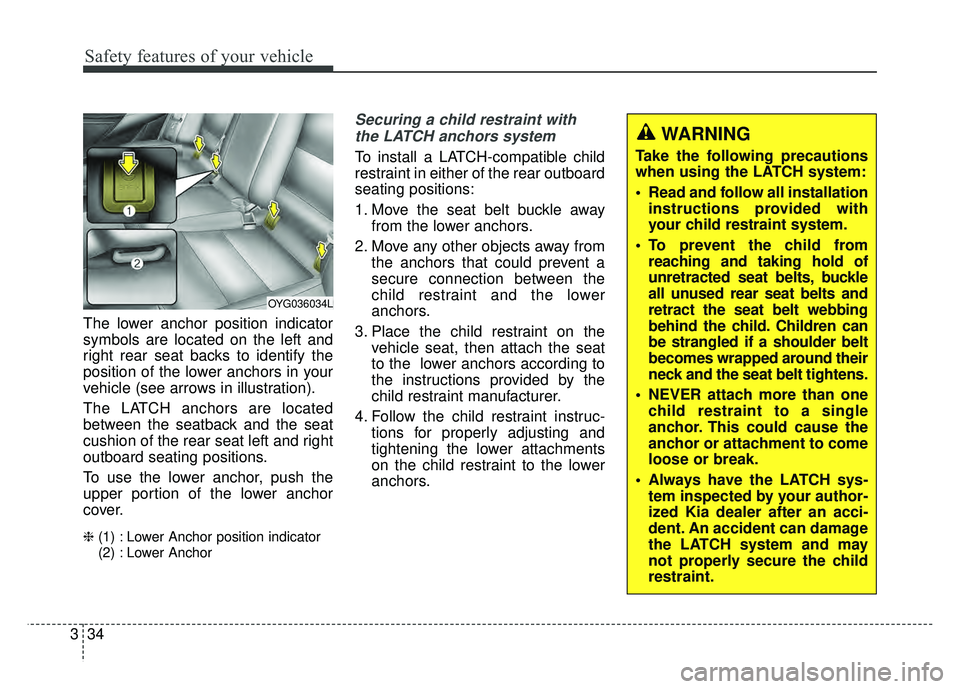
The lower anchor position indicator
symbols are located on the left and
right rear seat backs to identify the
position of the lower anchors in your
vehicle (see arrows in illustration).
The LATCH anchors are located
between the seatback and the seat
cushion of the rear seat left and right
outboard seating positions.
To use the lower anchor, push the
upper portion of the lower anchor
cover.
❈ (1) : Lower Anchor position indicator
(2) : Lower Anchor
Securing a child restraint with
the LATCH anchors system
To install a LATCH-compatible child
restraint in either of the rear outboard
seating positions:
1. Move the seat belt buckle away from the lower anchors.
2. Move any other objects away from the anchors that could prevent a
secure connection between the
child restraint and the lower
anchors.
3. Place the child restraint on the vehicle seat, then attach the seat
to the lower anchors according to
the instructions provided by the
child restraint manufacturer.
4. Follow the child restraint instruc- tions for properly adjusting and
tightening the lower attachments
on the child restraint to the lower
anchors.
OYG036034L
WARNING
Take the following precautions
when using the LATCH system:
Read and follow all installationinstructions provided with
your child restraint system.
To prevent the child from reaching and taking hold of
unretracted seat belts, buckle
all unused rear seat belts and
retract the seat belt webbing
behind the child. Children can
be strangled if a shoulder belt
becomes wrapped around their
neck and the seat belt tightens.
NEVER attach more than one child restraint to a single
anchor. This could cause the
anchor or attachment to come
loose or break.
Always have the LATCH sys- tem inspected by your author-
ized Kia dealer after an acci-
dent. An accident can damage
the LATCH system and may
not properly secure the child
restraint.
Page 51 of 502
335
Safety features of your vehicle
✽
✽NOTICE
The recommended maximum
weight for the LATCH system is 65
lbs. (30 kg). When selecting a proper
child restraint, consider that the
maximum total weight of the child
plus the child restraint should be
less than 65 lbs (30 kg).
As a guide, the MAX child restraint
weight should be determined by the
following calculation:
Child Restraint Weight =
65 - (child's total weight in lbs.)
Securing a child restraint seat
with "Tether Anchor" system
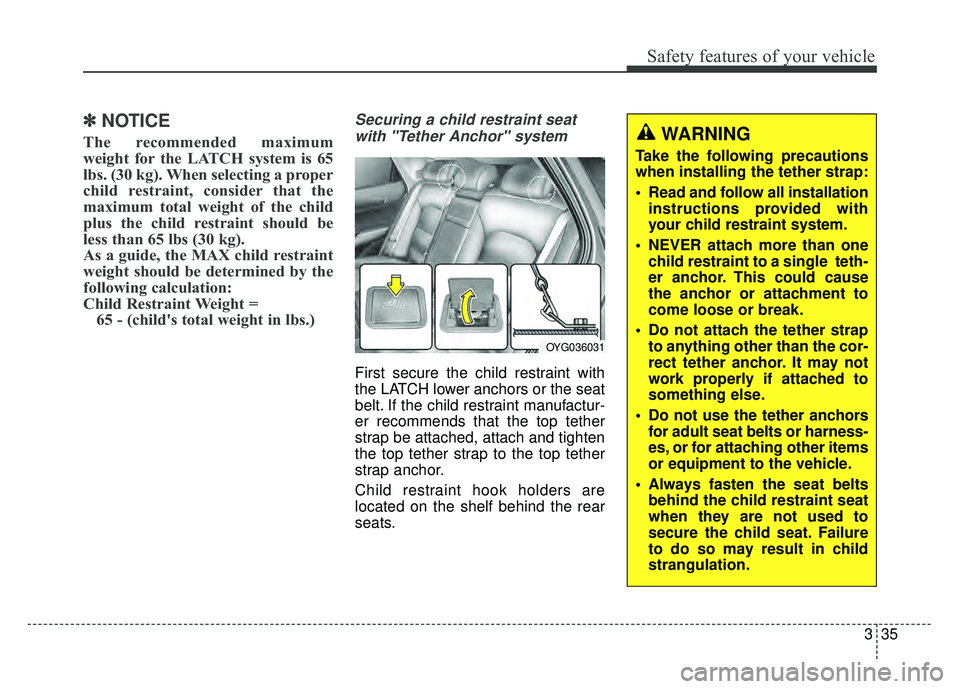
First secure the child restraint with
the LATCH lower anchors or the seat
belt. If the child restraint manufactur-
er recommends that the top tether
strap be attached, attach and tighten
the top tether strap to the top tether
strap anchor.
Child restraint hook holders are
located on the shelf behind the rear
seats.
OYG036031
WARNING
Take the following precautions
when installing the tether strap:
Read and follow all installation instructions provided with
your child restraint system.
NEVER attach more than one child restraint to a single teth-
er anchor. This could cause
the anchor or attachment to
come loose or break.
Do not attach the tether strap to anything other than the cor-
rect tether anchor. It may not
work properly if attached to
something else.
Do not use the tether anchors for adult seat belts or harness-
es, or for attaching other items
or equipment to the vehicle.
Always fasten the seat belts behind the child restraint seat
when they are not used to
secure the child seat. Failure
to do so may result in child
strangulation.
Page 52 of 502
Safety features of your vehicle
36
3
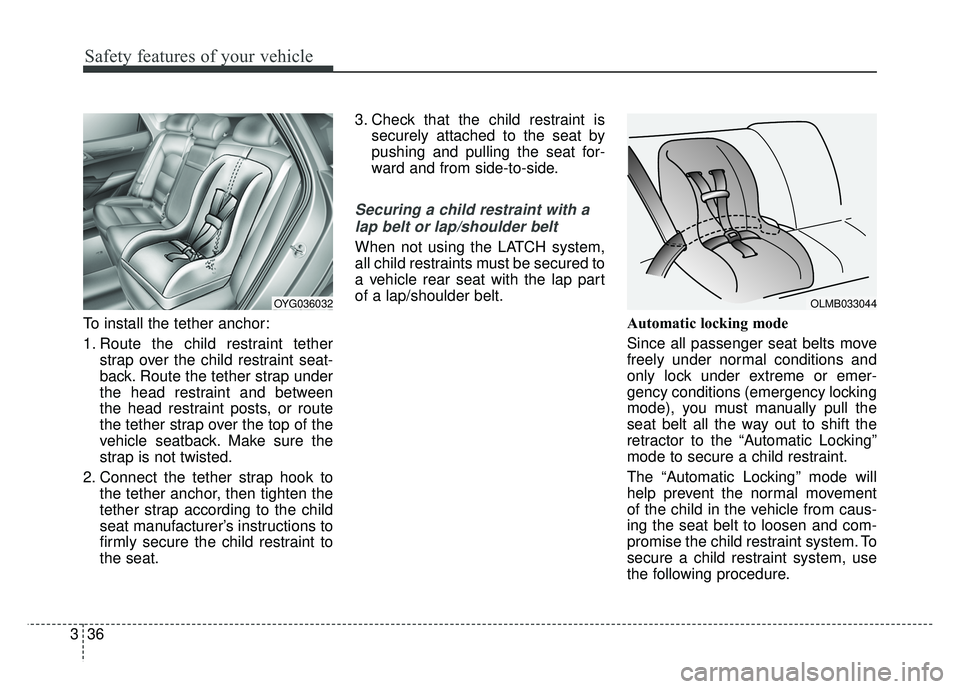
To install the tether anchor:
1. Route the child restraint tether
strap over the child restraint seat-
back. Route the tether strap under
the head restraint and between
the head restraint posts, or route
the tether strap over the top of the
vehicle seatback. Make sure the
strap is not twisted.
2. Connect the tether strap hook to the tether anchor, then tighten the
tether strap according to the child
seat manufacturer’s instructions to
firmly secure the child restraint to
the seat. 3. Check that the child restraint is
securely attached to the seat by
pushing and pulling the seat for-
ward and from side-to-side.
Securing a child restraint with a
lap belt or lap/shoulder belt
When not using the LATCH system,
all child restraints must be secured to
a vehicle rear seat with the lap part
of a lap/shoulder belt.
Automatic locking mode
Since all passenger seat belts move
freely under normal conditions and
only lock under extreme or emer-
gency conditions (emergency locking
mode), you must manually pull the
seat belt all the way out to shift the
retractor to the “Automatic Locking”
mode to secure a child restraint.
The “Automatic Locking” mode will
help prevent the normal movement
of the child in the vehicle from caus-
ing the seat belt to loosen and com-
promise the child restraint system. To
secure a child restraint system, use
the following procedure.
OYG036032OLMB033044
Page 97 of 502
Features of your vehicle
16
4
DOOR LOCKS
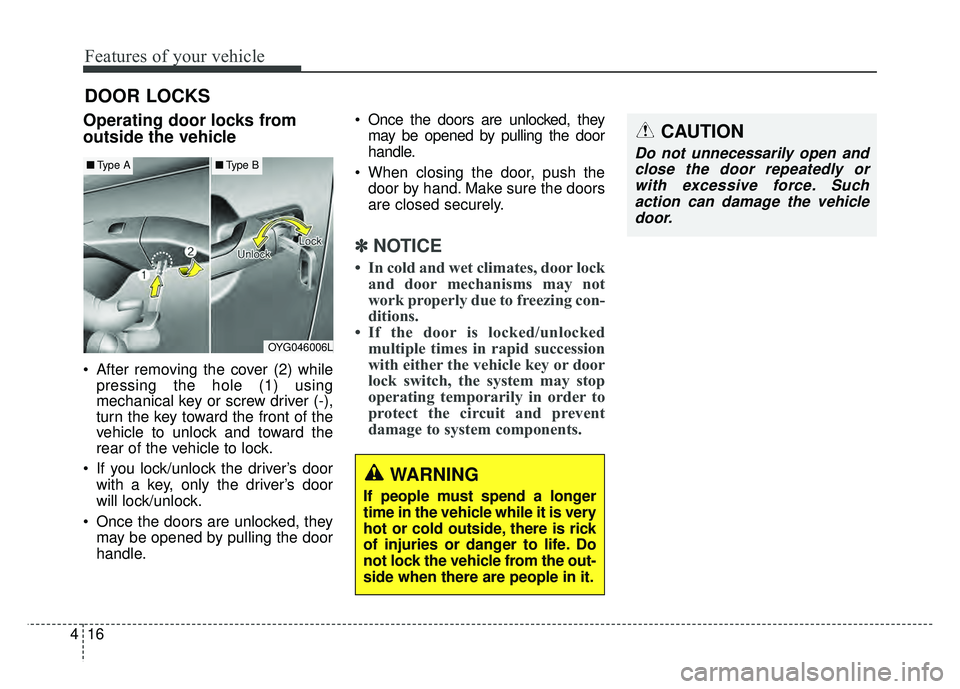
Operating door locks from
outside the vehicle
After removing the cover (2) while
pressing the hole (1) using
mechanical key or screw driver (-),
turn the key toward the front of the
vehicle to unlock and toward the
rear of the vehicle to lock.
If you lock/unlock the driver’s door with a key, only the driver’s door
will lock/unlock.
Once the doors are unlocked, they may be opened by pulling the door
handle. Once the doors are unlocked, they
may be opened by pulling the door
handle.
When closing the door, push the door by hand. Make sure the doors
are closed securely.
✽ ✽ NOTICE
• In cold and wet climates, door lock
and door mechanisms may not
work properly due to freezing con-
ditions.
• If the door is locked/unlocked multiple times in rapid succession
with either the vehicle key or door
lock switch, the system may stop
operating temporarily in order to
protect the circuit and prevent
damage to system components.
OYG046006L
■ Type A■Type B
WARNING
If people must spend a longer
time in the vehicle while it is very
hot or cold outside, there is rick
of injuries or danger to life. Do
not lock the vehicle from the out-
side when there are people in it.
CAUTION
Do not unnecessarily open and
close the door repeatedly orwith excessive force. Suchaction can damage the vehicledoor.
Page 103 of 502

Features of your vehicle
22
4
Closing the trunk
To close the power trunk, do one of
the following:
Push the close button of the power
trunk main button, until the power
trunk is closed securely. The chime
will sound twice.
Push the power trunk close button.
Push the power trunk lock button when all doors and engine hood
are closed with the smart key in
your possession. After closing, all
doors and trunk lock automatically.
✽ ✽ NOTICE
The power trunk lock button will
not work if you press the button
when:
- Any door is open.
- The engine start/stop button is not
in the OFF position.
- The smart key is in the vehicle.
Do not leave the power trunk open
for a long period of time. This may
drain the battery.
✽ ✽ NOTICE
In cold and wet climates, trunk lock
and trunk mechanisms may not
work properly due to freezing condi-
tions.
WARNING
Make sure there are no people
or objects around the trunk
before opening or closing the
power trunk. Wait until the trunk
is open fully and stopped
before loading or unloading
cargo from the vehicle.
CAUTION
Do not close or open the
power trunk manually. Thismay cause damage to thepower trunk. If it is necessaryto close or open the powertrunk manually when the bat-tery is drained or disconnect-ed, do not apply excessiveforce.
To prevent damage to the trunk lift cylinders and theattached hardware, alwaysclose the trunk before driving.
Page 118 of 502

437
Features of your vehicle
Closing the hood
1. Before closing the hood, check thefollowing:
ment must be correctly installed.
bustible material must be
removed from the engine com-
partment.
2. Return the support rod to its clip to prevent it from rattling.
3.Lower the hood until it is about 30 cm above the closed position and
let it drop. Make sure that it locks
into place.
4. Check that the hood has engaged properly. If the hood can be raised
slightly, it is not properly engaged.
Open it again and close it with a lit-
tle more force.
WARNING - Fire risk
Do not leave gloves, rags or any
other combustible material in the
engine compartment. Doing so
may cause a heat-induced fire.
WARNING - Unsecured
engine hood
Always double check to be sure
that the hood is firmly latched
before driving away. If it is not
latched, the hood could fly open
while the vehicle is being driv-
en, causing a total loss of visi-
bility, which might result in an
accident.CAUTION - Hood obstruc-
tion
Before closing the hood, ensure that all obstructions are removedfrom the hood opening. Closingthe hood with an obstructionpresent in the hood opening mayresult in property damage.
Page 119 of 502

Features of your vehicle
38
4
Opening the fuel filler lid
The fuel filler lid must be opened
from inside the vehicle by pressing
the fuel filler lid opener button.
If the fuel filler lid does not open
because ice has formed around it,
tap lightly or push on the lid to break
the ice and release the lid. Do not pry
on the lid. If necessary, spray around
the lid with an approved de-icer fluid
(do not use radiator anti-freeze) or
move the vehicle to a warm place
and allow the ice to melt. 1. Stop the engine.
2. To open the fuel filler lid, push the
fuel filler lid opener button.
3. Pull open the fuel filler lid (1).
4. To remove the cap, turn the fuel filler cap (2) counterclockwise.
5. Refuel as needed.
Closing the fuel filler lid
1. To install the cap, turn it clockwise until it “clicks” once. This indicates
that the cap is securely tightened.
2. Close the fuel filler lid and push it in lightly making sure that it is
securely closed.
✽ ✽NOTICE
There may be an intermittent noise
near the refueling hole while the
engine is idling if the fuel cap is not
closed securely. This occurs normal-
ly with the OBD system.
✽ ✽NOTICE
When refueling on unlevel ground,
the fuel gauge may not point to the F
position.
It is not a malfunction. If you move
your vehicle to a level ground, the fuel
gauge will move to the full position.
FUEL FILLER LID
OYG046031
OYG046032