Page 5 of 356
RESPECTING THE ENVIRONMENT
The vehicle is fitted with a system that carries out a continuous diagnosis of the emission-related components in order to help protect the
environment.
ELECTRICAL ACCESSORIES
If, after buying the vehicle, you decide to add electrical accessories (with the risk of gradually draining the battery), contact a Jeep
Dealership. They can calculate the overall electrical requirement and check that the vehicle's electric system can support the required load.
SCHEDULED SERVICING
Correct maintenance of the vehicle is essential for ensuring that it maintains its performance and its safety features, its environmental
friendliness and low running costs unchanged in time.
Page 8 of 356

USE OF THE OWNER HANDBOOK
OPERATING INSTRUCTIONS
Each time direction instructions (left/right or forwards/backwards) about the vehicle are given, these must be intended as regarding
an occupant in the driver's seat. Special cases not complying with this rule will be properly specified in the text.
The figures in the Owner Handbook are provided by way of example only: this might imply that some details of the image do not
correspond to the actual arrangement of your vehicle.
In addition, the Handbook has been conceived considering vehicles with steering wheel on the left side; it is therefore possible that
on vehicles with steering wheel on the right side, the position or construction of some controls is not exactly mirror-like with respect
to the figure.
To identify the chapter with the information needed you can consult the index at the end of this Owner Handbook.
Chapters can be rapidly identified with dedicated graphic tabs, at the side of each odd page. A few pages further there is a key for
getting to know the chapter order and the relevant symbols in the tabs. There is anyway a textual indication of the current chapter at
the side of each even page.
Page 9 of 356
WARNINGS AND PRECAUTIONS
While reading this Owner Handbook you will find a series ofWARNINGSto prevent procedures that could damage your vehicle.
There are alsoPRECAUTIONSthat must be carefully followed to prevent incorrect use of the components of the vehicle, which could
cause accidents or injuries.
Therefore allWARNINGSandPRECAUTIONSmust always be carefully followed.
WARNINGSandPRECAUTIONSare recalled in the text with the following symbols:
personal safety;
vehicle safety;
environmental protection.
NOTE These symbols, when necessary, are indicated besides the title or at the end of the line and are followed by a number. That
number recalls the corresponding warning at the end of the relevant section.
Page 18 of 356

THE KEYS
KEY WITH REMOTE CONTROL
1)1)1)
The metal insert A fig. 4 of the key
operates:
the ignition switch;the door lock.
Press button B to open/close the metal
insert.
ELECTRONIC KEY(versions with "Keyless Enter-N-Go"
system)
On versions equipped with "Keyless
Enter-N-Go" system, the vehicle featuresan electronic keyfig. 5, of which two
copies are provided.
Briefly press button
: unlocking of
doors and luggage compartment, timed
switching-on of internal lights and double
flashing of direction indicators (where
provided).
Briefly press button
: lock of doors and
luggage compartment with roof lights off
and single flash of direction indicators
(where provided).
Press button
: remote opening of
the luggage compartment (to open the
luggage compartment press the button
twice in quick succession).
Press button
: remote switching onof the main beam headlights, for a
maximum of 90 seconds.
Pressing button
again or at the end
of the 90 seconds, the lights switched on
previously will go off (if the parking light
function was already active it will remain
so). If, when 90 seconds have passed,
button
is pressed, the main beam
headlights and the side lights will stay on
for further 30 seconds.
REQUEST FOR ADDITIONAL
KEYS
Should a new key with remote control or
a new electronic key be necessary, go to
a Jeep Dealership, taking an ID
document and the vehicle ownership
documents.
WARNING
1)Press button B only with the key away
from your body, especially your eyes and
from objects which could get damaged
(e.g. your clothes). Do not leave the key
unattended to avoid the button being
accidentally pressed while it is being
handled, e.g. by a child.4J0A0181C
5J0A0315C
16
GETTING TO KNOW YOUR CAR
Page 27 of 356

lever B upwards or downwards to achieve
the required height.
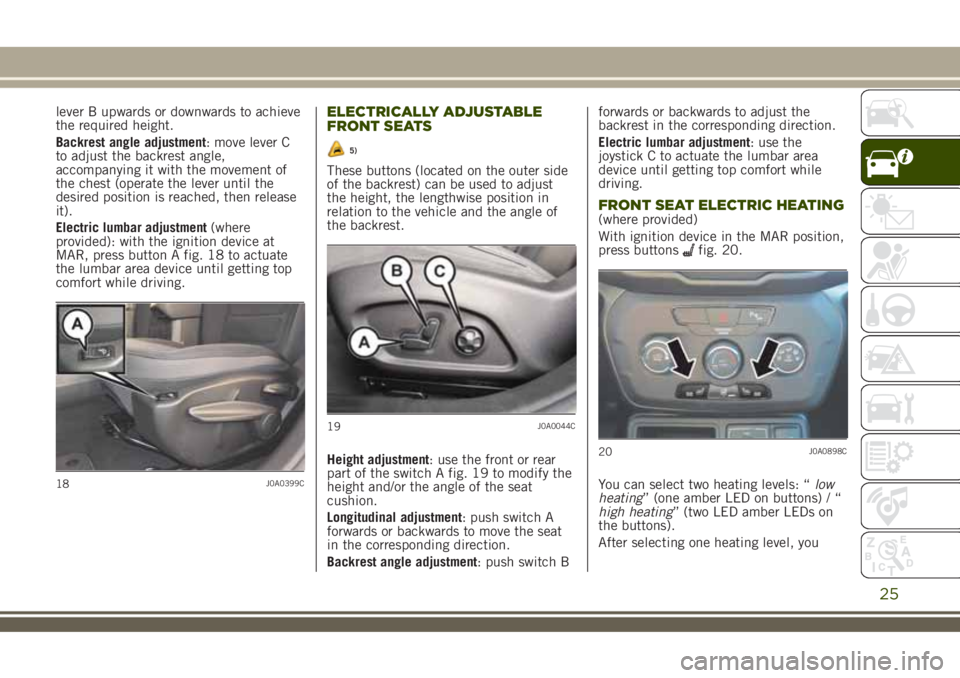
Backrest angle adjustment: move lever C
to adjust the backrest angle,
accompanying it with the movement of
the chest (operate the lever until the
desired position is reached, then release
it).
Electric lumbar adjustment(where
provided): with the ignition device at
MAR, press button A fig. 18 to actuate
the lumbar area device until getting top
comfort while driving.ELECTRICALLY ADJUSTABLE
FRONT SEATS
5)
These buttons (located on the outer side
of the backrest) can be used to adjust
the height, the lengthwise position in
relation to the vehicle and the angle of
the backrest.
Height adjustment: use the front or rear
part of the switch A fig. 19 to modify the
height and/or the angle of the seat
cushion.
Longitudinal adjustment: push switch A
forwards or backwards to move the seat
in the corresponding direction.
Backrest angle adjustment: push switch Bforwards or backwards to adjust the
backrest in the corresponding direction.
Electric lumbar adjustment: use the
joystick C to actuate the lumbar area
device until getting top comfort while
driving.
FRONT SEAT ELECTRIC HEATING(where provided)
With ignition device in the MAR position,
press buttons
fig. 20.
You can select two heating levels: “low
heating” (one amber LED on buttons) / “
high heating” (two LED amber LEDs on
the buttons).
After selecting one heating level, you
18J0A0399C
19J0A0044C
20J0A0898C
25
Page 49 of 356

Button Bfig. 40: Briefly press button B
will open the sunshade blind in “steps”.
Pressing the button for longer, instead,
will activate “continuous automatic”
opening. Briefly pulling the button will
give a “snap” closing of the sunshade
blind. Keeping the button pulled,instead, will activate “continuous
automatic” closing.
Button Cfig. 40: press and release the
button to move the roof to the “spoiler”
position (swivel opening). This type of
swivel opening can be activated
irrespective of the position of the
sunroof. During “spoiler” opening, any
pressure on button C stops the roof
closing. Press button C with the roof fully
closed to open the roof to the “swivel”
position. If the roof is positioned between
the fully open position and the “swivel”
position, press button C to close it
manually.
ANTI-PINCH DEVICE
The sun roof and the electric blind are
equipped with an anti-pinch safety
system capable of detecting the presence
of an obstacle whilst the roof is closing:
if this happens, the system intervenes
and the movement of the glass is
immediately reversed.
EMERGENCY OPERATION
If the control buttons fail to operate, the
sun blind and the sun roof can be moved
manually, proceeding as described
below:
Sun blind movement: remove protective
cap A fig. 41 on the internal trim;
Sun roof movement: remove protective
cap B on the internal trim;
take the supplied spanner C from the
luggage compartment;
insert key C in housing A (for blind
movement) or B (for sun roof movement)
and turn it clockwise to open the roof (or
the blind) or anticlockwise to close the
roof (or the blind).
INITIALISATION PROCEDURE
Following an automatic movement
malfunction while opening/closing or
after an emergency manoeuvre (see
description in the previous paragraph),
the automatic operation of the sun roof
must be initialised again.
40J0A0224C
41J0A00390C
47
Page 77 of 356

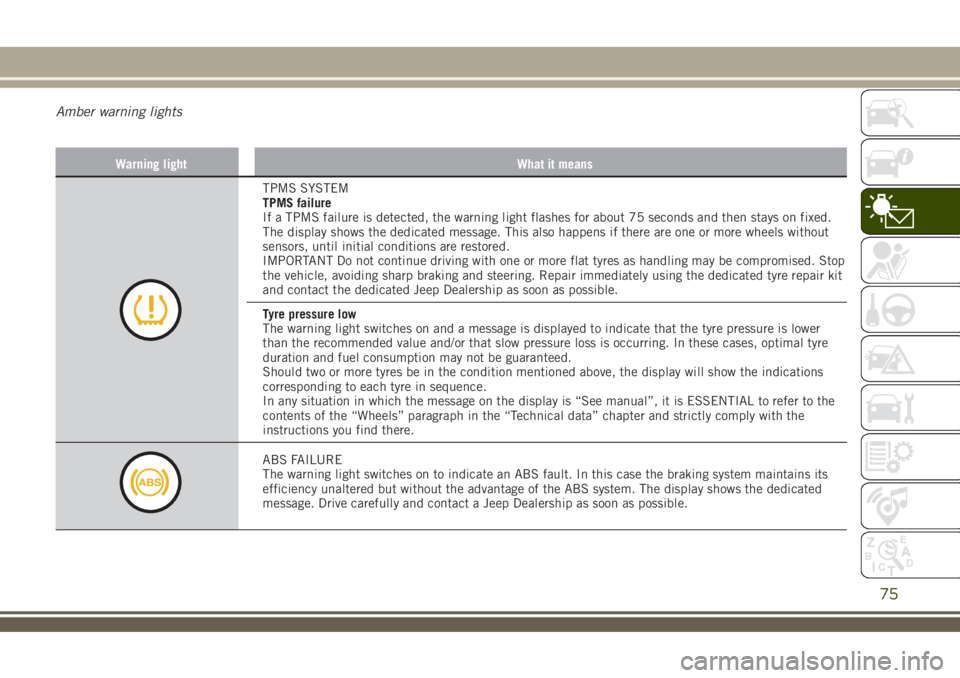
Amber warning lights
Warning light What it means
TPMS SYSTEM
TPMS failure
If a TPMS failure is detected, the warning light flashes for about 75 seconds and then stays on fixed.
The display shows the dedicated message. This also happens if there are one or more wheels without
sensors, until initial conditions are restored.
IMPORTANT Do not continue driving with one or more flat tyres as handling may be compromised. Stop
the vehicle, avoiding sharp braking and steering. Repair immediately using the dedicated tyre repair kit
and contact the dedicated Jeep Dealership as soon as possible.
Tyre pressure low
The warning light switches on and a message is displayed to indicate that the tyre pressure is lower
than the recommended value and/or that slow pressure loss is occurring. In these cases, optimal tyre
duration and fuel consumption may not be guaranteed.
Should two or more tyres be in the condition mentioned above, the display will show the indications
corresponding to each tyre in sequence.
In any situation in which the message on the display is “See manual”, it is ESSENTIAL to refer to the
contents of the “Wheels” paragraph in the “Technical data” chapter and strictly comply with the
instructions you find there.
ABS FAILURE
The warning light switches on to indicate an ABS fault. In this case the braking system maintains its
efficiency unaltered but without the advantage of the ABS system. The display shows the dedicated
message. Drive carefully and contact a Jeep Dealership as soon as possible.
75
Page 86 of 356
Symbol What it means
ALTERNATOR FAILURE
The switching on of the symbol with engine on corresponds to an alternator failure. Contact a Jeep
Dealership as soon as possible.
IMPORTANT
26)If thesymbol switches on when driving, stop the engine immediately and contact a Jeep Dealership.
84
KNOWING THE INSTRUMENT PANEL