2018 JEEP GRAND CHEROKEE AUX
[x] Cancel search: AUXPage 81 of 368

SAFETY
SAFETY FEATURES...........80
Anti-Lock Brake System (ABS)......80
Electronic Brake Control System.....81
AUXILIARY DRIVING SYSTEMS . .92
Blind Spot Monitoring............92
Forward Collision Warning (FCW).....93
Tire Pressure Monitor System (TPMS) . .95
OCCUPANT RESTRAINT
SYSTEMS..................99
Occupant Restraint Systems Features. . .99
Important Safety Precautions.......99
Seat Belt Systems.............100
Supplemental Restraint Systems (SRS) .109
Child Restraints — Carrying Children
Safely.....................118Transporting Pets..............130SAFETY TIPS...............131
Transporting Passengers..........131
Exhaust Gas.................131
Safety Checks You Should Make Inside The
Vehicle....................131
Periodic Safety Checks You Should Make
Outside The Vehicle.............133
SAFETY
79
Page 94 of 368

AUXILIARY DRIVING
SYSTEMS
Blind Spot Monitoring
The Blind Spot Monitoring (BSM) system
uses two radar-based sensors, located inside
the rear bumper fascia, to detect Highway
licensable vehicles (automobiles, trucks, mo-
torcycles etc.) that enter the blind spot zones
from the rear/front/side of the vehicle.
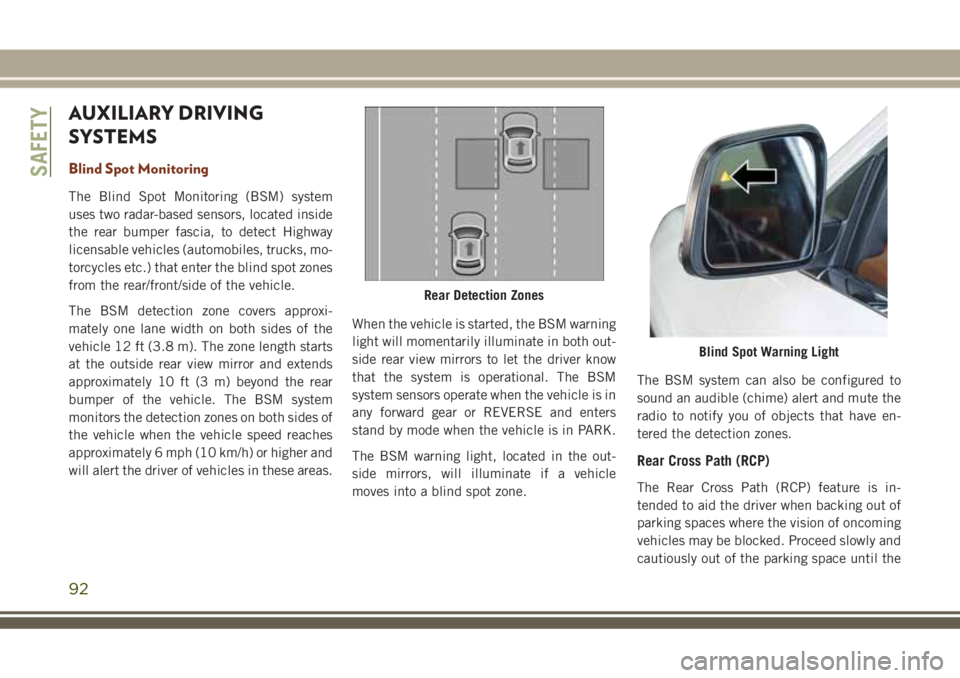
The BSM detection zone covers approxi-
mately one lane width on both sides of the
vehicle 12 ft (3.8 m). The zone length starts
at the outside rear view mirror and extends
approximately 10 ft (3 m) beyond the rear
bumper of the vehicle. The BSM system
monitors the detection zones on both sides of
the vehicle when the vehicle speed reaches
approximately 6 mph (10 km/h) or higher and
will alert the driver of vehicles in these areas.When the vehicle is started, the BSM warning
light will momentarily illuminate in both out-
side rear view mirrors to let the driver know
that the system is operational. The BSM
system sensors operate when the vehicle is in
any forward gear or REVERSE and enters
stand by mode when the vehicle is in PARK.
The BSM warning light, located in the out-
side mirrors, will illuminate if a vehicle
moves into a blind spot zone.The BSM system can also be configured to
sound an audible (chime) alert and mute the
radio to notify you of objects that have en-
tered the detection zones.
Rear Cross Path (RCP)
The Rear Cross Path (RCP) feature is in-
tended to aid the driver when backing out of
parking spaces where the vision of oncoming
vehicles may be blocked. Proceed slowly and
cautiously out of the parking space until the
Rear Detection Zones
Blind Spot Warning Light
SAFETY
92
Page 201 of 368

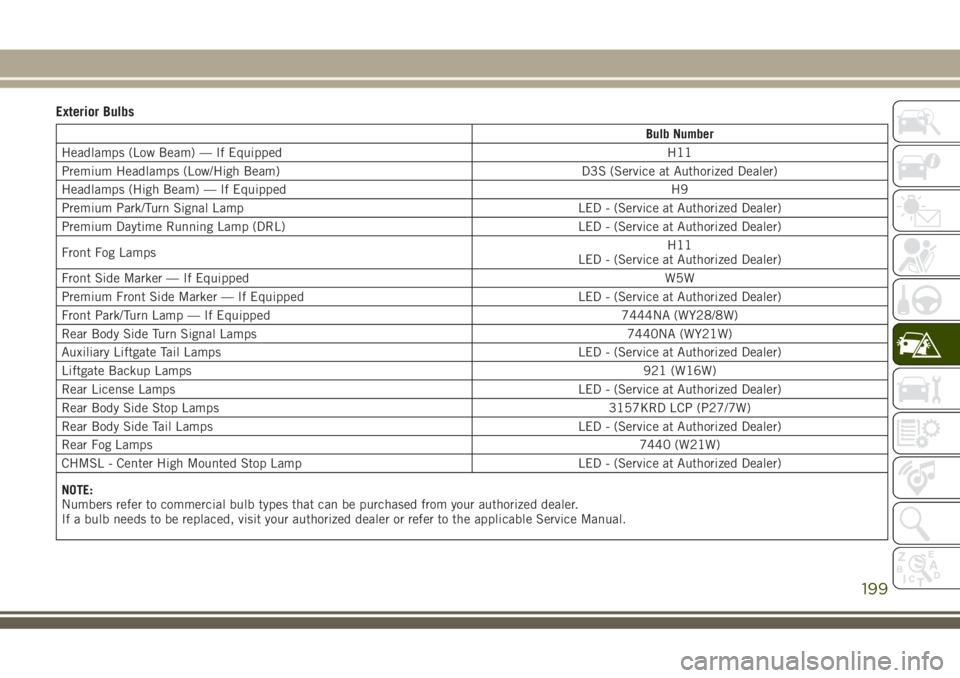
Exterior Bulbs
Bulb Number
Headlamps (Low Beam) — If Equipped H11
Premium Headlamps (Low/High Beam) D3S (Service at Authorized Dealer)
Headlamps (High Beam) — If Equipped H9
Premium Park/Turn Signal Lamp LED - (Service at Authorized Dealer)
Premium Daytime Running Lamp (DRL) LED - (Service at Authorized Dealer)
Front Fog LampsH11
LED - (Service at Authorized Dealer)
Front Side Marker — If EquippedW5W
Premium Front Side Marker — If Equipped LED - (Service at Authorized Dealer)
Front Park/Turn Lamp — If Equipped 7444NA (WY28/8W)
Rear Body Side Turn Signal Lamps 7440NA (WY21W)
Auxiliary Liftgate Tail Lamps LED - (Service at Authorized Dealer)
Liftgate Backup Lamps921 (W16W)
Rear License Lamps LED - (Service at Authorized Dealer)
Rear Body Side Stop Lamps 3157KRD LCP (P27/7W)
Rear Body Side Tail Lamps LED - (Service at Authorized Dealer)
Rear Fog Lamps7440 (W21W)
CHMSL - Center High Mounted Stop Lamp LED - (Service at Authorized Dealer)
NOTE:
Numbers refer to commercial bulb types that can be purchased from your authorized dealer.
If a bulb needs to be replaced, visit your authorized dealer or refer to the applicable Service Manual.
199
Page 205 of 368

6. Remove/replace bulb(s).
7. Reinstall the socket(s).
8. Reverse process to reinstall the liftgate
trim.
Rear Fascia Mounted Fog Lamp
1. Using a fiber stick or flat blade screw
driver, gently pry between the inboard
edge of the lamp and the fascia.
2. Remove lamp from fascia opening.
3. Twist socket counter clockwise.
4. Replace bulb.
5. Reinstall the socket.
6. Hook inboard side of the lamp into the
fascia pocket.
7. Rotate lamp forward in car until lamp
snaps back into the opening.
Center High-Mounted Stop Lamp (CHMSL)
The center high mounted stop lamp is an
LED. Service at an authorized dealer.
Rear License Lamp
The rear license lamps are LEDs. See your
authorized dealer for service.
Rear Of Liftgate Tail Lamp
1 — Auxiliary LED Tail Connector – Do
Not Remove
2 — Backup Bulb SocketRear Fog Lamps
Center High-Mounted Stop Lamp
203
Page 222 of 368

CAUTION!
Do not run the booster vehicle engine
above 2000 rpm since it provides no
charging benefit, wastes fuel and can
damage booster vehicle engine.
6. Once the engine is started, remove the
jumper cables in the reverse sequence:
Cable Disconnection
1. Disconnect the negative(-)end of the
jumper cable from the remote negative(-)
post of the discharged vehicle.
2. Disconnect the opposite end of the nega-
tive(-)jumper cable from the negative(-)
post of the booster battery.
3. Disconnect the positive(+)end of the
jumper cable from the positive(+)post of
the booster battery.
4. Disconnect the opposite end of the posi-
tive(+)jumper cable from the remote
positive(+)post of the discharged
vehicle.5. Reinstall the protective cover over the
remote positive(+)post of the discharged
vehicle.
REFUELING IN EMERGENCY
The funnel for the Cap-Less Fuel System is
located in the spare tire storage area. If your
vehicle is out of fuel and an auxiliary fuel can
is needed, insert the funnel into the filler
neck and proceed to fill the vehicle.
For more information on the Cap-Less Fuel
System refer to “Refueling The Vehicle” in
“Starting And Operating”.
IF YOUR ENGINE
OVERHEATS
In any of the following situations, you can
reduce the potential for overheating by taking
the appropriate action.
• On the highways — slow down.
• In city traffic — while stopped, place the
transmission in NEUTRAL, but do not in-
crease the engine idle speed while prevent-
ing vehicle motion with the brakes.NOTE:
There are steps that you can take to slow
down an impending overheat condition:
• If your air conditioner (A/C) is on, turn it off.
The A/C system adds heat to the engine
cooling system and turning the A/C off can
help remove this heat.
• You can also turn the temperature control
to maximum heat, the mode control to floor
and the blower control to high. This allows
the heater core to act as a supplement to
the radiator and aids in removing heat from
the engine cooling system.
WARNING!
You or others can be badly burned by hot
engine coolant (antifreeze) or steam from
your radiator. If you see or hear steam
coming from under the hood, do not open
the hood until the radiator has had time to
cool. Never try to open a cooling system
pressure cap when the radiator or coolant
bottle is hot.
IN CASE OF EMERGENCY
220
Page 287 of 368

MULTIMEDIA
CYBERSECURITY...........287
OFF ROAD PAGES — IF
EQUIPPED.................288
Off Road Pages Status Bar........288
Vehicle Dynamics..............289
Suspension..................289
Pitch And Roll — If Equipped......290
Accessory Gauges..............290
Selec-Terrain — If Equipped.......291
TIPS CONTROLS AND GENERAL
INFORMATION..............291
Steering Wheel Audio Controls......291
Reception Conditions............292
Care And Maintenance...........292
Anti-Theft Protection............292
UCONNECT 4 WITH 7-INCH DIS-
PLAY.....................292
Uconnect 4 At A Glance.........292
Drag & Drop Menu Bar...........294
Radio.....................295
Android Auto — If Equipped.......296Apple CarPlay Integration — If
Equipped...................297
Apps — If Equipped............298
UCONNECT 4C/4C NAV WITH
8.4-INCH DISPLAY...........299
Uconnect 4C/4C NAV At A Glance . . .299
Drag & Drop Menu Bar...........300
Radio.....................301
Android Auto — If Equipped.......302
Apple CarPlay Integration — If
Equipped...................306
Apps — If Equipped............308
UCONNECT SETTINGS.......308
IPOD/USB/MEDIA PLAYER CON-
TROL....................309
Audio Jack (AUX)..............309
USB Port...................310
Bluetooth Streaming Audio........310
UCONNECT REAR SEAT ENTER-
TAINMENT (RSE) SYSTEM — IF
EQUIPPED.................310
Getting Started...............311Dual Video Screen..............312
Blu-ray Disc Player.............312
Play Video Games..............315
NAVIGATION — IF EQUIPPED . . .316
Changing The Navigation Voice Prompt
Volume....................316
Finding Points Of Interest.........318
Finding A Place By Spelling The Name .318
One-Step Voice Destination Entry. . . .318
Setting Your Home Location........318
Home.....................318
Adding A Stop................320
Taking A Detour...............320
UCONNECT PHONE..........321
Uconnect Phone (Bluetooth Hands Free
Calling)....................321
Pairing (Wirelessly Connecting) Your Mobile
Phone To The Uconnect System.....323
Common Phone Commands
(Examples)..................326
Mute (Or Unmute) Microphone During
Call......................326
MULTIMEDIA
285
Page 295 of 368

NOTE:
Uconnect screen images are for illustration
purposes only and may not reflect exact soft-
ware for your vehicle.
Setting The Time
• For Uconnect 4, turn the unit on, and then
press the time display at the top of the
screen. Press “Yes.”
• If the time is not displayed at the top of the
screen, press the “Settings” button on the
touchscreen. In the Settings screen, press
the “Clock & Date” button on the touch-
screen, then check or uncheck this option.
• Press “+” or “–” next to Set Time Hours and
Set Time Minutes to adjust the time.
• If these features are not available, uncheck
the Sync Time box.
• Press “X” to save your settings and exit out
of the Clock Setting screen.Audio Settings
• Press the “Audio” button on the touch-
screen to activate the Audio settings screen
to adjust Balance\Fade, Equalizer, Speed
Adjusted Volume, Surround Sound, Loud-
ness, AUX Volume Offset, Auto Play, and
Radio Off With Door.
• You can return to the Radio screen by
pressing the “X” located at the top right.
Balance/Fade
• Press the “Balance/Fade” button on the
touchscreen to Balance audio between the
front speakers or fade the audio between
the rear and front speakers.
• Pressing the “Front,” “Rear,” “Left,” or
“Right” buttons on the touchscreen or
press and drag the Speaker Icon to adjust
the Balance/Fade.
Equalizer
• Press the “Equalizer” button on the touch-
screen to activate the Equalizer screen.• Press the “+” or “–” buttons on the touch-
screen, or press and drag over the level bar
for each of the equalizer bands. The level
value, which spans between plus or minus
nine, is displayed at the bottom of each of
the bands.
Speed Adjusted Volume
• Press the “Speed Adjusted Volume” button
on the touchscreen to activate the Speed
Adjusted Volume screen. The Speed Ad-
justed Volume is adjusted by pressing the
volume level indicator. This alters the auto-
matic adjustment of the audio volume with
variation to vehicle speed.
Loudness — If Equipped
• Press the “On” button on the touchscreen
to activate Loudness. Press “Off” to deac-
tivate this feature. When Loudness is On,
the sound quality at lower volumes
improves.
293
Page 296 of 368

AUX Volume Offset
• Press the “AUX Volume Offset” button on
the touchscreen to activate the AUX Vol-
ume Offset screen. The AUX Volume Offset
is adjusted by pressing of the “+” and “–”
buttons. This alters the AUX input audio
volume. The level value, which spans be-
tween plus or minus three, is displayed
above the adjustment bar.
Auto Play — If Equipped
• Press the “Auto Play” button on the touch-
screen to activate the Auto Play screen. The
Auto Play feature has two settings “On”
and “Off.” With Auto Play on, music begins
playing from a connected device, immedi-
ately after it is connected to the radio.
Auto On Radio — If Equipped
• The Radio automatically turns on when
vehicle is in run or will recall whether it was
on or off at last ignition off.Radio Off With Door — If Equipped
• Press the “Radio Off With Door” button on
the touchscreen to activate the Radio Off
With Door screen. The Radio Off With Door
feature, when activated, keeps the radio on
until the driver or passenger door is opened,
or when the Radio Off Delay selected time
has expired.
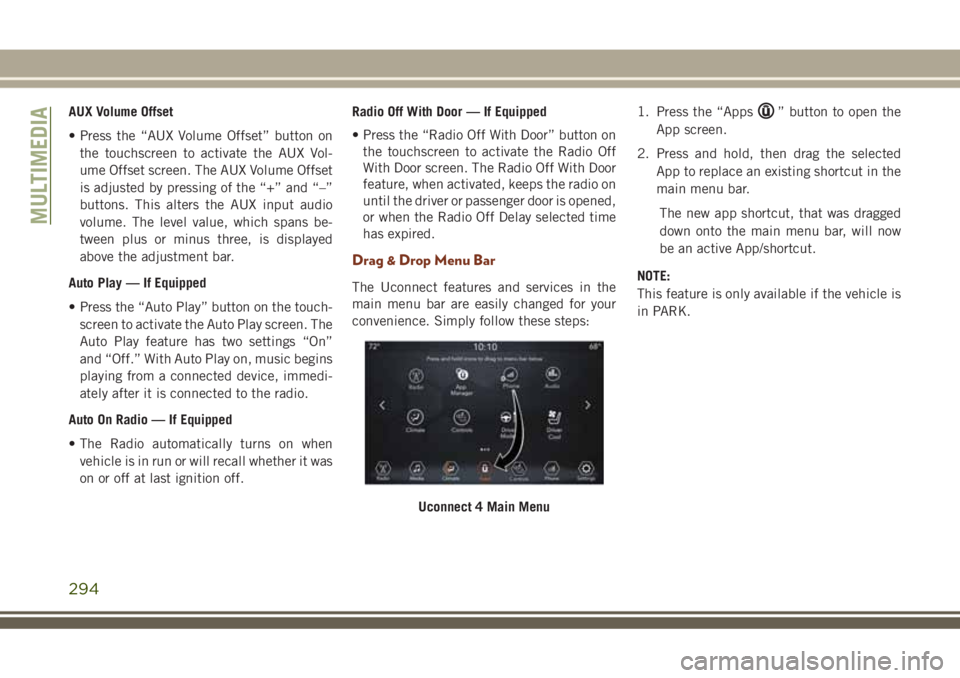
Drag & Drop Menu Bar
The Uconnect features and services in the
main menu bar are easily changed for your
convenience. Simply follow these steps:1. Press the “Apps
” button to open the
App screen.
2. Press and hold, then drag the selected
App to replace an existing shortcut in the
main menu bar.
The new app shortcut, that was dragged
down onto the main menu bar, will now
be an active App/shortcut.
NOTE:
This feature is only available if the vehicle is
in PARK.
Uconnect 4 Main Menu
MULTIMEDIA
294