2018 JEEP CHEROKEE AUX
[x] Cancel search: AUXPage 69 of 312

SAFETY
SAFETY FEATURES...........68
Anti-Lock Brake System (ABS) ......68
Electronic Brake Control System .....69
AUXILIARY DRIVING SYSTEMS . .79
Blind Spot Monitoring............79
Forward Collision Warning (FCW) .....81
Tire Pressure Monitor System (TPMS) . .82
OCCUPANT RESTRAINT
SYSTEMS ..................87
Occupant Restraint Systems Features . .87
Important Safety Precautions .......87
Seat Belt Systems ..............88
Supplemental Restraint Systems
(SRS) ......................95
Child Restraints — Carrying
Children Safely ...............104 Transporting Pets
..............116SAFETY TIPS...............116
Transporting Passengers ..........116
Exhaust Gas .................116
Safety Checks You Should Make
Inside The Vehicle .............117
Periodic Safety Checks You Should
Make Outside The Vehicle .........118
SAFETY
67
Page 81 of 312

• Vehicle speed exceeds 20 mph (32 km/h)but remains below 40 mph (64 km/h).
• Vehicle is shifted to PARK.
Disabling SSC
SSC will deactivate and be disabled if any of
the following conditions occur:
• The driver pushes the SSC switch.
• The driveline is shifted out of 4WD Low Range.
• The parking brake is applied.
• Driver door opens.
• The vehicle is driven greater than 20 mph (32 km/h) for greater than 70 seconds.
• The vehicle is driven greater than 40 mph (64 km/h) (SSC exits immediately).
Feedback To The Driver:
The instrument cluster has an SSC icon and
the SSC switch has an LED which offer feed-
back to the driver about the state SSC is in. • The cluster icon and switch lamp will illu-
minate and remain on solid when SSC is
enabled or activated. This is the normal
operating condition for SSC.
• The cluster icon and switch lamp will flash for several seconds then extinguish when
the driver pushes the SSC switch but en-
able conditions are not met.
• The cluster icon and switch lamp will flash for several seconds then extinguish when
SSC disables due to excess speed.
• The cluster icon and switch lamp will flash then extinguish when SSC deactivates due
to overheated brakes.
WARNING!
SSC is only intended to assist the driver in
controlling vehicle speed when driving in
off road conditions. The driver must re-
main attentive to the driving conditions
and is responsible for maintaining a safe
vehicle speed.
AUXILIARY DRIVING
SYSTEMS
Blind Spot Monitoring
The Blind Spot Monitoring (BSM) system
uses two radar-based sensors, located inside
the rear bumper fascia, to detect highway
licensable vehicles (automobiles, trucks, mo-
torcycles etc.) that enter the blind spot zones
from the rear/front/side of the vehicle.
The BSM detection zone covers approxi-
mately one lane width on both sides of the
vehicle 12 ft (3.8 m). The zone length starts
at the outside rear view mirror and extends
approximately 10 ft (3 m) beyond the rear
bumper of the vehicle. The BSM system
monitors the detection zones on both sides of
the vehicle when the vehicle speed reaches
approximately 6 mph (10 km/h) or higher and
will alert the driver of vehicles in these areas.
79
Page 174 of 312

Interior Fuses
The interior fuse panel is located on the Body
Control Module (BCM) in the passenger com-
partment on the left side dash panel under
the instrument panel.
CavityBlade Fuse Description
F13 15 Amp Blue Low Beam Left
F32 10 Amp Red Interior Lighting
F36 10 Amp Red Intrusion Module/Siren – If Equipped
F38 20 Amp Yellow Deadbolt All Unlock
F43 20 Amp Yellow Washer Pump Front
F48 25 Amp Clear Fog Lamp Rear Left/Right – If Equipped
F49 7.5 Amp Brown Lumbar Support
F50 7.5 Amp Brown Wireless Charging Pad – If Equipped
F51 10 Amp Red Driver Window Switch/Power Mirrors – If Equipped
F53 7.5 Amp Brown UCI Port (USB & AUX)
F89 10 Amp Red Door Locks – Driver Unlock
F91 7.5 Amp Brown Left Front Fog Lamp (Low And High Line)
F92 7.5 Amp Brown Right Front Fog Lamp (High Line)
F93 10 Amp Red Low Beam Right
IN CASE OF EMERGENCY
172
Page 245 of 312

MULTIMEDIA
CYBERSECURITY...........245
TIPS CONTROLS AND GENERAL
INFORMATION .............246
Steering Wheel Audio Controls ......246
Reception Conditions ............246
Care And Maintenance ...........246
Anti-Theft Protection ............246
UCONNECT 3 WITH 5-INCH
DISPLAY..................247
Controls On The Front Panel .......247
Clock Setting .................248
Equalizer, Balance And Fade .......248
Radio Mode ..................249
Media Mode .................249
Bluetooth Source ..............252
UCONNECT 3C/3C NAV .......253
Uconnect 3C/3C NAV At A Glance . . .253
Drag & Drop Menu Bar...........255
Radio Mode ..................255
Media Mode .................256
UCONNECT SETTINGS ........256IPOD/USB/SD CARD/MEDIA
PLAYER CONTROL
..........257
Audio Jack (AUX)..............257
USB Port ...................257
SD Card ................... .258
Bluetooth Streaming Audio ........258
NAVIGATION...............258
Changing The Navigation Voice
Prompt Volume ...............258
Finding Points Of Interest .........259
Finding A Place By Spelling
The Name ...................259
One-Step Voice Destination Entry . . . .259
Setting Your Home Location ........259
Go Home ...................260
Adding A Stop ................260
Taking A Detour ...............260
UCONNECT PHONE ..........261
Operation...................261
Uconnect Phone Features .........263
Uconnect Phone (Bluetooth Hands
Free Calling) .................263 Pairing (Wirelessly Connecting)
Your Mobile Phone To The
Uconnect System
..............263
Common Phone Commands
(Examples) ..................266
Mute (Or Unmute) Microphone
During Call ..................266
Transfer Ongoing Call Between
Handset And Vehicle ............266
Phonebook ..................267
Voice Command Tips ............267
Changing The Volume ...........267
Using Do Not Disturb ...........267
Incoming Text Messages .........268
Voice Text Reply (Not Compatible
With iPhone) ................269
Helpful Tips And Common Questions
To Improve Bluetooth Performance
With Your Uconnect System ........270UCONNECT VOICE RECOGNITION
QUICK TIPS................271
Introducing Uconnect ...........271
Get Started .................272
MULTIMEDIA
243
Page 252 of 312

Media Mode is entered by pushing the ME-
DIA button located on the faceplate. Once in
Media Mode, press the “Source” button on
the touchscreen and the desired mode button
on the touchscreen. Disc (if equipped), USB,
AUX, and Bluetooth (if equipped), are the
Media sources available. When available, you
can select the “Browse” button on the touch-
screen to be given these options:
• Now Playing
• Artists
• Albums
• Genres
• Songs
• Playlists
• Folders
Source
Press the “Source” button on the touch-
screen to select the desired audio source:
Disc (if equipped), USB, AUX and Bluetooth
(if equipped). This screen will time out after a
few seconds and return to the main radio
screen if no selection is made.You can press the “Source,” “Pause/Play” or
the “Info” button on the touchscreen for artist
information on the current song playing.
Disc Mode — If Equipped
Your vehicle may have a remote Disc player
located in the center console storage bin.
Disc Mode is entered by either inserting a
CD/Disc or by pushing the MEDIA button on
the faceplate. Once in Media Mode, press the
“Source” button on the touchscreen and se-
lect “Disc.”
Inserting Compact Disc
Gently insert one disc into the disc player
with the disc label following the illustration
indicated on the player. The disc automati-
cally pulls into the disc player and the disc
icon illuminates on the radio display. If a disc
does not go into the slot more than 1 inch
(2.5 cm), a disc may already be loaded and
must be ejected before a new disc can be
loaded.
If you insert a disc with the ignition ON and
the radio ON, the unit will switch to disc
mode and begin to play when you insert the
disc. The display will show the track numberand index time in minutes and seconds. Play
will begin at the start of track one.
Browse
Press the “Browse” button on the touch-
screen to scroll through and select a desired
track on the Disc. Press the “Exit” button on
the touchscreen if you wish to cancel the
browse function.
Eject Button — Ejecting a Disc
Push the eject button to eject the disc. If you
have ejected a disc and have not removed it
within ten seconds, it will be reloaded. If the
Disc is not removed, the radio will reinsert
the disc but will not play it.
A disc can be ejected with the radio and
ignition OFF.
USB/iPod Mode
USB/iPod Mode is entered by either inserting
a USB Jump Drive or iPod cable into the USB
port, or by pushing the MEDIA button located
on the faceplate. Once in Media Mode, press
the “Source” button on the touchscreen and
select “USB/iPod.”
MULTIMEDIA
250
Page 253 of 312

Inserting USB/iPod Device
Gently insert the USB/iPod device into the
USB Port. If you insert a USB/iPod device
with the ignition ON, the unit will switch to
USB/iPod mode and begin to play when you
insert the device. The display will show the
track number and index time in minutes and
seconds. Play will begin at the start of track
one.
Browse
Press the “Browse” button on the touch-
screen to select Artist, Albums, Genres,
Songs, Playlists or Folders from the USB/
iPod device. Once the desired selection is
made you can chose from the available media
by pressing the button on the touchscreen.
Press the “Exit” button on the touchscreen if
you wish to cancel the browse function.
AUX Mode
AUX Mode is entered by inserting a AUX
device using a stereo cable with a 3.5 mm
audio jack into the AUX port, or by pushing
the MEDIA button located on the faceplate.
Once in Media Mode, press the “Source”
button on the touchscreen and select “AUX.”Inserting Auxiliary Device
Gently insert the Auxiliary device cable into
the AUX Port. If you insert a Auxiliary device
with the ignition ON, the unit will switch to
AUX mode and begin to play when you insert
the device cable.
Controlling The Auxiliary Device
The control of the Auxiliary device (e.g., se-
lecting playlists, play, fast forward, etc.) can-
not be provided by the radio; use the device
controls instead. Adjust the volume with the
VOLUME/MUTE rotary knob, or with the vol-
ume of the attached device.
The radio unit is acting as the amplifier for
audio output from the Auxiliary device.
Therefore if the volume control on the Auxil-
iary device is set too low, there will be insuf-
ficient audio signal for the radio unit to play
the music on the device.
Track Selection
Seek Up/Seek Down
Press and release the “Right Arrow”but-
ton on the touchscreen for the next selection.
Press and release the “Left Arrow”
button on the touchscreen to return to the beginning
of the current selection, or return to the
beginning of the previous selection if the Disc
is within the first second of the current selec-
tion.
Fast Seek Up
Press and hold the “Right Arrow”button
on the touchscreen and the desired mode will
begin to fast forward through the current
track until the button on the touchscreen is
released.
Fast Seek Down
Press and hold the “Left Arrow”button
on the touchscreen and the desired mode will
begin to rewind through the current track
until the button on the touchscreen is re-
leased.
Info
Press the “Info” button on the touchscreen to
display the current track information. Press
the “X” button on the touchscreen to cancel
this feature.
251
Page 258 of 312

Direct Tune
• Tune directly to a radio station by pressingthe “Tune” button on the screen, and en-
tering the desired station number.
Store Radio Presets Manually
Your radio can store 24 total preset stations,
12 presets per band (AM, and FM). They are
shown at the top of your radio screen. To see
the 12 preset stations per band, press the
arrow button on the touchscreen at the top
right of the screen to toggle between the two
sets of six presets.
To store a radio preset manually, follow the
steps below:
1. Tune to the desired station.
2. Press and hold the desired numbered but-
ton on the touchscreen for more than two
seconds or until you hear a confirmation
beep.
Media ModeThe controls are accessed by pressing the
desired button on the touchscreen and
choosing between Disc, AUX, USB,
Bluetooth or SD Card.
NOTE:
Uconnect will automatically switch to the
appropriate mode when something is first
connected or inserted into the system.
UCONNECT SETTINGS
The Uconnect system allows you to access
Customer Programmable feature settings
such as Display, Voice, Clock, Safety & Driv-
ing Assistance, Lights, Doors & Locks,
Auto-On Comfort, Engine Off Options, Com-
pass Settings, Audio, Phone/Bluetooth, Ra-
dio Setup, Restore Settings, Clear Personal
Data, and System Information through but-
tons on the touchscreen.
Push the SETTINGS button (Uconnect 3), or
press the “Apps” button (Uconnect 3C/3C
NAV) located near the bottom of the touch-
screen, then press the “Settings” button on
the touchscreen to access the Settings
screen. When making a selection, scroll up or
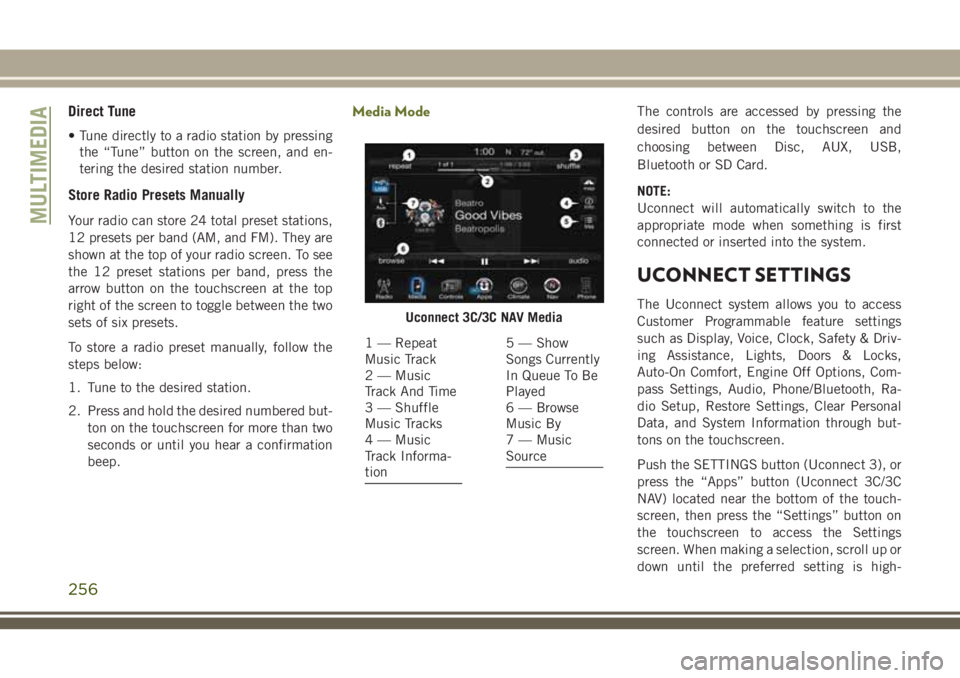
down until the preferred setting is high-Uconnect 3C/3C NAV Media
1 — Repeat
Music Track
2 — Music
Track And Time
3 — Shuffle
Music Tracks
4 — Music
Track Informa-
tion5 — Show
Songs Currently
In Queue To Be
Played
6 — Browse
Music By
7 — Music
Source
MULTIMEDIA
256
Page 259 of 312

lighted, then press the preferred setting until
a check-mark appears next to the setting,
showing that setting has been selected. The
following feature settings are available:
• Display• Engine Off Options
• Voice • Audio
• Clock • Phone/Bluetooth
• Safety & Driving
Assistance • Radio Setup
• Lights • Restore Settings
• Doors & Locks • Clear Personal Data
• Auto-On Comfort • System Information
• Compass
(Uconnect 3)
NOTE:
Depending on the vehicles options, feature
settings may vary.
Refer to “Uconnect Settings” in “Multime-
dia” in the Owner’s Manual for further infor-
mation.
IPOD/USB/SD CARD/MEDIA
PLAYER CONTROL
There are many ways to play music from
MP3 players, USB devices, or SD Cards
through your vehicle's sound system. Press
your Media button on the touchscreen to
begin.
Audio Jack (AUX)
• The AUX allows a device to be plugged into the radio and utilize the vehicle’s sound
system, using a 3.5 mm audio cable, to
amplify the source and play through the
vehicle speakers.
• Pressing the “AUX” button on the touch- screen will change the mode to auxiliary
device if the audio jack is connected, allow-
ing the music from your device to be heard
through the vehicle's speakers. To activate
the AUX, plug in the audio jack.
• The functions of the device are controlled using the device buttons. The volume may
be controlled using the radio or device.
USB Port
• Connect your compatible device into theUSB Port using a USB cable. USB Memory
sticks with audio files can also be used.
Audio from the device can be played on the
vehicle’s sound system while providing
metadata (artist, track title, album, etc.)
information on the radio display.
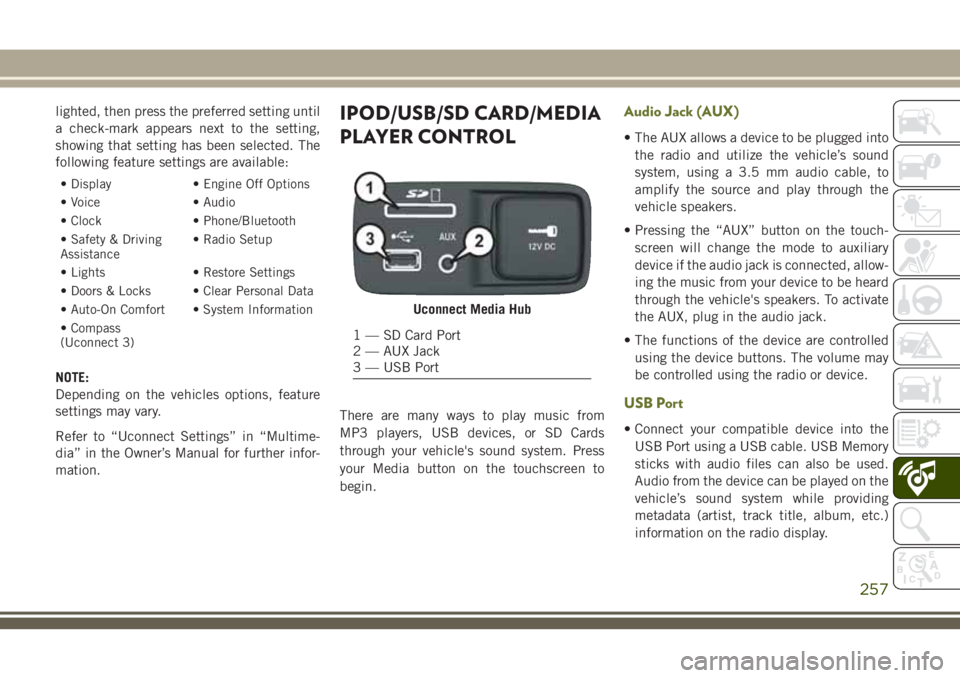
Uconnect Media Hub
1 — SD Card Port
2 — AUX Jack
3 — USB Port
257