2018 JEEP CHEROKEE clock
[x] Cancel search: clockPage 250 of 312

Clock Setting
To start the clock setting procedure:
1. Push the MORE button on the faceplate.Next press the “Settings” button on the
touchscreen and then press the “Clock
and Date” button on the touchscreen.
2. Press the “Set Time” button on the touchscreen.
3. Press the “Up” or “Down” arrows to ad- just the hours or minutes, next select the
“AM” or “PM” button on the touchscreen.
You can also select 12hr or 24hr format
by pressing the desired button on the
touchscreen.
4. Once the time is set press the “Done” button on the touchscreen to exit the time
screen.
NOTE:
In the Clock Setting Menu you can also select
the “Show Time Status” button on the touch-
screen, then select from “On” or “Off” to
display the time in the status bar.
Equalizer, Balance And Fade
1. Push the MORE button on the faceplate. Next press the “Settings” button on the
touchscreen.
2. Then scroll down and press the “Audio” button on the touchscreen to get to the
Audio menu.
3. The Audio Menu shows the following op- tions for you to customize your audio
settings.
Equalizer
Press the “Equalizer” button on the touch-
screen to adjust the Bass, Mid and Treble.
Use the “+” or “–” button on the touchscreen
to adjust the equalizer to your desired set-
tings. Press the “Back Arrow” button on the
touchscreen when done.
Balance/Fade
Press the “Balance/Fade” button on the
touchscreen to adjust the sound from the
speakers. Use the arrow button on the touch-
screen to adjust the sound level from the
front and rear or right and left side speakers.
Press the Center “C” button on the touch- screen to reset the balance and fade to the
factory setting. Press the “Back Arrow” but-
ton on the touchscreen when done.
Speed Adjusted Volume
Press the “Speed Adjusted Volume” button
on the touchscreen to select between OFF, 1,
2 or 3. This will decrease the radio volume
relative to a decrease in vehicle speed. Press
the “Back Arrow” button on the touchscreen
when done.
Loudness
Press the “Loudness” button on the touch-
screen to select the Loudness feature. When
this feature is activated it improves sound
quality at lower volumes.
Surround Sound
Press the “Surround Sound” button on the
touchscreen, select “On” or “Off” followed
by pressing the “Back Arrow” button on the
touchscreen. When this feature is activated,
it provides simulated surround sound mode.
MULTIMEDIA
248
Page 256 of 312

CAUTION!
Do NOT attach any object to the touch-
screen, doing so can result in damage to
the screen.
Setting The Time
• Model 3C NAV synchronizes time automati-cally via GPS, so it should not require any
time adjustment. If you do need to set the
time manually, follow the instructions be-
low for Model 3C.
• For Model 3C, turn the unit on, then press the time display at the top of the screen.
Press “Yes.”
• If the time is not displayed at the top of the screen, press the “Settings” button on the
touchscreen. In the Settings screen, press
the “Clock” button on the touchscreen,
then check or uncheck this option.
• Press “+” or “–” next to Set Time Hours and Set Time Minutes to adjust the time.
• If these features are not available, uncheck the Sync Time box. • Press “X” to save your settings and exit out
of the Clock Setting screen.
Background Themes
• Screen background themes are selectablefrom a pre-loaded list of themes. If you’d
like to set a theme, follow the instructions
below.
• Press the “Settings” button on the touch- screen.
• Press the “Display” button on the touch- screen.
• Then press “Set Theme” button on the touchscreen and select a theme.
Audio Settings
• Press of the “Audio” button on the touch-screen to activate the Audio settings screen
to adjust Balance\Fade, Equalizer, and
Speed Adjusted Volume.
• You can return to the Radio screen by pressing the “X” located at the top right.
Balance/Fade
• Press the “Balance/Fade” button on thetouchscreen to Balance audio between the
front speakers or fade the audio between
the rear and front speakers.
• Pressing the “Front,” “Rear,” “Left,” or “Right” buttons on the touchscreen or
press and drag the Speaker Icon to adjust
the Balance/Fade.
Equalizer
• Press the “Equalizer” button on the touch-screen to activate the Equalizer screen.
• Press the “+” or “–” buttons on the touch- screen, or press and drag over the level bar
for each of the equalizer bands. The level
value, which spans between plus or minus
nine, is displayed at the bottom of each of
the Bands.
Speed Adjusted Volume
Press the “Speed Adjusted Volume” button
on the touchscreen to activate the Speed
Adjusted Volume screen. The Speed Ad-
justed Volume is adjusted by pressing the
MULTIMEDIA
254
Page 258 of 312

Direct Tune
• Tune directly to a radio station by pressingthe “Tune” button on the screen, and en-
tering the desired station number.
Store Radio Presets Manually
Your radio can store 24 total preset stations,
12 presets per band (AM, and FM). They are
shown at the top of your radio screen. To see
the 12 preset stations per band, press the
arrow button on the touchscreen at the top
right of the screen to toggle between the two
sets of six presets.
To store a radio preset manually, follow the
steps below:
1. Tune to the desired station.
2. Press and hold the desired numbered but-
ton on the touchscreen for more than two
seconds or until you hear a confirmation
beep.
Media ModeThe controls are accessed by pressing the
desired button on the touchscreen and
choosing between Disc, AUX, USB,
Bluetooth or SD Card.
NOTE:
Uconnect will automatically switch to the
appropriate mode when something is first
connected or inserted into the system.
UCONNECT SETTINGS
The Uconnect system allows you to access
Customer Programmable feature settings
such as Display, Voice, Clock, Safety & Driv-
ing Assistance, Lights, Doors & Locks,
Auto-On Comfort, Engine Off Options, Com-
pass Settings, Audio, Phone/Bluetooth, Ra-
dio Setup, Restore Settings, Clear Personal
Data, and System Information through but-
tons on the touchscreen.
Push the SETTINGS button (Uconnect 3), or
press the “Apps” button (Uconnect 3C/3C
NAV) located near the bottom of the touch-
screen, then press the “Settings” button on
the touchscreen to access the Settings
screen. When making a selection, scroll up or
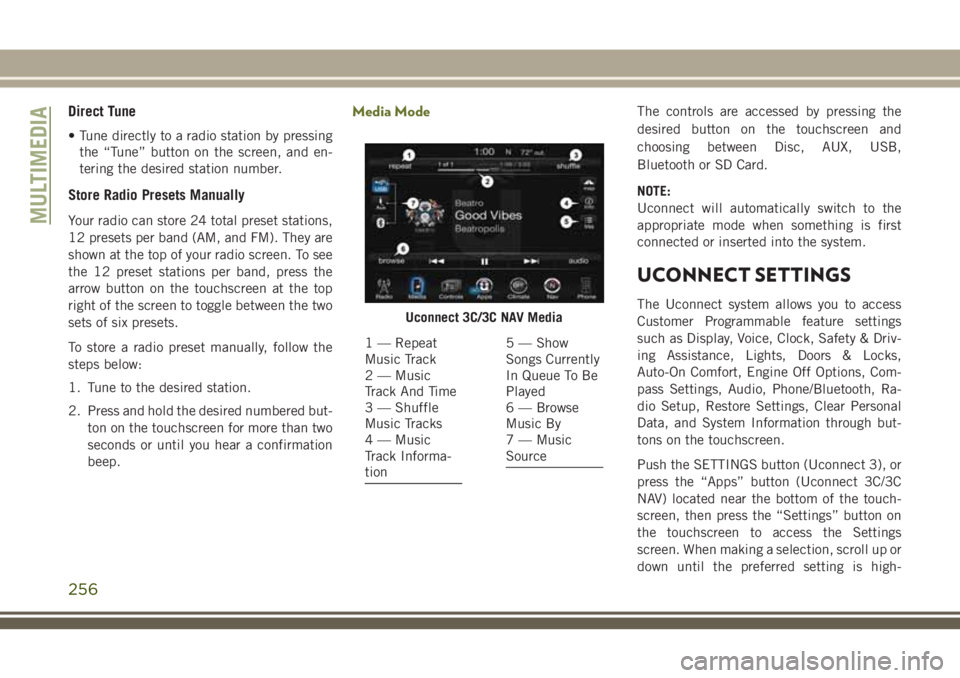
down until the preferred setting is high-Uconnect 3C/3C NAV Media
1 — Repeat
Music Track
2 — Music
Track And Time
3 — Shuffle
Music Tracks
4 — Music
Track Informa-
tion5 — Show
Songs Currently
In Queue To Be
Played
6 — Browse
Music By
7 — Music
Source
MULTIMEDIA
256
Page 259 of 312

lighted, then press the preferred setting until
a check-mark appears next to the setting,
showing that setting has been selected. The
following feature settings are available:
• Display• Engine Off Options
• Voice • Audio
• Clock • Phone/Bluetooth
• Safety & Driving
Assistance • Radio Setup
• Lights • Restore Settings
• Doors & Locks • Clear Personal Data
• Auto-On Comfort • System Information
• Compass
(Uconnect 3)
NOTE:
Depending on the vehicles options, feature
settings may vary.
Refer to “Uconnect Settings” in “Multime-
dia” in the Owner’s Manual for further infor-
mation.
IPOD/USB/SD CARD/MEDIA
PLAYER CONTROL
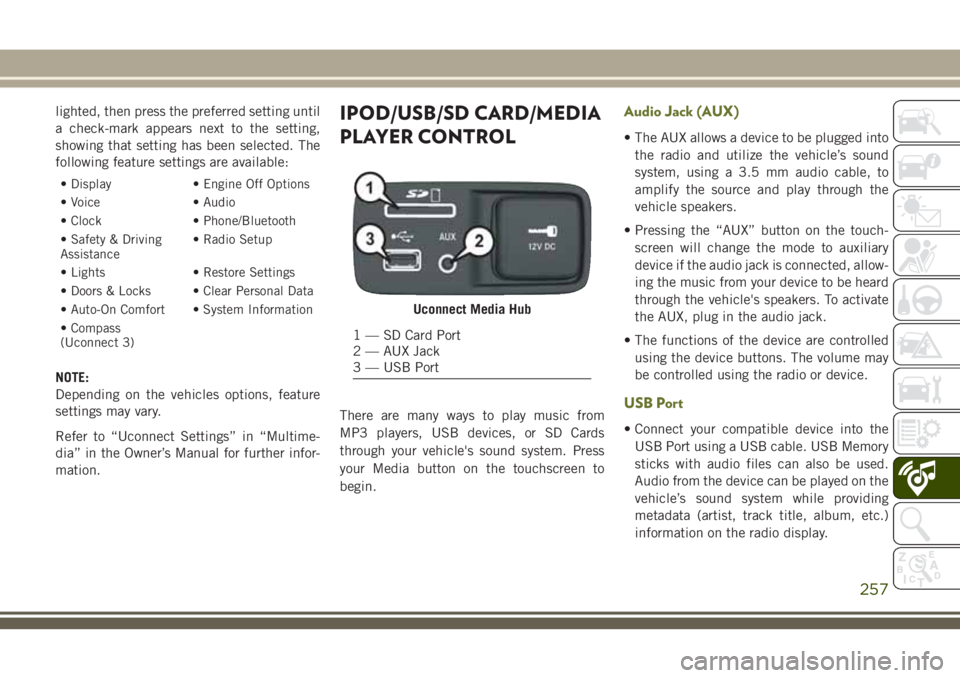
There are many ways to play music from
MP3 players, USB devices, or SD Cards
through your vehicle's sound system. Press
your Media button on the touchscreen to
begin.
Audio Jack (AUX)
• The AUX allows a device to be plugged into the radio and utilize the vehicle’s sound
system, using a 3.5 mm audio cable, to
amplify the source and play through the
vehicle speakers.
• Pressing the “AUX” button on the touch- screen will change the mode to auxiliary
device if the audio jack is connected, allow-
ing the music from your device to be heard
through the vehicle's speakers. To activate
the AUX, plug in the audio jack.
• The functions of the device are controlled using the device buttons. The volume may
be controlled using the radio or device.
USB Port
• Connect your compatible device into theUSB Port using a USB cable. USB Memory
sticks with audio files can also be used.
Audio from the device can be played on the
vehicle’s sound system while providing
metadata (artist, track title, album, etc.)
information on the radio display.
Uconnect Media Hub
1 — SD Card Port
2 — AUX Jack
3 — USB Port
257
Page 302 of 312

Oil (Engine)...............204
Oil (Engine) .....204, 205, 206, 207
Carbon Monoxide Warning .........116
Car Washes ..................226
Change Oil Indicator .............55
Changing A Flat Tire .........173, 216
Checking Your Vehicle For Safety . . . .116
Checks, Safety ................116
Child Restraints How To Stow An Unused ALR Seat
Belt ....................115
Child Safety Locks ..............22
Clean Air Gasoline .............232
Cleaning Wheels ..................222
Climate Control .............35, 276
Manual ...................35
Clock .....................248
Clock Setting .................248
Cold Weather Operation ..........121
Compact Spare Tire .............221
Cooling System ...............208
Coolant Capacity ............237
Inspection ................208
Selection Of Coolant
(Antifreeze) ............237, 238
Cruise Control (Speed Control) ......141Cruise Light
................64, 65
Customer Assistance ............280
Customer Programmable Features . . . .256
Daytime Running Lights ...........30
Dealer Service ................211
Defroster, Windshield ............117
Diagnostic System, Onboard ........66
Dipsticks Oil (Engine) ...............208
Disabled Vehicle Towing ..........190
Disturb ................... .267
Do Not Disturb ................278
Door Ajar ....................59
Door
Ajar Light ................59
Door Locks, Automatic ............22
Electric Brake Control System Anti-Lock Brake System .........68
Electronic Roll Mitigation .....71, 74
Electric Parking Brake ...........124
Electronic Brake Control System ......69
Electronic Speed Control (Cruise Control) ..................141
Electronic Stability Control (ESC) .....71
Electronic Throttle Control Warning Light .....................58 Emergency, In Case Of
Hazard Warning Flasher ........160
Jacking ..............173, 216
Jump Starting ..............186
Overheating ...............188
Towing ..................190
Engine ..........204, 205, 206, 207
Break-In Recommendations .....123
Checking Oil Level ...........208
Coolant (Antifreeze) ..........238
Cooling ..................208
Exhaust Gas Caution ..........116
Jump Starting ..............186
Oil .................237, 238
Oil Filler Cap ..............204
Oil Filler Cap ...............204
Oil Filler Cap .......205, 206, 207
Oil Selection ..............237
Overheating ...............188
Enhanced Accident Response Feature ...............102, 193
Ethanol ....................232
Exhaust Gas Cautions ...........116
Exhaust System ...............116
Exterior Lights ................118
INDEX
300