Page 9 of 24
6
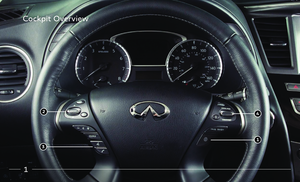
Meters and Gauges
1 Tachometer
2 Engine coolant temperature gauge
3 Shift lever indicator
4 Vehicle information display
5 Speedometer
6 Fuel gauge
Page 10 of 24

7
Adjusting the outside mirrors:
• To adjust the outside
mirrors, move the switch
1 right or left to select the
right or left mirror.
• Adjust the position of the
mirror using the directional
control switch
2.
Folding the outside mirrors:
To fold the mirrors closed, push
the
switch 3. To open the
mirrors, push the switch 4.
REVERSE TILT-DOWN FEATURE (IF SO EQUIPPED)
When backing up the vehicle, the outside mirrors will
turn downward automatically to provide better rear
visibility. To enable the reverse tilt-down feature, move
the switch
1 to either the left or right position.
If the switch
1 is set it in the center (neutral) position,
the mirror will not tilt down when reversing.
Please see your Owner’s Manual for important safety information, system
limitations, and additional operating and feature information.
Opening the Liftgate
To open the liftgate:
• Push the po wer liftgate switch 1 on the instrument panel.
• Push the lift gate opener switch 2; the liftgate must be
unlocked, or you must have the Intelligent Key with you (that
is, in your pocket or purse).
• Press the button 3 on the Infiniti Intelligent Key for
longer than 1 second.
• The power liftgate operation can be turned on or off by
the power liftgate main switch (if so equipped) 4 on the
instrument panel.
MOTION-ACTIVATED LIFTGATE (if so equipped)
The liftgate can also be opened and closed using a foot
kicking motion when it is locked or unlocked. The Intelligent
Key must be present within 3 ft (1 m) of the liftgate.
To use this feature, make a single kicking motion under the
center of the rear bumper
5. After the motion is complete,
step back to allow the liftgate to open or close.Please see your Owner’s Manual for important safety information, system
limitations, and additional operating and feature information.
Outside Mirrors
1
2
4 3
5
2
3
1 4
Page 11 of 24

8
2nd Row Seats
Forward and backward adjustment:
Pull the center of the bar
1 up and hold it while you slide the seat
forward or backward to the desired position until it latches.
Seat angle adjustment:
Pull up on the lever
2 and lean back until the seat latches. To bring
the seatback forward, pull the lever up and lean your body forward until
it latches.
MULTI-MODE/CHILD SEAT ACCESS FUNCTION
On the passenger’s side of the vehicle, the 3
rd row can be accessed
without removing a child seat installed in the 2nd row.
• Lift up on the seatback release lever 3 and slide the entire
seat forward.
• To return the seat to a locked position, push the upper seatback
rearward until the seatback and track are locked.
Please see your Owner’s Manual for important safety information, system limitations, and
additional operating and feature information.
1
2
3
Wiper and Washer Switch
Move the lever 1 up or down to one of the following positions to
operate the windshield wipers:
MIST
One sweep operation
OFF Wipers ar e off
AUTO Speed-sensing and r ain-sensing (if so equipped)
automatic wipe
LO
Continuous wipe, slow
HI Continuous wipe, fast
To adjust the wiper sensitivity for the AUTO setting, twist the
control ring 2. The rain-sensing function (if so equipped) can be
disabled in the vehicle information display under “Vehicle Settings”.
Pull the lever 1 toward you operate the windshield washer.
REAR WIPER AND WASHER
Turn the rear wiper switch
3 to one of the following positions to
operate the rear wiper:
OFF
Wiper is OFF
INT Intermittent wiping
ON
Continuous wipe, slow
Push the lever 1 forward to operate the rear windshield washer.Please see your Owner’s Manual for important safety information, system limitations, and
additional operating and feature information.
1
2 3
Page 12 of 24

The Dynamic Driver Assistance switch 1 can be used to temporarily turn
on and off the following systems:
• Lane Departur e Prevention (LD")
9
Dynamic Driver Assistance Switch
(if so equipped)
The Dynamic Driver Assistance switch 1 can be used to temporarily turn
on and off the following systems:
• Lane Departur e Prevention (LDP): The LDP system helps warns the
driver with a warning light and chime and helps assist the driver to
return the vehicle to the center of the traveling lane.
• Distance Control Assist (DCA): The DCA system helps assist the driver
to maintain a following distance from a vehicle ahead by activating the
brakes and moving the accelerator pedal upward to decelerate smoothly.
• Blind Spo t Intervention® (BSI): The BSI system helps alert the driver of
other vehicles in adjacent lanes when changing lanes with a warning
light and chime. It also helps assist the driver to return to the center
of the current traveling lane when another vehicle is present in the
adjacent lane.
Please see your Owner’s Manual for important safety information, system limitations, and
additional operating and feature information.
1
The USB ports 1 are located in the center console under
the armrest.
• When a c ompatible USB memory device or iPod® is plugged
into one of the USB ports, compatible audio files stored on
the device can be played through the vehicle’s audio system.
• These ports will also char ge compatible devices.
USB/iPOD® CHARGING PORTS
• There is a USB port located in the 2nd row on the back of the
center console
2 and two ports in the 3rd row
located above the cup holders
3. These ports will charge
compatible devices.Please see your Owner’s Manual for important safety information, system limitations,
and additional operating and feature information.
USB Connection Ports
1
3
2
Page 13 of 24

To start your vehicle remotely, press the
button 1 on the Infiniti Intelligent Key, and
within 5 seconds, press and hold the remote
engine start
button 2 for")
10
Remote Start* (if so equipped)
To start your vehicle remotely, press the
button 1 on the Infiniti Intelligent Key, and
within 5 seconds, press and hold the remote
engine start
button 2 for at least
2 seconds.
• Automatic climate control will begin
heating or cooling the vehicle based
on the temperature inside and outside
the vehicle.
• The engine will run f or 10 minutes and
then turn off. To extend the time for
an additional 10-minute period, repeat
the procedure.
• To start driving, depress the brake pedal
and press the ignition switch START/STOP button.
Remote start can be enabled or disabled through the vehicle
information display.
HEATED STEERING WHEEL (if so equipped)
The heated steering wheel may be activated during remote
engine start when outside and cabin temperatures are low.
During remote start, the heated steering wheel switch will be
inoperable until the ignition switch is turned on.
* State laws may apply; review local laws before using.Please see your Owner’s Manual for important safety information, system limitations,
and additional operating and feature information.
1
2
Two positions for the driver’s seat,
steering column and outside mirrors
can be stored in the automatic
drive positioner memory. To set a
memory position:
1. Place the ignition switch in the
ON or ACC position. (The vehicle
should be stopped while setting
the memory.)
2. Adjust the driver’s seat, steering column and outside mirrors to the
desired positions using the adjusting switches for each feature.
3. Push the SET switch 1, and within 5 seconds, push the memory
switch (1 or 2) 2. The indicator light for the memory switch you select
will illuminate for approximately 5 seconds and a chime will sound
when the memory is stored.
4. Press the unlock button on the key fob to link the memorized position
to your Infiniti Intelligent Key.
The driver’s seat and steering column will automatically move when the
shift lever is in the P (PARK) position to allow the driver to get in and out
of the driver’s seat more easily. “Exit Seat Slide” and “Exit Steering UP” can
be disabled in the vehicle information display under “Vehicle Settings”.
Please see your Owner’s Manual for important safety information, system limitations, and
additional operating and feature information.
Automatic Drive Positioner
(if so equipped)
2 1
Page 14 of 24

• Press the AUTO button 1 to turn the system on and automatically control the
inside temperature.
• Press the CLIMATE button 2 to adjust the")
11
Heater and Air Conditioner (automatic)
• Press the AUTO button 1 to turn the system on and automatically control the
inside temperature.
• Press the CLIMATE button 2 to adjust the automatic climate controls using
the climate settings on the control panel display screen.
• Use the driver’s side 3 or passenger’s side 4 control buttons (warmer air)
or
(cooler air) to control the desired side’s temperature.
• Press the air flow control button 5 to manually cycle through the available air
flow modes.
• Press the DUAL button 6 to turn the system on and off.
• Press the fan speed control buttons 7 to increase or decrease the fan speed.
• Press the front defroster button 8 to turn the front defroster system on and
off, and use the temperature control buttons 3 to change the temperature.
• To defrost the rear window and outside mirrors, push the rear defroster
switch 9 to turn the system on and off.
• Press the intake air control button 10 to recirculate the air inside the vehicle.
• Press the OFF button 11 to turn the climate control system off.
4
3
5 6
12
REAR CONTROLS
• Press the REAR ON-OFF button 12 to turn the rear
air conditioner on and off.
• Press the OFF button 13 to turn the system off.
• Adjust the fan speed up or down using the control
buttons
14.
• Press the AUTO button 15 to turn on the
automatic mode.
• Adjust the temperature up or down using the TEMP
buttons
16.
Please see your Owner’s Manual for important safety information, system
limitations, and additional operating and feature information.
10
13 14
15
16
1 2 8 9 11 7
Page 15 of 24

your cellular phone with the in-vehicle system for
hands-free use of your cellular")
12
Connecting your Cellular Phone
or Device via Bluetooth
®*
Using Bluetooth® technology, you can connect (pair)
your cellular phone with the in-vehicle system for
hands-free use of your cellular phone.
1. Press the SETTING button on the
control panel.
2. Select the “Phone/Mail” key.
3. Select “Connect Device”.
4. Select “Add New (X/5
Free)”.
5. If a PIN appears on the screen, operate the
Bluetooth® device to enter/confirm the PIN.
For any Bluetooth® connectivity issues, reboot your cellular phone or device.* Some jurisdictions prohibit the use of cellular telephones while driving.
Please see your Owner’s Manual for important safety information, system limitations, and additional
operating and feature information.
If you have a compatible Bluetooth® device with streaming audio (A2DP
and AVRCP profiles), you can set up a wireless connection between your
Bluetooth
® device and the in-vehicle audio system, enabling you to listen to
the audio from your device through the vehicle’s audio system.
After connecting your Bluetooth
® device, press the MEDIA button on the
control panel to switch to Bluetooth® Streaming Audio.
For any Bluetooth® connectivity issues, reboot your cellular phone or device.Please see your Owner’s Manual for important safety information, system limitations, and additional
operating and feature information.
Bluetooth® Streaming Audio Voice Recognition
SYSTEM OPERATING TIPS
•
The interior of the vehicle should be as quiet as possible.
• Speak naturally. Speaking too fast, too slow, too soft, or
too loud makes voice recognition more difficult.
• Confirm that the correct voice commands are being used.
Glance at the screen to see the currently
available commands.
USING THE VOICE RECOGNITION SYSTEM
• Press the or button 1 on the steering wheel, and a
list of commands will appear on the screen.
• After the tone sounds, speak the command.
• To skip the voice prompt and give the command
immediately, press the
or button 1 on the steering
wheel to interrupt the system. Speak the next command
after the tone sounds.
• To cancel the command, press and hold the or
button 1 on the steering wheel.
Please see your Owner’s Manual for important safety information, system
limitations, and additional operating and feature information.
1
Page 16 of 24
, Navigation System (if so equipped), InTouch Apps,
Bluetooth
® hands-free phone, and various")
13
Center Display
Infiniti InTouch® controls the audio, RearView/Around View® Monitor
(if so equipped), Navigation System (if so equipped), InTouch Apps,
Bluetooth
® hands-free phone, and various settings using the
touch-screen display, Infiniti controller, menu button and steering
wheel switches.
INFINITI CONTROLLER AND MENU BUTTONS
4 ENTER – Select the highlighted item.
5 Center dial – Turn or slide to select an item or navigate
through options.
6 BACK – Return to the previous screen.
7 CAMERA – Press to view the Around View® Monitor
(if so equipped). Press and hold to control the brightness.
STEERING WHEEL SWITCHES
8 – Return to the previous screen.
9 ENTER – Press to select the highlighted item.
10 – Tilt the ENTER button up or down to
navigate through options.
Please see your Owner’s Manual for important safety information,
system limitations, and additional operating and feature information.
9
8
10
TOUCH-SCREEN DISPLAY
1 – Return to the previous screen.
2 < or > – Touch the arrow keys to navigate between screens.
3 Touch any key to select that item.
3
1
2 2
5 4 6 7