Page 9 of 20
6
Meters and Gauges
1 Assist charge gauge
2 Tachometer
3 Shift lever indicator
4 Vehicle information display
5 Speedometer
6 Fuel gauge
Page 10 of 20
 your cellular phone with
the in-vehicle system for hand")
7
Bluetooth® Streaming Audio*
Connecting your Cellular Phone
or Device via Bluetooth
®*
Using Bluetooth® technology, you can connect (pair) your cellular phone with
the in-vehicle system for hands-free use of your cellular phone.
1.
Pr
ess the SETTING button on the control panel.
2.
T
ouch the “Phone/Mail” key.
3
.
T
ouch “Connect Device”.
4.
T
ouch “Add New (X/ 5
Free)”.
5.
When a PIN appears on the scr
een, operate the Bluetooth
® device to
enter/confirm the PIN.
For any Bluetooth® connectivity issues, reboot your cellular phone or device.
* Some jurisdictions prohibit the use of cellular telephones while driving.
Please see your Owner’s Manual for important safety information, system limitations, and additional
operating and feature information.
If you have a compatible Bluetooth® device with streaming
audio (A2DP and AVRCP profiles), you can set up a wireless
connection between your Bluetooth
® device and the in-vehicle
audio system, enabling you to listen to the audio from your
device through the vehicle’s audio system.
After connecting your Bluetooth
® device, press the MEDIA
button
1 on the control panel to switch to Bluetooth®
Streaming Audio.
For any Bluetooth
® connectivity issues, reboot your cellular
phone or device.
* Some jurisdictions prohibit the use of cellular telephones while driving.
Please see your Owner’s Manual for important safety information, system
limitations, and additional operating and feature information.
1
Page 11 of 20

3
2
1
3
2 1
CONVENTIONAL CRUISE CONTROL (if so equipped)
SETTING A CRUISING SPEED
•
Press the MAIN (ON-OFF)
1 to turn on the system.
•")
8
5 6
Cruise Control (if so equipped)
3
2
1
3
2 1
CONVENTIONAL CRUISE CONTROL (if so equipped)
SETTING A CRUISING SPEED
•
Press the MAIN (ON-OFF)
1 to turn on the system.
•
With the
vehicle at the desired speed, push down the switch
2 to COAST/SET to
enable cruise control.
•
The cruising speed c
an be adjusted to a higher or lower speed by toggling the control
switch
2 up or down.
CANCELING THE PRESET SPEED
•
Push the CANCEL switch
3 or tap the brake pedal.
INTELLIGENT CRUISE CONTROL (ICC) (if so equipped)
The ICC system is designed to maintain a selected distance from the vehicle in front of
you and reduce the speed to match a slower vehicle ahead.
•
T
o increase the distance to the vehicle ahead to be maintained by the ICC system,
press the DISTANCE switch
4 until the display shows the desired set distance,
which is shown by the number of lines on the set distance indicator
5.
•
When a
vehicle is detected ahead, a car icon will illuminate on the vehicle ahead
detection indicator
6 and your vehicle will reduce the speed to match the
slower vehicle.
To use Conventional (fixed speed) Cruise Control mode (if so equipped):
•
While cruise c
ontrol is off, push and hold the MAIN (ON-OFF) switch
1 for more
than 1.5 seconds. The CRUISE indicator light will illuminate.
•
A
ccelerate to the desired speed.
•
Push the swit
ch
2 down toward COAST/SET and release it. The SET indicator light
will illuminate.
Please see your Owner’s Manual for important safety information, system limitations, and additional operating and
feature information.
INTELLIGENT CRUISE CONTROL (ICC) (if so equipped)
4
Page 12 of 20
9
Navigation System (if so equipped)
Use the Infiniti controller 1 and ENTER button 2 to navigate through the center display screen.
•
Press the
BACK button 3 to return to the previous screen.
•
Press the MAP button
4 to display the map.
SETTING A ROUTE
To set a route, first ensure that the correct region is selected on the touch-screen.
1.
Pr
ess the NAVI button
5 on the Infiniti controller.
2.
T
ouch the “Destination Menu” key
6 on the display.
3
.
Select the pr
eferred destination setting method.
4.
E
nter the address number, street name, and city as prompted by the screen.
CANCELING A ROUTE
1. Pr
ess the NAVI button
5 on the Infiniti controller.
2.
T
ouch the “Cancel Route” key
7.
Please see your Owner’s Manual for important safety information, system limitations, and additional operating and feature information.
6
7
1 2
3
5
4
Page 13 of 20

10
Infiniti Intelligent Key System
POWER SEAT ADJUSTMENTS
•
T
o slide the seat forward
or backward, push the
switch 1 forward
or backward.
•
T
o recline the seatback, push
the
switch
2 forward
or backward.
SEAT LIFTER
•
T
o adjust the angle of the front portion or height of the seat,
push the front or rear end of the
switch
1 up or down.
POWER LUMBAR SUPPORT
•
T
o adjust the seat lumbar support, push the front or back end of
the
switch
3.
AUTOMATIC ENTRY/EXIT FUNCTION
•
T
o turn on and off the
automatic entry/exit
function, press and hold
the SET switch
4 for more
than 10 seconds.
Please see your Owner’s Manual for
important safety information, system limitations, and additional operating and
feature information.
Seat Adjustments
3 2 1
ROLL DOWN FEATURE
The windows can be opened remotely using your
Infiniti Intelligent Key.
•
Pr
ess and hold the unlock button
1 to
open the windows remotely.
•
I
f the unlock button
1 is released, the
windows will stop. To resume the roll down
feature, press and hold the unlock
button
1 again.Please see your Owner’s Manual for important safety
information, system limitations, and additional operating and
feature information.
1
Fuel-filler Door
To open the fuel-filler door, unlock the
vehicle and gently push the front side of
the fuel-filler door.
Please see your Owner’s Manual for important
safety information, system limitations, and additional
operating and feature information.
4
Page 14 of 20
.
•
Push the door
handle request
switch
1 to unloc")
11
To use the door handles to lock and
unlock your vehicle, make sure the
Intelligent Key is with you (that is, in
your pocket or purse).
•
Push the door
handle request
switch
1 to unlock the
corresponding door.
•
Push the door
handle request switch
1 again within 1 minute to
unlock the rest of the doors.
•
T
o lock the vehicle, push either door handle request switch
1 once.
USB Connection Port
• The USB ports 1 are
located in the center
console under the
armrest. Compatible
audio and video files
stored on a USB device
can be played through the
vehicle’s audio system and
front display.
Please see your Owner’s Manual for important safety information, system limitations,
and additional operating and feature information.
Locking and Unlocking your Vehicle
via the Door Handle
To change the settings for the door locking
and unlocking system, press the SETTING
button
2, select the “Others” key, and
select the “Comfort” key.
•
T
o unlock all doors by touching the
inside of the door handle, select
“Selective Door Unlock”.
•
T
o disable unlocking by touching the
inside of the door handle, select “Touch Sensitive Door Sensor”.
Please see your Owner’s Manual for important safety information, system limitations, and
additional operating and feature information.
2
Use these switches to adjust
the brightness of the vehicle
information display.
•
T
o increase the brightness, push
the upper switch
1.
•
T
o decrease the brightness, push
the lower switch
2.
Please see your Owner’s Manual for important
safety information, system limitations, and
additional operating and feature information.
Brightness Control Switches
1
2
1
1
Page 15 of 20

12
Windows
All power windows can be operated through the main
switch on the driver’s door.
1 Power windows open/close
2 Disable rear passenger window operation by
rear passengers
POWER WINDOW CONVENIENCE OPENING/
CLOSING FEATURE
The vehicle can be unlocked and the power windows
can be opened simultaneously from outside the
vehicle using the Intelligent Key as follows:
To unlock the vehicle and open the windows
simultaneously, press and hold the
button on the
Intelligent Key until the windows have reached the
desired position.
Please see your Owner’s Manual for important safety information, system
limitations, and additional operating and feature information.
1 2
6
7
Exterior Light Operation
3
5 1
2
1 Side lights, license plate lights and combination meter lighting ON position
2 Headlight ON position
3 Automatic headlight mode ON position (headlights switch on/off
automatically depending on ambient light conditions/daytime running
light system)
4 OFF position
5 Front fog light switch
6 Push the headlight switch forward for the high beams
7 Pull the headlight switch rearward to flash the high beams
For normal headlight operation, leave the exterior light switch in the
AUTO position
3.
Please see your Owner’s Manual for important safety information, system limitations, and additional
operating and feature information.
4
Page 16 of 20

13
Trip Computer
When the button 1 is
pressed, the following modes will
appear on the vehicle information
display
2:
3
1
2
• ENERGY MONITOR
•
EV ODOMETER
•
FUEL ECONOMY
•
TIME/MILES
•
RANGE • COOLANT TEMP
•
OUTSIDE TEMP
•
SETTING
•
WARNING
To reset the elapsed time/miles, press and hold the
button 3 for more than 1 second. Both elapsed
time/miles will reset at the same time.
Please see your Owner’s Manual for important safety information,
system limitations, and additional operating and feature information.
3
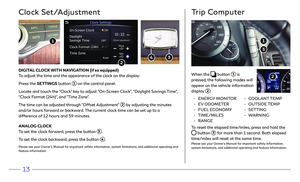
DIGITAL CLOCK WITH NAVIGATION (if so equipped)
To adjust the time and the appearance of the clock on the display:
Pr
ess the SETTINGS button
1 on the control panel.
Locate and touch the “Clock” key to adjust “On-Screen Clock”, “Daylight Savings Time”,
“Clock Format (24h)”, and “Time Zone”.
The time can be adjusted through “Offset Adjustment”
2 by adjusting the minutes
and/or hours forward or backward. The current clock time can be set up to a
difference of 12 hours and 59 minutes.
ANALOG CLOCK
To set the clock forward, press the button
3.
To set the clock backward, press the button
4.
Please see your Owner’s Manual for important safety information, system limitations, and additional operating and
feature information.
Clock Set/Adjustment
2
1
4


Use the Infiniti controller 1 and ENTER button 2 to navigate through the center display screen.
•
Press the
BACK button 3 to return to the previous")